
Use--is it a show quilt or a utility quilt?
Batting--what is the minimum space un-quilted recommended by the manufacturer?
Deadline--how soon does it have to be done?
Quilt "Worthiness"--how much time does this quilt, for it's intended use and/or recipient, deserve?
I know I almost always err on the side of too little quilting. Usually a deadline is pending and this shop sample just has to be done. Sometimes, I'm over this particular quilt and it just needs enough quilting to get by.
Rarely, have I added more quilting and wished I hadn't but from time to time I have wished I had added more after the quilt was complete--that can be done but rarely is. Done is done.
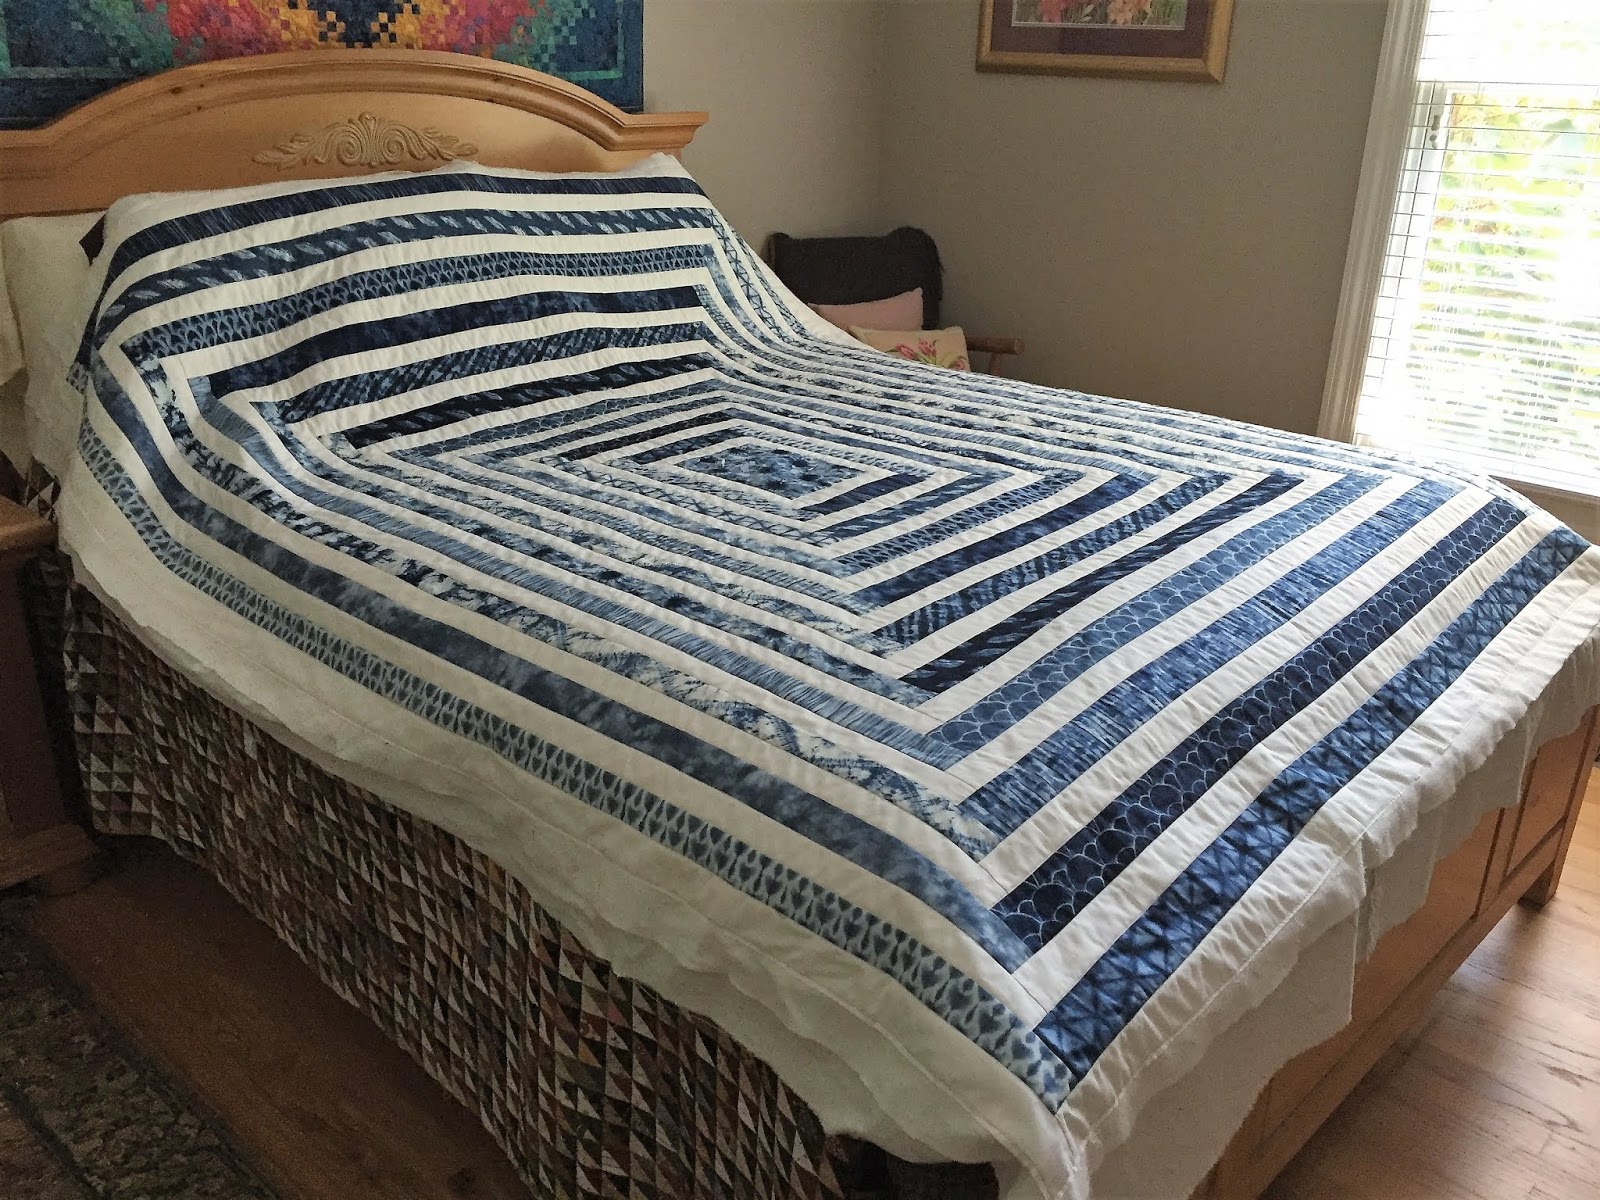
Spellbound is a great pattern from Calico Carriage Quilt Designs I first discovered at Spring Market in St. Louis in 2017. I took lots of photos of the quilt hanging in their booth, bought the pattern and secured the fabrics--two jelly rolls of a Shibori design by Debby Maddy for MODA. Here it is at Market:

When I got the top done, I decided I would first stitch in the ditch along all the seams, using white thread top and bottom, as the back is a very light white/floral fabric. Here it is "resting" after all the stitch in the ditch was done:
I always make a "practice piece" as soon as the top is done and when it is "sandwiched"--using the exact same backing, batting and leftover fabric pieces from the top. Since it can take me years to actually quilt a top, doing this at the same time the quilt is basted is a timesaver--no more searching through fabric bins to find that backing fabric leftover, or pieces from the top, and what was this batting? Now the practice piece is made and stored with the basted quilt, waiting for me. It doesn't have to be pretty, just functional. Here is the piece from Spellbound:


BUT the sleeve was already sewn into the binding, that's how I always do it. If I was going to quilt the white bands I had to do that BEFORE I stitched the sleeve in place along the top edge of the quilt and before I attached the printed label I made to the back. Did I want to double the quilting? No. Did the quilt NEED me to double the quilting? Yes.
For the white thread, I switched to Glide--it has a bit of shine and is certainly thicker than the 80 weight MicroQuilter. It behaved beautifully.
I started on the outside edge, at the top where the sleeve is, pulling the sleeve out of the way and coming up with a design that would fill the space but not catch the binding or any of that sleeve. To make matters just a bit more challenging: the vertical white bands are 1.25" finished and the horizontal white bands are 1.5" finished. Both blue bands are also different sizes but that stitching hardly shows and because they are wider, it was easier to come up with designs to fill the spaces.
The top design I did with a ruler and I loved how it looked:

It only took a few hours to quilt all the white bands and I was so glad I put in that time. Here is the quilt just after the last white stitching was completed. Much better:

 |
| Sleeve ready for hand-stitching |
 |
| Label ready for hand-stitching |
I have written in detail about bindings a few times--find specific details here in this Tutorial and here where I explain adding a sleeve and the quilting process.
And now here is the finished quilt, ready to show off at the next guild meeting and then get installed at Huntsville Sew & Vac where it will be a one-day class October 5, 10-4. The pattern seems pretty easy, I thought I would zip right through it but it took me over a week to complete the top. There are important tricks to staying organized with this one--students will learn those tricks.
 |
| My Spellbound 64" x 83" |
It is not easy to get good photos of the quilting--this is the best I could do. I am SO glad I quilted the white bands--it really shows there:

Let's Quilt.
Barbara
Great post! I am currently quilting a project on my domestic machine and am wishing I hadn't added so much. It's a wall hanging and truly didn't need it. I just love FMQ so much! Now I just want to get 'er done!
ReplyDeleteI like FMQ more, the better I get. It just takes lots of practice.
DeleteGood for you to add the quilting to the white areas! Even though it was more effort on your part, the quilting is perfect! It is even prettier now than it was before. Great post!
ReplyDeleteThanks!
DeleteThe quilting on the white bands was a good idea. It's the first quilting I notice when I look at the photos. And I love that you used different designs in the bands -- so interesting. Love this quilt and your post.
ReplyDeleteVery pretty quilt Barbara. I worry that my quilting is too minimal sometimes as well. FMQ, I find that easier than the walking foot. Both are wonderful, though.
ReplyDeleteLooks good! I had to modify the label on my current project too.
ReplyDeleteSuch s striking quilt! Beautiful work.
ReplyDeleteGood for you to bite the bullet and quilt the white spaces. I recall in a class years ago from Karen McTavish that she pointed out that the neutral background is where your quilting will show the most. In essence, she told us to keep our quilting simple in the busy fabrics where it wouldn't show much, and put your more interesting designs in the light spaces. I don't always stick to that, but when you think about it, it makes sense that the quilting shows up more in the neutral.
Absolutely true, the blue quilting hardly shows at all. Often, I just followed the design in the blue fabric. Where I did a motif you really have to look for it.
DeleteIt really is a fantastic piece -- incredibly eye appealing. Isn't it funny how quilts dictate the way they need to be quilted? :)
ReplyDelete