It needed to be fast to make, attractive enough and have flannel on the back at least.
Thursday morning I shopped my closet and found two floral flannels I've been saving for the right project--they were pieced together to create a 60" x 60" back. Not having many more flannels I worked with these cotton fabrics, mostly the Cumberland collection by Fons and Porter for Benartex and English Oak from Moda, both about 10 years old. (SEE THE NOTE AT THE BOTTOM FOR SMALLER SIZES)
I decided to construct it on the Bernina Q20--no feed dogs, no quarter inch foot, just free motion sewing. That would be fast and give me a bit of practice with ruler work. Here are the supplies I gathered:
5.5" x 60" strips of fabric, I cut and pieced 13 from fat quarters and width of fabric (WOF) yardage
60" x 60" Throw size cotton batt, this was Legacy from Pellon
Pieced back from 2 flannels, 60" x 60"
 |
| 13 strips laid out in order |
 |
| Back taped to table, center marked |
 |
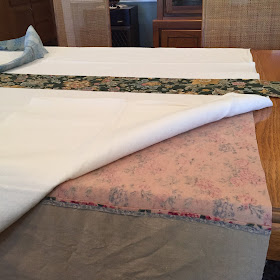
| Back face down on table, batting centered on back, first strip centered on batting |
 |
| Second Strip pinned face down on first strip, ready to sew through all four layers |
OK, ready to sew. With both extensions in place, my sewing table is 78" wide, very nice for working with this large project. The machine was set to 10 stitches/inch, since the piecing is also the quilting. I would be creating a straight line of quilting as the strips were pieced together, sewing through the 2 seams of fabric, the batting and backing.
The ruler work foot is 1/2" wide, with the needle precisely in the center. By placing the right edge of the foot along the raw edges of the 2 fabric strips, and the left edge of the foot along the 1/4" thick ruler, I was able to sew a mostly straight line, all the way down the 60":
This was really very quick, much faster than if I were using my regular machine due to the bulk.
After sewing the strip in place, I took it to the big ironing surface, and pressed the strip over onto the batting. Then I pinned the next strip in place and repeated the process until the first half, from center to the outside edge, was covered:
Turn the quilt around, start back in the middle again, and cover the other half of the batting/backing. Here it is completely covered:
You might notice there are only 11 strips sewn to the back. I had pieced the back just a little small, the seam allowances were a tiny bit more than 1/4" mostly, and the batting may have been a bit short. So I only needed 11 strips to complete the top. The remaining 2 strips were a green fabric, perfect for the binding.
One more thing--because the strips are wide, 5" finished, I needed to add more quilting. So at this point, I started again in the center and free-motion quilted a squiggly line with occasional hearts down the center, more or less, of each strip. That put quilting on every seam, the straight lines from construction, and a curvy line about 2.5" from the straight lines. This will hold up well with washing. It really needed the extra quilting and I enjoyed the free motion practice.
The quilting and squaring up process took the afternoon BUT by 5:30 it was dinner time and I was done. My husband brought dinner home when I told him I'd been working hard all day. Good man!
Friday morning I cut those two long 5.5" green strips in half, 2.75", and made a slightly wider than usual binding. Using the Bernina 630 and the walking foot, I sewed the binding in place, adding a hand-written label in the seam on the back. That afternoon and evening I hand sewed the binding to the back of the quilt, a task I enjoy. Saturday morning it's off to the Post Office and this project is done, less than 48 hours from conception to completion.
 |
| The completed quilt, approx. 57" square |
 |
| The back |
 |
| Hard to read but I quilted the recipient's name here |
 |
| Back flipped over so you can see the simple label |
NOTE ON MAKING A SMALLER SIZE QUILT:
This is such a fast way to make a simple quilt, it makes a great baby, kid's quilt or Charity quilt. Use a crib size batt, 45" x 60", or Craft size, 36" x 46" and use strips that are 2.5" by 45", or the width of fabric (WOF). This will require no additional quilting on the surface, as the 2" lines created from construction are enough for most batting. Read the label! Think Jelly-Rolls--30 strips will cover a 60" batt.
Here is one of these quilts I made years ago for my husband. He uses this every night, Fall through Winter, to keep comfy in his big manly chair. It's about 42" x 64". It's been washed many times and has held up very well. Most of these fabrics are flannel or brushed cotton. The back is the same floral flannel used on the chemo quilt--he keeps the plaid side up:
I could have made my sister-in-law a much more beautiful quilt, with lots more work but that would have taken a lot of time. This quilt is needed NOW. I hope she likes it and that it provides a warm hug as she goes through her days of treatment.
Let's Quilt!
Barbara


