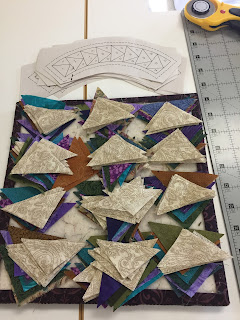
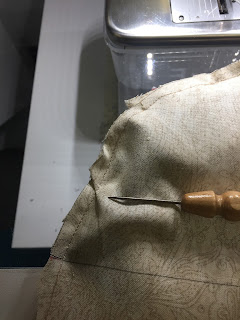
1, READ ALL THE DIRECTIONS. Use a highlighter to take note of the important steps. Read them again, before you start. NOTE: I've been asked the size of the curved arc so you can be sure your paper is printed the correct size. Measure the straight line at the base of the "goose"--it is 1.25" finished so the arc is 1.75" wide, UN-finished, measuring straight across the base of the "goose".
2. Yardage for Background: I am using several different backgrounds, various tan/beige prints. It occurred to me I'd better be sure I had enough of the one fabric I wanted to use to make the 36 Curved Flying Geese blocks. The pattern has the background squares cut at 8"--this is oversize but makes it easy to sew. If you cut those background squares 8", you need about 2.75 yards of background--this includes the 2" strips cut to make the "sky" triangles for each block. I only had just over 2 yards SO I decided to see if cutting the squares 7" would work. It does. Now I needed 70" or just under 2 yards--success! IF you want to be really frugal, you can cut the background pieces from a 6" square, though it will be tight. I recommend you do the first one with an 8" square, then try a 7" square, then decide which you prefer.
3.Cut out all the pieces needed for the paper pieced curved geese. I am using lots of fabrics from my stash. Each curve has 8 "geese" triangles and 16 background "sky" triangles.
5. Use good Scissors to cut the curve: I am a huge fan of Karen K Buckley's Perfect Scissors--the serrated edges gripped the paper and fabric firmly as I trimmed exactly on the printed line. You don't want to accidentally cut into that curve you spent so much time making. These are the medium size scissors, the larger scissors would work as well. After trimming the curved edges, I removed the paper, per Sue's instructions.
6. Cut Background Squares; As I said, I found I could cut them 7" and still be successful. You decide which you prefer. Because we are making 36 of these blocks, I took a few minutes to create the background templates from template plastic. This makes it easy to draw the lines on the reverse side of the fabric--I use a mechanical pencil for a smooth, fine line. I also use a sandpaper board to secure the fabric squares for easy tracing. Fine grit sandpaper does the trick. This board I made years ago from sandpaper squares and cardboard. The easiest way to make a sandpaper surface is to tape or glue a sheet of sandpaper inside a manila file folder--that way, the sandpaper doesn't stick to fabrics when not in use--just close the folder.
After tracing the squares, I followed Sue's instructions for marking the centers and the outer edges. Then I used the Karen K Buckley scissors again to CAREFULLY trim on the curved lines. The templates include the seam allowances all around, so you are cutting precisely on those curved pencil lines. Don't trim the straight lines--we'll do that after sewing.
7. Piece those curves: when you are rested and ready for this step. I watched Carolyn Hock's show again, #2001. She used paper she is leaving in place so did not remove the paper. I took the paper off and had no problem using a quarter-inch foot to get the proper seam allowance:
 |
| Background shown here is cut from 8" square, most I cut 7" |
8. Make tiny snips: There are tiny snips placed at the center of the large piece, less than 1/4" deep, and the two outer edges of the large piece. Sue has good photos of that. I did not make any snips on the skinny curved piece:
9. Use as many pins as you need: Sue pinned the seams with lots of pins. I used 3 pins. As Carolyn said, "keep your bum on the bottom"--this means when I joined the geese to the baseball diamond-shaped piece, the geese were on the top. When I joined that unit to the outside skinny curved piece, the geese were on the bottom. I pinned the center first, then put a pin at the two outer edges of the curved geese. Remember, that background is extra big so you don't pin the curved geese to the outside edge of the background, you pin it to the mark:
Sew slowly, breathe, you can do this!
10. First curve: I use a stiletto to hold the two edges together. Here I am approaching the pin at the center. Remove the pin just as you get to it:
Success:
11.Second Curve: this time the geese are on the bottom. Again, I used 3 pins:
The stiletto holds the edges together as I sew, slowly:
Success:
Reverse side, press toward the background pieces, I used a dry iron so I didn't distort the piecing. Press firmly to be sure all your beautiful geese points are visible:
JUST A NOTE: Hands Free Sewing: I teach a LOT of classes and often see students who sew on Bernina machines, NOT using the knee-lift for their presser foot. They just haven't learned how. This tool makes sewing like this so much more enjoyable--use the knee-lift to raise the presser foot as you stitch slowly, pivoting slightly as you go--this keeps your hands in place, stiletto secure to the fabrics. The BEST advice I got with my first Bernina, 30 years ago, is to "drive" with my left foot. It took less than a day of sewing to get used to that, but what a difference it made in using the knee-lift. I am not associated with Bernina in any way, other than being a satisfied customer. If you aren't using your knee-lift, force yourself to learn to use it--you'll thank me later.
12. Square up those Blocks: I liked Carolyn's idea of using a ruler to square up the blocks. I used a 5.5" ruler, and taped a paper foundation of the curved flying geese unit, minus the seam allowances, to the bottom of the ruler. This made it easy to line up exactly where the square should be cut. I worked from the FRONT SIDE, though you could just as easily work from the back side. First cut:
After the second cut. Notice this was an 8" square of background, you can see how much excess fabric there is. The 7" squares make less excess fabric. The excess you see here is more than 2" wide--enough to cut a few 2" squares for more "sky" squares:
13 What Could Go Wrong: in a perfect world, your curves will be precise and smooth, with no tucks or puckers. BUT, sometimes things happen. Here I got a small tuck on the bottom side of the first curve:
I un-sewed less than an inch of stitching and found I could easily work that slight excess fabric in by sewing on the baseball diamond side, the side you see here. I only had to re-sew an inch and all was well. This may happen a few times while making 36 of these. It's part of the process, just fix it and move on. (Update: all 36 of mine are done, this happened twice.)
ONE MORE NO GOOD, AWFUL, VERY BAD THING that can go wrong: Be careful when cutting the curves--pay attention to the line you SHOULD be cutting. There is no save for this, I had to make another entire curved flying geese arc:
Making progress:
ONE MORE NO GOOD, AWFUL, VERY BAD THING that can go wrong: Be careful when cutting the curves--pay attention to the line you SHOULD be cutting. There is no save for this, I had to make another entire curved flying geese arc:
 |
| Boulder! Boulder! Boulder! That's a big DAM! |
 |
| 18 blocks made and up on the design wall |
I found once I got going sewing these curves I could complete a block in about 10 minutes. It's not about the time involved but I do like to have an idea how long these steps will take me, for planning purposes... This month you will make 18 blocks. Next month, you will make:
18 more blocks, same size, same process. So, if you finish April early and can't stand to wait for May 1, the process for May is the same. Also, in May, we will create the borders with these blocks, and calculate, cut and sew on the floaters needed to join these curved flying geese borders to the center of our quilt.
Let's quilt!
Barbara


.JPG)