Tuesday, October 25, 2016

On the Road Again

It's finally time to head to Houston, where I will check in tomorrow to the Hilton-Americas for 13 days.  It takes a lot of planning and organizing to have clothes for 13 days but I have done it for 18 years and pretty much have it down pat.

New luggage will be easy to find at Baggage Claim:


I will NOT buy black luggage.  Not when purple is available.  The large TravelPro suitcase is new so this is the photo I will keep in my phone until the suitcase has to be replaced.  When/if my luggage is delayed, it helps to have this photo to work from at the Lost Luggage Claim department.

While I'm gone, The Splendid Sampler will reveal four more blocks so I'll have to play catch-up when I get home.  Here are blocks #71-73:


This week I finished binding Quilters Madder and Color in Black and White, 2:


I thought I would hand-quilt this one but first, I normally Stitch in the Ditch (SID) by machine. You can't see the SID, it's hard on my hands, and takes a long time.  Once I do that by machine, the quilt is effectively basted so the hand-quilting can commence.  BUT once I did the SID, I just kept going and quilted the whole thing by machine.  It was Ruler Work for the straight lines and free-motion quilting in the border, following a stencil design marked with chalk.  There is wool batt in there which adds a nice loft to the piece.  Best of all, it's done!  Quilt is from Lori at Humble Quilts.


It's hard to tell scale, this quilt is 48" wide x 44" high.  It is the small version of a queen-size quilt. It will hang in the Education office for two weeks--several of our Team bring a quilt to help brighten the office for all to enjoy.  I wrote about the large one here.

For my local friends, the Winter Class Schedule at Patches & Stitches  is being completed right now. Here are my samples and dates:


QuiltMaking101  Tuesday 5:30-8:00 p.m. Jan 10, 17,31, Feb 7, 14
3 Sessions                                                    Feb 21, 28, Mar 7, 14, 21
                               Friday 9:30-noon         Jan 13, 20, Feb 3, 17, March 3


Texas Braid Sat Feb 25 9-4 p.m.


X Blocks  Thurs Mar 9, 5:30--8:30 p.m.


Antique Rose Star by Machine Sat Jan 21, 9-3

Those are 1/2" finished squares, quilt is 28" x 22" 

Teeny Tiny Two-for-One  Fri Feb 10, 24, 9-1


Smitten  Friday March 10, 24, 2017  9-noon   BACK BY POPULAR DEMAND


Quiltmaking 202--The Next Step Tuesday March 28 and April 11, 5:30-9 p.m.  Feathered Star will be taught in a future class.

All of these quilts are in my car to be dropped off tonight when I go to teach the Beginning class.  Here's hoping many of the local folks will find something here that appeals to them.  It is so rewarding to help quilters improve their skills and make "gifts for generations yet unborn.".

If I get a chance, I'll do a blog post or two from Houston--our days are long and full but there will be lots worth sharing, just not sure I'll have much time for it.  I will post photos on Instagram for sure so follow me there if you like:  bbquiltmaker.

Let's quilt!

Barbara


Friday, October 21, 2016

Friday Finishes

It's been a busy week but I have a few things to show for my efforts.

First, is a sample for a new class I'll be teaching this Winter:  Quiltmaking 202--Stars and More Stars. I have taught beginning classes for 27 years and many of my students want to know "what's next?"  If they want to improve their skills and move along to more challenging patterns, this is a great class.  We'll make 8 pointed Lemoyne stars, yes, with real set-in piecing:


In the late Spring/Summer, I'll teach another Feathered Star by paper piecing--this is a 12" star, smaller than the 15" one I usually teach.  I quilted this with ruler work on the Bernina Q20. It has to go to the shop now as a sample--when I get it back I'll add more quilting.

Today I finished the Quilters Madder top from Lori's Humble Quilts Sew-A-Long.  It's about 29" square.  I think I'll take it to Houston to hand quilt--I always have hand work with me on a trip, even if I sometimes don't get to work on it:


Another blogger I follow did a pin cushion swap recently and today I received my pin cushion all the way from jolly old England--look what Penny made for me:


I love how it is reversible--use upside or down.  Very sweet--I am very happy, thanks, dear Penny!  Here is the one I made for Laura L in Massachusetts:


I have also kept up with Stella's Splendid Sampler, here is yesterday's block, #72 of 100:


I will be able to do Sunday's block then will be in Houston when the next four blocks are released so will have to get caught up when I get home.  This block was designed by Victoria Findley Wolfe, who I will see in Houston.  She said she loves to use polka dots in her quilts--that was the reason she added the dots to this block.  I started with a polka dot background.  This one I hand appliqued.

The binding is almost done on Color in Black and White, 2--I showed it here.  I still have a RARE Bear body to make--to donate to the cause in Houston.  You can read more about that here.

Let's Quilt!

Barbara

Monday, October 17, 2016

Lots to Do

In less than 10 days I'll be in Houston, TX for Quilt Market and Festival.  It is the highlight of my year and something I look forward to so much.  But there is a LOT to do before I get on that plane.

Today I've been having fun with my Bernina Q20 sit-down longarm machine, free-motion quilting on a small quilt I am taking for our Education Office display:


Just organic wavy lines about 1/4" apart.  In two hours I got half of it done and will finish the other half tomorrow.  This morning I made the binding and the sleeve so I'm on track to get this done on time.  The pattern is from the book Making Quilts by Kathy Doughty, Her pattern is entitlted "Soul Searching". My quilt is titled "Color in Black and White, 2" as it is the baby verison of a full-size quilt I made last year:

"Color in Black and White": Queen Size version at guild quilt show in 2015

While cutting fabrics for the queen-size version, which used 2.5” strips, I also cut 1.5” strips for this baby version. I delved into my “deep stash” to find all the colors I needed.  The baby size is 48" x 44".  I had the queen-size one long-arm quilted but wanted to do the baby by myself.

The other day I posted a photo of Stella's Splendid Sampler quilt hanging on my design wall.  I usually crop everything else out of the photo but didn't this time and there was a lot of interest in my "Lifetime Quilt" in progress.  Today I finished another large block so here are 4 of those on the wall:


I wrote a step-by-step blog on this one a few months ago:  Lifetime Leader/Ender project.  Shown here are four 20" blocks--there are a total of 2048 triangles, 1.25" finished.  I expect to make at least 16 of those 20" blocks, hence the name, My Lifetime Quilt.  I can't die until it's done so I'm sewing slowly!   These blocks are being made as I am working on other projects and start out as 5" blocks of 1.25" finished half square triangles:


This isn't hard.  I just make four, then join four together for a 10" square, then make four 10" squares and join them together for a 20" block.  That's as big as I'm making them right now.  When I have 16 20" blocks, I'll join those together then decide if I need four more.  Right now I can easily take the 20" blocks off the design wall should I need to.

This past weekend our grand-girl Stella made a quick visit here with her folks, my son and his wife.  We loved having her visit.  She makes funny faces on command.  And she got to see her big-girl bed quilt, "Stella's Splendid Sampler", on the design wall.  It's a great "I Spy" quilt--she found the bunny and the cupcake and the house and the dress and...  She'll be back at Christmas when she'll be almost 19 months old.  She even called me "BB" this trip--I was thrilled!!


Also, this week I have to create Supply Lists and send those and class samples and photos of the samples to my local quilt shop, Patches & Stitches, where I teach.  The Winter 2017 schedule will be coming out soon so this all has to be done before I leave town.  One more sample needs a binding--the binding and sleeve are made, now to get them on the quilt.  It's always something...

Let's Quilt!

Barbara

Friday, October 14, 2016

Tutorial: How to Add a Mitered Border to Your Quilt

There are times when a quilt really benefits from a mitered border, instead of a border with butted or cornerstone corners.  It takes a little more time to do miters, but the effort can really pay off.  It is NOT HARD, just a little slower to accomplish than plain borders.

Sometimes it's the fabric you've selected for your border that tells you to miter.  A stripe or a border print really looks good mitered.  Here are the steps I took this week to add a striped fabric to my   Circa 2016 quilt.

1. Measure the quilt top in both directions:

This was 52" x 43" including seam allowances.

2. Carefully cut the borders exactly the same size in width and placement of the lines.  This almost certainly has to be done one layer at a time to be sure all four borders are the same. I placed the 2.25" mark on my ruler on a specific line on the striped fabric--this is the center of the border.  I cut four borders, 4.5" wide each, 2.25" away from the center line in both directions.  Now the borders have the stripes exactly the same. The longest border I needed was 52" + 8" = 60" so the 2 yards (72") I had of this stripe was plenty.  I did not cut the borders to exact size before sewing.  Some people do, but I wait until the borders are sewn in place to make the final cut to size--insurance in case I measured incorrectly--it happens...

3.  Fold the border in the middle, mark the middle, and mark the outside measurement on both ends--here is the 52" border, marked at 26" and at the outer ends:


4. Do the same thing with other border, 43" is marked at both ends and 21.5" in the middle.

5. Pin the first border to the quilt, pinning at the middle and precisely at each end.  Use as many pins as you need to ease the border/quilt to fit each other:

This shows the back side of the border, where the mark on the border is lined up with the outside edge of the quilt.  I pinned and sewed with the quilt side up so I could see the Half Square Triangles (HST).

6. Start and end the seam 1/4" from both outside edges:


7.  Add all four borders in the same manner, starting and stopping 1/4" in from the outside edge of the quilt.

8.  When all four borders are in place, you will mark the 45 degree miter line with a pencil.  Carefully fold a corner of the quilt so two borders are exactly on top of each other and the quilt is folded at the seam where you started/stopped sewing:

Both borders sewn, from the back

Both borders sewn, from the front

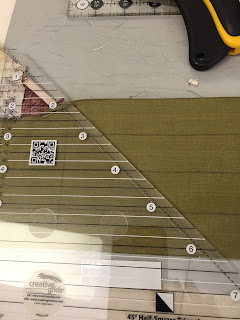
If you have a triangle ruler, now is a good time to use it.  Line up the ruler with the start/stop stitches where the quilt joins the border and the bottom edge, keeping everything in line:


If you don't have a triangle ruler, any ruler with a 45 degree line will work:


Pencil line drawn carefully from start to finish:


I pin and check that the border lines are precisely lined up, this looks good so I'm ready to sew:


9.  Starting at the top where the quilt is joined to the border, sew with a few back stitches, being sure you don't go inside the seam allowance.  Any stitches that go inside the seam allowance will cause a small pucker--you'll want to remove any of those stitches.  Sewn and ready to trim:


10.  Carefully trim the seam.  I cut this slightly larger than 1/4", but 1/4" is fine if you prefer.  Press the seams open and admire how precisely you sewed your borders:


Lather, rinse, repeat with the other three borders.  Your quilt looks great!

Here is mine:


And, because someone will ask, the top border is wider because I did not cut the selvedge off when I cut the fourth border.  It will be trimmed off when the quilt is finished and I am squaring it up for binding.

Just a NOTE:  if you have multiple fabrics in your border, make "border fabric" first before joining the borders to the quilt.  Here is a striped border that I didn't worry about matching at the corners and an inner narrow black border.  The black fabric was sewn to the striped fabric before I marked, pinned, and sewed the borders to the quilt.  I only want to miter four times/quilt. not eight or twelve or however many borders you have on the quilt:


I hope you learned a trick or two here.  If so, please share this with all your quilt-y friends.  It can seem like no one is reading these posts out there in cyber-land!

Let's quilt!

Barbara

Monday, October 3, 2016

Garments? Check!

I had a very productive few days and got my Houston garments done:


This fabric is Eternal Sunshine by Amy Butler for Free Spirit Fabrics.  The pattern is Kwik Sew 3732.  I used this pattern in 2011 for one of my favorite jackets so it was easy to decide to use it again.  I still have to put 2 buttonholes on this--I found the perfect buttons in my stash for this jacket.  Some of the prints in this line are quite large--it will be very interesting to see how the other 20 members of the Education Team use their fabrics.  I'll have group photos when I get home from Houston, mid-November.


This fabric is from Cherrywood Fabrics, with an old Hoffman print as the accent piece.  The pattern is the Kanustandit Jacket for Design and Planning Concepts.  It's an old pattern, I first made it in 2005.  The sleeves are kimono-style so they look slouchy on the hanger, a little less so on me.  Again, I'll be eager to see the other Cherrywood garments our Team makes.

We wear these garments on specific days so, as a team, we look recognizable, but everyone chooses their own fabrics/colors from what is offered and we can make whatever we want.  Here is a shot from 2015--we are wearing Vintage Made Modern by Amy Barickman for RJR Fabrics:


Now I have a couple quilts to finish quilting--one of them is going with me to hang in the office.  That helps the space look more home-y, less industrial.

And I'm going to do another small sew-a-long put together by my friend Lori D at Humble Quilts.  She is calling this one "Quilters Madder"--it will be small and scrappy, right up my alley. Here are my fabrics pulled quickly from pieces I am also using in Circa 2016 and Rajah Revisited:


 Those two projects are winding down so it is safe to use these for the next project--then I don't have to put them away, right?

Let's Quilt!

Barbara