Sunday, June 30, 2024

PICK A PETAL -- MONTH 7

PICK A PETAL is the 2024 Block of the Month quilt designed by Jen Kingwell exclusively for The Quilt Show. It is FREE to Star Members, join today to take advantage of this great bonus. WATCH Jen's Show to see how she makes this quilt--it is FREE for EVERYONE all of 2024: Jen Kingwell Show 3401

This month we start on the EMBROIDERY. The pattern provides basic embroidery stitches and placement guides for two of the log cabin borders. Month 10 will provide the remaining embroidery motifs and placement for the remaining two borders.

While I am familiar with embroidery it is not my strong suit. Here I will show a lot of photos of the embroidery on the  quilt. And I will provide links to great resources, showing how to do the basic stitches used.


Watch Jen's show, #3401, it's FREE for  ALL this year--use the link ABOVE. She explains how some of the embroidery is actually quilting stitches, taken through all 3 layers. We are only doing the embroidery stitches now that form the various motifs on the borders.

Alex Anderson is great at hand embroidery and has provided several CLASSES with excellent videos:

BOUNTIFUL FRUIT  a great place to start. Click the VIEW  button to see the 4 lessons.

MAKE IT YOUR OWN EMBROIDERY STITCH ALONG LESSONS 19 lessons!!

The current Alex Class, MAGIC GARDEN GNOME Lessons 4-7 show BASIC stitches you will use. Find it in her Classroom on The Quilt Show: MAGIC GARDEN GNOME

Alex advised me to: 

1. Use a hoop on the pieced log cabin borders to keep the fabric from being pulled or distorted.

2. She uses SASHIKO needles, her favorites are in the SHOP

3. Work with thread about 18"-22" long. Single strand for thicker thread, like Perle size 8, or double strand like the Wonderfil size 12 included in the kit. When using double thread cut it twice as long 36"-44".      See how to make a Non-Knot with doubled thread:

Alex's Make it Your Own Embroidery Stitch Along--LESSON 2, start at 16 minutes

LESSON 3 start at 30 minutes  Chain Stitch, also called Stem Stitch  
            BTW--from 8-30 minutes is an interview Alex did with me about my personal exhibit at                         Houston in 2021--if you want to see what I used to look like and lots of my quilts. 

4. Mark designs with Quilters Select Self Erase Marker--it disappears in less than a day so don't mark more than you will stitch today.

There are MANY videos on Hand Embroidery, simply Google it. Here are two I found very simple to understand and helpful:


I am using the threads from the KIT, Wonderfil size12. I preferred double strands for good definition and I love the little "knotless-knot"--I used it all the time in cross stitch. I have lots of needles in my collection, find the size that works best for you. The eye must be big enough to allow easy threading. When doing "wrapped stitches", like French knots, you want a needle that is straight all the way, like Sashiko needles that Alex likes. 

I am just getting started. Here are my SUPPLIES:

My first stitches in many years

Lots of needles, two hoops, both a bit large for this 6" border 

Try a variety of threads and needles to find your favorites. If you have trouble threading needles, try the Self-Threading ones. Alex doesn't like them but I have found them useful for some threads. 

You can add more stitches if you like, or do fewer motifs. It's your quilt, you get to decide.

It will be fun to see all the embroidery/embellishments everyone will do. Please post your work on the FORUM so we can see your progress.

Next month we get more appliques for Border 3. 

Let's quilt.

Barbara


Sunday, June 23, 2024

SUNDAY SALE!

The other night my guild had a "Yard Sale" with members renting a table to sell their quilting stuff. As usually happens at this event, there were LOTS of sellers and not so many buyers. It isn't advertised outside of the guild and that's too bad. It takes a lot of work to prepare and most people took much of their things home again. Girl Scouts, Girls Inc, Kids to Love, and area churches with sewing outreach programs would benefit greatly from being able to buy quality supplies at great prices. 

Our Table

I was only there to help a friend so had not brought much to sell. A few things sold but most came home. That's where you get lucky! 

Here are 10 items I think worthy of finding a good new home. If you see something you like, let me know right away. Local people: I can deliver. Out of town friends, shipping will be added, in the $15-20 range or more depending on weight. I do accept PayPal if you prefer that to sending a check in the mail. And if you are registered for my 3 great classes in Houston this October, I will be happy to bring your purchase to you there. Two of my 3 classes SOLD OUT on the first day!

1. SUN, MOON, AND STARS pattern and carefully selected fabrics, more than 13 yards, $75.


top plaid 7.75 yards, green plaid 1 yard, 60" 

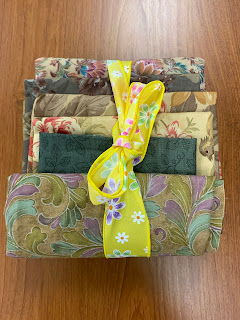
2. MUTED FLORALS, about 4 yards, $10:


3. VERA BRADLEY Set, 3 zippered pouches, $5: SOLD


4. HAND DYED LINEN, each piece one of a kind. 
        EARTH TONES:  2 pieces 26" x 38", 24" x 52", one of a kind pieces, $20 for BOTH:


ROSY RED HAND DYED LINEN, almost 4 yards, with Indygo Junction pattern. $30: SOLD


5.  SARI SILK RIBBONS, great for string piecing, and so much more, luscious colors, 4 at $5 each, $20:  SOLD


6. ZEBRA FABRIC, 1 yard, $5: SOLD


7. FAN QUILT, fan print fabric center, quilt made and hand quilted by me, late 1980's, using Metallic thread, polyester batting, has small sleeve on the back for hanging on a dowel. One of my earliest works, $25:


8. FLORAL REFLECTIONS QUILT PATTERNS, from Quilt Nouveau Designs by Binky, complete set of 13 patterns and additional helpful handout. This is a beautiful quilt I always intended to make but now know I won't. $25: SOLD


9. RED ORIENTAL COLLECTION OF FABRICS, more than 11 yards, $90:

Red 2 yds x 108", Stripe 1.25 yds, Gold Batik 3.25 yds, Print 3 yds


10. PURPLE ORIENTAL COLLECTION OF FABRICS, about 9 yards, $75. It is one of those fabric sets that I put in and take out of the SALE BOX often, it is so beautiful. If it doesn't sell this time I am cutting it up for the next quilt:  SOLD

Large Theme Print, 1.33 yards, about 9 yards total in the group

FREE WITH PURCHASE: the first two buyers get their choice of one of these, an early Feathered Star block, 15" finished OR Patriotic Panel, 17" square:

Feathered Star block, 15" finished

Spirit of America Panel, 17" square


Happy shopping! I hope you find something you love. 

Let's quilt,

Barbara


Sunday, June 16, 2024

MORE STARS, OH MY!

 I have been having so much fun making Stars for my latest project, Oh, My Stars!, a pattern from American Jane. I wrote about it last week, find that post here:

Oh, My Stars!

Here is just a peek at the process. This is not the final arrangement--when the rest of the 13 full stars are made I will decide who goes where. This just lets me see the general idea:

Picking fabrics is my favorite part! The latest fabric "pulls":


Here they are ready to sew. Having them all set helps me make the most of my time the next sew day--just start sewing, these are cut and ready for assembly:

The actual sewing is slower and requires careful pinning and sewing. I make two diamonds first to be certain I like the 5 fabrics together, then I finish the star. Once that is done, I sew the other half of the strips and finish making either full stars, half stars or corners.

Each set of fabrics makes either TWO full stars, or ONE star and TWO halves, or ONE star and TWO corners:


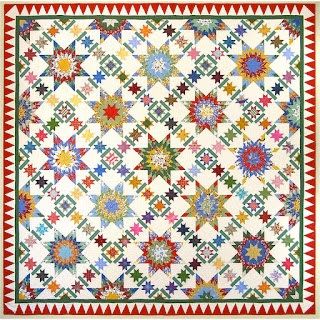
The pattern quilt. There are 132 little 4" stars for sashing. I make the star points unit from flying geese, using my TUTORIAL for 4 Flying Geese at Once. Those geese are 1" x 2" finished, that's small. I am making them as I go, using them as Leader/Ender projects. I prefer that to having to make 132 all at once.


Let's quilt.

Barbara


Sunday, June 9, 2024

Oh, My Stars!

 This week I started a new quilt project. Oh, My Stars from American Jane Patterns is a bit challenging and will make a great multi-day project for students who want that immersive experience of several days with one teacher.

My FAVORITE PART is the FABRIC PULL--also called "shopping in my closet":

The first pile, way more than is needed

These were pre-washed, notice how much dye is on the Color Catcher

Everything that wasn't pre-washed, still more than needed but lots of choices

While the pattern calls for 1/4 yard pieces cut into Width of Fabric strips, about 42" long, Fat Quarters can be used. I have lots of them and will be using them, along with Width of Fabric cuts--much more instruction about that will be provided in class. 

There are full stars and half stars, and even 4 quarter stars for the corners:


There are 132 small Evening Stars; these are great to use as "leaders/enders" while sewing the larger stars or other projects:


The piecing will require our best work. All the important aspects of piecing quilt blocks is at play here, the CUTTING, the SEWING, and the PRESSING. Each will be taught in detail in the class.

All the DIAMONDS have a bias edge so it is important to keep them straight and true. Here are just a few photos of my process:


The units are sewn together so you get a perfect seam alignment match:


Then you get to choose which fabric arrangement you prefer:

Light points on the Outside

Dark points on the Outside

As usual, I even get to show WHAT NOT TO DO:

OOPS, time to get out the stitch ripper and fix that middle segment--I sewed the orange to the WRONG FABRIC

When the top is done I will start offering this as a Workshop for extended day classes. It is big, 94" x 94"  square as the pattern is written. I am planning to add an additional border to make it King size. So I don't think I will quilt it before teaching the workshop--a King size quilt can fill a suitcase by itself.

So tell me? Would it bother you to see the sample as a top only? I can make a very small additional sample and quilt that to provide quilting suggestions for the final bed-size quilt. 

I am also considering a different pieced border. Do you like the long Sawtooth border or would you like an optional alternative?

Making a quilt for a major workshop takes a lot of time. I write a lot of notes about pressing instructions, notions that will be helpful, how to speed up the process, how to achieve maximum accuracy. All the things I have to consider and think about get written down while the quilt in in progress. There will be an additional handout for students with all the "Tips and Tricks" to being successful with this quilt. 

Let's Quilt!

Barbara