Sunday, January 31, 2021

MY JOURNEY: QUILT # 12

 Another quilt from the Special Exhibit My Joyful Journey, part of the Virtual Quilt Festival, December 3-5, 2020.

QUILT # 12: Baker's Dozen Does It, 86" x 88". machine pieced, quilted by Terry Owens, 2003


The Story: Blocks were swapped with 12 other quilters, using colors each requested. I played with this design for a long time before I settled on the narrow black sashing to set off the bright colors. The pieced border added a lot of time but gave it some personality. 


Let's quilt.

Barbara

Wednesday, January 27, 2021

MY JOURNEY: QUILT # 11

 Another quilt from the Special Exhibit My Joyful Journey, part of the Virtual Quilt Festival, December 3-5, 2020.

QUILT # 11: Persistence, 70" x 70", machine and hand pieced, hand applique, hand quilted. 2003


The Story: Begun in 1990, I hand pieced the Mariner's Compass, using fabric I hand marbled. Another center medallion quilt, of which I have made many. Finally finished in 2003, hence the name. 


Let's quilt.

Barbara

Monday, January 25, 2021

COLOR MY WORLD--MONTH 2

 This Block of the Month quilt is available FREE to Star Members of The Quilt Show with Alex Anderson and Ricky Tims. It was designed by Wendy Williams exclusively for The Quilt Show for 2021. It is not too late to start--you will learn a lot.

NOTE: If you are a Star Member--be sure to WATCH THE VIDEO--lots of important info there too.

This month we go to the center of the quilt to make a Mariner's Compass. The pattern has excellent, step-by-step instructions with photos--take the time to read them. Wendy used two pretty blues for her Compass: 


I used my two favorite kit fabrics, a shiny gold and shiny purple, for mine: 


Last summer as I was making the sample quilt, I was so focused on getting it done, I didn't take photos of the process. No problem, I made another one: 

Using Freezer paper for paper piecing was new to me and I found it very enjoyable. I was eager to share this process so I wrote a detailed blog about making this Mariner's Compass last June: Freezer Paper Foundation Piecing.  I will touch on the most important instructions again here. 

Helpful things to know and do for this month:

1. First, as always, it is absolutely essential that the 1" scale box is exactly 1". Much has been written about printing on the Forum--each person has to figure out what the correct settings are for their printer. 

2. Here you can see that Section 1 and Section 2 look very much the same BUT--the darks and lights are located opposite of each other. Be sure to take the time to fold all the lines on the patterns, in both directions, just as we did in Month 1, before starting to sew: 

3. It is easy to get the colors mixed up--use a pencil to write your colors on the paper to keep it all straight, especially if using more than just one light and one dark. I suggest after you cut out your fabrics, using the cutting instructions in the pattern, lay out all your pieces to be sure you have them in the proper order.  It is really easy to sew the wrong piece in the wrong place--ask me how I know...  NOTE: the LARGE piece, 8" x 3", is for piece F, the largest point in the Compass.

4. When piecing angles like these, it can be tricky to get the pieces lined up accurately before sewing. I use a few pins to test the placement before sewing to be sure the fabric will cover the paper completely after sewing. Pin on the sewing line, open the fabric and double-check. If it's right, sew it. If it needs to be moved just a bit, do that, re-pin and try again. 

5.  As pieces are added, they are pressed over, onto the freezer paper--the waxy side. The excess is trimmed 1/4" away from the line--using one of my favorite tools, the Add-A-Quarter ruler:


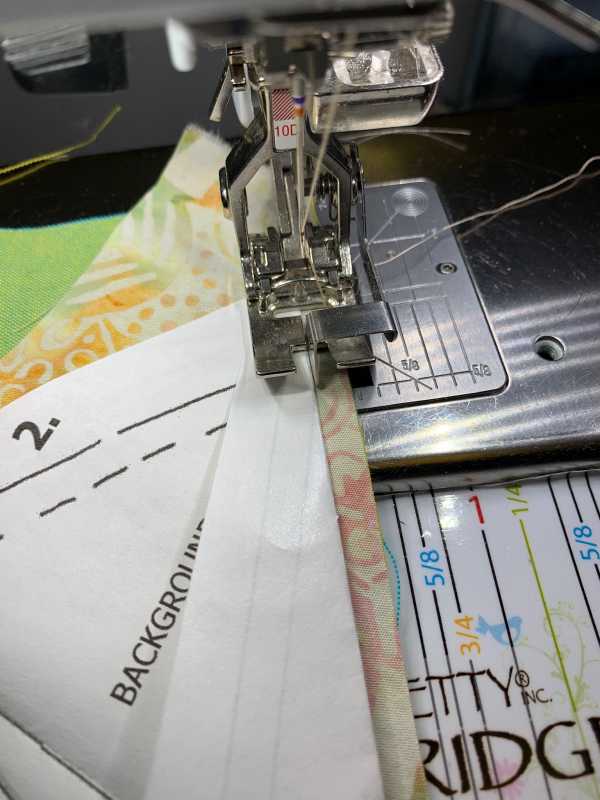
6. If you haven't tried the Edgestitch Foot yet for Freezer Paper Foundation piecing, you really should. Sometimes called the Stitch-in-the-Ditch foot, or the Edge-Joining Foot, or the Topstitch foot, most machines have this foot available. I learned about it in January from the Forum, and WOW--how I wish I had known to use it last Summer as I made the quilt--such a help! I was still able to use the single hole throat plate and keep the needle in the center position. The guide runs right along the edge of the paper--no more stitching through the paper--just keep your eye on the guide:


7. Each fabric is added in turn until the paper is covered with all the fabrics needed. When the pattern is completely stitched, carefully trim 1/4" away from the sewing line--see Step 6 below first!  Then carefully remove the unit from the Freezer Paper--and the paper is ready to be used again! A real bonus if doing a block with many of the same units. I used the two paper patterns to make the 8 units needed, 4 of each. So I only had to print 1 sheet of Freezer paper to get ALL the patterns needed for this 14" block:


8. Trimming the outside curved edge is tricky with a rotary cutter. I used good quality scissors, I am a fan of Karen K Buckley's Perfect Scissors--to trim exactly 1/4" away from the dashed line, creating the seam allowance. You want the Compass points to be 1/4" away from the outside edge. 

NOTE: when joining the wedges, I recommend you start at the center point and sew to the outside edge to prevent the seam allowances at the outside edge from becoming stuck:


9. When joining units together that put more than 4 fabrics at one point, I always pre-check the center by machine basting, BEFORE sewing the center seam. Here are the two halves, ready to be sewn together:


10. Using a long stitch length, I use at least 5.0, carefully pin the center and then baste, about 1" on either side of the center: 

11. Take it out of the machine, hold your breath, and check yourself. If it meets YOUR approval, turn the stitch length back to the proper size, and sew the entire seam, pinning all along the edges. 

If it doesn't meet YOUR approval, it's a simple matter to remove the basting stitches, fiddle a bit again, re-pin, baste again and check. I was happy with this:

12.  This center point is probably the most important part of the entire quilt because your eye will go right there and it is a high contrast spot. It is worth your time to get it as accurate as you can:


13. Here is the way I pressed the back. The longest seams are pressed open--these are the seams that join the 8 wedges. Do what makes you happy: 


14. The finished size of this Mariner's Compass is 14". That means the Compass with seam allowances should measure 14.5" now. 

15. All the outer edges are bias so take care to handle gently. If you have a place on a wall you can put it, do that, so you can admire your handiwork. Even using a piece of cotton batting to put the Compass on will allow you to see it but not handle it excessively. The piece of batting can be draped over a chair if wall space is limited.

Next month we are back to Small Houses #3 and #4--same size as Month 1 but different windows and doors. 

Be sure to share your work on the Forum--there is a specific category to SHOW  YOUR MARINER'S COMPASS. We want to see and cheer you on.

Let's quilt. 

Barbara


Sunday, January 24, 2021

An OLDIE, Finished

Time for a little break from the Special Exhibit quilts for this post. 

 Recently, I was looking for what to quilt next, and found this small piece, made years ago, that was even basted and ready to go.

It's about 34" square. I think the pattern came from an old book by Mary Ellen Hopkins, who encouraged quilters to create their own designs, using basic traditional blocks in various layouts. 


I am a fan of ruler work quilting, particularly curved crosshatching. I am inspired a lot by Natalia Bonner, her books and her videos and classes.  This was so much fun to figure out and then execute: 


Although it is hard to see, I also designed a scalloped border in the dark fabric--here is a closeup--maybe you can see it:


This quilt has one of my favorite light fabrics--I wish I had yards and yards of it. I think it was a Gutcheon print--it came in several colorways--I loved this one:


It took a couple days to design the quilting and then execute it. Really fun and now it's finished!

Let's quilt.

Barbara


Wednesday, January 20, 2021

MY JOURNEY: QUILT # 10

 Another quilt from the Special Exhibit My Joyful Journey, part of the Virtual Quilt Festival, December 3-5, 2020.

QUILT # 10: Back In Time, 70" x 70", machine pieced and hand quilted, 2001


The Story: This pattern captivated me. I used the block for a secret swap with a guild member. I first made the quilt with a very complex border. When that quilt was done I realized it is the simplicity of this setting that I loved. So I made this one. The hand quilting was a joy to do, though you hardly see it in the large plain blocks. Based on a pattern in American Patchwork & Quilting, October 2000, Living in the Past. 

Let's quilt.

Barbara

Sunday, January 17, 2021

MY JOURNEY--QUILT # 9


Another quilt from the Special Exhibit My Joyful Journey, part of the Virtual Quilt Festival, December 3-5, 2020.

QUILT # 9: Purple Plus!, 78" x 102", machine pieced, quilted by Lin Hayden, 2001:


The Story: Each block uses eight fabrics to create both a light and dark block, using all eight, shaded from dark to light or light to dark. I have made several of these. It is a very popular workshop I enjoy teaching. Every quilt is different depending on fabric selection.

Here is a detail shot of the second one of these I made, almost twins:


Let's quilt.

Barbara

Wednesday, January 13, 2021

MY JOURNEY--QUILT # 8

 Another quilt from the Special Exhibit My Joyful Journey, part of the Virtual Quilt Festival, December 3-5, 2020.

QUILT # 8: Devil's Claw, 76" x 88", machine pieced, hand quilted, 1999:


The Story: A replica of an antique quilt I bought in Virginia. I call this "planned scrappy". There is one constant fabric in each block and a specific order in how fabrics are placed in the block. The more fabrics in a quilt, the better I like it. 


Let's quilt.

Barbara

Sunday, January 10, 2021

My Journey--QUILT #7

 Another quilt from the Special Exhibit My Joyful Journey, part of the Virtual Quilt Festival, December 3-5, 2020.

QUILT #7 Lone Star Garden, 90" x 90", hand applique', machine pieced, hand quilted, 1997:


The Story: It took more than 12 yards of the border stripe to cut eight large diamonds exactly the same size and from the exact same place on the fabric and to soft-edge piece the outer borders. The hand applique' took many hours but I enjoyed selecting a wide variety of fabrics for the flowers and leaves. The center deserved more of a border than just plain fabric so I appliqued the border stripe. by soft-edge piecing, onto the pink fabric, then joined it to the center of the quilt. This quilt was included in the Special Exhibit "Traditional Treasures', Houston 2013.

I worked on this for two years and it's another of my most favorite:

Let's quilt.

Barbara

Wednesday, January 6, 2021

My Journey--QUILT #6

 Another quilt from the Special Exhibit My Joyful Journey, part of the Virtual Quilt Festival, December 3-5, 2020.

QUILT #6 If It's Purple...94" x 94", hand applique', machine pieced, hand quilted, 1995


The Story: Block patterns were from my guild as Block of the Month patterns. This began my love of Feathered Star Medallion quilts and pairing applique' blocks with pieced blocks. From the beginning, it was intended as a wedding quilt for the first of my sons to marry. In 2012 it was presented to Andrew Wilkins and his bride Lauren Santoro. 

Beautifully hand quilted by my friend. This quilt won Best of Show in the Heritage Quilters of Huntsville show, Fanfare 1995 and was included in the Special Exhibit "Traditional Treasures", Houston 2013: 


Let's quilt. 

Barbara

Sunday, January 3, 2021

My Journey--QUILT #5

 Another quilt from the Special Exhibit My Joyful Journey, part of the Virtual Quilt Festival, December 3-5, 2020.

QUILT #5 Five Easy Pieces, 86" x 93", machine pieced, hand quilted, 1995


The Story: A much simpler version of the previous quilt, Pieces of the Past--Circa 1875--based on an antique top I bought at a yard sale. This pattern is often called Wild Goose Chase. It does not have the tricky set-in four patches at sashing intersections; instead it has squares making it easy to sew together in diagonal rows. Students preferred to piece this one--no one ever tried piecing the more difficult version.

It was hand quilted by a friend who did many quilts for me in this time period. I marked and basted the quilt, she quilted it:

Let's quilt.

Barbara


Friday, January 1, 2021

COLOR MY WORLD--MONTH 1

 It is finally time to start COLOR MY WORLD! I made this quilt in May and June 2020 and had to keep it quiet until November 1, 2020. Let's get started!

Here is my top finished, with the delightful Stella for scale. The quilt is about 70" square:


RESOURCES: 
1. The PATTERNS are available FREE to Star Members of The Quilt Show. They are available ONLY on The Quilt Show for all of 2021. After this year, the designer gets the rights to  her design back and you will be able to buy it from her. Join The Quilt Show now to get this incredible added bonus.

2. The SHOW which features this quilt is available to watch NOW. It airs January 1, 2021 and will be one of the FREE shows all year so everyone can see what a terrific project this is.

3. The FORUM: under CONNECT on www.thequiltshow.com  find the Forum where you can ask questions, get answers, share your progress and be part of the world-wide quilting community. 

4. Instructional Videos: under LEARN/BOM on www.thequiltshow.com, find several videos I have made to show you the steps for making this quilt , with the Freezer Paper Piecing technique. It is very important that the patterns are printed the correct size--the videos and show address this. 

5. Facebook LIVE broadcasts done monthly, and available on YouTube--watch and learn at your leisure.    The Quilt Show Playlist on YouTube

This month we begin to make Small Houses, 1 and 2, eight of each. In Month 3 we will make 16 more Small Houses, 3 and 4. Each of these houses is slightly different in design but the same size overall. DO NOT Sew them to each other after getting all 16 done--WAIT until Month 3 when you make 16 more that are different in design. 

Here is a quick look at my Small Houses. You don't have to use the same colors I used, this just gives you an idea: 


FABRIC SELECTION: You decide how to build your houses, using colors you choose.

The Kit Fabrics I received

I recommend you cut one strip of 3.5" x width of fabric (WOF) from each fabric EXCEPT the black and white and background. The black and white are for the Inner and Outer Roads, the background is cut wider than 3.5":

Each Small House #1 and #2 are made from 4 fabrics plus the background: a door, windows, roof and the building. Use the Cutting Instructions to cut out the fabrics for your first small house #1. SAVE all the Scraps:

Small House #1 and # 2


Start by making one--select the 4 fabrics for the house and get started. There are videos on how to Work With Freezer Paper, and the Basics of Sewing the Blocks. 

For the Background, I came up with a way to efficiently cut the background pieces with minimal waste. There is a Video for that. Find all the Videos here: Instructional Videos 

I recommend you make the eight Small House #1's  THEN move on to make the eight Small House #2's. The bottoms are different sizes though they look very similar and I wouldn't want to sew a small bottom for House # 2 to the top of Small House #1. And the Background angles are the opposite in Houses # 1 and 2; I found it less confusing to concentrate on just making all the #1's  then making all the #2's. 

The patterns can be used over and over--some I used 12 times. When most of the wax is gone, I simply used a light swipe of fabric glue stick to lightly secure the fabric to the freezer paper pattern. Not sewing through the paper makes it possible to use just two sheets of freezer paper to make all this month's houses. 

Another advantage to the Freezer Paper technique is using the same size stitch for piecing as usual, a 2.0 for me. This makes it easy to "un-sew" when you sew something wrong--and we all do that from time to time. 

The only disadvantage I can find is that since I was not sewing through the paper, if I just grabbed the paper out of the back of the machine, it was easy to have the fabric come off the paper. This is especially true as there is less wax on the freezer paper. Then I had to carefully line up the seam of the fabric with the line on the paper--not really easy, but really important. I quickly learned to hold the paper AND fabric in my hand when removing the unit from the machine.  

Like any other new skill, there is a learning curve. Just take it easy, don't rush, and know you will get better with practice. There is no rush to get these 16 Small Houses done--you have all month. 

Next month we will make the Mariner's Compass center. Until then, take advantage of all the videos, read the pattern, check the Forum frequently, and enjoy the Journey.

Let's quilt.

Barbara