A couple days early, here are some helpful tips to get you ready for the 2022 Block of the Month from www.thequiltshow.com: Garden Party Down Under, by Irene Blanck. It's not too late start--just join The Quilt Show and jump in.
This month we make the first of six PIECED blocks and an applique vase:
 |
Irene Blanck's Month 3 blocks
|
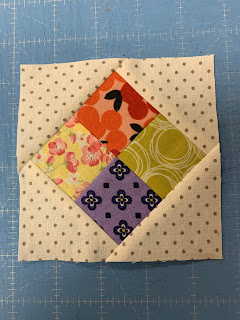
Let's start with the pieced block,
4-Patches on Point:
 |
| Mine from Kit fabrics |
When making small units, everything counts: the cutting, sewing and pressing. The block is 12" finished, when sewn into the quilt, so each 4 Patch on Point is 4" finished/ 4.5" including seam allowances.
Following the cutting instructions, be as accurate as you can cutting the pieces. Sew with fine thread--no thicker than 50 wt. I piece with 60 wt. on top and 80 wt. in the bobbin--Quilters Select brand.
The 4- Patch pieces are oversized then cut to the correct size--BE SURE to trim the 4-Patch to 3.25" before proceeding to add the background triangles. Those triangles are CUT from 3.5" squares--don't get mixed up.
It's easy to see how to align the triangle on the 4-Patch. Sew with the 4-Patch on top--it's always best to have the bias edge on the feed dogs--when possible, as it is here:
I trim the ears off the unit before adding the final two triangles--you can wait and trim at the end if you prefer:
When trimming the 4-Patch to exactly 4.5" measure from the center out--the ruler should be at 2.25" at the center and top and bottom. This will also put a diagonal line on the center seam of the 4-Patch:
Trim the first two sides, turn the block completely around and trim the remaining two sides--this unit is now exactly 4.5" including seam allowances:
DRESDEN PLATE:
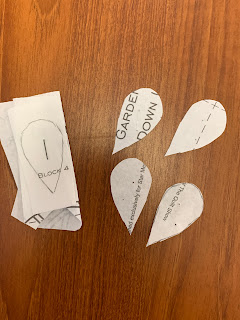
NOTE: if you didn't buy the Paper Pieces Irene listed in the Recommended Supplies, there is a PDF on the Month 3 pattern/document page showing a FULL SIZE Dresden Plate that you can use to create your own petals and the center circle.
The center of each of the 6 pieced blocks in the quilt has a small Dresden plate. For my sample quilt, made last year, I put Dresden Plates in the two 4-Patch on Point blocks, and Double Hearts in the four Shoo Fly blocks. The Dresdens take time to make so I simplified my sample quilt. You are free to put anything you want in the middle--including another pieced block, no applique.
I made two Dresdens, one by English Paper Piecing. one by regular Machine Piecing. In both cases, I cut out the 12 tiny petals the same way. Using a sandpaper board underneath, trace around each petal on the back side of the fabrics:
I cut a 1/4" seam allowance on each petal, as I need that for machine piecing and it's the correct size for English paper piecing:
I love using this drafting circle template for tracing circles. Find these in the Drafting section of an office supply store. So far, every circle size I need has been here. I draw the size to CUT on the back of the fabric and use a Perfect Circle Template for the actual circle size:
Since circles from cardboard were provided with the petals, I used those to gather around:
For English Paper Piecing, use a light touch of glue to secure the seam allowances to the paper templates. This will be removed before sewing the plate to the background so go easy on the glue:
Ready to hand sew:
English Paper Piecing, use thin, strong thread--I used Quilters Select 80 wt. thread. Catch just the edge of fabric folded over the paper template--don't sew through the paper. A Wonder clip helps to hold the petals together:
Machine sewing process. Of course, you could hand piece them if you like:
Complete Dresden Plate machine pieced:
I found it helpful to have a line on the front side to turn the upper edges to the back so I traced around the point of the petals with an erasable pen:
REMOVE the papers when the Dresden Plate is complete. Irene recommends using starch or sizing, etc. first, then remove the papers. Now sew it to the background with your favorite method, then add the circle.
I machine appliqued one and hand appliqued the other. Your quilt, you get to decide.
My finished block:
 |
| Front |
 |
| Back, showing how I pressed seams |
THE APPLIQUED VASE;
One of my students had a brilliant idea for selecting fabric for her vases: she made a window template. If using Print & Piece Fuse Lite, you will want to REVERSE the template since your shape will be reversed. It allows you to really see what your vase will look like. I chose neither of these:
Rather than print 4 pages onto PNPFL, since there were not a lot of shapes, I simply used a pencil to draw the shapes needed on one sheet of Print & Piece Fuse Lite. The large vase doesn't really require all the PNPFL, so I created a "border" of about 1/2" of it for the vase and the rest was used for shapes:
For multiple shapes, try this. Fold or stack small pieces together, draw the shape on the top piece, put a staple in the center to hold them securely, cut out the stack, remove the staple and you have 4 shapes all the same from small pieces of leftover PNPFL:
Here is the vase prepped for sewing. Be sure to cut out the opening around the handle BEFORE YOU FUSE the PNPFL to the back of the fabric. Then carefully cut out the fabric in the opening, leaving a 1/4" seam allowance to turn under, if you are doing turned edge applique:
Ready to go:
There is no need to explain all the applique procedures again. Review the Month 1 videos and blogs and Instructions if you need to or want to try another technique this time.
You will need about 26" of bias stems, 1/4 finished. I used Perfect Stems this time and that went pretty quickly.
VERY IMPORTANT TRIMMING INFORMATION: this Applique block is trimmed to 12.5" H x 13.5" W, NOT a square. It must be this size to fit in the quilt. Be VERY careful with the trimming step.
Here is a Cutting Guide Trick: Using tracing paper that is 9" x 12", tape two sheets together and cut out a rectangle that is exactly 12" x 13"--the Design Area of the block. This allows you to see exactly what the block will look like when sewn into the quilt. You must ADD SEAM ALLOWANCES when trimming the finished block.
Here is WHAT NOT TO DO. Placing the Cutting Guide exactly in the middle of the background, you can see the far most right small petal will be cut off at the edge, a big NO-NO (NOTE: my shapes are reversed from the pattern):
By moving the Cutting Guide a bit more to the right, all of the shapes are inside the Design Area, about equal all around and I am now safe to mark the outside edges for cutting--REMEMBER TO ADD 1/4" TO EACH SIDE WHEN YOU CUT. I used a water soluble marker to make lines several places on each of the sides so I know where to place the 1/4" line on a ruler. The block MUST BE CUT 12.5" H X 13.5" W:

Here are the Month 3 blocks from my Sample quilt made last year. Remember, my vase is reversed because I used a fusible product, PNPFL, to prepare the shapes. You can now sew Block 2 (vase) to Block 3, (4-Patches). They should be 25.5" W x 12.5" H when joined.
These blocks were made by Pam R, one of the fabulous Sunday Sew and Sews:
Next month you will make the second 4-Patch on Point block. So if you like to work ahead, you can make another now.
NOTE: All the instructions for the 4-Patch on Point block and the Dresden Plate unit will be repeated next month, exactly the same as this month. Decide if you need to print them again or not. There will be a new applique vase block in Month 4.
Let's quilt.
Barbara