Showing posts with label charity quilts. Show all posts

Sunday, February 16, 2025

THE PERFECT BABY QUILT

 One of the original "Sunday Sew and Sews" had a pattern she created for the perfect baby quilt. Janet Noever called this her SAWTOOTH STAR BABY QUILT. 

Here are two of her creations. Janet usually started with a panel or kid themed fabric for the center:
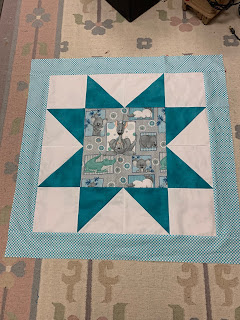
As simple as it gets, one star block, one border

Janet loved Seminole Piecing and often added it to the baby quilt

Donna D, one of the Sunday Sew and Sews has made several of these, here is her latest, designed for the newest ALABAMA fan:


At the time of Janet's unexpected death in 2020, Janet was in the process of making 50 baby quilts to donate to Huntsville Hospital to be given to children patients. The Sunday Sew and Sews took on completing this project and several months later Janet's quilts were presented to the hospital. I wrote about that here: A Quilter's Legacy

The other quilt Janet loved to make for donations was this one, she called it "My Favorite Donation Quilt". Various strips/widths of kid-themed fabrics couldn't be easier so I am not providing instructions here, but I do have a TUTORIAL:


A little Seminole Piecing for interest makes this a bit more work


When I make this quilt, I start with backing and batting, then "flip and sew" each fabric in place through all three layers. This means it is quilted as it is created. I did a TUTORIAL for my method here: STRIPPY QUILT 

Here are 3 mockups I made in EQ8 to give you ideas for Janet's SAWTOOTH STAR BABY QUILT:

Janet's original design, 36" x 43"

Super Simple, 36" x 36" 

Border Variation, 32" x 44" 

INSTRUCTIONS FOR JANET'S SAWTOOTH STAR BABY QUILT,  36" X 43" finished

Fabric Required:

Center Focus Fabric                Fat Quarter

Star Points                                Fat Quarter or 1/4 yard

Background Fabric                     2/3 yard

Top/Bottom Accent Border          1/6 yard

Border Fabric                             1/2 yard


Cutting Instructions:

Center Focus        cut 14.5" square

Star Points            cut FOUR 8" SQUARES for Half Square Triangles

Background          cut FOUR 8" SQUARES for Half Square Triangles

                              cut FOUR 7.5" SQUARES for Corners

                              cut TWO 2" x Width of Fabric (WOF) strips for top and bottom borders

Accent Border      cut TWO 2.5" x WOF strips for ACCENT BORDER top and bottom

Outer Border        cut FOUR 4.5" x WOF strips for outer borders


QUILT ASSEMBLY INSTRUCTIONS:

1. Make  8 HALF SQUARE TRIANGLES:
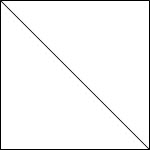
 Pair 8" squares of STAR POINT and BACKGROUND fabrics, right sides together

On the WRONG SIDE of the BACKGROUND fabric draw a diagonal line 

Sew 1/4" from BOTH SIDES of the DIAGONAL LINES 

Cut apart on the drawn line, press toward the Star point fabric, OR press the seam OPEN, your choice

Trim to 7.5" square

2. Sew the EIGHT Half Square Triangles into PAIRS:


3. ASSEMBLE THE QUILT CENTER using the quilt diagram as a guide:

 Sew the Star Block by adding corners to TWO of the Star Point Pairs, press toward corners

Sew Star Point Pairs to each side of the Center Square, press toward center

Join the THREE rows to create the middle of the quilt

4. ADDING BORDERS--from here on MEASURE YOUR QUILT to determine what size to cut the borders:

Accent Borders: Cut TWO borders from strips previously cut 2.5" x your quilt measurement. In a perfect world it is 28.5" wide, yours may differ a little

Attach Accent Borders to Top and Bottom of Star Block, press toward Accent Borders

Background Borders: Cut TWO borders from background fabric strip, 2" x your quilt measurement

Attach Background Borders to Top and Bottom Accent Borders, press toward Accent Borders

Outer Borders: Cut TWO borders for the Left and Right Sides. MEASURE YOUR QUILT to determine what size to cut them, 4.5" x your measurement. In a perfect world they are 35.5"

Attach Left and Right borders, press toward the outer borders

Cut TWO borders for the Top and Bottom. MEASURE YOUR QUILT. In a perfect world they are cut 4.5" x 36.5". It is MOST IMPORTANT borders be cut to the SIZE NEEDED so the quilt will be flat and square.

Feel free to change your borders, add more or less. Create Pieced Borders if you like. Keep in mind, it is best to keep the finished size to no WIDER than 40" so regular quilt fabric can be used as the backing without the need to enlarge the back. 

This quilt is fast and easy to make. It is easy to alter in many ways. We are all thankful to Janet for her friendship and her great organizational skills that made it easy for us to complete her important project.

 See the earlier post to see Janet's great notebook: Janet's Donation Quilt Project . See the post that shows all the finished DONATION QUILTS

Let's quilt!

Barbara

Sunday, February 3, 2019

Comfy Quilts

Comfy quilts, also called Charity quilts, are often made by groups of quilters to donate to local organizations to support the community. They can be simple to elaborate, small to bed-size. Each quilt donated will find an appropriate home in time.

My guild, the Heritage Quilters of Huntsville, has done this for years. At a recent meeting a few of the agencies we support spoke to the guild about how well-received these quilts are by those who are given one. Veterans, NICU babies, those dealing with domestic violence, children in distress due to family issues, those who have lost their homes to fire, anyone who could use some comfort may receive a quilt. Fire, police and EMTs all carry quilts in their vehicles so they can be given to those who need them immediately.

Our Comfy Quilt coordinators were ready--they presented more quilts to the three agency spokespeople who were there. AND they had a supply of comfy quilts that needed work: some just needed a binding, some needed to be quilted and bound, a few only needed labels. That was smart because, after hearing how important these quilts are to those who have gotten them, all of the projects that needed work were picked up by members.

I selected this top to quilt and bind. It is a simple design, made from a "Jelly Roll"--2.5" strips of fabric packaged in a roll. Each print has some kind of food--I think every food group is represented. The top was done by someone else, the backing was provided, all I needed to do was add batting, baste, quilt and bind it. The strips were the perfect place to practice machine quilting.

First, I "stitched in the ditch", between all the strips. Here is the back after that step was done:


Then I stitched Free Motion Quilting (FMQ) in every other strip. I  tried a variety of designs, some I am pretty good at and some I want to get better at. That stitching was quick and it was fun to decide how I would quilt each strip.


In the remaining strips, I quilted with Rulers, more correctly called Templates. Using a Ruler Foot and a variety of Longarm Rulers, I created lots of designs, some straight, some curved. This is a slower process but with careful stitching, the quilting designs can be very consistent in size and shape. It took more work to come up with those designs.

Over the course of 3 days I worked on the quilting, then created and attached the binding by machine. It will be turned in at our next meeting and eventually find its' way to a recipient who, I hope, will enjoy it.


If your organization makes Comfy Quilts, ask some of the agencies who receive them to speak to your group about what they do with them. You will see a definite increase in the participation by your members.

Let's quilt!

Barbara


Saturday, January 30, 2016

TUTORIAL: Snuggly Cuddly Strippy Quilt

A few days ago, my sister-in-law told us she had been diagnosed with breast cancer and would start chemo therapy this week.  Time to get busy on a quick quilt she can take with her to treatments.  Here is what I came up with:


It needed to be fast to make, attractive enough and have flannel on the back at least.

Thursday morning I shopped my closet and found two floral flannels I've been saving for the right project--they were pieced together to create a 60" x 60" back.  Not having many more flannels I worked with these cotton  fabrics, mostly the Cumberland collection by Fons and Porter for Benartex and English Oak from Moda, both about 10 years old.    (SEE THE NOTE AT THE BOTTOM FOR SMALLER SIZES)

I decided to construct it on the Bernina Q20--no feed dogs, no quarter inch foot, just free motion sewing.  That would be fast and give me a bit of practice with ruler work.  Here are the supplies I gathered:

5.5" x 60" strips of fabric, I cut and pieced 13 from fat quarters and width of fabric (WOF) yardage
60" x 60" Throw size cotton batt, this was Legacy from Pellon
Pieced back from 2 flannels, 60" x 60"

13 strips laid out in order

Back taped to table, center marked


Back face down on table, batting centered on back, first strip centered on batting


Second Strip pinned face down on first strip, ready to sew through all four layers
This process took the morning to accomplish.  I got to this stage and took a short lunch break.

OK, ready to sew.  With both extensions in place, my sewing table is 78" wide, very nice for working with this large project.  The machine was set to 10 stitches/inch, since the piecing is also the quilting. I would be creating a straight line of quilting as the strips were pieced together, sewing through the 2 seams of fabric, the batting and backing.

The ruler work foot is 1/2" wide, with the needle precisely in the center.  By placing the right edge of the foot along the raw edges of the 2 fabric strips, and the left edge of the foot along the 1/4" thick ruler, I was able to sew a mostly straight line, all the way down the 60":


This was really very quick, much faster than if I were using my regular machine due to the bulk.


After sewing the strip in place, I took it to the big ironing surface, and pressed the strip over onto the batting.  Then I pinned the next strip in place and repeated the process until the first half, from center to the outside edge, was covered:


Turn the quilt around, start back in the middle again, and cover the other half of the batting/backing.  Here it is completely covered:


You might notice there are only 11 strips sewn to the back.  I had pieced the back just a little small, the seam allowances were a tiny bit more than 1/4" mostly, and the batting may have been a bit short.  So I only needed 11 strips to complete the top.  The remaining 2 strips were a green fabric, perfect for the binding.

One more thing--because the strips are wide, 5" finished, I needed to add more quilting.  So at this point, I started again in the center and free-motion quilted a squiggly line with occasional hearts down the center, more or less, of each strip.  That put quilting on every seam, the straight lines from construction, and a curvy line about 2.5" from the straight lines.  This will hold up well with washing.  It really needed the extra quilting and I enjoyed the free motion practice.

The quilting and squaring up process took the afternoon BUT by 5:30 it was dinner time and I was done.  My husband brought dinner home when I told him I'd been working hard all day.  Good man!

Friday morning I cut those two long 5.5" green strips in half, 2.75", and made a slightly wider than usual binding.  Using the Bernina 630 and the walking foot, I sewed the binding in place, adding a hand-written label in the seam on the back.  That afternoon and evening I hand sewed the binding to the back of the quilt, a task I enjoy.  Saturday morning it's off to the Post Office and this project is done, less than 48 hours from conception to completion.

The completed quilt, approx. 57" square

The back

Hard to read but I quilted the recipient's name here

Back flipped over so you can see the simple label

NOTE ON MAKING A SMALLER SIZE QUILT:

This is such a fast way to make a simple quilt, it makes a great baby, kid's quilt or Charity quilt.  Use a crib size batt, 45" x 60", or Craft size, 36" x 46" and use strips that are 2.5" by 45", or the width of fabric (WOF).  This will require no additional quilting on the surface, as the 2" lines created from construction are enough for most batting.  Read the label!    Think Jelly-Rolls--30 strips will cover a 60" batt.  

Here is one of these quilts I made years ago for my husband.  He uses this every night, Fall through Winter, to keep comfy in his big manly chair.  It's about 42" x 64".   It's been washed many times and has held up very well.  Most of these fabrics are flannel or brushed cotton.  The back is the same floral flannel used on the chemo quilt--he keeps the plaid side up:


I could have made my sister-in-law a much more  beautiful quilt, with lots more work but that would have taken a lot of time.  This quilt is needed NOW.  I hope she likes it and that it provides a warm hug as she goes through her days of treatment.

Let's Quilt!

Barbara


Monday, October 14, 2013

Starstruck Block Lottery

My guild is starting a new project this month, using this simple block. 


To participate, we make at least one or more of these great little floating stars, in that months' designated color.  The first block made is donated to our Comfy Quilt program, and will be used to make quilts donated to children and adults in need.  Any additional blocks we make go into a lottery and someone gets to take them home for their own use.

The blocks are currently about 9" and can easily be cut down to a smaller size--very important in group swap projects!

This month the colors are your choice--Auburn or Alabama team colors--the Iron Bowl is a big football rivalry here in Alabama so we're going to see if the group that makes the most blocks predicts the winner of the BIG game.

I had a wonderful time at our guild quilt show this past weekend--winning Best of Show was a thrill!  See my post here to see what I wrote about that.  Now it's back to reality so:

Let's Quilt!

And check out Judy L's blog to see what others are doing.

Barbara