Showing posts with label sawtooth stars. Show all posts

Wednesday, January 26, 2022

ANTIQUE QUILT # 6

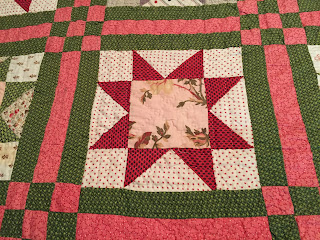
 Another purchase from Cindy Rennels in 2017. The pink and green caught my eye. And I love Sawtooth Stars. 


Interesting way to turn the corner: 

Unusual print in the center of each star:


The quilt in Cindy's booth in Chicago 2017. I put this one on layaway and picked it up in Houston later that year:


Let's quilt.

Barbara

Sunday, March 28, 2021

Latest Finish--Sawtooth Stars

 About a year ago I participated in a swap of 6" Sawtooth Stars organized by Barb Vedder of  the blog Fun With Barb. She has done several and this link shows some great tutorials on the swap blocks used in this and prior swaps. She has said this will be the last, there is lots of work to manage these free swaps, and I understand why she will do no more.

I had fun with the quilting. It is now finished except for the label, almost queen size: 


It is hard  to show the quilting. All of it was done with rulers on my Bernina Q20 sit down longarm. Simple half circle designs on the white sashing:


Point to point half circles on the stars--I figured that out all by myself: 

Curved crosshatching on the perimeter triangles  and the smaller triangles: 


Overall effect is pleasing to me. Might just give this one away to a friend who needs a quilt: 

I made and received 40 star blocks made from reproduction fabrics. I made 10 more to complete the design. To enlarge the blocks I added four triangles to each to make them 9" blocks: 

I posted more about how and I why I made this quilt here: Sawtooth Star project.

Now on to finish another top.

Let's quilt.

Barbara


Wednesday, March 3, 2021

MY JOURNEY: QUILT # 21

  Another quilt from the Special Exhibit My Joyful Journey, part of the Virtual Quilt Festival, December 3-5, 2020.

QUILT # 21: Stars in a Time Warp  90" x 90". Orignal design, machine pieced, longarm quilted, 2016 Quilted by Magnolia Longarm Quilting: 


The  Story: The blocks were a 2015 block of the week project from Barbara Brackman. Over 50 weeks she presented a fabric style or color and explained the history of that design. I  made 2 blocks a week. When trying to decide how to assemble 100 blocks, I remembered I had this John Hewson reproduction panel that would do nicely. He was a fabric printer from Colonial Philadelphia, my hometown. Since by now I am known for making Medallion style quilts, it made the perfect center. All the rest of the borders I designed as the quilt grew. It was included in the Special Exhibit "In The American Tradition", Houston, 2017. 


Let's quilt. 

Barbara


Wednesday, June 17, 2020

Design Wall Time

As I will soon need the whole design wall for a big project, I decided to finish the Sawtooth Stars top that was taking up more than half the wall:


Once I study this photo a bit, I will decide which blocks to move or rotate. This can become a never-ending task so better not to over-think it too much. I see a couple I will rearrange...

There may or may not be added borders--that is a decision for months from now when the big project is done.

Glad to have this one to this stage. I will dedicate today to finishing it so I can "clear the board" and put up the big project, which I cannot show you, but it is fun and you will like it.

I  feel like I am way behind compared to lots of friends who are finishing old projects left and right and jumping into new projects--so much is available on the Internet right now.   The secret sewing has consumed me the last month and will for the next two months then I can jump back into quilting several tops that will get done later this year. Having 9 jobs that have cancelled or been postponed from April to August has kept me home, and I am enjoying that just fine. Still waiting to hear about two more big jobs for later this year.

What are you working on? Are you feeling accomplished with projects completed or overwhelmed with so much time?

Let's quilt.

Barbara


Sunday, June 7, 2020

Sawtooth Stars

You would think that a 10 foot x 9 foot design wall would be big enough. But, no, when there is secret sewing in progress I wish the wall were twice that size.


This Sawtooth Stars quilt is just a leader/ender project for other sewing. It will be queen size when it's done.

And that step stool tried to kill me. Don't climb up on a step stool wearing flip flops. And don't be too close to the wall--you just might try to fall backwards...

No injuries but a warning to be more careful. Quilting can be dangerous.

UPDATE: The Giveaway Goal is up to 2796! Just a few more to go over my goal of 2800 followers. See this post for more information.  It's likely the Giveaway will be up with my next post...

Let's quilt.

Barbara

Sunday, May 24, 2020

The Latest New Quilt Project

While doing "secret sewing" I can't show you, I am making another quilt at the same time:


This is not the final design placement and there are many more blocks to go, but you get the idea.

The corner triangles are being sewn on as "leader/enders" while making the secret quilt. Easy and it gives me a sense of accomplishment as each star goes from 6" to 9" finished and finds a place on the design wall.

At the first Joyful Journey Retreat, one of the women was working on an old project she was eager to get finished. I really liked it and thought I would want to make one like it someday:

All of April's Sawtooth Star points are the same light off-white fabric and the centers and backgrounds are different fabrics. The sashing and cornerstones tie it all together. I like the wide variety of fabrics very much, especially in the outside perimeter triangles. But when would I have time to start yet another quilt from scratch?

While laying in bed, when I should have been sleeping, I remembered I had 40 6" Sawtooth Star blocks I received in a swap, from Barb Vedder's blog: Oh, My Stars Swap  Perfect!

I "did the math" and decided to cut 80 squares, 6" each, to provide the 160 triangles needed to surround each star. Rather than dig out 80 fabrics, my original plan, I quickly decided to cut 2 each from 40 fabrics, in a wide variety of colors.

Once the four triangles were sewn on the four sides of the star, I pressed them firmly and trimmed the block to 9.5" square. This allows the stars to "float" just a bit. To float them even more, I could have cut those squares larger, say 6.5", 7" or even 7.5". That would make the stars larger. 

Once all the stars are surrounded with triangles and trimmed to 9.5",  I will decide what sashing and cornerstones I want to use. This makes for a larger quilt and gives each star room to shine.

Swaps are notoriously challenging--I have participated in many over the years. Even though Barb's instructions were clear and spot-on, not all of the blocks I received followed those instructions. A few had bias on the background triangles instead of straight-of-grain, and the requirement to use "quilt shop quality muslin" wasn't always followed.

Adding your own fabrics to blocks received in swaps is a good way to control the quality and fix block sizes that are not exactly perfect.

I once participated in a swap of Dear Jane blocks done in Halloween fabrics--fun! It was a big swap with people from several countries and many US states. The person who coordinated it was up-front from the beginning. As she received your blocks, they would be sorted into 5 "quality levels"--A, B, C, D, and E. If you sent in A blocks, you got A blocks in return. If you sent D blocks, that's what you got in return. I can only imagine what any E blocks looked like! I tried hard to be sure I sent in A's.

Here is a poor photo of what I did with those Dear Jane blocks. I gave the quilt away and now cannot find any other photo of it:


My recommendation if you want to create a swap: choose the participants wisely, be sure all agree to follow whatever the rules are, and be sure everyone understands the rules. Also set a time requirement that allows adequate time but not too much time--most will do their blocks right at the deadline.

Let's quilt.

Barbara

Sunday, December 15, 2019

Sawtooth Swap Blocks

I love making 6" sawtooth star blocks. In 2016 I made 100 of them during Barbara Brackman's "Stars in a Time Warp" block a week sew-a-long:


So when I learned that Barb Vedder of Fun With Barb was hosting a swap I jumped in. Of course, I was at Houston when this was announced and saw it late so I was happy to be #38 out of 40 to make the reproduction list, phew!

Barb has a great tutorial for this block--try it, you might like it: Oh My Stars Swap Tutorial.

As soon as I got home from Houston I jumped on making these 40 blocks even though they aren't due until January. I'd rather get them done and sent to Barb before I start on the next project that awaits.

Here are mine on the design wall:


These go quickly and I enjoy working from small pieces of my repro fabrics.

I look forward to seeing what blocks I receive in return, early in 2020, when I will probably have forgotten all about it--the package will be an unexpected gift.

Thanks, Barb, for the Fun!

Let's quilt.

Barbara

Wednesday, September 5, 2018

An Alternative Center for The Patchwork Barn

Instead of the Patchwork Barn, I made an alternative center. It is made from half square triangles and is easy to construct. The star is 24" square, including the sawtooth borders. This design is Barbara Brackman #2165, The Twinkling Star, published under the name of Nancy Cabot in the 1930's:


Here are the instructions I  have written:

My Alternative Center 2018 BOM
The Patchwork Barn
MONTH 9

Instead of the Barn, I made a Sawtooth Star Block for the center of my quilt. I used the leftover fabric from my blocks.

NOTE--I used 3 yards of Kona Snow, an off-white, for all the sashing. The full cutting instructions for this layout will be given in Month 11. For now, save 2.5 yards of your sashing fabric for the vertical sashing and narrow sashing between blocks and use .5 yard for the center block construction.

Center Block Construction:

From a half yard sashing fabric cut:

(1) 5” x width of fabric (WOF)
Sub-cut into four 5” squares for the block corners
For the 12 light solid triangles for pieced blocks, you have a choice:
            Use a Half-Square Triangle ruler to cut (12) 4.5” FINISHED half-square triangles--this will require one additional strip of 5” x WOF
 OR:
            Cut a 5.5” x WOF strip of sashing, sub-cut into (6) 5.5” squares, cut each in half to get 12 half square triangles, these are slightly larger than needed.

To Piece triangle units for the center block: I worked from leftover fabrics from the quilt:


            Make 36 1.5” FINISHED half square triangle units
               I used a half-square triangle ruler and 2” strips,
                        Right sides together, cut triangle pairs, sew them.
     
 Cut 36  1.5” FINISHED half square TRIANGLES, mine were all red--I used 2” leftover strips and a half-square triangle ruler. You could cut (18) 2.5” squares in half.

            Join 3 HST units and 3 triangles to form half of the pieced squares.
                  Make a total of 12 of these
Join the 12 pieced triangles to 12 solid white triangles to make 12 pieced squares that FINISH at 4.5”, they will be 5” raw edge to raw edge

Lay out the 12 pieced squares and the 4 corner squares, sew into 24” block.
            I pressed all seams open, press them however you prefer.

From remaining sashing fabric, cut two strips 2” x WOF for inner sashing.
            Sub-cut into (2) 2” x 18.5” and (2) 2” x 21.5” sashing strips

Join left and right sashing to left and right of pieced block, press toward sashing

Join top and bottom sashing to top and bottom of pieced block, now your block should be 21.5” square, raw edge to raw edge

SAWTOOTH BORDERS:

To create the sawtooth borders, make 56 1.5” FINISHED half square triangle units. I used a half-square triangle ruler and 2” strips, lights and darks placed right sides together, cut and sewn into squares. They should be 2”, raw edge to raw edge. You could cut them from 2.5” squares, trimming them to perfection after sewing the triangle pairs together.


Cut (4) light 2”squares for the four corners of the borders.

Left and Right borders: sew 14 HST units together--I changed direction at the mid-point, you may prefer to have all the diagonals go in the same direction

Top and Bottom borders: sew 14 HST units together, add one light square to each end.

When sewn together, the center block is 24” FINISHED, 24.5” raw edge to raw edge.

IMPORTANT TIP FOR SEWING SAWTOOTH BORDERS:

It is very easy for these borders to “grow” as you join them together. I strongly recommend, you “ruler check” your work, with each pair you sew. Chain piece the 14 HST into 7 pairs. Decide how you want to press them--I pressed open.


Measure them carefully--they should be 2” x 3.5” now--two 1.5” FINISHED HSTs, and .5” seam allowance. If they are that size, join these pairs into units of four. Press and ruler check--they should now be 2” x 6.5”. Continue to create the border, ruler checking as you go. If you are off two threads every seam, your border will really grow.


Remember when piecing units: If your unit is not the RIGHT SIZE NOW, it will NOT MIRACULOUSLY become the right size when you do the next step.

The more you ruler check yourself, the better your piecing will be. Eventually, your piecing will be spot on, congratulations--you can stop checking now.

I check every time I make these kind of units--it is very easy to get careless. A metal tape is a good way to check the borders if you don't have a ruler that is at least 24.5" long. Do not use a paper or fabric tape--they stretch over time and are not accurate.

MY LAYOUT:

I also added 1" finished sashing between the blocks to lengthen the quilt. This layout will be provided in Month 11 if you are interested. My quilt has no applique'. The finished size is 74.5" x 97.5".


Let's Quilt.

Barbara

Sunday, December 6, 2015

Getting in the Christmas Spirit

Here's my annual Antique Quilt photo--this is the treasure I found some years ago at a Trade-Day sale in Scottsboro, AL:


Feathered Wreath with Heart motif quilted in all green squares

A "W" quilted in one area--my husband's last name is Wilkins


A Dragonfly quilted in one area--I am  a Dragonfly fan

In keeping with the Spirit of Giving, I've been clearing away some clutter and have given a dozen small quilts away this week.  Class samples I won't use again, small wallhangings, pieces I know I don't need or want any more.  Some went to guild members who stopped over to pick up something else, some went to people who attended my husband's retirement party yesterday, women he has enjoyed working with over the years.  It was the first time they met me and were surprised and happy to be given a small quilt.  It was fun to give my work away and make a little more room in the closet.  It also gives me "permission " to keep making more quilts--like I really need that permission right?  

Let's Quilt!

Barbara


Friday, November 27, 2015

Stars in a Time Warp---Ta Da!

Here they are, all the blocks from Barbara Brackman's Stars in a Time Warp QuiltAlong.


I have about 95--each time I count them I get a different number so I say "about 95".

Barbara Brackman is a quilt historian who has written many books about the subject of quilts and history.  She writes several blogs that are  incredibly full of great information.  During the course of this year, she has used Stars in a Time Warp to educate us about fabrics, quilt patterns, and the history of the times various designs and fabrics were popular.  She has a wealth of information that she shares so freely.  I'm eager to see what she comes up with next.

In many of this year's weekly posts on Stars in a Time Warp, Barbara has included ideas for setting these blocks.  As I made at least two of each block, I've been looking for a set that uses many blocks.  While I'm not sure which set I'll ultimately use, this one feels promising:


I have a John Hewson reproduction panel that might be perfect for the center:


Over the next few weeks, the Stars in a Time Warp blog will feature more setting ideas so I'm keeping my options open.  I also like these:

Hertiage Stars by Lori DeJarnette humblequilts.blogspot.com


An Antique from New Jersey--has been patterned by Sandy Klop

The bottom one uses the Sawtooth Stars as sashing--around larger Star of Bethelem blocks--that might be a challenge.  Time will tell what I decide to do--right now, I have several projects in front of this one so I'm not in a rush.

Next up is a quick baby quilt for a  new great-nephew who is due soon.  I'll be back when that top is done.

Let's Quilt!

Barbara


Thursday, June 4, 2015

Stars In a Time Warp and More

I love making these 6" blocks from Barbara Brackman.  Called "Stars in a Time Warp", each week on Wednesday Barbara's blog talks about a specific type/style/color of historic fabrics.  We learn a lot this way and the block is every easy to make.  I am making 2 each week so I really use my stash, or at least really get to search through it, as the blocks don't take much fabric.

Here is this week's style:  Neat Stripes:


 In addition, I started reproducing the antique top I bought in Minneapolis--read about it here.  A few blocks so far, being made as leader/ender blocks:


Four Economy Blocks with sashing

 
It's been fun digging through my stash looking for blues, double pinks, plaids, reds, similar fabrics to the original.  No rush on this one, I am always eager to get a project started then let it sit for awhile as I finish something started before it. 

I'm off to meet my granddaughter, Stella.  Can hardly wait!  Until then,

Let's quilt!

Barbara