Showing posts with label Sizzle Pieced Borders. Show all posts

Sunday, April 5, 2020

Free Motion Quilting--Ruler Work--Quilting Sizzle Quilt

UPDATE NOTICE--lots of photos have been added showing how I quilted the Cool Sizzle quilt.

For a lot of quilters, deciding HOW to quilt our quilts is the biggest challenge. It certainly is for me. I really like Ruler Work so do as much of it as I can.

This week I finished quilting the Cool Sizzle quilt, with the pieced borders:


While quilting it, I thought "who can I give this to?" Our niece, Kallie, who is expecting her first baby in just a couple weeks did not get the traditional "college graduation Super Star quilt" I make for all our nieces and nephews--she wasn't an official part of the family then. A couple years ago she told me turquoise was one of her favorite colors. It just seems like she is the right one to get this quilt.

Sizzle was designed by Becky Goldsmith for The Quilt Show. It was the 2019 Block of the Month. Now Becky has the rights to her pattern back and is working on having it published. She enjoyed seeing some of the border variations members of TQS did on their quilts and this is a border she wants to include. So good photos are a must.

Once the quilting was done on Cool Sizzle, I jumped on to Foothills:


I really love this quilt and am keeping it for  myself. See these posts for more information:

Last Chance

Change Your Mind

I worked with plexiglass and a dry erase marker, trying out a variety of design ideas after going through a lot of Free Motion Quilting books and YouTube videos:


I also played with paper and pencil:

When I had a plan, I just started. Only have a few blocks done so far but I am happy with the designs overall:


For Free Motion Quilting, I am working to master a few designs I really love and those will become my "go-to" designs for most quilts. Feathers are high on the list so I might quilt a simple feather border on the narrow outside border. On second thought,  it really might be too  narrow for feathers so loopy leaves is another design I enjoy--that is fast and fun.

I will enjoy quilting several blocks on Foothills each day, now that I know what the plan is.

What are you working on? Does the quilting part come naturally to you or is it hard to decide what to quilt?

Let's quilt.

Barbara

Sunday, October 6, 2019

Pieced Border for SIZZLE

Maybe you are not a fan of applique'. Why not consider a pieced border instead?


I love applique'--it just takes me a while. Since I am making two of these quilts, a Cool and a Warm, I decided to applique' the Warm version border and piece the Cool version border.

My Cool version is being made from the Kit available from  The Quilt Show Store.  I tried a few variations but I had to be able to use just the Kit fabric remaining after I finished the 9 large blocks--I didn't want to come up with a design that would require purchasing more fabric.

After "test-driving" 3 options, the border I decided on is made from 4" blocks, that are half square triangles (HST) and quarter square triangles (QST). Easy to make and I had just enough fabric to make it.

NOTE: you could make these units 3" for a narrower border--I chose 4" so the numbers here are for that size.

There are 15 of these on each of the four sides--60 total. There are 4 corner blocks that are made from HST only--white and dark blue. All 64 of these blocks are 4.5" unfinished.

My preferred way to make HST is with the Half Square Triangle Ruler. This strip of white is 4.5" wide--with two cuts I have the 4 white HST needed for the corner blocks:


I cut all the blue fabrics with the Half Square Triangle Ruler--I needed a total of 64 HST. In planning this border, I had to be sure I had enough Kit fabric left for those 64 HST--I did.  The blue fabric strips were cut 4.5".

Here the white and dark blue Corner Block HST placed right sides together, ready to be sewn:


After sewing, press toward the blue. Trim each corner block to precisely 4.5". You might notice the selvedge is still on the white triangle--I save time not cutting it off at the beginning, but I do cut it off at the end:


The Quarter Square Triangles are made from white and green fabrics. I prefer what I call the "Sew First Method". I cut strips of white and green fabrics, 5.5", then cut into 5.5" squares--15 squares of white, 15 squares of green.

NOTE: Precise quilters' math says we can cut these 5.25" square--I increased them to 5.5" to allow for a little "insurance". If cut 5.25", I have to be 100% accurate with the cutting, drawing the narrow pencil line, the sewing and the pressing.

Draw a diagonal pencil line on the back side of the white squares--I use a mechanical pencil for an accurate, narrow line. Put a white square and a green square right sides together. Sew 1/4" on BOTH sides of the diagonal line.

Use any ruler that fits from corner to corner to cut the sewn white/green squares apart on BOTH diagonals:


When cut apart they look like this:


Press toward the green fabric (note--this green is not a kit fabric, it is just used here for this demo). Notice the units are NOT THE SAME--two have the white QST on the left, two have the white QST on the bottom. This is important, you need them both:


Give each white/green QST a blue HST friend--the HST are smaller than the QST. I lined up the raw edges of the HST so they were centered on the QST:


Once sewn, press toward the blue triangle.

Trim each unit to 4.5" precisely. I place the 2.25" mark at the center of the unit, being sure the diagonal lines are diagonal. Trim two sides, rotate the block completely around, and trim the remaining two sides.

Ready for first trim, 2.25" mark in the exact center;


 After the first trim, ready for the second side trim:


Done, exactly 4.5". Make a total of 60 of these:


Lay out 15 of these units to create one border. Sew them together in pairs, then "ruler check" your work. This is important in the beginning because being slightly off with each seam will cause problems as you sew all 15.

Place the 4.25" mark at the center seam--this unit is made from two 4.5" blocks--so when sewn together two of them are 8.5": 4" + 4" + 1/2" seam allowance:

Yes, I checked every pair. I rarely had to fix anything. This when you want to find out your seam allowance is too narrow or too wide. If it is not the right size now, it will miraculously become the right size when you do the next step!

Sew 15 blocks together for the first border. When done the border should measure 60.5"--15 x 4" = 60" + 1/2" seam allowance. I use a quality measuring tape to check long borders. Fold the border exactly in half, press firmly, and "ruler check":


Ahh, perfect! Half of 60.5" is 30.25"--good to go:

What if it is not perfect? Use a ruler to check each block. When you find one or more that is smaller or larger than 4" you will know which seam to fix. I checked every seam as I made the border so didn't have any I had to fix at the end.

Make 4 of these pieced borders, being careful with the placement of the two different block units--I wanted the white all along the outer edge:


I prefer to add the left and right borders, then the top and bottom. The left and right are 60.5" long unfinished. Pin the center of the border to the center of the quilt, then pin the  two outside edges, and pin all along the rest of the border. Sew slowly and precisely--being fast is not as important as being accurate and straight.

After adding the left and right borders, press toward the body of the quilt.

Make the top and bottom borders by adding the corner blocks to each. Again, watch the placement of the HST--the white faces out, the blue faces in.

Add the top and bottom borders to the quilt, press toward the body of the quilt.


The quilt is now 68" finished. You can stop there or add another border. I had plenty of the turquoise print left so I decided on a 2" finished border of it and the same fabric for the binding. I cut 2.5" strips, 8 to piece the border.

Piece the left and right borders to be 2.5" x 68.5". Add those to the body of the quilt, press toward the border.

Piece the top and bottom borders to be 2.5" x 72.5". Add those to the body of the quilt press toward the border.  DONE!


For the binding I cut 8 strips 2.5" wide, joined them together with a diagonal seam, and pressed in half. The binding is now waiting for the top to be quilted. Making the binding now insures I won't use that fabric for something else and then hunt all over looking for it when it's time to do the binding.

I have a detailed Finishing and Binding Tutorial here.

Feel free to design any kind of border you like. It's your quilt, you get to decide.

Let's quilt.

Barbara

Sunday, September 29, 2019

SIZZLE Month 10--the Borders Begin

This is the  2019 Block of the Month from The Quilt Show. This quilt pattern designed by Becky Goldsmith is FREE to Star Members.  Join Today  to be part of the fun.

Be sure to READ ALL THE GENERAL DIRECTIONS and WATCH ALL THE VIDEOS. Each month's pattern has detailed instructions as well. 

PRIOR POSTS WITH HELPFUL INFORMATION:

Block 1
Block 2
Block 3
Block 4
Block 5
Block 6
Block 7
Block 8
Block 9

It is finally time to make the borders. As I am making two of these, the Cool Kit and a Warm/Combo version using my own fabrics, I decided one quilt will have an applique' border and one a pieced border.

The Warm/Combo is getting the applique' border. Here is the top before the borders:
Here is my Cool Kit top with pieced borders--the instructions for this posts October 6:

I had just enough Kit fabric available to make this border--I was careful when cutting fabric for the blocks. If I had fabric left over, I cut pieces from the leftovers for the next month before cutting new strips. If you run low, any blue or green fabric that looks like these can easily be substituted in the border.

FIRST, before you begin the applique' borders, READ THE INSTRUCTIONS, and WATCH THE VIDEOS. Becky has put a lot of time and information into both the Instructions and the Videos--they will really help you. Find the Applique' Instructions HERE.

IMPORTANT CUTTING NOTE:  Cut the borders wider and longer than called for. They shrink some with all the applique--you can always cut off the extra but it's harder to add more later.  I recommend the side borders be cut at least 7.5" x 64".

This post will show you how to use her vinyl overlay technique. I will also offer you an alternative method you may prefer.
I printed the border pages following the instructions in Month 10 and taped them together to form the Side Border Pattern. At first, I thought I might be able to see through it on my dark border fabric. Alas, I could not. Here the pattern is on top of the border--I was  not able to place the applique' shapes under the pattern accurately. Here the shapes are simply laying on top for the photo:


So, on to the vinyl applique' method. Using an old rotary cutter blade, I cut the vinyl overlay material included in the Kit into a 5" wide long piece--I needed two of those to be able to join them to form a 60" long piece.

I pinned the vinyl to the paper pattern and used an Ultra Fine Sharpie pen to trace the pattern onto the vinyl. Tracing is not my favorite thing. My drawn lines are not perfect but close enough:


The entire border is traced on the 60" long vinyl overlay:


Now I was able to place the prepared applique' shapes on the border where they are supposed to go. Top photo shows shapes under the vinyl:


The vinyl is carefully removed and the shapes are pinned in place, ready for sewing. You can glue the shapes down if you prefer:


It took time to trace the 60" pattern onto the vinyl and I didn't enjoy that task. I got to thinking: What if I printed the pattern pages onto Vellum???

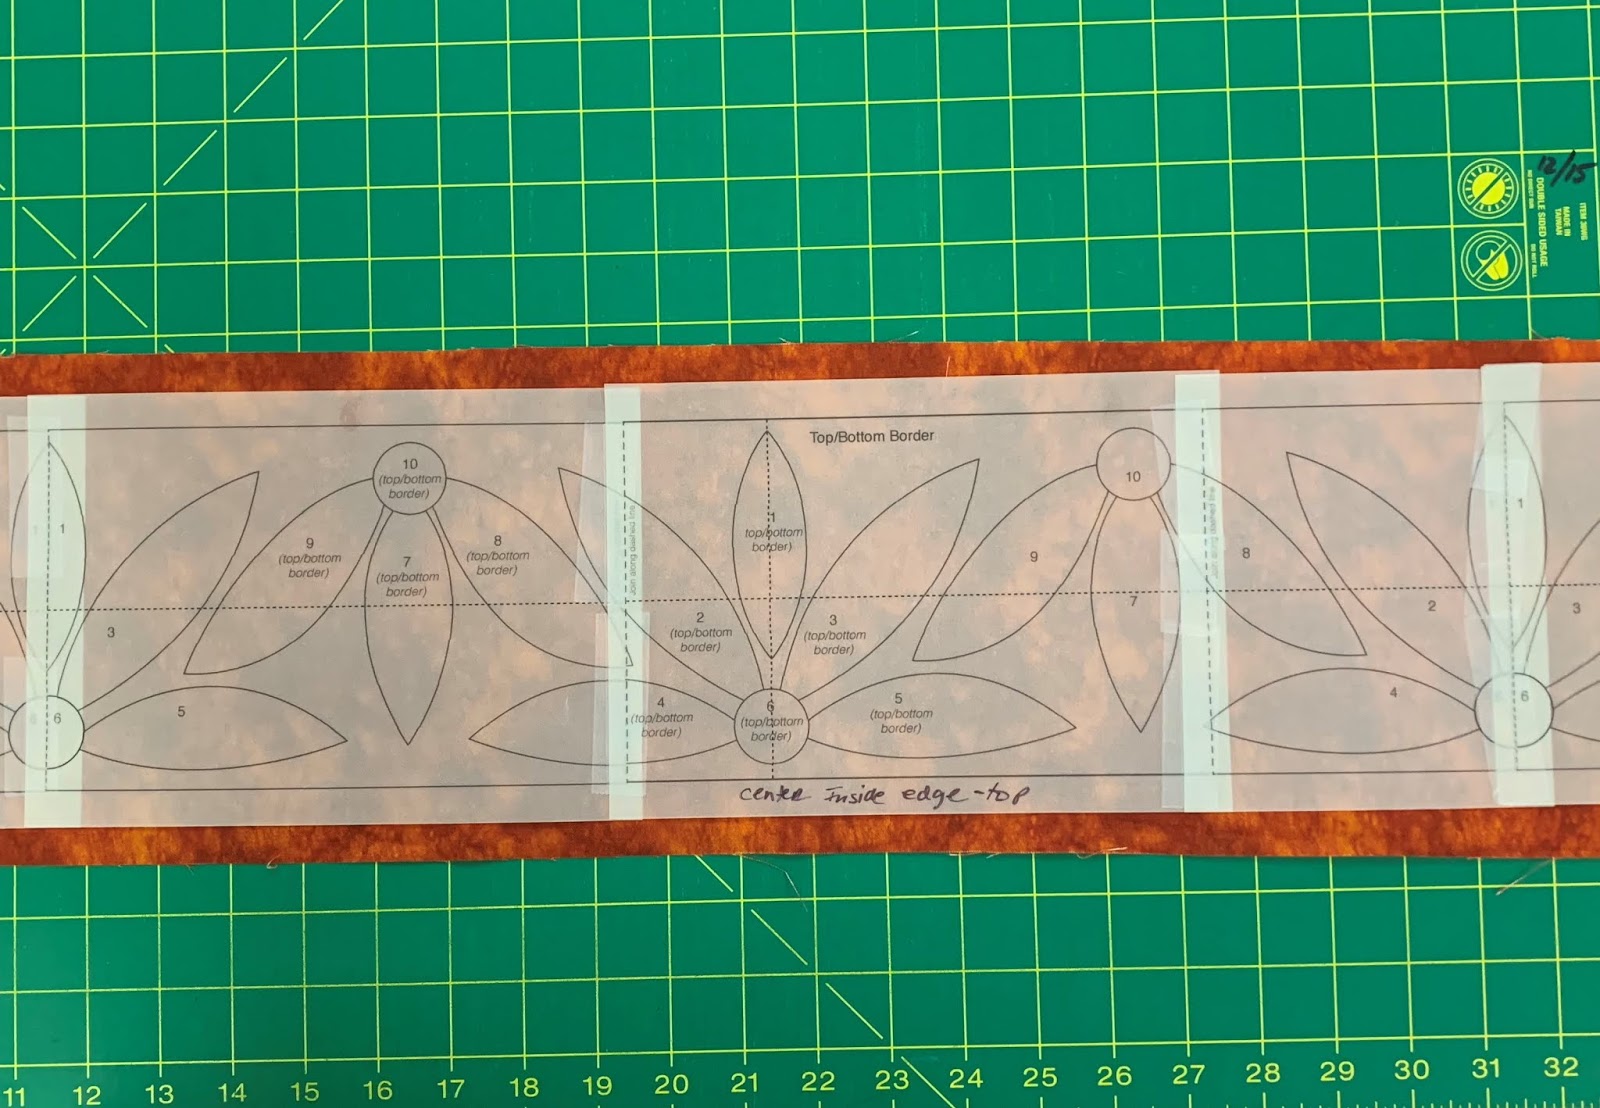
Here is the Top/Bottom border, printed on Vellum, taped together, ready to go. So much faster, so  much more accurate than my poor tracing. I can easily see through the Vellum to place the applique' shapes on the border. You don't see the prepared shapes here because I haven't made them yet--still working on the Side Borders:


In the next blog post, October 2, I will show you how I cut out the applique' shapes and prepared them for machine applique'. My method is different from Becky's--she uses freezer paper which she puts on the RIGHT side of the fabric before gluing the turned edge under. I use a wash-out fusible fabric product that I put on the BACK side of the fabric before gluing the turned edge under.

Let's quilt.

Barbara

Wednesday, August 14, 2019

Secret Sewing and Preparation

There has been a lot of secret sewing going on in my studio. The other day I finished my second Sizzle top--my Warm/Combo one:

The applique' border patterns will be released  October 1, but I have to work in advance so the blog with tips and tricks will be ready that day.

While I am making two of these quilts, I did not want to do applique' on both of them, it takes a long time. So here is my Cool Kit version, with a pieced border I designed:


I wanted to be sure whatever design I came up with could be made from the remaining Kit fabrics. If someone runs out, any blue or green that looks like these fabrics, or for the Warm Kit, fabrics that look like those, can easily be substituted in the border.

Recently, I have been hard at work on the 2020 Block of the Month for The Quilt Show. Yes, with a little help from my friends, I made it and will be heading to Denver later this week to tape the show that will reveal it. That show will air in late December. It is a commercial pattern, not my own, and I think most of you will LOVE it.

Much work goes into preparing samples and "step outs" for taping a show. Lots of coordination with the Producer, and others, and lots of practice. Here is my stack of stuff, ready for another run-through before I pack my suitcase:


As an added incentive to join or renew your membership, The Quilt Show is offering a "Taping Special" until August 20--a roll-back to the 2008 price of $42.95 for a one year Star membership. All you have to do is enter AugTaping as the Coupon Code at checkout to get this great deal. The Quilt Show.

Do you know that as a Star Member you have access to ALL the previous shows from the last 12 years? Wonderful teachers, some who no longer travel to teach, and so much great information.

If you join now, you get SIZZLE, the 2019 Block of the Month designed by Becky Goldsmith, FREE,  and get all the information as it is released for the 2020 Block of the Month--you will get that pattern FREE as well, starting in January 2020. Yes, I get paid for some of the work I do for The Quilt Show, but first and foremost, I am a FAN.

The other day I just wanted to quilt something so I created a back and batting for this cute quilt a friend gave away. It is about half done. When finished, I will donate it to my guild's Comfy Quilts program:


Let's quilt.

Barbara