
Part 1 Introduction
Part 2 The Shoo Fly
Part 3 The Old Italian Block
Now it's time to lay out your blocks in a pleasing arrangement, that means what ever pleases you, and sew the top together:


We are using an "on-point" or "diagonal" set, which means the blocks are set at an angle instead of in straight horizontal and vertical rows. We still have rows, they are just running on the diagonal.
To fill in the spaces around the outside of the blocks, we will use Corner triangles, four of those, and Perimeter triangles, 10 of those. And we need to do just a bit of math. Don't be alarmed, math is a quilter's friend once you learn the basic numbers. A calculator will do all the work.
Corner Triangles:
Divide the block size by 1.4142 to find out the finished size of the Corner Triangle:
6"/ 1.4142 = 4.2427 Round this up to 4.25"
Add 7/8" 4.25" + .875" = 5.125"
If you wanted to be perfectly precise, you would cut 2 squares 5.125" for the Corner Triangles. I prefer to have the blocks "float" against the outside border so I cut my squares 5.5". I can always trim them down later if I want. (5.25" would allow for less "float" but will work also.) Two squares 5.5" cut in half will give us four Corner Triangles.
Perimeter Triangles:
Multiple the block size by 1.4142 to find out the finished size of the Perimeter Triangle:
6" * 1.4142 = 8.485" Round this up to 8.5"
Add 1.25" 8.5" + 1.25" = 9.75"
Again, 9.75" would be perfect, I'm going to cut the squares 10", for "float". It will require three 10" squares to give us 10 Perimeter Triangles--actually, three squares cut in quarters will give us 12 triangles, we will only use 10 of them.
Cutting the Perimeter Triangles:
I need to cut a strip of fabric 10" wide by the width of fabric (WOF) about 42". First, I clean up the edge of the fabric:

Then I use a long ruler and a pencil to make marks 10" over from the cut edge:
 |
| Draw a pencil line near the bottom and another line near the top |
Now I can place the long ruler along the drawn pencil lines and cut the strip 10" wide:

I used a large square ruler to cut 10" squares from the 10" wide strip. First, the ruler is placed beyond the selvedges on the left, make that first cut:

Now rotate the fabric, place the 10" line on the ruler on the left cut edge, and cut the right edge, creating two exact 10" squares:

We need one more 10" square so open the fabric you have left and cut one more 10" square:
 |
| The leftover fabric on the right is perfect to cut the two 5.5" squares needed for the Corner Triangles |
Carefully cut the 10" squares in half twice, on BOTH diagonals, to create 10 Perimeter Triangles:

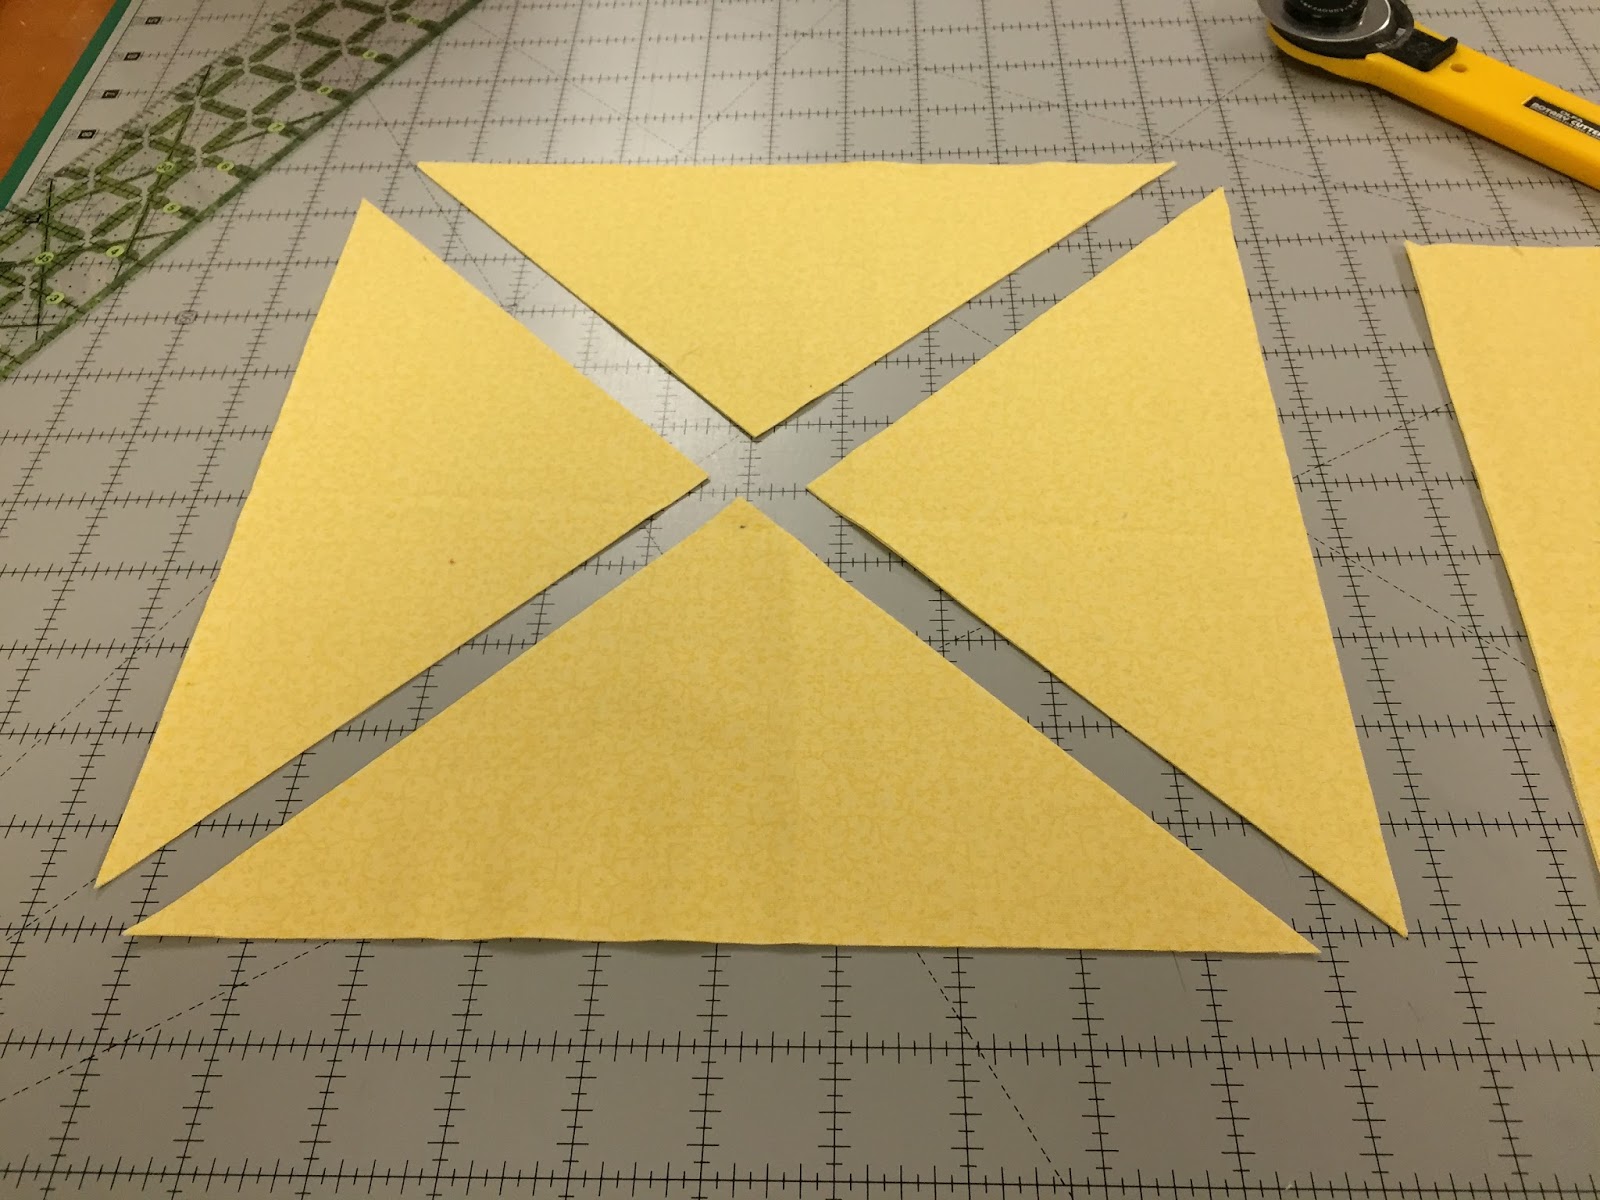 |
| Two squares, cut in quarters makes 8 Perimeter Triangles |

Cutting the Corner Triangles: Use the remaining fabric left over from cutting the 10" wide strip
 |
| Cut the leftover fabric 5.5" wide, cut 2 squares, each 5.5" |
 |
| Cut the two squares in half once on the diagonal--you now have 4 Corner Triangles |

Now it's Design Time!
It will help to work on a design wall. If you don't have one, cotton batt makes a good substitute--pin or painters' tape it to a wall if possible, use a flat surface if you must. I recommend Quilters Select Request weight batt, that is what I put in most of my quilts.
First I put up the Corner and Perimeter Triangles:
 |
| Please excuse all the threads... |
Then I added the 6 Old Italian Blocks:


Now we can SEW:
We will sew diagonal rows. Here you can plainly see the path:

Tips for this process:
1. Sew with the bias edge on the bottom whenever possible. All the triangles are bias edges here. This is easier and makes for more success for most quilters.
2. Press toward the triangles--the path of least resistance
3. Press toward the Old Italian Blocks--again, the path of least resistance
I start at the upper left and work toward the lower right. With a big quilt, I will make it in two halves, upper left to the middle, lower right to the middle, and join the two halves across the middle. This quilt is small enough to work from left to right.
I use my 16" x 20" design board to take pieces off the design wall, carry them to the machine, then to the ironing station, then back to the wall.

The Shoo Fly block is turned on top of the left side Perimeter triangle and pinned, ready to sew:

Both left and right Perimeter triangles are sewn and press toward the triangles:

I use a ruler and rotary cutter to clean up those triangle points sticking out of the top edge:


NOTE: I want to sew with the triangle on the bottom, since it's a bias edge, so I flipped this over to sew. This also allows me to see the HST intersections on the block:

First Corner all done, neat and tidy. I have pressed all seams toward the triangles:

The remaining rows are sewn the same way, pressing the seams toward the triangles or the Old Italian Blocks. Remember in pressing, put the seam you want to press toward UP at the top, use the edge of the iron to open that seam and press firmly UP toward the block or triangle you want to press toward:
 |
| Preparing to press the seam at the TOP |
 |
| Pressed toward the Old Italian block |

OK, the body of the quilt is done, now it's time for borders. This is personal preference, for the most part. It helps to know how you plan to use the quilt. This will be a baby quilt someday. Before borders it measures approximately 26" x 35". If I add 4" finished borders the quilt will be 34" x 43". That will allow me to use one width of fabric for the backing and that is a good size for a baby quilt.
Remember we cut the triangles extra large so the blocks could "float"? Now it's time to decide if you want that float. It is really just a little extra space outside the block edges. If you prefer the blocks to touch the outside border exactly, you will now trim the triangles exactly 1/4" beyond the block edges. Put the 1/4" mark on the ruler exactly on the block intersections and trim the excess:

As for me, I'm going with the float. I placed the 3/8" line at the corners of the blocks and trimmed.
Now you will carefully measure the body of your quilt so you know what size borders to cut.Measure across the top, through the middle and across the bottom, in both directions, to get your measurements. They should be similar, so take the average for the width and length. Mine is 26.5" x 35".
The biggest mistake quilters make when adding borders to a quilt is when they cut a long piece of fabric, sew it to the outer edge and whack off the excess, repeating on the other side. This pretty much guarantees your quilt will not be square and straight when done. We are going to cut the borders the exact size they need to be. I cut two borders 4.5" x 35" for the left and right sides. I prefer the way borders look when the sides are sewn on first, then the top and bottom. This is personal preference, you decide. Note I pressed the borders in the center, right sides out and I pressed the quilt top in the center, wrong side out:

Yes, I'm using a stripe. If I wanted to miter the borders at the four corners I would need to cut the stripes exactly the same, all four of them. This takes more fabric and is too much work for this project so I just cut them so they are "pretty close" to the same. I will cut the top and bottom borders after I sew on the left and right borders. Now that the yellow triangles are all on the straight of grain, I can sew with the quilt on top, borders on the bottom. This allows me to see the block intersections. If you are not using the "float" you want to hit those intersections exactly and it helps to be able to see them.
Pin at the centers, each end, and use several pins along the rest of the border. The idea is to sew straight and accurately, all the way down the seam.

Once the right and left borders are sewn on, I pressed firmly and measured carefully for the top and bottom borders. They need to be 4.5" x 34.5".
Here's a tip on how to cut those long borders. Use a calculator to tell you what half of the border measurement is. To cut my top and bottom borders, which need to be 34.5" long, I folded the border fabric in half, right side out, pressed firmly to create a fold at the mid-point, and put the 17.25 mark on the ruler on the mid-point fold, allowing me to easily cut a 34.5" with one cut:

Pin and sew the top and bottom borders. As you begin and end each border, do a few backstitches to secure the borders. This is the first time in the entire quilt that backstitching is necessary.
All borders are one and this top is DONE:

And here's a "What If" option. If you are short on fabric or you want to break up the stripe so it doesn't look like you just didn't want to miter those borders, you can use a "cornerstone" on the top and bottom borders. Here's the math: cut the top and bottom borders from the stripe 4.5" x 26.5". Cut four 4.5" squares for the corners. Sew a square to both ends of the top and bottom borders. Then add them to the quilt just the same as if they were all stripe:

Next lesson we will discuss the finishing--selecting a back and batt, basic machine quilting, and binding by machine for either hand or machine finishing.
Let's Quilt!
Barbara


