Wednesday, December 29, 2021

10 YEARS AND COUNTING

 And just like that, it's a Blog-A-Versary! This blog has been in existence for 10 years. Hard to imagine it's been that long. I am completely self-taught at this process and have learned a LOT over these 10 years. 

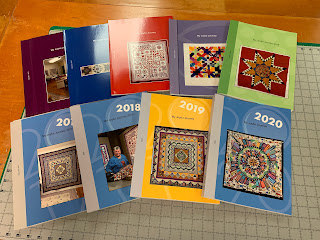
Each year I get them bound by Blog2Print so I have a complete set of the posts, minus the comments, those aren't included:


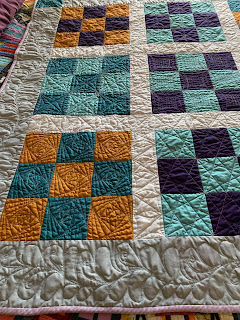
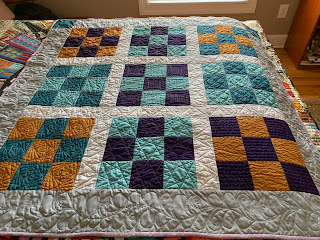
I started when I realized I enjoyed reading blogs from quilters far away and was learning a lot from them. Usually short posts, always something interesting, I thought I could do that too.

The first post was published December 31, 2011--find it here: Out With the Old...  It ends with "Welcome to my world..." 

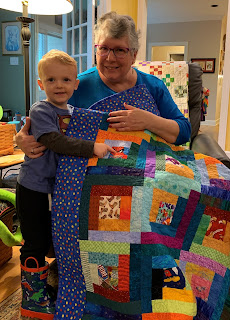
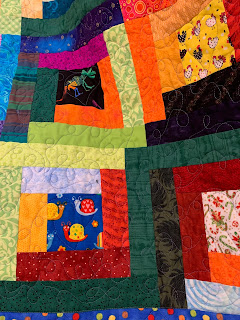
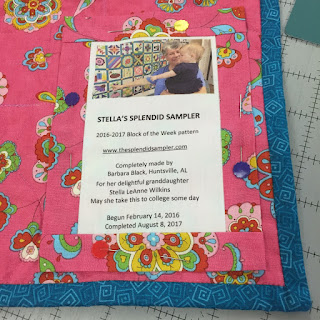
It is mostly about my quilting journey and a  place to share what I've learned over almost 40 years of quiltmaking. Occasionally, family things are included, like the wonderful Stella and Sam:

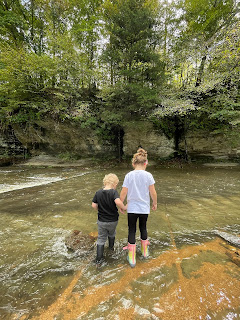
Family Vacation in the Woods October 2021

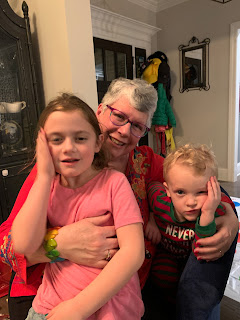
Christmas Day 2021--hold still!

The biggest change came earlier this year when Google stopped providing "follow by email" service and I had to find a new provider. I switched to Follow It and there was a bit of a learning curve. 

It seems once Follow It had your email address when you subscribed where it says Get New Posts By Email, they thought you wanted to follow MANY blogs/news subscriptions. NO, I did NOT. So it took a few minutes to Unsubscribe to all the many links they sent the first day but now that's all done and I only get a link to THIS BLOG.  Read more about that here: Changes

We are approaching 2000 followers, through Bloglovin' (my Favorite way to follow blogs), Feedly, Follow It and Google Followers. If you are NEW, I welcome you and hope you find interesting content here. If you have been here since the beginning, I sincerely THANK YOU!  And you don't have to FOLLOW the blog to see it, you can always come looking for it each Sunday and Wednesday when I usually post.

TWO TIPS about this Blog: 

1. The Search Box on the upper left is your friend--type in a keyword like Studio to see all the posts I have made about my studio and how I set it up and/or rearranged it.

2. The Tabs across the top are there to help you. TUTORIALS shows a number of posts made to teach specific things or in answer to a Reader's request for specific posts--take a look on that tab to see what is currently there.

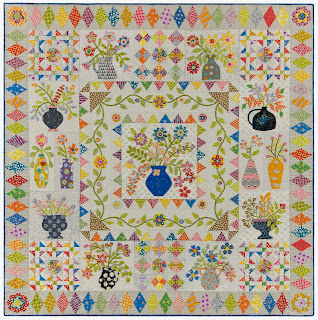
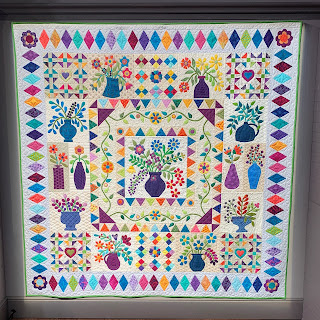
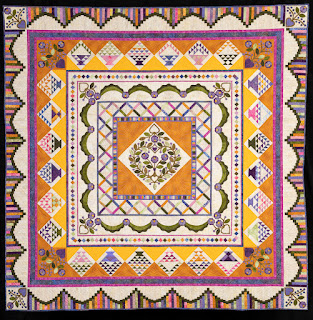
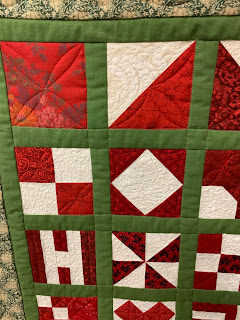
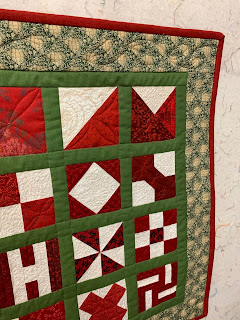
Come along on my Joyful Journey as I share tips and tricks, ideas and thoughts, as we travel this path together. While some of the posts pertain to the 2022 Block of the Month quilt for The Quilt Show, I hope the content is educational enough for those who are not making that quilt--this one has lots of applique, mine done by machine, while the pattern is done by hand. 

When we hit 2000, there will be a great giveaway--so tell your friends to join us here.

Here's to another 10 years!

Let's quilt. 

Barbara

Sunday, December 26, 2021

Garden Party Down Under--Get Ready

 On January 1, 2022, the Block of the Month quilt for The Quilt Show will begin. Designed exclusively for The Quilt Show by Australian designer Irene Blanck, it is FREE for Star Members from January 1-December 31, 2022. 

The show that will kick off this exciting project is FREE FOR ALL TO WATCH, beginning January 1, 2022. I hope you'll watch, even if you are not a Star Member or don't want to make this particular quilt. The show is so well-done and I bet you'll learn a tip or two. Watch Show 3001 starting January 1, 2022

Here is Irene's quilt:. It has that "Australian vibe" that many of us find so appealing:


Here is my sample quilt. It has my "vibe" and I also incorporated some "Optional Alternative Techniques", like pieced borders instead of needle turn hand applique borders:


Here are some TIPS for GETTING READY:

1. Have copy paper and ink on hand. The first month you will print up to 30 pages on copy paper--the patterns, the instructions for  Month 1, Irene's General Instructions, and my Optional Alternative Instructions, should you want those. I created a paper piecing pattern for the Dogtooth Borders in Months 1 and 2--you will print those IF you want to paper piece them.

2. Print & Piece Fuse Lite: if you want to print your pattern pieces on a fusible product using an ink jet printer, you will need 6-9 pieces for Month 1. 

3. Prepare Your Fabrics: the Kit instructions recommend pre-washing. I did. I separated darks/lights, made a slight 45 degree angle cut on all four corners to cut down on raveling and put a Color Catcher in each load. There was very little color loss in either load:

Trim all 4 corners to cut down on raveling before pre-washing

Color Catchers after pre-washing

This is a wonderfully scrappy quilt that doesn't require a large amount of any one fabric--you can use small pieces of your favorites. The Fabric Requirements document shows all the Kit fabrics and the amounts of each: Fabric Requirements  I provided a list of the Fabrics I used in my Sample quilt in an earlier post: Fabric Selection for My Garden Party

4. If you are new to Applique or want to consider making your quilt a "Sampler of Techniques", review some of the great shows available to Star Members on www.thequiltshow.com  I especially recommend the two Master Classes on Applique. Find those easily with the Search box at the top of each page.

I provided a Resource Guide for quite a few shows that will be helpful in making this quilt: Resource Guide

You can combine various techniques in this project: hand applique, turned edge machine applique, machine pieced borders, embroidery--the 1/8"stems are perfect for that. Trying these different techniques throughout the year will help you get better at them all and find your favorites. Irene Blanck's instructions are for needle turn hand applique.

5. Turned Edge Machine Applique: this is the method used to make my sample quilt. Eight of the Sunday Sew & Sews helped and this  method was new to each of them. I have written about it Here
and Here Those earlier posts used a different fusible product but the process is the same. It is how I made Ruffled Roses:


6. Tomorrow, December 27, 2021 I will do a LIVE broadcast at Noon Central time on how to GET READY for the Kick Off January 1, 2022. I will review these suggestions and answer your questions. If you can't make it live, all the LIVE broadcasts are available on THE QUILT SHOW channel on YouTube. You can find them easily at The Quilt Show On This Page

7. On New Year's Day be sure you watch the Show that begins January 1, 2022--FREE TO ALL--to see a complete overview of Irene's process and the Optional Alternative Techniques I offer. It will answer some questions you may have right off the bat. 

8. Additional  Resources to help you on our year-long journey:

     Monthly Blog Posts on Garden Party Down Under--available to all the first of each month--this is my primary way of  "teaching" how to make this quilt 

     Videos for a variety of techniques used in this quilt--find them under each month for the 2022 BOM  on www.thequiltshow.com 

    The Forum--the place to Ask Questions and Share Your Progress:  2022 BOM Forum

I hope you will join us on this journey! I am looking forward to a great year.

Let's quilt.

Barbara

Wednesday, December 22, 2021

Antique Quilts #2

 My most recent purchase. This one seems destined to be a Christmas display quilt each year: 


It is a terrific collection of old fabrics, I can study it for hours: 


The quilting design is hard to see but fun--large circles, perhaps marked with a dinner plate, then a small circle inside that, like saucer size: 


I love how they change direction for no apparent reason: 


The back: 

Let's quilt. 

Barbara

Sunday, December 19, 2021

Antique Quilts #1

 I'll show a few of my antique quilt collection over the next few posts.

This one usually gets shown at this time of year. I found it at a "trade day" sale years ago. The price was really low and the condition is great. The handquilting is beautiful. One of my most favorite antique quilts: 


Upon closer inspection at home, I saw a handquilted letter "W". My husband's last name is Wilkins so it was meant to be: 


Then I found a handquilted dragonfly motif--my favorite insect and one I collect images of.  This quilt had found the right person to love and care for it: 


Look at that lovely quilting: 


This one only comes out at Christmas time, to display on the unused guest bed. A real treasuure.

Let's quilt.

Barbara

Wednesday, December 15, 2021

Still Learning

 Students are often surprised when I mention a class I am taking or recently completed. They wonder why, after almost 40 years of quiltmaking, I would still take classes. Don't I know everything I need to know by now? The answer is NO, there is always something new to learn. 

Here is a good example. This little quilt is a pattern from the Temecula Quilt Company blog. It is called "12 Days of Christmas", the patterns are still available free and I have made several of these over the years. The first block has 1 fabric, the second block has 2, the third, 3, etc. Adorable, fast and fun:

These blocks were made last year, and stored with the border and binding, just waiting to be completed. So I cut the green sashing and used it as a "leader/ender" project while working on other things. 

Usually, I quilt these very simply, stitch in the ditch along the sashing, something simple in the border and call it done. This time, I wanted to try something more. The idea of micro-quilting in the white fabrics occurred to me as it would make the red fabrics pop. 

The current show on The Quilt Show features award-winning quiltmaker Kumiko Frydl, who demonstrates how she micro-stipples on very small quilts. I watched the show and was game  to try it. 

First, I did stitch in the ditch along all the sashing seams, using a dull medium green Microquilter thread. This provides the "bones" and lets me play in each block next.

Using white Microquilter thread on top, a 100 wt. polyester thread, and  light tan Bottom Line thread on top, 60 wt. polyester, both by Superior Threads, I was on my way. It was fun and easy, just slow, which took a bit of time to learn. Going slow is not my usual speed. 


Then I added simple quilting with red Microquilter in the red fabrics. Without it, the quilt didn't look done. In the busy border I knew no stitching would show up so I quilted one of my go-to border designs, a leaf vine, that I can do quickly and easily, with no marking, it's just great practice: 


So watching Kumiko's show gave me the knowledge and confidence to try a new technique.

Another quilter I enjoy learning from is Natalia Bonner of Piece n Quilt.com I have several of her books and have taken a few classes and watched lots of her videos. Recently she had a free class on quilting designs, 9-Patch Along 2.0, similar to her 9-Patch Along last year. I made a simple 9 Patch quilt and followed her instructions for a different design in each block:

The Back


About 50" square

Natalia encourages you to change up her designs if you like and I did on a few blocks, adding more lines where I wanted more quilting. 

I used wool batting because it is easy to quilt and adds great dimension. After machine washing, I laid it out on a tile floor for a couple days to dry.

For the sashing, I played with her rulers to come up with a design I liked. The outer border was a good place to practice a curvy feather vine--I used her Guide to Feathers book for ideas. I may still add some more lines in the largest feathers--a few of them still look empty to me. Or maybe not. Finished is better than perfect, right?

So, there is always something to learn from every class you take, even if what you learn is "I don't ever want to do that again!"

As I look forward to all the things I will teach for the 2022 Block of the Month quilt, Garden Party Down Under, I hope those who are afraid of applique or think it's too slow, or just haven't enjoyed it in the past, will give it a try. It will be a "Sampler of Techniques"--try something new, you just might like it. Lots of options for machine work if hand applique isn't your thing.

Let's quilt.

Barbara


Sunday, December 12, 2021

Sam's "I Spy" Quilt

 My 3 year old grandson, Sam, recently moved from the crib to a "big boy bed" and he is so proud! His mother asked me if I was going to make him a quilt like I did his big sister, Stella. Well, YES, I am. So I knew I better get started.

Presenting the finished quilt to Sam--Spiderman is his current favorite block:


I wanted it to be an "I Spy" quilt--one with lots of figures he could search for. But I only needed a 3.5" square of each of those fabrics and didn't have more than a few that would work. So I searched Etsy for I Spy Charm packs and found several offerings. Most had 5"squares and that's fine. I ordered two packs, they were exactly the same, so I had 80 squares to choose from.

Log Cabin blocks were perfect since I could put the 3.5" square in the center and cut 2" strips for the light and dark logs. The strip fabrics I bought for Sam's quilt two years ago!

Sam came to visit while I was working on it and he loved it! He kept asking "BB, is this for ME?!" Yes, Sam, it is. He woke up from a nap to find the top all done:


The quilting was fun and easy to do, loop-de-loops on the log cabins, ruler work and free-motion wishbones on the border. And I quilted a large heart on each of the 3" center squares to secure them:

The border: 


Here it is all washed, dried and snuggly:


Sam picked the back fabric--cats--and I just had to enlarge it to fit: 


Every quilt needs a label:

Stella's quilt was much larger. I wrote about it Here  And her label:

I love making quilts for my grands. Wonder what I'll do next? 

Let's quilt.

Barbara

Wednesday, December 8, 2021

Students Color My World Quilts

 Recently, the year-long class I did locally for Color My World wrapped up. Two hours a month, lecture/demo to teach the steps for that month's pattern, and all sewing was done at home. Students LOVE this format for long-term projects.

See what they created:

Sally used a beautiful dark navy backgroumd

Paula used garment silks from 40 years of sewing--and it's done

Evelyn used Cherrywood solids and used all the scraps for a pieced inner border. The Tim Holtz map fabric is perfect for the outer border

Evelyn's husband worked for Morgan Stanley--he lost friends in the 2001 World Trade Center attack. Her World Trade Center building is falling apart

Pam wanted a happy quilt so she used a sunny sky. She said she learned a lot from this quilt and "Finished is Better than Perfect"

Mary Louise used the alternative Kit and will add one final border. Her Little Houses in the City represent Spring, Summer, Fall, and Winter

Cyndi designed Skyscrapers--the Seattle Space Needle, a future Shuttle ready for launch, the Eiffel Tower and Big Ben

Cyndi's Clock on Big Ben is perfect

Several students are still working on theirs. This is a long, detailed project. 

Most of these women are signed up for another adventure for 2022--Garden Party Down Under--the 2022 BOM designed exclusively for The Quilt Show by Australian designer Irene Blanck. This class will meet every other month beginning in January 2022 at Sweet Home Quilting in Madison, AL. There are a few spaces left. Having a deadline helps keep people on target and learning tips and tricks in person is priceless! 

Let's quilt. 

Barbara


Sunday, December 5, 2021

FABRIC SELECTION FOR A NEW PROJECT

 I love fabric and the more fabrics I put in a quilt, the better I like it. My process is simple and this is the process I use to help new quilters get started with Fabric Selection.

Start with a Focus Fabric OR a Focus Theme. Themes are things like "Baby" or "Christmas" or "Fall". Each of us has something that comes to mind when we think of those themes.

Since I am more Fabric Driven, I usually start with a Focus Fabric. A multi-print fabric  that speaks to me. I use it to choose the colors for the new project. 

For Garden Party Down Under, the 2022 Block of the Month quilt designed by Irene Blanck exclusively for The Quilt Show, I started with this fabric, a Timeless Treasures fabric, designed by the late Patricia Campbell. It's called Jacobean Arbor and is probably 20 years old: 


From that fabric, I selected the color families to use and adapted them to my stash. More yellow, less peach, more lime/bright green, less olive, etc. I dug deep in my stash of fat quarters or even smaller than that. If the color was right, it made the selection cut: 


The backgrounds are a wide variety of tone-on-tone prints. I only needed a 2 yard piece for the outer borders, everything else could be cut from smaller pieces. The two pieces in the back, the blue/tan dots and the gray/white dots never made it in the quilt--they were too busy: 


And this is my finished quilt. It does not contain ANY of the Focus Fabric:


My fabrics are somewhat different from the original quilt, designed by Australian designer Irene Blanck. It's no surprise hers has a more "Australian" feel to it. Here is hers:


The Quilt Show has put together a beautiful kit of fabrics similar to Irene's fabrics. She used many fabrics, as I did, and many were old favorites of hers so the Kit is not an exact copy of hers. It simply has the "feel" of hers. You can find it in the Shop of The Quilt Show, while supplies last.

If you would like to assemble your own palette, select your favorite Focus Fabric or Theme and play. This quilt is VERY SCRAPPY so small amounts of your favorite fabrics can easily be included.

Here are my suggestions for each fabric color group I used. You can always add more or change color families:

Background:  2 yards for outer Diamond Borders—they should be cut lengthwise for Irene’s applique method. Those who piece the outer border will not have to cut lengthwise, but still can if they like.

 5 yards additional Background fabric is needed—select five 1 yard pieces for a wide variety—this is more than enough.   I love the look of a variety of backgrounds but you can use only one if you     prefer--6.5-7 yards total.

Stems:  1 yard total is needed to cut stems on the bias.  3 Fabrics, 1/3 yard each for variety or only one fabric  There is almost 600" of bias stems in the entire quilt.

Vases:  There are 12 vases and each can be made from a 10" square of fabric--select a variety and use a different fabric for each vase  OR If you prefer fewer fabrics, select 1/3 yard EACH of 4 fabrics—this is more than enough for all the Vases—each Vase fabric will be used 3 or 4 times.

 The following Color Families are strictly based on personal preference. Use your favorites:

Yellow:  4 fabrics, ¼ yard each

Red/Pink:  6 fabrics, ¼ yard each

Purple: 4 fabrics, ¼ yard each

Orange/Brown:  4 orange fabrics, ¼ yard each.  Brown for the baskets in the corners Month 2—1/4 yard is more than sufficient--my baskets are purple.

Green: 6 fabrics, ¼ yard each, for leaves

Blue: 5 fabrics, ¼ yard each

 I hope this gives you an idea how to get started on your next project. Anything goes, if you like it, use it. For Garden Party Down Under, some have asked about using 1800's reproductions, batiks, 1930's reproductions, or completely modern fabrics. Each of those choices would work and be beautiful in their own way. It's your quilt, you get to choose.

Let's quilt.

Barbara