Sunday, September 17, 2023

FULL CLASS FOR FULL CIRCLE

 Recently, I was fortunate to have a full class of 15 dedicated students enroll in a 5 Day Special Event workshop at Southern Charm Quilting here in Huntsville AL. They worked hard for all 5 days and accomplished so much. I was so happy with how the class went.

Full Circle is a pattern by Wendy Williams. I saw the quilt in 2020 and determined I wanted to make one. When I was asked to teach it at Empty Spools Seminar in March 2024 I had to get the sample made:

90" x 90" 

I loved the fabrics I selected, some are 20 years old but real favorites of mine. The spectacular quilting was done by an amazing local longarmer Patty Wilson. I love everything about her quilting on this. See this blog post with more details of the quilting: Full Circle is Quilted

Hoping to get about 10 local students for this class here at home, I was thrilled when 15 enrolled. Five flew or drove in from out of state, the rest were local. Six states were represented in the group. They may have started the week as strangers but they left as friends. 

Everyone learned a lot and got so much done. As a teacher, you think you know what can be done in the time allotted but you are never sure until you teach the class. As I will have 24 students at Empty Spools I was eager to see if my plan would work. It does!

There is a substantial Supply List for this class and Fabric Selection is key. I offered a day at the shop where I would help anyone who wanted hands-on help picking fabric, about a month before the class. Here are my fabrics: 

Here are some photos to give you an idea how the week progressed.

The first day I gave each student a set of labels for each of the 9 blocks and Borders--they put them on their Ziploc bags to keep organized:


My biggest concern was Block 2, Flower Garden. It takes time to prep the circles and hand embroidery can take awhile. Most students got the stems sewn in place so they could move on--the hand work can be done later. Some used machine stitches for the circles so they got them sewn on: 


Learning to paper piece using freezer paper as a foundation was new for most students. The results were excellent:


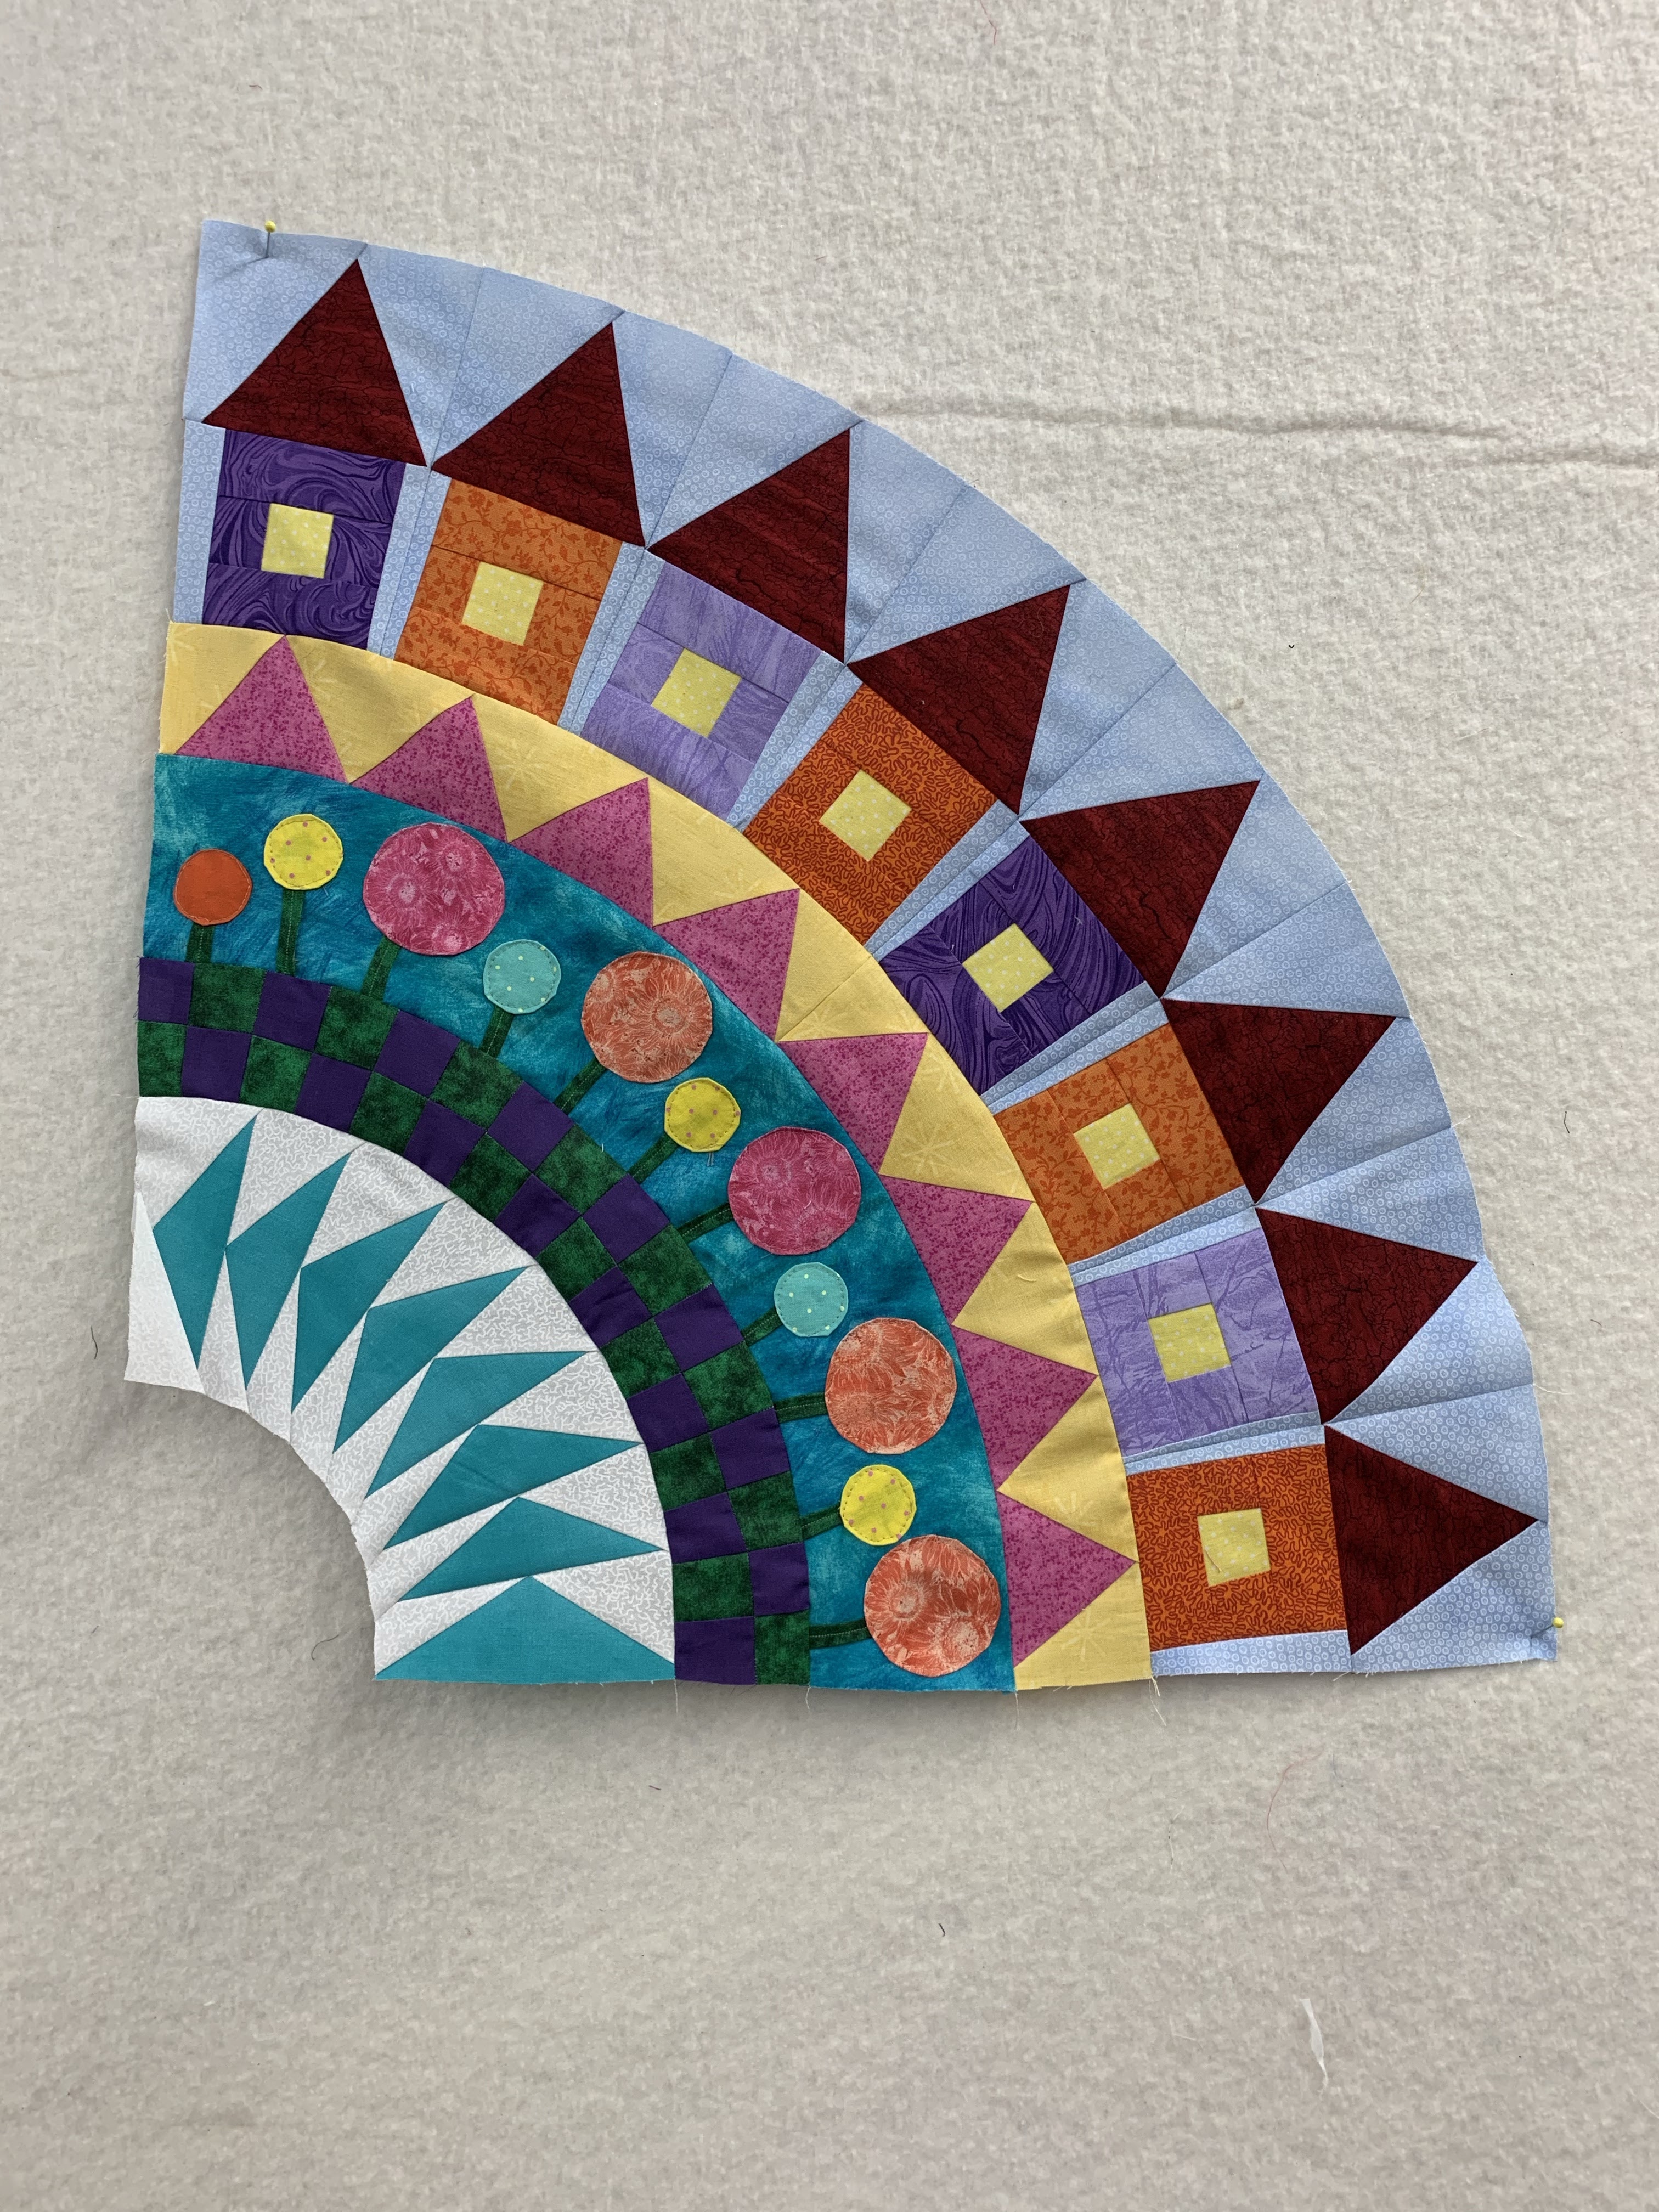
Learning to sew curves is another technique this quilt project provides, it's not hard, just don't be in a hurry: 

By day Two we had made 4 "blocks": flying geese, checkerboard, flower garden, and houses, AND learned how to sew the arcs together: 


Mid-week we had a Field Trip--out to dinner at Guadalajara Mexican Restaurant for those who wanted to come. We had 17 including a few spouses. Joan snapped this shot and I'm glad she did. After dinner anyone who wanted to come see my studio was welcome since I live very close to the restaurant:


I was delighted my friend Jan Davis was in the class. She and I have a "mutual admiration society" thing going on. She is a local hero, having flown on the Space Shuttle three times. The first day I embarrassed her a bit by making sure everyone in the class knew who she was, most did not. Young women today may think women have always been able to do anything they want but many of us remember the struggle to succeed in a "man's world" should we have chosen to pursue such a career, as I did in the United States Marine Corps and Jan did at NASA.

Jan has just released her first book, Air Born,  the story of her dad's life as a B 17 pilot in WWII who spent 21 months as a POW. It also includes her own story as an Astronaut. Many of the students bought copies of her book which she graciously autographed, and she even posed for pictures with those who asked:

Jan with Sandy F: 


The week flew by for all of us. I told the students in advance to expect to be tired at the end of each day and they were. But they hung in there and were rewarded for their efforts.

THE WALL, the last day of class--I was so happy with how much was accomplished by each student:


Japanese/Oriental style fabrics from Lisa C:


Happy Houses and everything else from Kari:


How about making this quilt with Neutrals as Jan did: 


The mandatory "class photo" after "graduation". What a wonderful group of quilters this was, I am honored they chose to spend a long 5 days with me. They taught me things too:


There are just a few spots left in this class at Empty Spools Seminar March 2024 . See this blog post about Full Circle at Asilomar

If you prefer to take the class here in Huntsville, I am very happy to say I will offer it once again at Southern Charm Quilting May 6-10, 2024. The Class Fee includes 5 days of detailed instruction, the pattern, my 10 page Handout of "Changes, Tips and Clarifications", lunch the first day, a $100 gift card for store purchases, and a day when I will be in the shop for Fabric Selection assistance, about a month before class begins. 

I offer a huge "Thank You" to this fine group of students and look forward to seeing their completed quilts, whenever that may be. And a "Thank You" to Southern Charm Quilting, Cindy and her staff, for taking a leap of faith to offer a 5 day class with me. Several students said this was the perfect place to take this class. Those who slept in their own beds were happy and those who slept at the Spring Hill Suites hotel nearby raved about it. I hope you join us next year. Sign up now as I expect this class to fill with 20 students as people see what their friends have done so far.

Let's quilt!

Barbara


HAND QUILTING

I enjoy hand quilting. Because it takes so much more time than machine quilting I don't do it a lot.

Recently I completed a small quilt I hand pieced and hand quilted, HEXIE STARS:

40" x 40" 

Detail 

It has wool batt, making it easy to hand quilt, and very soft. The downside to wool is that it costs more and should not be dried in a hot dryer. I always indicate on my label if a quilt has a wool batt and that it should be air-dried. This label was made 2 years ago so needed an "update" when I finally finished this quilt:

A few weeks ago I wrote about a New OLD Quilt I recently bought. As I like to have a handwork project available for "slow stitching" in the evenings, I put a small quilt together last week. It is a tribute to the antique.  While I AM making a full-size reproduction of the original, the Goose Track blocks are a variation style so the blocks are easier to piece. I did make 4 Goose Track blocks with Y-seams, as the original maker did hers, but knew few people would want to do that. 

So here is what I am doing with those 4 blocks. I wanted to replicate the quilting motifs used in the original quilt, feathered wreaths in the blocks and feathered plume vines in the borders. Rather than use shirting fabrics for the background, I used white so you can really see the quilting. And wool batt is so easy to quilt through: 


A few more of the quilts I have hand quilted include:

42" x 42" 
        
Detail--black thread

Detail
If you are new to hand quilting, start small, there is a learning curve:

14" x 15" 

This one took me 7 years to complete. It won Best of Show, Heritage Quilters of Huntsville, 2011:

    A-Round With My Friends, 68" x 68" 


If you want speed, try Big Stitch quilting. I find it faster than fine hand quilting. It uses thicker thread, I like Perle cotton size 8, a large needle and doesn't take too learn to learn. Here are a couple I have quilted with Big Stitch:

Antique Rose Star, 76" x 76"


Charming Sampler Red 33" x 33" 


Recently a great student friend asked if I would offer a hand quilting class locally as she wants to improve her hand quilting skills. Not expecting much interest from local shops and knowing it would be months before that could be arranged, I offered a "Pop Up" two hour class in my home. With only a few days notice we got one other interested student. 

Mazie and Betina came and had good time while learning a variety of tips for both fine hand quilting and Big Stitch quilting. I dug out lots of threads and other tools, and gave them each a simple "sandwich" with wool batt to try. See those smiles:

Betina and Mazie


Some tools of the trade


Do you hand quilt? It does make for a cuddly quilt--it uses half as much thread as machine quilting. It can be hard on aging hands so I save it for very special quilts, and use a "hybrid" method--I do machine Stitch in the Ditch quilting first, to anchor seams and provide stability to the quilt. Then I hand quilt where it can really be seen and appreciated. Works for me.

Let's quilt.

Barbara

Sunday, September 10, 2023

GOODIES FROM STEADY BETTY

 Recently I was sent some products from Steady Betty to try out and review:

I have the Steady Betty Bridge Supreme on the cabinet bed of my machine and have used it for years. It allows you to sew all those half square triangles or flying geese (shown here) without having to draw a line. The lines are here so you can see the process. The point of the fabric runs along the 1/4" line on the Bridge. If sewing down the center of the square as you would for Snowball blocks, etc., the point of the fabric would run along the 0 CTR line. There are lots of additional markings as well. Note, there are two of these in the package--mine has lasted in place a long time:


I am using the Steady Stiletto II--I love a stiletto and use one with all my piecing. This one feels good, it's smooth wood, lightweight and has a foam tip on the flat end that really holds the fabric securely: 


Package information

These next two items are both really cool. The Steady Betty Pro Ultimate Pressing and Design Surface is lightweight, a great take-to-class tool, can be used for pressing AND as a Design Board--I use design boards all day long as I move blocks from the sewing machine to the ironing station and back again. There is foam on both sides of this 13" square board:


The Steady Betty Wooly Ultimate Pressing and Design Surface is 13" x 17". It has the foam on one side and a wool pressing surface on the other side. If you have become a fan of wool pressing mats, as I have, you know how much it helps improve your piecing to press with a wool surface:

Each of these boards has a little hanging tag making it easy to carry too.

Check out the Steady Betty website  to see ALL the many products they carry--things you might need. Also check them out on YouTube and Facebook--a link to both those pages is on the Home page of their website. This is truly a "mom and pop" business who will deeply appreciate your support.

If you see something you like, tell them I sent you. Also look for their products at  your local quilt shop, if you are fortunate enough to have one near you. Then you are supporting TWO small businesss.

Let's quilt.

Barbara


Friday, September 1, 2023

HOMEWARD BOUND -- MONTH 9

  This quilt is the 2023 Block of the Month quilt for The Quilt Show. It was designed by Sarah Fielke exclusively for The Quilt Show and is only available at The Quilt Show. The best news is it's FREE for Star Members of The Quilt Show. Each month in 2023 a new part of the quilt is released for download to Star Members. 

This month we finish the wide applique borders by adding the Birds and more leaves.

As always, I strongly recommend you watch any videos prepared for this month. They are important additions to the pattern instructions. 


First, we add the remaining leaves to the four borders. If using the Kit, here are the fabrics to use:

VINE LEAF SMALL: Tiny Stripes Moonglow  8
                                     Tiny Stripes Fern             8
                                     Tiny Dots Lilypad           8
                                      Dragon's Breath Matcha   8

VINE LEAF LARGE:  Roman Glass Emerald      4
                                      Paperweight  Lime           8
                                       Tiny Stripes Fern            8 --these go on the ends of the 8 vines
                                       Dragon's Breath Shire     8

Once all the leaves are in place, you can add the FOUR BIRDS on the top and bottom borders. 

BIRD BODY: Tiny Dots Bluebell     4 Right Side Up  4 Reversed
FRONT WING: Tiny Dots Candy    4 Right Side Up  4 Reversed
BACK WING: Roman Glass Pastel  4 Right Side Up  4 Reversed


I used Print n Piece Fuse Lite to make the birds, printing four of them and drawing the other four, which are Reversed. If your printer will print in Reverse, you could print all 8 of them. This product serves as a template and a stabilizer. Most of it will wash out when the quilt is completely finished and quilted. 


Print n Piece Fuse Lite fused to the wrong side of the bird parts: 

I used Quilters Select Fabric Glue Pen to turn the seam allowances over onto the back of the PNPFL patterns. Note a few places you need to clip to be able to smoothly turn over the seam allowance:


There are several previous blogs I have written about this "turned edge machine applique" technique. Here is the TUTORIAL and another with MORE DETAILS The product used in these earlier blogs is very similar to Print n Piece Fuse Lite.

I did all the Bird applique by machine. You can do it by hand with the turned edge prepared shapes if you prefer. I was in  a hurry.

I chose not to do the very tiny Heart that is reverse appliqued to the bird. My birds just don't have a heart. I also chose to omit the very tiny eye--mine will be either hand embroidered OR I will use tiny black buttons. Sometimes you just have to say "I am not up to that."

UPDATE: Here is how I solved the "sightless bird" issue: I used small black snaps for the eyes. You could also use a permanent fabric pen to draw them:


OK, now to add the Left and Right borders to the center of the quilt so you can:

1. Complete the Vines
2. Add the four remaining birds

When joining the Left and Right borders to the center of the quilt, be careful to keep the loose ends of the vine out of the way as you join the Left and Right borders to the quilt.

Before you can place the four birds that are on the Left and Right borders, you need to complete the vines as they travel around the the corners of the quilt. 

I used a ruler to be sure the vines cross each other on a 45 degree angle, right in the middle. This also shows how I placed the birds so they would each be about the same distance away from the Star points: 


This isn't perfect but it is pretty close and from any distance looks fine. Much better than if I had just "hoped" I got them close to the middle:

There is a lot of work to finish these four wide applique borders, but once done, you are in the home stretch. I found the rest of the quilt went together quickly, relatively speaking...

Next month we made the next pieced Half Square Triangle borders, very similar to Month 5. 

Let's quilt.

Barbara