Tuesday, January 31, 2023

HOMEWARD BOUND -- MONTH 2

 This quilt is the 2023 Block of the Month quilt for The Quilt Show. It was designed by Sarah Fielke exclusively for The Quilt Show and is only available at The Quilt Show. The best news is it's FREE for Star Members of The Quilt Show. Each month in 2023 a new part of the quilt is released for download to Star Members. 

Even if you are not making this quilt, these tips may be of interest on other projects.

RESOURCES TO HELP YOU: 

Watch BOTH videos Sarah provided for Month 2.

Watch the Show again to remind yourself of all the goodness to come.

Read the pattern carefully before beginning.

This blog is also intended to supplement the pattern and will often show what I did wrong to save you from the same mistake.

MAKING CIRCLES:

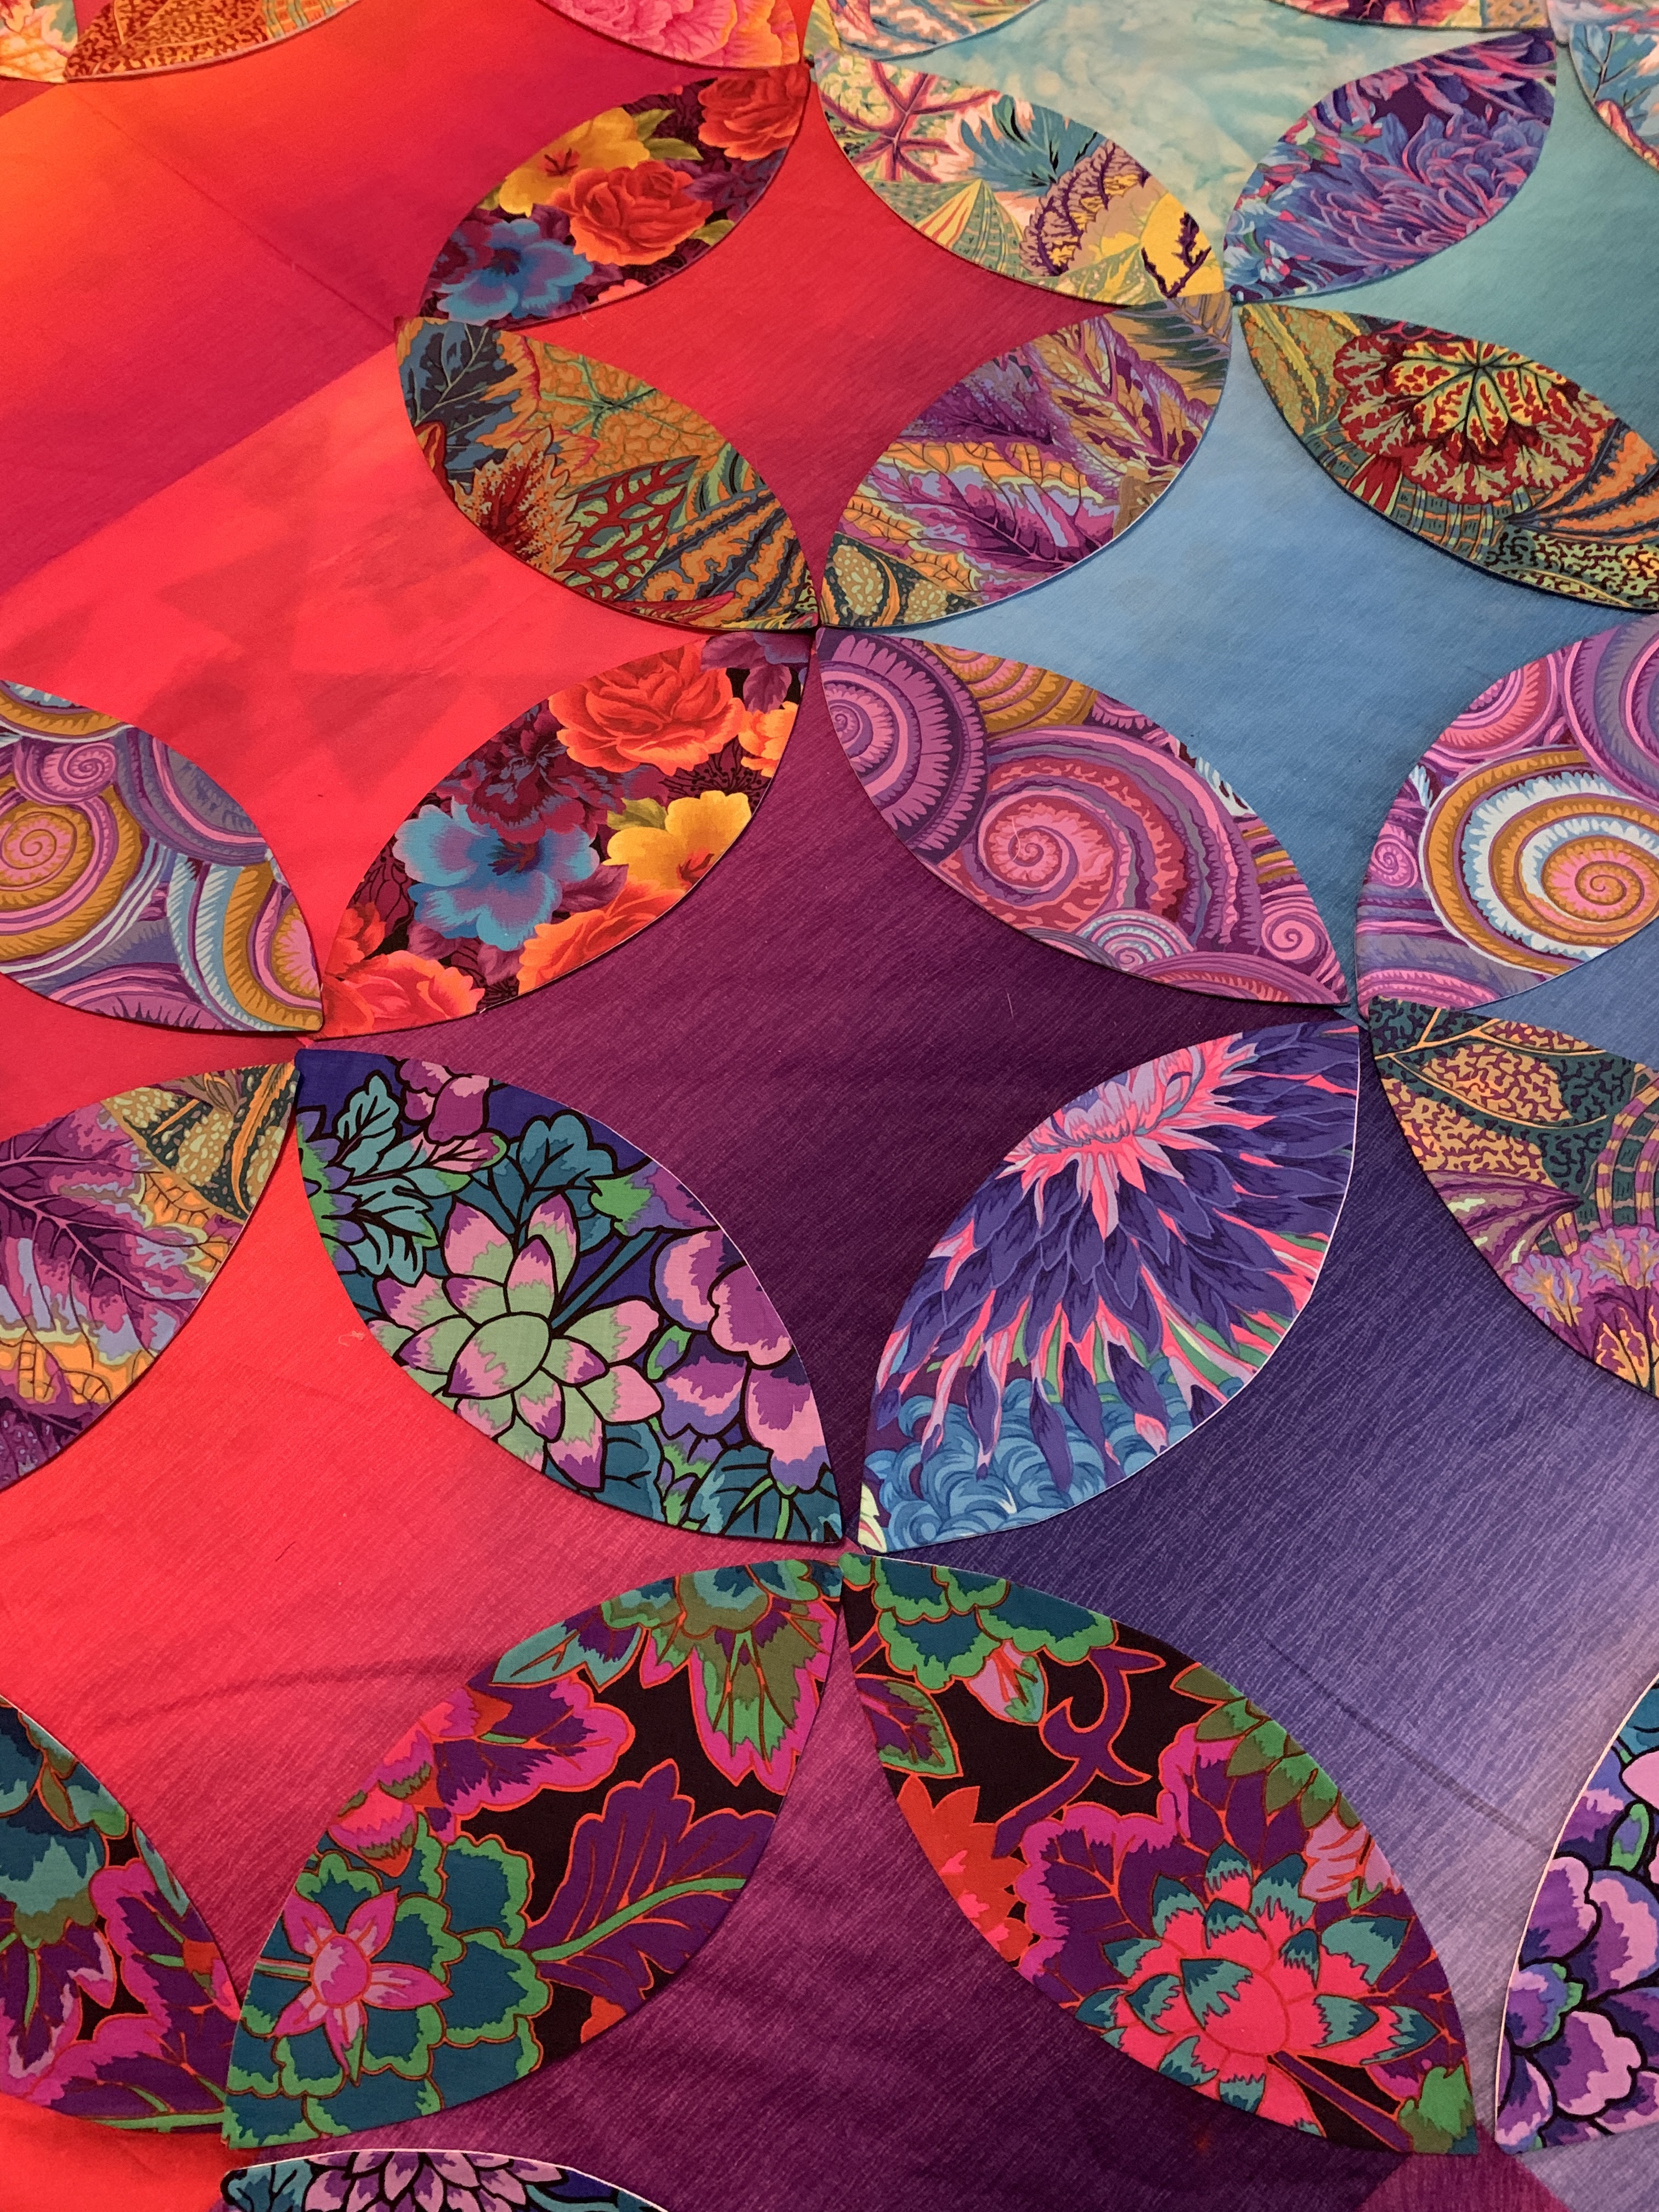
This month we start making circles, a lot of circles. Sarah calls this design Hollyhocks:

There are 116 circles in 5 different sizes--we make some this month and the rest in Month 3.

Sarah has a nifty way of making turned edge circles using cardboard templates and aluminum foil. You simply must watch the show--it's FREE for EVERYONE all of 2023--to see her amazing method: Show 3201  Those who bought the optional Accessory Kit have these templates for her method:


When making my test blocks, I didn't have the Accessory Kit so I made the circles with Karen K Buckley's Perfect Circles. I know how and they work great. Watch Karen show you how she does it: Show 2007

 I draw the circles on the wrong side of the fabric, using a pencil, and at night I cut them out, gather them using quilting thread, and slip the templar circle inside. A good dose of sizing, a hot, dry iron, and I leave them overnight to dry. The next day I make more:


PREPARING THE BACKGROUND: 

The four backgrounds are cut 10.5" according to the pattern. This is the exact size needed to sew into the quilt. I wished they were cut 11" as I spent a lot of time holding them while doing all the applique. The downside to this is you might not be able to cut FOUR squares 11" from your background fabric. There is enough to cut 3 from one 11" strip x Width Of Fabric (WOF) and one more from the next  strip. But I know people get nervous about "running out" of Kit fabrics so do what makes you comfortable.

If you cut the background 11", be sure you allow for that when tracing the stem placement lines and securing those stems to the background. This is cut 11" and I drew a 1/4" line around it to remind me that is the size the block needs to be trimmed to when all the applique is done. It will be 10" when sewn into the quilt:


Sarah has excellent instructions on tracing the stem placement lines in her video. She uses her metallic pen, you can use a pencil. The line will be covered by the stem: 


With the lightbox turned off you see how clearly you can see the placement lines: 

What NOT TO DO: When I cut the pattern on the diagonal line as explained in the video, I accidentally cut the most important part OFF--the little diagonal line on the first page that will show me where to align it with the second page. I simply used a pen to draw that line back on and I was back in business:


Because someone will ask, this is the inexpensive lightbox I bought two years ago to work on Garden Party Down Under. It came from Amazon, is very lightweight, works great, and it cost me $21.58. Last week it was priced at $15.98:


The next what NOT TO DO: I didn't realize the 10.5" square was the actual size I needed so I didn't place the stem all the way to the edge. When I realized that, I knew I needed to add a tiny bit more stem to each of the four blocks. I could do it the hard way--take some of the stem off, join more stem, re-sew the stem back in place. OR the easy way--lay a bit more stem in place and cover the seam with a leaf. 


Leaves are added in Month 3 and I will have something VERY IMPORTANT to say about those next month.

MACHINE APPLIQUE:

To sew the stems on the background I usually do machine applique. It's much faster than hand applique and usually a lot of the stem is covered with motifs anyway. I use a Blanket Stitch, #1329 on my Bernina 765. W 1.0 L 3.0:


I use thread that closely matches the stem on the top, and a neutral color thread, Quilters Select 80 wt in the bobbin. On the left I used white thread so you can see it, on  the right I used green that closely matches the stem, completely invisible. You can use monopoly if you like but I prefer colored thread: 


Alex Anderson has a great little class on how she does this, I learned it from her, so take a look at her video for more help: Machine Applique of Stems on Neutral Blooms

For hand applique, I like Quilters' Select Pre-Wound bobbins. It is fine, strong thread and I always have the color I need:


There is a trick to using fine thread for hand sewing successfully. Tie a tiny knot that secures the thread to the eye of the needle. This works great for silk thread, and this 80 wt. and any other fine thread you may want to use for hand sewing. Hard to describe in words, maybe this video in an earlier post will help explain it:


However you sew the stems and circles, enjoy the process. You have two entire months to get these four blocks done. 

My sample quilt is complete so far into Month 6. My background is different because I got the Kit two months after starting the test quilt. Most of the fabrics are the same as or very similar to the Kit fabrics. I had a jelly roll of the Tula Pink fabrics to work from:


Share your progress and ask questions on the Forum. When you share on social media, please use #thequiltshowBOM2023 and @thequiltshowsocial and @sarahfielke.

Let's quilt.

Barbara

Sunday, January 29, 2023

WESTERN SUN IN TENNESSEE

Recently, I taught for the Needlechasers Guild of Iuka, MS at their winter retreat. This was the fourth time I have been to their guild over 15 years so it's like going to a family reunion. 

I have been teaching locally for 35 years and on the national circuit for almost 10 years. Eventually, that will stop--travel is tiring. But for now, when I have an experience as great as this one, I know I am doing what I should with my time.

Held at Pickwick State Park in Counce, TN, the Lodge is a lovely facility with a great staff, good food, and very nice rooms. An easy 2.5 hour drive for me, I was checked in by 3 pm on travel day. The view from my room:


The class sample doubles as my bedding on these trips: 


This group wisely chose Western Sun as a two-day class. We started getting things set up about 8 am for class to start at 9:30. It takes time to get almost 30 students set up, and another dozen or so who were just attending to "retreat", not take the class. More tables and chairs had to be brought in quickly but all was well by class time and we got started.

It makes me laugh to see what dedicated "retreaters" bring to these events. I wish I had better photos. Many brought their own sewing chair. All brought their own little table with a small iron and wool pressing mat. The jumble of electric cords running in all directions gave me pause and I made several announcements to "mind the cords!" We didn't blow the power and that's a very good thing:


I love this quilt and I love to teach this class. See these posts for more details about Western Sun:


Big Circles

There are a few new techniques for most students to learn for this particular quilt. But I want to to teach more than just the specific project. For me, it is a successful class if EACH student, regardless of skill level, leaves class saying "I learned MORE than I thought I would." 

Teaching is my legacy for the future of quilting. I share tips and tricks for successful piecing: the cutting, the sewing, the pressing and, other steps if there are any. Like drawing diagonal lines on the back of fabric. Or making big circles. Hand or machine applique that big circle to the block with it's secret part that holds it all together. There is so much to learn. 

Class is run with military precision as you might imagine. Having two days to teach all I want to share with this quilt was a luxury. I wasn't the only one tired at the end of the day. About half the students had their first block on the wall at the end of Day 1:


I was thrilled to be greeted with THIS wall when I came to class the morning of Day 2. They stayed up sewing for quite a while:

Here are just some more photos to give you an idea of the fun we had along with the work put out by the students. I regret I didn't get a photo of all the people standing together but they were just so BUSY!

The young'uns, Marcella and Shelby, good friends who only get to spend time together at retreat. They learned a few things. I love having "young" women in class, meaning at least 25 years younger than me. These women let me know the future of quilting is bright:


Kathy Y told me at breakfast Day 2 she had 5 blocks done. I was blown away she made them all the same. I LOVE when a student makes the quilt her own so she got her own wall: 


Day 2 was dedicated to making Flying Geese sashing, learning several ways to do that. Freezer paper foundation, newsprint foundation, four flying geese at once, a couple other methods. I loved the scrappiness of this set of FG sashing:

There has to be Show and Tell. Lynn B has an excellent sense of color and design. She is close to retiring from her day job and we talked a bit about how she can move into teaching classes. She has a lot to share: 

Lynn B showed me this "work in progress" long in the making  It is a Sue Garman pattern, Pennsylvania Stars. I have the pattern for "someday" and would be delighted to take a class with Lynn to get started. Those are SMALL geese, 2" wide x 1" high: 


On Day 3 I stopped in the classroom to say goodbye. Some of the women were still hard at work: 

I loved how free with color and fabric this student is. She is not afraid to mix it up and use what she has:  


The fog rolled in after an evening rain the last night. I delayed my departure a bit until it lifted: 

The roaring gas fireplace in the lobby made a nice place to gather.  Pickwick Landing State Park Lodge

 All in all, this was a very nice location for a Retreat and/or classes. Being off-season, made the cost reasonable too:


Many of these women are also  members of the Cross City Piecemakers guild of Corinth, MS, where I will be teaching in July 2023. They think they may have to plan for 50 students--my maximum. Everyone who saw that class project said "Sign me up!"

I had such a wonderful time, and was rewarded with so many lovely thoughts, comments and thanks by everyone. When I get tired of traveling to teach, I will think of the Needlechasers and our time together this past weekend. Ladies, I will come back to you any time. Thank you so much for trusting me with your time!  

If you follow me on Facebook or Instagram, you can see some of their "testimonials" about the Retreat from their perspective. Some told me this was their first class ever. One was making her first quilt. Three women who follow my blog joined the guild that week so they could take the class. And some are very experienced quiltmakers. We all had fun, and learned a lot. 

Let's quilt.

Barbara


Sunday, January 22, 2023

COLOR OR CONTRAST?

 As you are reading this, I am finishing up a 3+ day trip to the Needlechasers Guild of Iuka, MS. We are at their annual Retreat--at Pickwick State Park Lodge in Counce, TN.

There is a great statement I learned about quiltmaking years ago on a episode of "Simply Quilts" with Alex Anderson. "Color gets all the credit, but Contrast does all the work!"

I made this top years ago to prove the point. Each of these blocks is sewn in the EXACT SAME WAY--meaning all the pieces are exactly the same size and in the same location. 

It is the placement of light, medium and dark value fabrics that determines what you see:

I really like blocks that appear hard to figure out. And color and contrast can make that work for you.

Here is a simple quilt that is special because of placement of contrasting fabrics: Simply Serene , pattern available on Etsy:


Here is a very simple antique top I bought years ago for the lovely collection of old fabrics. It was only when I hung it on the design wall to photograph that I saw the distinct pattern that was no accident:


Here are some Western Sun star blocks made the first day of our Needlechasers Guild retreat. In most, the star is prominent. But in a few, you have to really look to see it. We call these “Maverick” blocks, same design, color and contrast determine what you see:

The next time you want to just PLAY, take a favorite block and change the color/contrast layout. See how many versions you can make that are different.

Let Contrast do some of the work for you as you make great quilts.

Let's quilt.

Barbara

Sunday, January 15, 2023

Prepping Handwork

 In a few days I will be teaching a two-day class with the Needle Chasers of Iuka, Mississippi, at their annual retreat. These are a great group of women and  I look forward to being with them again, for at least the third time. We will be working on Western Sun. Here is my "wild" version:

Wild Western Sun

And the more traditional fabric selection:

I still have a lot to do to get their substantial kits ready. But what I did first was prep some handwork for me to have for the evenings. This is an important quilt for me and it is taking some time. The circles will be prepped with Karen K Buckley Perfect Circle templates, then machine appliqued in place. I did try Sarah Fielke's aluminum foil technique for circles--I believe I will be faster with Perfect Circles.

First, I marked the circles on the background with a chalk pencil. Then I traced either the cutting line or the finished size line, depending on the size of the circles onto a variety of fabrics. I will decide which fabrics I want for each background and prepare them:


If time permits, I will do some simple embroidery stitches, as I did here on the first section of this "block" I made: 


There are lots of 1/4" bias stems already made--they are machine appliqued first to the background, then the circles will be machine appliqued. I used light green thread, except for the darkest stems. Blanket stitch, #1329 on my Bernina, W 1.0 L 3.0.  Here are two backgrounds ready to get circles: 


I am really tempted to use a decorative thread and some of the many decorative stitches I have on my Bernina 765 SE machine for appliqueing the circles. These great machines come with so many stitches and I only use 2-3. Machine stitching would be so much faster than hand embroidery.

The other project I had to get done was my top for "Aether", which I have named "Sunrise, Sunset". This will be a class offered locally February 4 and 25, 2023, at Southern Charm Quilting. The pattern is by Patty Murphy and is available at the store. I have some good ideas for quilting designs but that will have to wait until later this year:


LOCALS: There is a last minute OPENING for my 4th Joyful Journey Retreat at Red Rooster Retreat Center in Crane Hill, AL. It is March 1-5, 2023. We have a wonderful time and have become a close group. If you are interested, please contact me right away so I can send you all the particulars.

Here are photos from prior years to tempt you. Spend 5 days sewing, laughing, eating, loving time for yourself. Spend NO time cooking, cleaning, or working for someone else. It's all about YOU:


I have written about these events here:


Let's quilt.

Barbara 

Sunday, January 8, 2023

I LOVE MY JOB!

 In fact, I have always loved my job. First, I was a student. Then I was a United States Marine Officer. And then I was a Tax Professional for 35 years with H&R Block. All of those jobs taught me life lessons and I really loved them all.

For the past 9 years I have been able to expand my quilt career--which first started in 1989. I love teaching all over the country, to groups large and small. And locally. It is fun and the friendships that are built with this kind of job are priceless.

Here is what I am working on right now. In just a few weeks I am teaching AETHER locally so I am really pushing to get the sample done.

Some of the petals laid out on the background. When all 100 petals are done I will make the final decision about who goes where:


I came up with the best way for me to make the petals quickly, for turned edge machine applique. I will teach this method in class: 


A closeup of how the petals will lay--they will be machine appliqued to the background: 

The pattern is called "Aether" by Patty Murphy. The pattern is available locally at Southern Charm Quilting. I named mine "Sunrise, Sunset", since I don't really know how to pronounce Aether:

Aether by Patty Murphy

The other fun thing I had to do this weekend was approve the Scrappy Plus Quilt Kit for the class I am teaching on a Stitchin' Heaven Cruise two months from now. As the cruise was supposed to happen last year, I made the test quilt from a different kit. Here is the one I made at least two years ago, Scrappy Plus:


The other day I received the NEW KIT, the actual one students will get in class. I had to count every piece, verify the size and number of pieces was correct, and be sure the pattern was included. Happy to say, I did that and all is well. They even included the page of Pressing Instructions I wrote for this quilt as there were none in the pattern and good pressing makes for a good quilt.

I love these fabrics--especially the grays and low volume prints, I never seem to have enough of them:


After counting everything I turned the packages over so you can see MORE of the fabrics:


Wouldn't you love to have someone cut all your fabrics for a scrap quilt and label them in cute little baggies? All you have to do is SEW!

I am also happy to report my knees are better. The doctor thought I just rushed back into my power walking too far, too fast, after 5 days off during the super cold weather. He did say my 10 year old replacement will eventually need to be replaced--they don't come with a lifetime guarantee, unless you don't live very long. Since I plan to live many more years, I have that to look forward to. For now, I just have to build back up to my one hour, 5 mile pace.

Let's quilt.

Barbara