Sunday, January 27, 2019

Quiltmaking 101

For thirty years I have been teaching the beginning quiltmaking 5 week class at my local shop, Patches & Stitches.  This has allowed me to work with well over a thousand local students who want to learn to quilt.

For the last 13 years the project has been this quilt, Mix n Match Stars by
Glad Creations patterns:

Class Sample, 48" x 60"
The 9" block is made with basic units: half square triangles, quarter square triangles and squares. The pieced border is optional, about 25% of the students tackle that. They can use "super simple borders" if they choose--I teach that too.

Students come from all age groups, the youngest being a very motivated 14 year old, to those much older, even older than me. Many are women but over the years there have been a few men. Some are young mothers eager to make a baby quilt for their child. Some are newly retired women who say "now is my time, I want to learn to quilt". As I live in Rocket City USA, Huntsville, AL, many of the students are engineers or are married to them. The engineers take to the precision of piecing a quilt pretty quickly. Some are more "laid back"--whatever their style, the desire to learn what I can teach them is all that matters to me.

I am not the quilt police. When asked how perfect something has to be, I give them the 3 tests:

1. How does it look from 6 feet away?
2. How does it look to a man going by on a galloping horse?

and the MOST IMPORTANT TEST of all:

3. Can YOU live with?

This is supposed to be fun, not stressful, and everyone gets to decide their level of perfection as they learn.

Some student work:

Donna

Stacy

Sophie, on the right in the photo

Peggy
Beverly

I could post hundreds more photos--this just gives an idea of how the student can make the quilt her own. 

Currently, one of the students is really making this project her own. Catherine has taken several classes from me and is most definitely not a beginner. She showed me a quilt she found on Pinterest  that inspired her fabric selection. Her blocks take much longer to make than the other students since she cuts all the pieces separately, arranges the block, takes a photo--very smart!--then sews the block together--every piece in the block is a different fabric but a specific color:

I think she is right on target with the look she wants. She is not in a hurry, and is taking her time to enjoy these blocks. I am so eager each week to see what she has done so far.

Having taught beginners for 30 years, I usually change the project every few years but this one has proved to be such an excellent project for those who really want to learn as much as they can. AND I have kept it because in 2009 I was asked to work with a film crew to create a "class" for the website Monkey See. Over the course of 6.5 hours we recorded 7 three-minute videos that supposedly teach you How To Quilt.  I jokingly say "I can teach you how to make a quilt in 21 minutes."

The block I am making in the video is the block from this class, Students have found it so helpful to go home and have me continue to "teach" this block online. I still find it pretty hokey, BUT students tell me they really benefit from it. So, this is the project I'll stick with for now.

Many of the students have become friends, many have joined local guilds to continue to learn and find support. It is really my honor and privilege to teach all these students. My goal for every class is that I addict ONE of them, completely and totally to quiltmaking--so the industry will continue to grow and we all benefit from that. And I am always successful at that.

Let's quilt!

Barbara

Wednesday, January 23, 2019

Paper Choices for Paper Piecing Quilt Blocks

I love Paper Piecing, especially complex blocks. Currently, I am making two Sizzle quilts, so I am getting lots of practice. I have written about paper piecing before--if you want lots of tips for this technique, Read this Tutorial.

The paper I use for piecing has to have certain qualities:

It has to be easy to print on a home printer
The ink cannot smear once dry
It has to be easy to sew on
It  has to be easy to press the sewn fabrics flat
It has to be easy to remove

I am testing 3 different "vellum" papers on a Sizzle block:


 Here are my results:

1. C&T Simple Foundations Translucent Vellum Paper--this is the product Becky Goldsmith recommends and it is included in the Accessory Kit for the Sizzle quilt, the 2019 Block of the Month for The Quilt Show.

   This is the medium weight of the 3 papers I am testing. It works well, is easy    to  run through my printer, the ink doesn't smear, and tears off pretty easily. It curls just a bit but not enough to be a problem.

2. Master's Touch Tracing Pad, 25 lb., 9" x 12"--bought at Hobby Lobby.
This is the thinnest of the 3 papers I am testing. I had to trim to 8.5" for the printer. Even though I separated each of the 8 sheets from the stack to "un-stick" them, each time I printed 8 copies, one page stuck to another and I had to re-print that one--and had one page printed on regular paper. The ink also smeared a bit even days after printing. It curled the most of the 3. It was easy to remove.

3. Vellum Paper Value Pack, bought from Amazon online. Amazon
This the thickest of the 3 papers I am testing. It printed easily, the ink did not smear but the thickness of the paper made it difficult to press the fabrics as they were added. It took a hard press to get the fabrics as flat as possible, without having a pleat at the seam. It was more difficult to remove than the other two papers, I really had to pull the paper away from the stitches.

I know a couple people who like to use lightweight tracing paper. They have to print one page at a time since the thin paper does not feed easily in their printers. This would be inconvenient for me--the printer is on the other side of the house from my studio where my computer is.

So, for now, I am sticking with the C&T vellum paper. It does what I need it to do and is dependable.

If you search online for "vellum" be aware there are many weights and levels of transparency. Much of the vellum I saw online was being marketed for Wedding Invitations--the little page that goes between the fancy papers. Those are most likely too thick and not transparent enough for paper piecing quilt blocks, especially complex designs like these.

This is half of a Sizzle Block, showing where a lot of seams come together. You can see it is important that the paper work well with this kind of project:

Paper Piecing allows for the kind of precision I just could not get with regular piecing. Here is the center of that block, finished:


If you have a paper you love, please let me know about it.

Le'ts quilt.

Barbara

Sunday, January 20, 2019

The Village

In 2018 I was involved in two swap projects, one was 5" paper-pieced houses and one was 4.5" stars. I wrote about the Quilters Scrap Houses here and the Tiny Star Blocks here.

Recently, when I should have been sleeping, I wondered what I could do with thirty 4.5" tiny stars. And then wondered what I could do with thirty-six 5" little houses. Two  more quilts to make. Wait a minute...

What If: they were combined into ONE quilt, stars and houses. I ran the numbers in my head--what do you know? Ten 4.5" stars = 45" of stars, 3 rows of 10 stars each could be made.  AND nine 5" houses = 45" of houses, 4 rows of 9 houses could also be made. No extra blocks had to be made--I had just enough--that never happens!  It was meant to be, here is "THE VILLAGE":


A much better photo will be achieved when this is quilted and bound--in the not too distant future. I was just so eager to see it up on the wall. Good to have another top finished for 2019.

After I made the rows of stars and the rows of houses, I thought the neighborhood looked a little sterile--it needed some greenery. So each row of houses got one paper-pieced tree on either end of the "street"--much better. When I write the directions, the trees will be added to each "street" before the rows are sewn together, so much easier. If only I had thought about the trees earlier.

This will make a great 3 hour class for guilds--in 3 hours you can learn to paper-piece the house and one tree AND learn the adorable Tiny Star--and how to convert that simple star into other easy-to-make sizes. They are so good for swapping because the points "float" and don't have to match, always good in a swap project.

Let's quilt!

Barbara

Wednesday, January 16, 2019

Clear the Clutter

This is the time of year people resolve to diet, exercise, save money, clear the clutter--all the usual things.

My quilting stuff seems to multiple when I'm not looking and my husband saw lots of stuff in the guest room closet when putting Christmas decorations away. In theory, all my "quilt stuff" is supposed to be in my studio BUT... The only quilt stuff in the studio is the stuff I really want right now.

Fortunately, I gave a bunch of stuff away last month to quilters who came to visit--not enough to matter but at least 30 things I no longer had to store.

My guild has a "Free to a Good Home" table and I am bringing stuff to "share":

Hopefully, someone will want these various treasures: books, threads, fabric, Celtic Press bars, etc...

It fills two tote bags and I'm getting rid of three large stacks of magazines too--there is just too much stuff here.


Remember, your kids don't want your stuff. You will be doing them a favor to get rid of some of the stuff you really don't want or need any more.

Now, about those two other closets...

Let's Quilt!

Barbara

Sunday, January 13, 2019

My, How Things Have Changed

Recently, I was preparing supply lists and class handouts for an upcoming class I am teaching for the St. Andrew Bay Quilters Guild of Panama City, FL.

5 EASY PIECES/PIECES OF THE PAST CIRCA 1875

5 Easy Pieces

Pieces of the Past Circa 1875
These quilts are similar in design but not the same. The dark version is a replica of an antique top I bought at a yard sale 30 years ago. That has a bit of an interesting story to it, read that HERE.

I completed both these quilts in 1995, hand-quilting the dark one and having someone else hand-quilt the light one for me. In those next few years I taught these quilts in classes a few times. Fortunately, I kept my teaching folder for that class. I was surprised how much has changed today.

The supply list included template plastic, sandpaper, glue, 1/4" graph paper--we started out drafting the pattern!!! Here are the things I found in that teaching folder--one of the sketches is true "cut and paste", and I printed with a dot matrix printer:

Today, if you try to offer a class that has the word "Drafting" in the title or Description, no one will sign up. Most classes today are "project" classes--step-by-step how to make that exact quilt.

I love to teach quilters how to "fish"--to teach them skills to plan their own quilts, whether from antique quilts or quilts they dream up themselves.

In 5 Easy Pieces that I will be teaching later this year, we will concentrate on the simple construction of the light version--the dark one involved LOTS of set-in pieces to truly replicate the original. There is a work-around that makes it easier, I will teach that too.

The class handout will include layouts I printed quickly and easily from Electric Quilt 8 (EQ8) and paper patterns for paper piecing,. an option for students. I use this class as a way to teach at least 4 ways to make Flying Geese units--students can try them all or concentrate on the one they like best--the quilt has a lot of geese:

Calculating fabric yardage was a snap with EQ8--my old notes have pages of my math calculations for how I figured out the yardage in 1995.

I often tell today's students that I learned to quilt BEFORE THE INTERNET and am proof that it was possible. We have so many wonderful resources available today at our fingertips--I would not want to go back.  But having the skills I learned in those early years has stood me in good stead.

My goal as a professional quilt teacher is to share as much of my knowledge with all those who want to learn it--so they can pass it on to future generations. My calendar is full this year and getting that way for next year and that makes me happy.

This class will be a lot of fun and students will learn lots of great tips for the 3 basic skills we need to piece great quilts:  the Cutting, the Sewing and the Pressing. I look forward to joining my friends in FL later this year--this is a repeat engagement--we had a lot of fun and very happy students the last time I taught there about 2 years ago.

Let's quilt!

Barbara

Wednesday, January 9, 2019

Fabric Name Tags--How to Make Them

A group of quilters called the Sunday Sew and Sews are starting the 2019 Block of the Month soon. We have grown to 25 people and will  meet one Sunday a month. With such a large group it is important to me that everyone feel included--learning each other's names is a great first step.

So I made them all a name tag:

It was easy. Using Word, I created a document that had all the names on one page, keeping the spacing as even as possible.  I printed the document on fabric prepared for printing, the same product I use for quilt labels:

I cut each name apart, trying to keep them as close to the same size as possible. It would have been easier if each person's name was the same number of letters, but that was not to be.

Then I created little "quilts" where the  names were the blocks and I used sashing strips that I cut 2.5" wide:


 When I ran out of pink fabric, I switched to green:

All 25 ready to be layered and quilted

quilted
I used three different back fabrics, just pulling from the scrap pile, and scraps of Quilter's Dream Cotton batting:

Ready for quilting
Quilting was simply straight lines with my Bernina Q20 sit down machine and a ruler--free motion and fast, with variegated thread. One start and one stop, traveling at the outer edges which I knew would be cut away:

Then they were cut apart with a wavy blade rotary cutter--that was all the finishing to do. I could have added binding or finished with decorative stitches but keeping this simple was the idea. I added a safety pin to the back of each and they were done.

I made one a little bit special. This person found us the meeting space, she arrives early to help me be sure we are ready, and stays late to help me clean up. She is the designated "Teacher's Pet" and she didn't know that until she got her official Name Tag:


It took a few hours to do this but I think it is a fun way for them to learn each other's names. I told them there would be a test in December, without name tags!

Let's quilt!

Barbara


Sunday, January 6, 2019

A Simple Gift Quilt

Sometimes you need to make a quilt as a gift and you need to make it quickly. If it's a "Group Project", you need a block everyone can be successful with--no Mariner's Compasses or Feathered Stars.

Recently, the Sunday Sew and Sews (a group of quilters who meet monthly) decided to make a quilt for one of our members who is dealing with cancer treatment. In just a few minutes of brainstorming, a plan was hatched and here is the result:

We used the super simple little floating star I wrote about in October: Tiny Star Block Tutorial. With the instructions already available to everyone on that blog, it was decided all 12 of us would make 6 blocks, using blue and white--turns out, blue is our friend's favorite color.

When I worked on the layout, I determined there should be 80 blocks so I made extras. Then a few others made extras and the quilt was 10 rows of 9 blocks, each block finishing at 4.5". The inner border is 3" finished and the outer border 5.5" finished.

This block is great for groups because the star points do not go to the outside edge, very forgiving. Each person just had to make their blocks 5" unfinished. I joined the stars into rows, added two borders, then basted, quilted and bound it.

Each person was asked to sign one of their blocks and I centered the signature blocks in the middle so we can all hold our friend close as she uses the quilt. I used one block as a label and placed it in the center--telling her the quilt was made just for her with love from the Sunday Sew and Sews and the date.

The quilting was fun. I used white thread to stitch loop-de-loops all around each block. I started with Microquilter thread, a 100 wt. polyester thread from Superior. About half way through it was breaking  frequently so I changed to Glide, a 40 wt. polyester. That worked very well and I was able to zip along with those fun loops:


In the light print inner border I used the white Glide thread for wishbone quilting, another free motion quilting design I really like and am getting better at--remember, practice makes perfect.

The outer border was also fun--blue Glide thread with swirls, leaves, a few hearts and flowers, and more loop-de-loops to fill in  the areas that needed more stitching:


In the center of each star I used the blue Glide thread to quilt a heart:


My favorite batting is Quilter's Dream Cotton, Request weight. When the quilt was finished I washed it--the binding was a dark blue batik and those can bleed. The Color Catcher was only slightly gray after washing so that was good. The quilt measured 57" x 61" before washing and 54" x 58" after washing and drying. It had that nice, cuddly, soft. slightly wrinkly, old-timey feeling. She loved it--perfect for a nap.

Gift quilts don't have to be elaborate or take months to make to be a special gift to a special person.  Three years ago I wrote about another quick quilt made for a relative: Snuggly Cuddly Strippy Quilt--a really fast quilt to make.

So jump right in and make a gift quilt when one is needed--it will be loved more than you know. Plus, what else are you saving all that fabric for???

Let's quilt!

Barbara

Tuesday, January 1, 2019

SIZZLE--BLOCK 1

The 2019 Block of the Month from The Quilt Show. This quilt pattern is FREE to Star Members. Join today  to be part of the fun.

Today is the day the SIZZLE patterns become available. Find Block 1 HERE.

TIPS:

1. Becky has produced wonderful videos with all her tips. Find them here: VIDEOS.

2. The 30 pages of General Instructions are available now. I read them several times, highlighter in hand, and refer to them frequently while working on the blocks. Find them HERE  NOTE: the General Instructions were prepared while Becky was making the Warm quilt--the photos are from the Warm quilt but are identical for the Cool quilt--there are not two separate sets of General Instructions.

3. Watch Becky's Show, episode 2401--find it HERE..  NOTE--it is FREE for everyone--encourage your friends to watch too--then get a group together.

4. I have written several blogs about this project:

Get Ready to SIZZLE--making a notebook and other things

Fabric Selection and Preparation--use a Kit or your own fabric palette

SIZZLE Preparation--how to print your patterns and make the Block Corner Template


BLOCK # 1

1. READ all directions carefully. In Month 1 Becky has us cut all the Block Corners--if you are using the Kit, be sure you cut the correct fabrics in the correct amounts.

2. Print 8 pages of the pattern. I used the Vellum in the Accessory kit--it printed very easily and the ink did not smear. Double check the 1" box to be sure the patterns print accurately--this is critical.

3. Cut all the pieces for the block--Becky's method of using squares and rectangles makes this very easy:
In the Cool Kit--the white Lace fabric is a bit hard to tell the front from the back--I turned all mine face up as I laid them out.

4. Be sure there is no water in your iron--no steam when pressing on paper--we don't want to make pulp.

5. Stitch with a SMALL stitch--I use 1.5. Makes it easy to remove paper, hard to unpick--so try not to sew the wrong thing to the wrong thing.

6. When backstitching at the circle, be sure to stop at the circle--our computerized machines have a tendency to do one more stitch. I start at the circle, go forward 4 stitches, then back 3, so I don't stitch beyond the circle.

7. Trim all threads close as you are making the units--a neat unit makes for a neat quilt.

PHOTOS OF MY PROCESS--I won't do this for every block and won't show the same things as Becky does--just my process and tips you may find helpful--this is photo heavy--if you are not interested, skip to the end.


I made one wedge and one diamond to get started--they went together very easily, so I continued to make the units in those pairs. READ THE DIRECTIONS--I didn't and sewed the wedge to the left side of the diamond--the directions say to do the opposite. It doesn't matter, as long as I do them all the same--READ THE DIRECTIONS.

THE DIAMOND: When placing Fabric 1 on the Diamond, be sure Fabric 1 will completely cover the paper pattern, including seam allowance:


Front Side of Pattern--BUTT side of the fabric to the BUTT side of the paper

You might want to use a dab of glue to help hold the first piece of fabric to the paper--glue on paper, not in seam allowance--once the sewing begins, no glue is needed

Add-A Quarter used to trim Fabric 2, ready for Fabric 3


 NOTE: These fabric pieces are NOT exceptionally large but they are Large Enough--be sure you place them correctly--if in doubt, PIN along the seam BEFORE you sew it so you can check to be sure the Fabric will cover the space it needs to cover.

Fabric 3 sewn, ready for trimming to add Fabric 4

While sewing, I check by looking under the paper to be sure the two fabrics stay lined up


Ready to add Fabric 5--note how much fabric is to the right. NOTE--you can't see it, but remember if the seam starts at a CIRCLE, backstitch to the circle, not past the circle.
Ready to trim to add Fabric 6


I love the Add-a-Quarter ruler!

Be VERY sure you place Fabric 6 so the 4" length will cover the paper

Paper is covered, ready to trim

I use this ruler, placing the 1/4" line on the solid sewing line, then trimming the excess 1/4" away from the sewing--this ensures I have a 1/4" seam allowance

Very little fabric is wasted
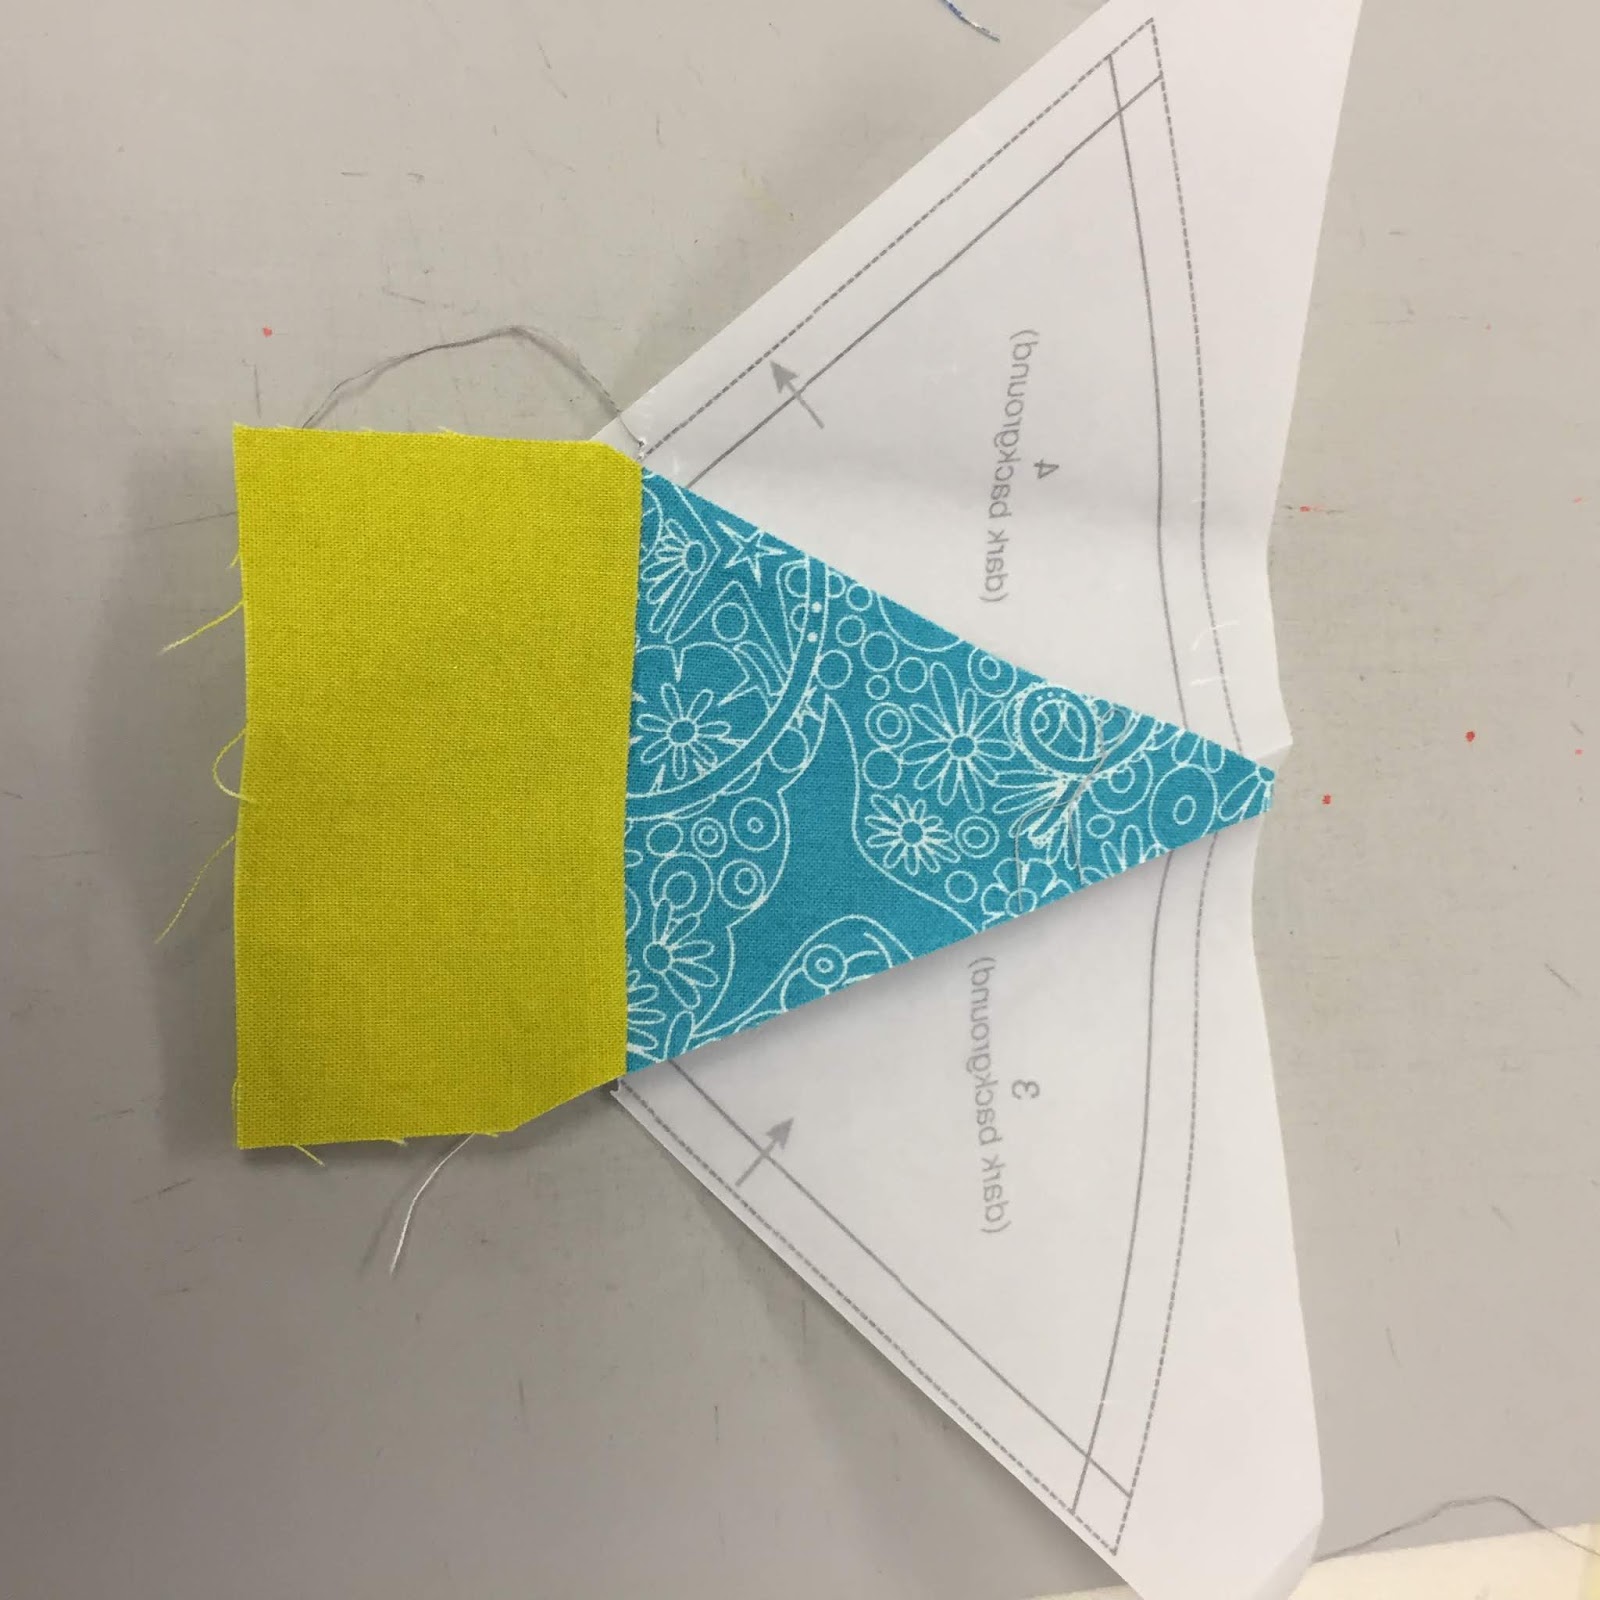
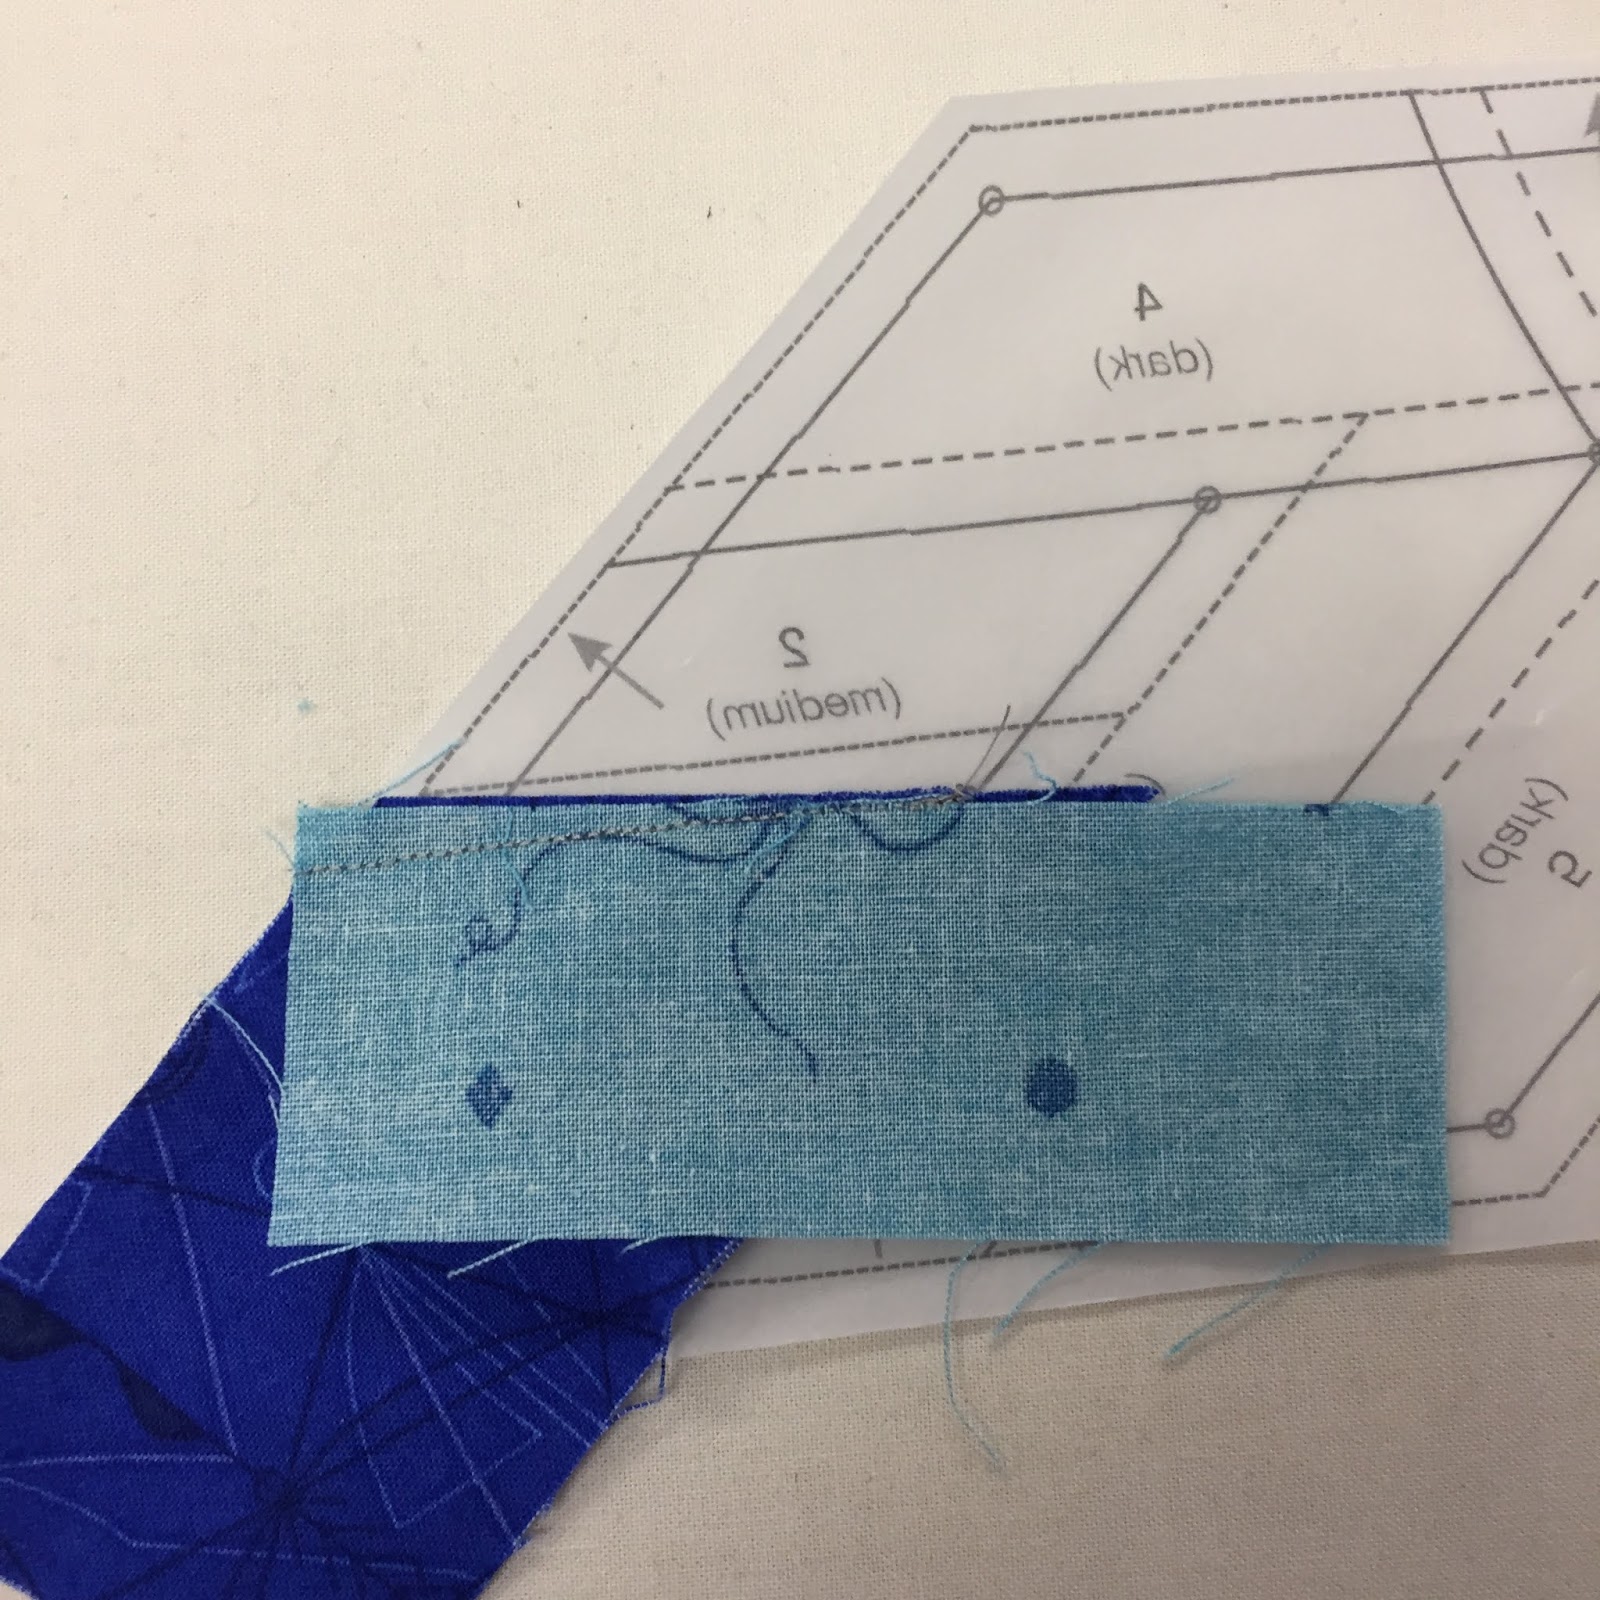
THE WEDGE:  fewer pieces makes this unit easier/faster to sew--we will use this same shape or very similar lots of times for the nine blocks.

Fabric 1 is cut 3.25" x 3.5"--this looks square but is not. BE SURE you place the 3.5" length so it will cover the paper. The BUTT side of Fabric 1 is on the BUTT side of the paper, covering Fabric 1

Fabric 1 and 2 are sewn, ready to trim both sides of Fabric 1 to receive Fabrics 3 & 4

Add-a-Quarter--use a heavy postcard, place it on the solid sewing line

Fold the paper back over the postcard, put the Add-a-Quarter ruler lip over the postcard and trim, exactly 1/4" away from the sewing line

Both sides trimmed, ready for Fabrics 3 & 4--Lace fabric is hard to tell back from front--double check before sewing

Before trimming excess fabric/paper, a dab of glue on the paper, pieces 3 & 4, will  help keep them in place as you cut

First I used the ruler to trim the two straight edges

I used Karen K Buckley's Perfect Scissors to CAREFULLY cut the curved edge
JOINING DIAMONDS AND WEDGES: remember, I sewed the wedge to the WRONG side of the diamond--READ DIRECTIONS. Mine will work as long as I do them all the same way.

My SECRET for accurate joins--I machine BASTE before sewing. Turn stitch length very long--I used 5.5 here. Carefully pin the units, using Positioning Pins as Becky describes. Baste about 1/2" on either side of the important place where the wedge and diamond meet--I would rather be wrong with basting stitches than those tiny sewn stitches. Yes, this takes time, but not as much time as ripping out tiny stitches.

All that is sewn here is about 1" of basting stitches

Unpin, check the join, if happy, TURN THE STITCH LENGTH BACK TO small
and sew the seam. If unhappy, remove the basting stitches, fiddle a bit, try again

The seam is now sewn--note there is a circle at the center and straight sewing off the edge at the curve. I stitched right on top of the basting stitches. After the seam is sewn I remove the basting if I can easily. If it is sewn completely in the seam, I trim the thread ends and leave it.

One unit joined, trim the "dog ears" as they occur

Remove the paper in both sides of the seam allowance--much easier to do now

Joining two Diamond/Wedge units--my basting goes from 1/2" before to 1/2" after the Fabric 3 joins--note the green pencil lines showing where they start and stop

Checking my basting--that's good--repin, and sew the entire seam. Remove paper from the seam allowances and follow the pressing arrows to press the units together

Four units become a half. Now make another half, exactly the same
WHAT COULD POSSIBLY GO WRONG???

Fabrics slip--it happens to everyone at least once:

This just won't work

FIRST, I put a piece of tape on the paper side to protect it--this allows you to carefully remove the stitches from the paper and have access to stitches on both sides of the seam.

Use a sharp stitch ripper, working on the fabric side, remove every 3rd stitch, that should do it

This time I used a flathead pin to hold fabrics in place before sewing--well beyond the stitching line

Shadowing Through--when adding a light piece to a dark piece, be sure the dark is not visible--or you will see the dark piece on the front, as a "shadow":

What NOT to do

Place the white fully over the blue fabric

No blue shadow through the white--if you get a bit of shadow because the white slipped, you can trim the blue seam allowance away, as long as it's just a bit
And, of course, at least once you will sew the wrong fabric to the wrong place. We all do. Keeping your fabrics in number order and remembering to sew 2 to 1, 3 to 2, 4 to 3, etc., will help to keep you from doing this. But you will, at least once. The only fix then is to remove the wrong piece and add the correct one. I'm sorry.

CREATING THE CIRCLE: I followed Becky's instructions to join the two halves, creating a circle:

Two Halves ready to be joined
Again, I machine basted the center seam BEFORE I sewed it--there was one join that did not meet as it should so I took that one apart and re-basted it--it was fine the second time. This is time well spent for me--I don't want to have to take the seam apart, with those tiny stitches, to fix problems:

After the center seam is sewn, sew the two remaining wedges to their adjacent diamonds--and you are done the circle!

Once the two halves are sewn together, remove all the paper. This job took me 20 minutes, not too bad.

Remember to turn the stitch length back to regular piecing now that the paper piecing is done--I use 2.0. Piece the four Block Corners to form the background.


Block Corners joined to form Background, sitting on top of the complete circle
 I followed the instructions for pinning--lots of pins--and sewed slowly to set the circle into the background. This is not a race, the point is not how FAST can you sew it, it's how accurately can you sew it. If you tend to sew fast, turn your speed down if that's an option--I did.
20.5" Block #1

THE BACKGROUNDS-- just a thought about the backgrounds. If you are using either Kit, with 3 different background fabrics, be sure you select the correct fabrics for the backgrounds--they are determined by where the block is set in the quilt. If you want to wait until your blocks are all done before deciding where to put them, simply make the block circles and wait to create the backgrounds until the end.  If you are using your own fabrics  and choose to have only one background fabric, each background will be the same so you don't have to wait. 

Mine is being made just like the instructions so I can answer questions as they arise. I have one English Cream light gray corner, and three Mist darker gray corners. This block will go in the lower right corner of the quilt.

Future blogs will not be nearly this long--the basic process is the same for all nine blocks. My best advice:

1. READ the directions
2. WATCH the videos
3. Do your best work--this is not a race
4. Read my blogs with photos--I put a lot of "teaching" into them to help you.
5. ASK questions if you need help--the FORUM is a great place--you will reach everyone working on the quilt:  2019 SIZZLE Forum

This first block should take you the longest--it is the learning curve block. Future blocks have similar construction and each block will increase your confidence and skill. Enjoy the journey.

Let's Quilt!

Barbara