Friday, June 30, 2017

Halo Star Medallion--Month 7

This month we make half the pinwheels for the next border. We will make a side and a top border.

First, you get to decide if you want to paper-piece them as Sue did. I chose to go with this method because I find it fast and all the cutting math is already done. If you prefer to make Half Square Triangles with regular piecing, you certainly can.

Second, you get to decide if you want to make pinwheels at all. One of the members of my small group said she really doesn't like pinwheels. That's fine. ANY 3" finished shape will work in place of 3" finished pinwheels. How about:

Monkey Wrench blocks:


Nine Patches:


Other options could be:  Quarter Square Triangle blocks, Four Patches, Friendship Star, any block that can be made easily in a 3" size. It's your quilt, you decide.

I am paper piecing the pinwheel blocks AND the flying geese borders that come next. I am using more than a few fabrics, using up what I have, some fabrics are smaller than fat quarters, some are yardage. I decided to figure out the best way to cut BOTH the pinwheel fabrics AND the flying geese fabrics. This way I could handle all these fabrics once and cut both sets of borders at the same time.

For Month 7 we'll be making 40 Pinwheels. In Month 8, we'll make the remaining 40 AND start the Flying Geese. I decided to CUT them all now. If you are using the Kit, you will follow the fabric selections listed in the pre-cutting instructions. If you are using your own fabric, use whatever colors you like.

Background: From Width of Fabric (about 41-42")  we can get four 8" x 10" rectangles if we cut the strips 8" wide. Month 7 requires 2 strips, Month 8 requires 2 more so I cut 4 strips 8" wide. They were sub-cut into 10" lengths, giving me ALL sixteen background pieces I needed (8" x 10") for ALL the pinwheels, with very little extra leftover.

Pinwheel Fabrics: For these I found it was better to cut the strips 10" wide because of the sizes needed for the flying geese borders in Months 8 and 9. For Month 7 pinwheels we need 8 colors cut 8" x 10"; we need the same amount for Month 8--for a total of 16 pieces 8" x 10". I cut each fabric 10" wide, then sub-cut into two 8" x 10" rectangles. Sixteen 8" x 10" rectangles = ALL the pinwheel fabrics needed.

How do you cut a strip of yardage 10" wide if you don't have a 10" wide ruler?

I placed a 6" x 24" ruler straight along the fold of the fabric. To the left of that long ruler I placed a smaller square, aligning the 4" line with the left edge of the fabric. Now I could easily cut the strip 10" wide. You can pair other rulers to get the 10" width, depending on the width of your long ruler.

Here is everything cut for the Pinwheel Borders:


After cutting the two rectangles 8" x 10" from eight fabrics needed for the pinwheels, I cut the fabrics needed for the flying geese borders. Now I am getting ahead here so if you prefer to wait and cut the flying geese fabrics in Month 8, just put your eight fabric strips that are 10" wide aside for now.

If you want to keep cutting for the flying geese borders, you will need 5" squares of color for the geese--a total of 45 of those. The instructions call for 8 fabrics for the geese, just like the pinwheels. Three fabrics are cut into five 5" squares, five fabrics are cut into six 5" squares--this will give you the 45 squares needed.

Because I cut the color fabrics 10" wide, it was easy to cut 5" squares from the remaining fabric, here are four being cut, there are 2 layers of fabric here:


I cut one additional 5" square of this green and had the 5 squares of that green I needed.

After all the colors were cut for the flying geese, I kept going and cut the background needed for Month 8 and 9 too--the geese background. Again, if you want to wait, stop reading and wait for next month. You need 180 squares of background, 3" square, for the flying geese borders. I decided to use all the the background fabrics I have used so far before cutting any new background. That worked well as they are all similar tan tone-on-tone fabrics. It feels good to use up some of these fabrics that have lived in my closet for years and when the flying geese borders are made they will be more interesting to me.

Here is everything cut for the Flying Geese Borders:


There are more than 8 different fabrics because I was using up what I had, but the colors are similar. For example, there are 3 different golds, a total of 5 squares. All 3 of those have been used earlier in this quilt.

It took less than 2 hours to cut out all these fabrics, including the time to figure out the cutting plan, dig out and press my fabric and take photos. It felt great to have ALL this cutting done at one time.

Now it's on to the paper piecing. Remember to make your stitch length smaller, 1.5 works for me. If you need reminders on the basics of paper piecing, you might want to review Month 1 here.

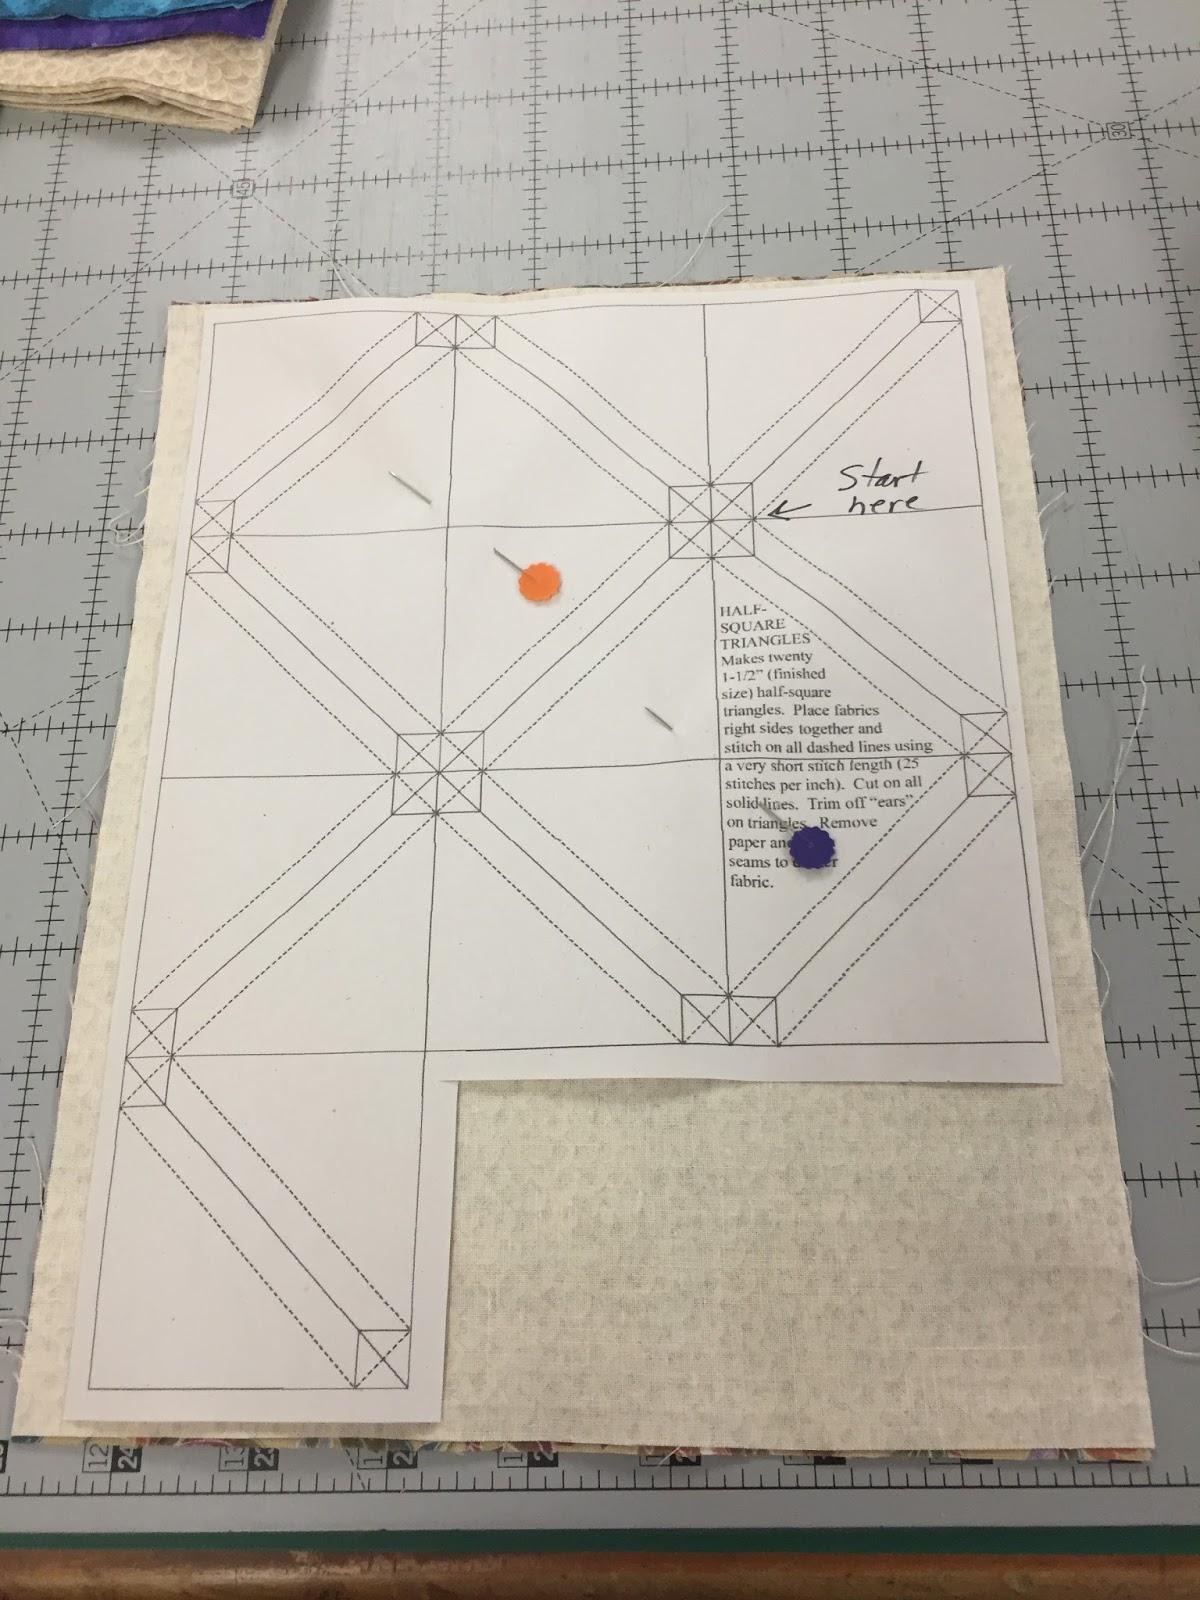
Pair a background and fabric rectangle, right sides together, place the paper pattern on top and you are ready to begin sewing. NOTE: I trimmed the margin of the paper down a bit, not completely to the solid line, but close.

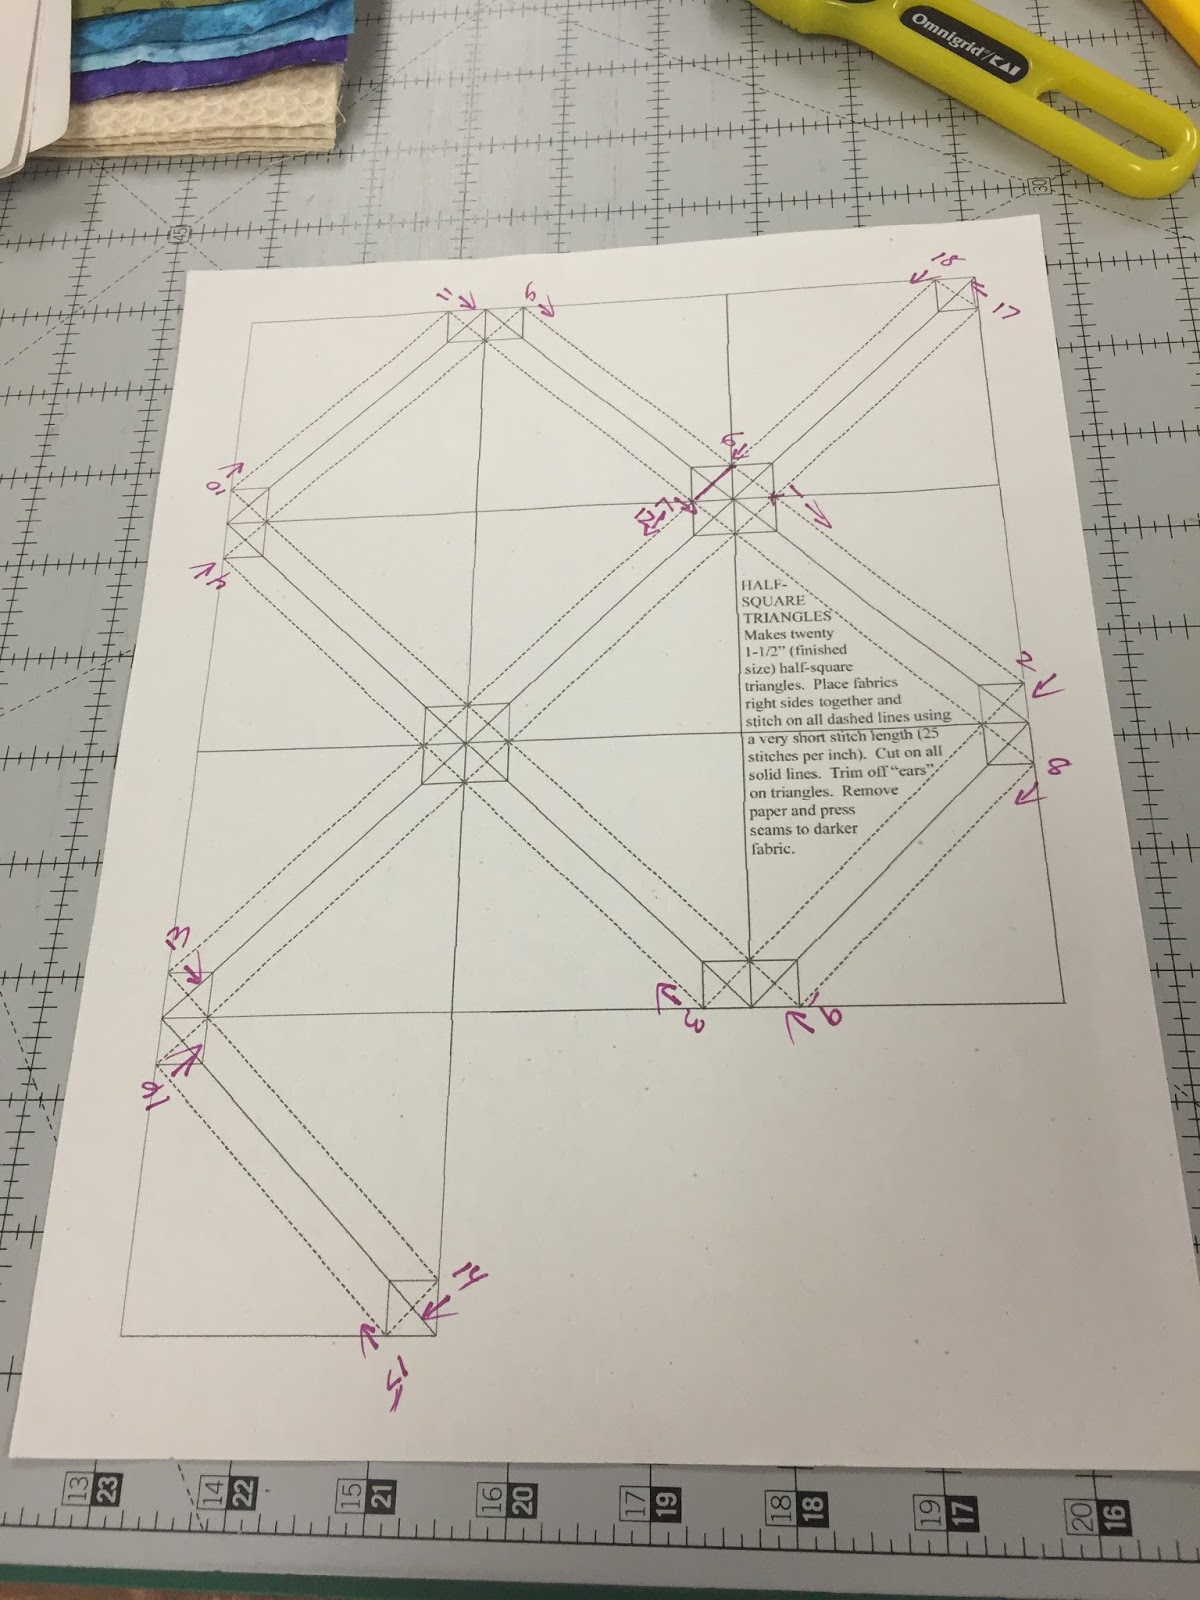
If you start sewing where indicated in this photo below, you can sew all the seams in one continuous, non-stop line. Pivot at each corner. When you get back to where you started, pivot and do the long line that remain, both sides. Try to sew on the dashed line, or slightly to the left of it. Sewing on the outside of the dashed line will make your HST units slightly small:


NOTE:  After doing a few of these, and finding I was missing a few lines, I thought it might be helpful to number all the pivot points. Once you've sewn a couple of these, you'll get the hang of it--that's good, because we have 16 of them to sew:


After sewing on all the DASHED lines, cut on all the SOLID lines:


Cut the long lines, I was careful to save the extra chunk at the bottom

Separate all the squares

Cut the squares in half, trim off the outer edge excess too

If you trim these solid lines now there will be no dog ears to trim off later

Gently remove the paper, mine came off easily. Press toward the dark fabric. Check to be sure your HST units are 2" unfinished. With luck, you won't need to trim.

Now it is very important to lay out the HST units so the pinwheels all SPIN in the same direction. Once I have the orientation correct, I like to stack multiples ready to sew, this keeps me straight because I have a visual guide to go by. Here half are done, and half are half sewn, laid out ready to join the top half of the pinwheels to the bottom half:


Chain piece the units together. Separate them and press toward the color fabric:


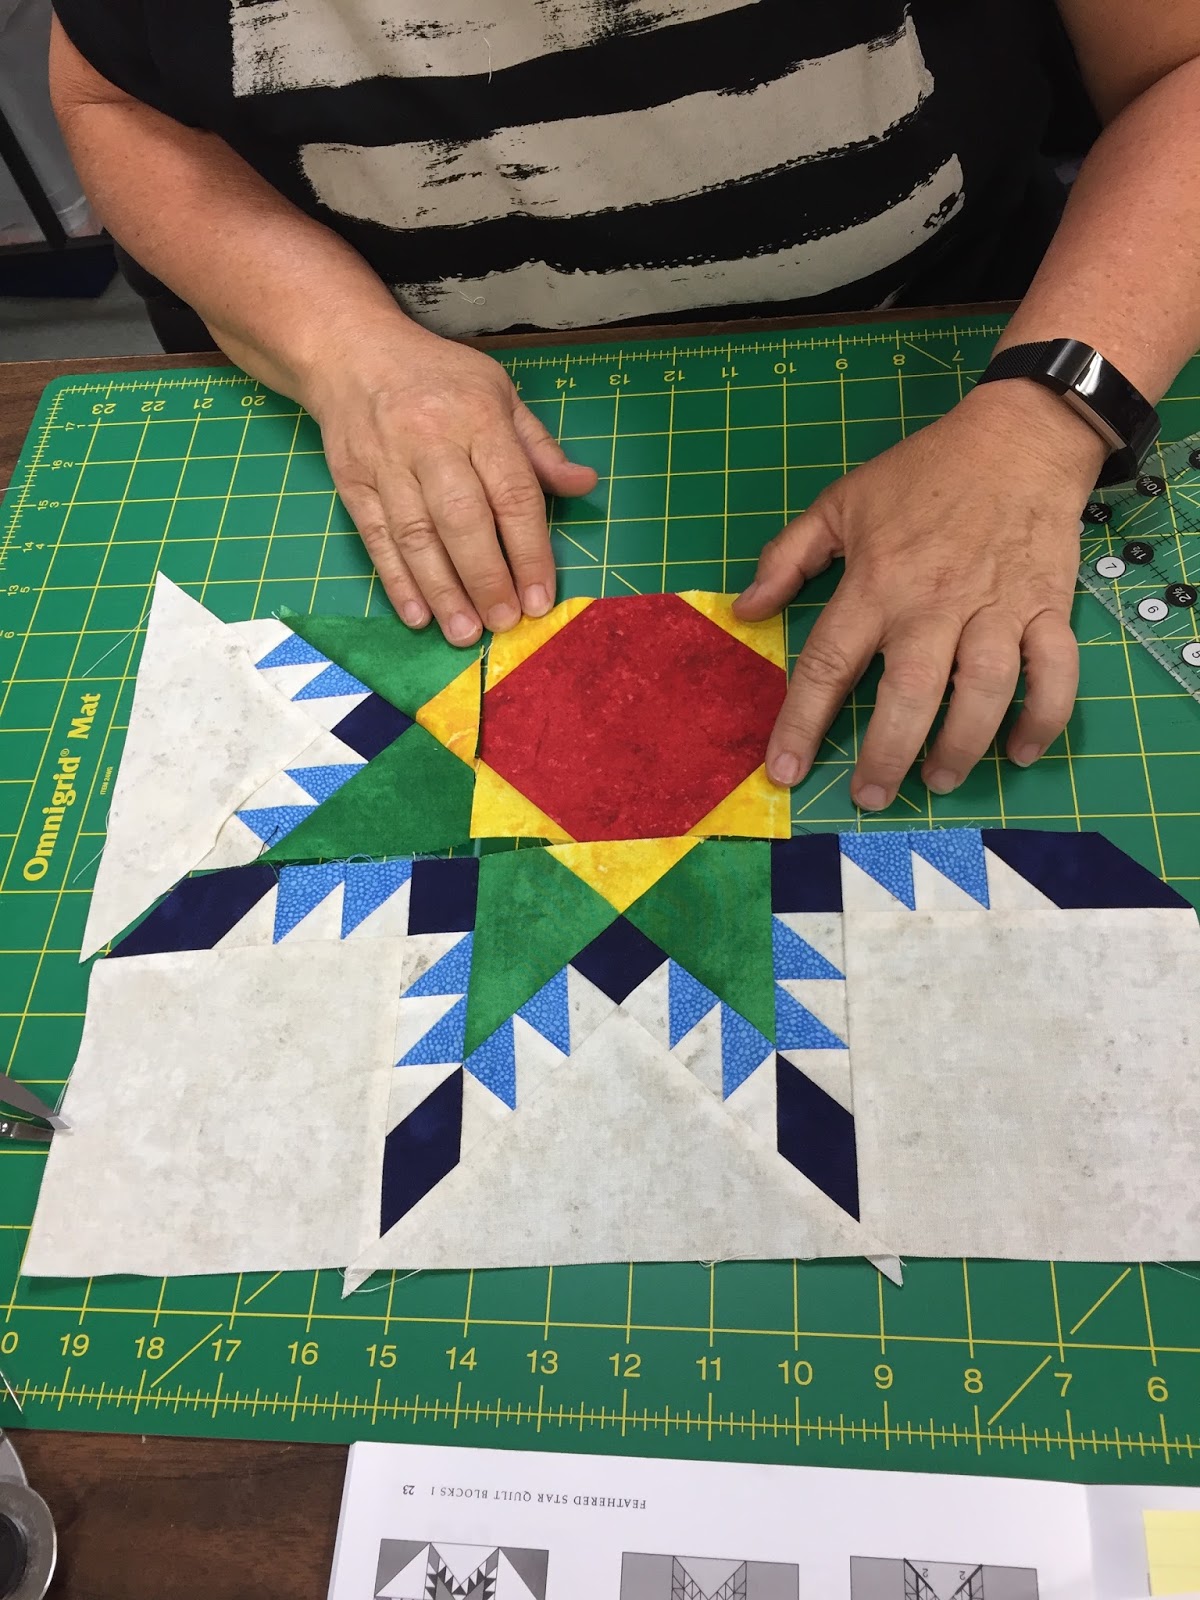
Sew the top half to the bottom half and then decide how you want to press the center seam. You can press in a spiral, distributing the bulk around the center, as I did. You can press in one direction. You could also press the seam open, though I rarely do. Decide which you prefer.


Continue to make pinwheels until you have 40 completed, 5 from each set of fabrics/paper pattern. Be sure they all spin in the same direction. Use the diagrams on page 3 to assemble the top and side borders.

VERY IMPORTANT NOTE: It is important that all the units are sewn the same way, BOTH MONTHS, and that the borders are all sewn with pinwheels going in the same direction. Make sure your pinwheels all SPIN in the same direction.

After you have the top and side borders sewn together, you are done for this month.

Let's Quilt!

Barbara

Thursday, June 29, 2017

Three Amigas Retreat

Each summer for about the last 8-9 years, three of us get together for a personal sew-in/retreat. Ellen moved 2 hours away 10 years ago so this is how we reconnect each year. We have a super/terrific/ideal room at a church to use, just a few miles from our homes and best of all, we sleep in our own beds, except Ellen, who bunks at one of our homes each year.


Things quickly become "tradition":  the selfie, show and tell, stories of family, now including two grand-girls, Winnie and Stella, and sons- and daughters in law. Grilled chicken dinner cooked by Sharon's husband, Rick, on Monday night--my husband joins us and we listen to Ellen's tales of her latest trip, this year it was Spain, always fun to "travel" with her. A trip to Patches and Stitches for retail therapy--Ellen doesn't have a really great quilt shop near her so stash enhancement is necessary. And there's a visit to my studio and the archaeological dig that is the spare bed, to see what I've made in the last year--too much to drag to our meeting site.

We talk and laugh, solve design dilemmas, and just have a wonderful time being together. Food is not the focus of this event, as it can be at retreats, we keep it simple. And the only things we don't talk about are politics and religion and there is no spouse-bashing--we've each been married to great men for about 40 years, bless their hearts. We love them and by now have figured out we can't change them so why bother?

Productivity is the name of the game. We usually all work on lots of projects but this year we each seemed to just stick to one major project. Ellen made this, squealing repeatedly, "It's sooooo cute!!!":


She kept hard at it and got the top just about finished before it was time to pack up:

Sew Cute!
Sharon worked diligently on a Family Reunion quilt, which she designed in great detail to show the family connections, on her husband's side of the family, no less. The legend will explain how each person is connected to the others, including babies not yet born at the last reunion; her planning and detail is amazing:


I got Long Time Gone pin basted, ready for machine quilting, or, I should say, in line for machine quilting:


After walking around and around the table for 45 minutes trying to lay this thing out flat, I decided next year I'll get two extra sets of hands to help me with that task-- it took more than 2.5 hours to baste this sucker, really cutting into my sewing time. It is nice to baste on several tables and each year I have one ready for that job.  

Then I was able to sew, paper piecing 3 of the 4 Flying Geese borders for Halo Star Medallion:


At the tail end of the 3rd day I generated a few more half square triangles for my Lifetime Quilt:


Too soon it was time to load the elevator and end this party:


It used to be 2 days but that wasn't enough time together so now it is 3 days and even that flies by too quickly and we all wish we had more time. As Sharon said at the end: "We've been in our quilt bubble for 3 days and now it's back to the real world." So, we look forward to next year...

I hope you have a special friend or two you can sew with, it's such a great thing. If not, I'll be your virtual quilting buddy, send me your photos and I'll oooh and ahhhh over them!

Let's Quilt!

Barbara

Monday, June 26, 2017

Learn to Quilt in Two Days

For 30 years I've been teaching quilting classes, many of those to beginners. I've become a much better quilter because of that--we always learn from our students. My Quiltmaking 101 class is 5 weeks long, and the students end up with a quilt top, approximately 48" x 60", although some make a larger quilt. Most of their sewing happens at home, there is LOTS of homework.

In the Summer, I don't offer the 5 week class because most people aren't home for all 5 weeks. This year I decided to offer a 3 day class I called "Learn to Quilt This Weekend". The plan was: Friday and Saturday, 9-4, Sunday 12-4. The students would make a top, baste it and start quilting it, all in that one weekend.

Three people signed up and I was eager to try out this experiment. Two days before class, two of them, friends, dropped out. I contacted the remaining student to see if she still wanted to come, being a "student of one". Not everyone likes being the only student, some get nervous with too much attention. She said she was happy to get what would be essentially private lessons, as she was looking forward to the class.  I learn a lot about what can and can't be accomplished in the time available the first time I teach any class so we went forward.

The pattern is my 2017 Sew-A-Long project. They would have all the instructions and step-by-step help should they want to make another one of these later 2017 Sew-A-Long:


Melinda starting learning from the beginning--selecting her fabrics. At first she wanted me to do it, but I walked her through the process, selecting 6 fat quarters, one background, a border, and then getting to work. We decided to wait to select the perimeter fabric, mine is yellow, until she had a few blocks done to see how they would look on various fabrics.

Quickly, she was cutting fabrics and was soon ready to sew. The advantage of having me as her personal assistant, is that, once I knew she understood how to carefully cut strips from her fabrics, I took half of them and cut too. In  no time, she was ready to sew the Churn Dash blocks. She had a brand new sewing machine so we took a few minutes to figure out how to achieve the 1/4" seam allowance we strive for and then she was off and running.

I quickly realized she didn't want me to hover, just to be available to answer questions as they came up. By lunch she had 4 of the 12 Churn Dash blocks done and was pleased with her progress. After lunch, she started on the Old Italian blocks, and had all 6 of those done by 4 p.m.--it was a very productive day.

The next morning she got back to work on the remaining 8 Churn Dash blocks--they were done by lunch. It was time to select a perimeter background fabric. We tried blue, green, yellow and, the winner:  RED!

After lunch, I explained the process of sewing a quilt together "on-point", a diagonal set. She cut the triangles from the red, both half-square triangles for the corners and quarter-square triangles for the edges, and put her quilt top together. Here it is before the borders:


With a striped border, there are several options for how to address the corners. She could put the borders on left/right, then top/bottom., like my sample. Or she could use a corner block:


Or she could go the extra mile and miter the border, a bit more work with the cutting and sewing but it makes a striking finish.  The choice was hers.

Melinda opted to keep it simple and was very happy with her finished top, complete by 3:30 p.m. the second day:


As this was a new machine, Melinda didn't have a walking foot yet. I explained how that would be very helpful with the quilting. She decided to wait until she had that foot before we meet again for 4 hours of quilting/finishing instruction.  She has a baby quilt she had previously made that is basted and ready for quilting--she will practice some free motion quilting on that before we meet again too.

All in all, Melinda was very pleased with all she learned. I learned that 3 solid days is too much for most students so if I teach this again, we'll put a week between the first 2 days and the final half-day session. Had there been a full class, there would have been at least a couple students who didn't get this far on the first two days--they would benefit from the extra time to complete their tops.

I love teaching, both beginners and more experienced quilters. I have 3 goals for my beginning students:

1. They feel their time and money was well-spent at the end of the class
2. They actually finish the project
3. I addict one of them, completely and totally, to quiltmaking--so the industry/craft/art can continue to grow.

I am happy to say I am always successful with that 3rd goal. With Melinda as the only student, it was more of a challenge, but I think we did it.

Let's quilt!

Barbara


Friday, June 23, 2017

Long Time Gone

The top is done:


This pattern is a book by Jen Kingwell, a well-known Australian designer. I found a sew-a-long that is running from March through July 12, 2017 and started with it, making one set of blocks a week:
Long Time Gone Sew-a-Long. If you want to make this quilt, I recommend you go to that website right now to print out the one page TRACKER she created that shows what blocks will be done each week--you can keep track of your progress easily that way, even if you aren't working on it now. It was so much fun, I pushed ahead and got this top done today, ahead of schedule.

NOTE: I didn't enter the contests or follow the tutorials or use templates. The only blocks that are paper pieced are the 16 Pineapple Log Cabin Blocks. I used EQ7 to print my patterns--the pattern is included in the book that you can copy for your use.

The one change I made;  instead of 3 narrow borders of mostly light fabrics, I made 2 light and one dark border--the lights were cut 1.75" wide, various lengths, whatever I had left, and the dark outer border pieces were cut 3"--feel free to do whatever you like with your borders. This quilt is 70" x 71" and I think that's big enough. I was considering adding another dark border but no, I think this top is done.

Back in January I signed up with Homestead Hearth to do this as a Block of the Month, using their fabric--I've received 4 months of fabrics so far and will use those to demo with when teaching this class locally this Fall. So, yes, that means I'll be making a second one of these. As it is no longer on their Special Programs page, that means they are no longer taking sign-ups for this one.

For my local students: this class will be at Huntsville Sew and Vac,  Saturday: Sept 16, Oct 21, Nov 18, Dec 16, 2017, Jan 27, Feb 24, 2018, from 1-4 p.m. They are not ready for sign-ups yet, but will be soon. I hope you'll join me for this journey.

Stash-busting isn't what you would think: this used lots of fabric but created just as much "new" scrap it seems. So, rather than put all those pieces away, I'll be making block samples for several upcoming classes and maybe, someday, I'll make my own scrappy orphan quilt.

Now to prepare a back and baste this so I can quilt it.

Let's Quilt!

Barbara


Saturday, June 17, 2017

Guess Who Is Teaching at Road to California?

That would be ME! I am very happy to be offering my most popular classes at this very large quilt show in California in January 2018.

For those of us East of the Mississippi, this show is not one we are very familiar with, although it's been in business for more than 20 years. This show is to the West, what Paducah is to the East. Here are some facts from their website:

Road to California is the premier consumer quilt show West of the Rocky Mountains, awarding over $92,000 to fiber artists from around the world. More than 39,000 visitors from all 50 states and several foreign countries come each January to view exhibits featuring antique, traditional, art and modern quilts designed by both national and international quilt groups. A vibrant vendor mall of over 225 nationally and internationally known retailers feature the very latest to see, try and buy in quilt making supplies, machines, notions, antique quilts and gift items. Classes taught by a distinguished faculty are geared to all levels of quilters, offering assistance with traditional to modern techniques, hand and machine quilting skills and the latest in surface-embellishment using paint, thread and embroidery. Join us at Road to California Quilters Conference in Ontario, California for a complete immersion into the quilting world.

Teaching my favorite classes will be so much fun. Here they are:

ANTIQUE ROSE STAR: We'll start by machine piecing to see just how fast that can be but this block lends itself to hand piecing too, so you can increase your sewing time:


Mine at a Trunk Show

A friend's quilt under construction, one of many layouts

SMITTEN: What's not to love about this fresh and vibrant Hexagon based pattern. Use lots of fabrics to create your own one-of-a-kind quilt:


My first one


Student work

Student work

2-For-1: I call this a "Dorito quilt"--it's hard to make just one; I've made 6 in various sizes. Another great quilt to use your stash, each pair of blocks comes from 8 fabrics. So many tips are included in this class, from cutting to sewing to pressing, that will improve all your future quiltmaking. This two-day class is worth the time it takes:


One of mine, twin size

Student work

Student work

Student work, using 1800s reproductions
If you want to see all the classes, the information is available now, registration opens in July. Click the link over there on the right, to find the 2018 Class Schedule. I think you will be amazed at all the wonderful classes available, beginning Monday January 15, 2018. Mine are Thursday, Friday and Saturday/Sunday.

I hope to see some of my West Coast friends in class--what could be better than sunny, Southern California in January?!

Let's Quilt!

Barbara


Sunday, June 11, 2017

Teaching the Feathered Star Block


I recently spent the day with 5 enthusiastic students, who were eager to learn the Feathered Star--not paper pieced. We used Marsha McCloskey's wonderful book, Marsha McCloskey's Feathered Star Quilt Blocks 1. Marsha believes in truth-in-advertising--the book is sub-titled:

REALLY HARD BLOCKS THAT TAKE A LONG TIME TO MAKE.

The students could choose whether they wanted to make a 12" or a 15" block and they all went with the 15". For good reason: the pieces are easier to cut for that size.

We worked from 9 a.m. to 4 p.m. and each student got a row together. All the rest of their pieces are cut out and they now know the process to complete the block. They did great:

Mary used a reproduction-style palette

Brenda knows black looks great with brights
Loretta had a quilt started with these soft fabrics so added this block 
Susan used brights with white

JoAnne is making hers red, white and blue, very striking

They learned a lot, like these are really hard blocks that take a long time to make and they all seemed to be tired at the end of class. Hopefully, they'll finish their Feathered Stars and use them in a great quilt project.

Let's quilt!

Barbara

Friday, June 9, 2017

The Halo Sunday Sew and Sews

In December 2016 two of my quilt students, who are sisters, asked me if I thought they were capable of making the 2017 Block of the Month quilt from The Quilt Show The Halo Star Medallion Quilt. A Sue Garman design, this quilt is not for a pure beginner or someone who wants to zip through a quilt in a weekend.

These two women have taken a lot of classes from me and others in the past few years and have really gotten the "quilt bug"--they are hooked! Add determination to that and you have quilters who can learn to do anything. I told them they could do this, one month at a time, and not to expect to rush through it or to find each part really easy. Even to me those curved flying geese blocks looked challenging. They were relieved and excited, they both signed up as Star Members of www.thequiltshow.com and got fabrics ready for January 1, 2017 when the first month's pattern would be released.

As much as I love Sue Garman and her patterns, I wasn't going to do this quilt, now, I really wasn't. BUT. I started thinking about it as a few other students told me they were going to do it too. What if, a famous phrase Sue used very often, what if I offered to host a small group, once a month, at my house, for those students who might want some help? I posted a note on our guild Facebook page and quickly had 15 people, when 10 was going to be my limit. I still had to say no to several more. Now I was committed...

Sunday January 1 the first month was released and the show that aired that day featured Carolyn Hock, who was the "stunt sewer" for the Kit/Pattern. I sent a quick note to Alex Anderson, telling her how well I thought Carolyn did and what a great BOM this would be. I mentioned my group--by now I had named us the Halo Sunday Sew and Sews. Next thing I know, Alex asked if I would monitor the Forum, the board where people ask for help--I would be watching for questions about this quilt and answering them. A teacher at heart, I said "sure".  I also sent a note to Sue, telling her how much I loved this pattern and how I appreciated all the work she put into it during 2016, a year of great difficulty for her. She sent back a lovely note--we have been real friends for several years.

The following Sunday, 14 intrepid quilters came to my house, loaded down with fabrics and notebooks. eager/petrified to get started. I began by explaining who Sue Garman is, and what she meant to me, most of them didn't know who she was. We all shared our fabric plans, asked and answered tons of questions, and began the process of getting to know each other. Our guild has over 200 members and I was the only person who knew who everyone was. 

The next day the quilt world learned that Sue passed away--the afternoon before, during our first meeting. It is still so sad. But what a wonderful life she lived and how much she enriched the world. Now I was glad I was making this quilt, her last design. 

Here is how things are progressing for our little group:

Pam has a plan! She also fell a month ago and broke her wrist and arm so has been held back a bit
Donna got the halo effect beautifully

Brenda and Rhonda--keeping up 

Janet and Susan, ready to add their curved flying geese

JoAnne who is not afraid of color

Sheila, winner of the "most dramatic fabric" award--we are all loving her quilt
Terri has such a bright and lively color scheme

There are 5 more who either haven't started, or didn't bring theirs last week or didn't send me a photo. As photos come in, I'll update this.

They are all doing GREAT--I am so proud of the effort they are all putting in and how much the newer quilters are learning. About half these women have been quilting less than 5 years. Some of us are more "seasoned". 

I am a bit ahead as I test all the instructions and write a blog for the first of each month with tips and tricks so here is mine; next up are straight flying geese borders:


Starting a small group is a terrific way to make friends, encourage each other, and learn new things. It's easy to do, all you have to do is ask.

Let's Quilt!

Barbara