Wednesday, March 31, 2021

The Second Annual Joyful Journey Retreat

 Recently I had the pleasure of hosting the Second Annual Joyful Journey Retreat for 17 wonderful women:

We gathered at Red Rooster Retreat Center on Smith Lake, in Cullman, AL, about an hour and a half for most of us. Due to Covid, we were limited to 17 this year, down from 19 last year, to allow for adequate space for all. We were able to have 3 "newbies" join us this year, due to last minute cancellations, we had a great group and fun was had by all.

Perfect for quilters, we like Red Rooster because:

Lots of workspace for each person, a full table and a comfortable rolling chair

Multiple Ironing Boards and Cutting Stations provided and set up in advance

Excellent food, 3 times a day, no cooking or cleaning

Comfortable beds--it's just not the Ritz, more dormitory style

Wonderful lighting and views of Smith Lake from every window

A few photos to show off what was accomplished:


Maybe the happiest camper all week--Terri got lots of help from Suzie and Margo in making her beautiful bag: 


My view from my spot, Smith Lake:
The Wall of Completion:


The view of the pool and hot tub from the covered porch--my happy place, too cold in March for swimming, plus that would cut into sewing time: 
This group of women really like each other and LOVE the chance to "retreat" for 5 days. We were surprised and so appreciative of the gifts several of them made for everyone. A personalized drinking glass, a votive jar with our logo, tiny chicken pincushion, mask holder for around the neck, a pin celebrating this event, a fabric bowl AND, most amazing of all--in the drawstring fabric bag was a beautiful hand-made stitch ripper from a local artisan--THANK YOU to everyone who gave us these wonderful gifts--you have set the bar really HIGH!:


Two special friends--on the right is Kathy--my fantastic Admin, who takes care of all the details, room arrangements, contact with our participants, backs me up and keeps me on track, none of this would happen without her help. And in the middle, the wonderful Margo, who I  have known since the beginning of The Quilt Show, almost 15 years ago--so good to spend real time with her here--she comes that farthest to join us. Can you read the sign over our heads?

We also did fat quarter drawings, notions baskets, and swapped 2.5" light/dark strips with everyone for the special quilt project I designed just for us. Next year will bring new and different plans. 

We are all set for next year, when we fully expect to be back to our perfect number of 19. Those who attend this year get first chance to sign up for next year, when we start the process in late Summer. Then those who had to cancel this year and desperately want back in get the opportunity to come back. When the time comes, I will ask for those who want to be on the "waitlist"--as we found this year, things happen and last minute cancellations are always a possibility. 

And just so some of you can recognize us, the 2021 Joyful Journey Retreat Gang:

Let's quilt.

Barbara


Sunday, March 28, 2021

Latest Finish--Sawtooth Stars

 About a year ago I participated in a swap of 6" Sawtooth Stars organized by Barb Vedder of  the blog Fun With Barb. She has done several and this link shows some great tutorials on the swap blocks used in this and prior swaps. She has said this will be the last, there is lots of work to manage these free swaps, and I understand why she will do no more.

I had fun with the quilting. It is now finished except for the label, almost queen size: 


It is hard  to show the quilting. All of it was done with rulers on my Bernina Q20 sit down longarm. Simple half circle designs on the white sashing:


Point to point half circles on the stars--I figured that out all by myself: 

Curved crosshatching on the perimeter triangles  and the smaller triangles: 


Overall effect is pleasing to me. Might just give this one away to a friend who needs a quilt: 

I made and received 40 star blocks made from reproduction fabrics. I made 10 more to complete the design. To enlarge the blocks I added four triangles to each to make them 9" blocks: 

I posted more about how and I why I made this quilt here: Sawtooth Star project.

Now on to finish another top.

Let's quilt.

Barbara


Wednesday, March 24, 2021

LAND AHOY CRUISE NASHVILLE 2021

 I recently had the pleasure of teaching at the first Land Ahoy Cruise Nashville, run by Stitchin' Heaven, a  well-known quilt shop in Quitman, TX. Five "land cruises" are being held this year since the 15 "sea cruises" held each year by Stitchin' Heaven are not possible.

In many ways, this teaching experience was like most--happy students from all over the country, classes were taught, there was fun and games, lots of good food, and many hours of sewing. The SHAG box (Stitchin Heaven Amazing Gift)  was, indeed, amazing. We also had an "excursion" day that  got us out of the hotel and a chance to see the area and learn some history.

In some ways, things were different--masks were required in all public areas of the hotel and in all restaurants. Sewing tables were set farther apart and dining tables that could accommodate 8 were set with only 4 chairs. In our conference rooms and large dining area masks were optional--some students wore them, some did not.

I tried to eat meals with different students most times, learning names and where they were from. The name tags on the back of each machine sure helped out!

Kelly hard at work

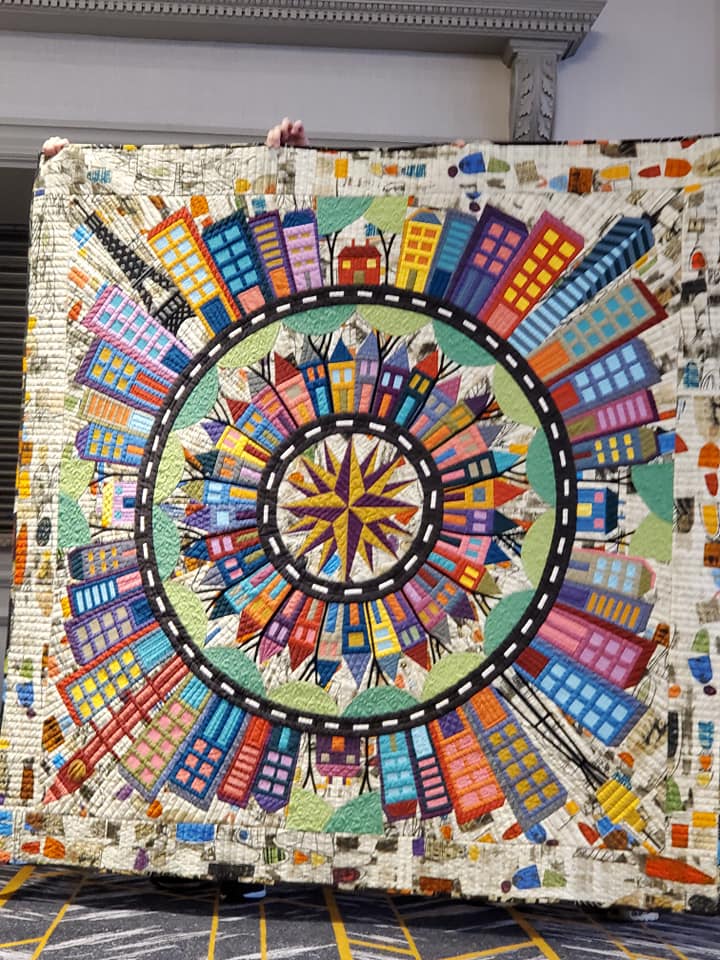
I led off the first day with my Trunk Show--bringing 13 of my quilts that related to our 1800's theme or my journey as a quiltmaker. Color My World. the 2021 Block of the Month for The Quilt Show, got a bit of attention and two students joined The Quilt Show immediately so they can get started:


The back, showing the quilting I did on my Bernina Q20 sit down long arm:


My Lifetime quilt, 100" square, with 12,800 triangles, each 1.25". Subtitled "Wow!":


The recently completed Western Sun top which used a wide variety of 1800's reproduction fabrics: 

The class I taught was Parlor Music, by Carol Hopkins. While I thought it was simple, compared to the other class, Remember Me, the students felt differently and most worked on the other project for the most part.  A couple students did work on Parlor Music first. Tanya got the body of hers done, and will cut off the excess, then add borders:


Terry had fun on the design wall and decided to alternate the quarter square triangle rows, I liked that idea a lot:


Autumn got far along on Remember Me, using her own fabrics:


Thursday was excursion day. First stop was Quilting Squares, a small quilt shop in Franklin, TN:
Good advice: 
Lots to see and buy:

Next stop was Carnton House in Franklin, a home used as a field hospital during the Battle of Franklin in 1864. The home is beautifully restored, with a lot of original furnishings. I felt lucky to have Carrie as our guide, the best historical guide I ever had and I've been to lots of such places:


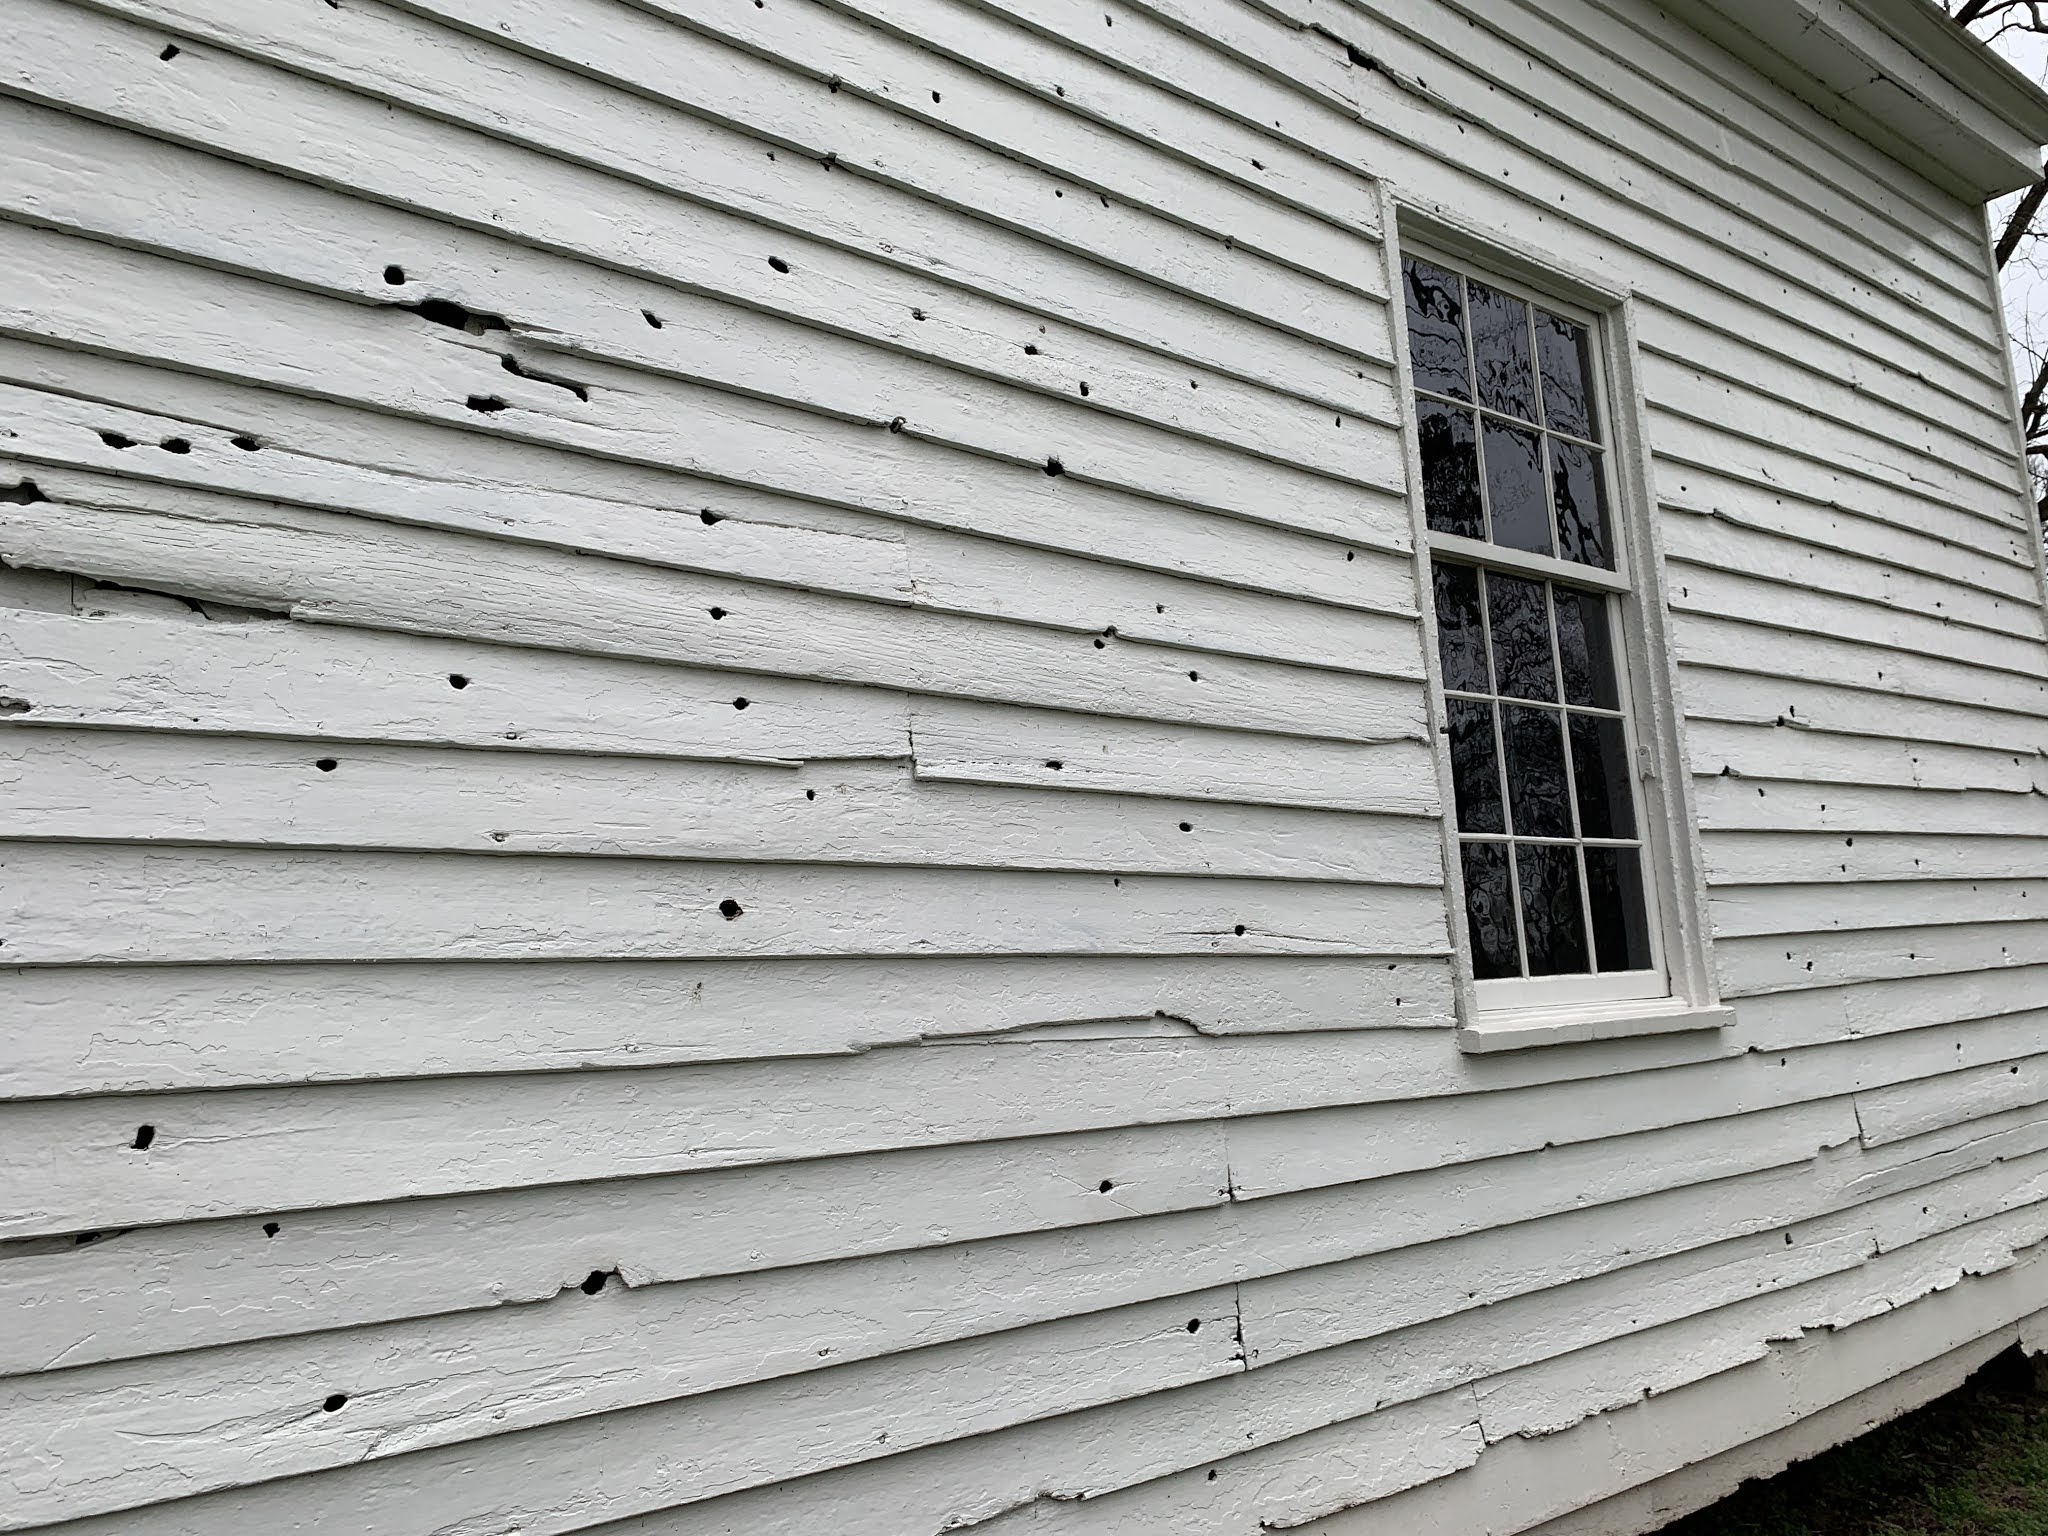
Then we headed down the road a few miles to Carter House. More Battle of Franklin stories and more outbuildings. This one we saw first from the outside:


Seeing those bullet holes from the inside was eerie: 


Thursday evening we enjoyed the Trunk show from Janet Tanner, the other teacher:


After teaching for two days I was able to sew some personal things, while remaining available to students who needed assistance. I was glad to get two blocks started over two days, for an upcoming Round Robin project I am doing with the Sunday Sew and Sews.

This Bullseye block designed by Becky Goldsmith, took me all day Friday and still needs a frame. It is paper pieced to this stage. The center circle is pieced in to the ring of points--it took me almost an hour to pin, sew, fix a few places and press: 


Much faster, this one will be appliqued to the background, then a pieced sawtooth ring will be added: 


All in all, this was a lot of fun. I enjoyed meeting quilters from WA, UT, WY, CA, MN, IL, AR, AZ, PA, NY, NJ, FL and TX. The hotel staff was great, the food excellent, I enjoyed the meals and friendship I shared outside the hotel too. 

This year there are 3 more Land Ahoy Cruises--Fort Worth in April, Las Vegas in May and San Diego in June.  I believe only Ft Worth has space available and registration ends very soon. Several are in the planning stages for 2022. If you want to sew for a week and make new friends, I recommend you come along on a Land Cruise.

Let's quilt,

Barbara


Sunday, March 21, 2021

MY JOURNEY: QUILT # 25

 Another quilt from the Special Exhibit My Joyful Journey, part of the Virtual Quilt Festival, December 3-5, 2020.

QUILT # 25: RUFFLED ROSES  88" x 88".  machine pieced and appliqued,  longarm quilted, 2011-2019 Quilted by Lois Kindley


The Story: designed by Sue Garman as the 2011 Block of the Month quilt, I worked on this quilt sporadically for 8 years. When Sue died in early 2017 I was determined to finish it to honor our close friendship.  It was awarded "Best of Show" at the Fanfare 2019 Quilt Show. For so many reasons this is currently my most favorite quilt of all I have ever made. 

I have written about this quilt many times, including a detailed description of the machine applique process used. Use the Search Box above for "Ruffled Roses" or check out the Tutorials Link above.


This brings us the END of this Special Exhibit. I hope you  have enjoyed seeing my life's work and the journey it has taken me on. Stay tuned for what's to come. 

Let's Quilt.

Barbara

Wednesday, March 17, 2021

MY JOURNEY: QUILT #24

  Another quilt from the Special Exhibit My Joyful Journey, part of the Virtual Quilt Festival, December 3-5, 2020.

QUILT # 24: SIZZLE HOT: 72" x 72". machine pieced, longarm quilted, 2019 


The Story: This was the 2019 Block of the Month quilt for The Quilt Show.com, designed by Becky Goldsmith. one of two I made. For this one, I selected fabrics from my collection that were more "hot" than I typically use. I was very pleased with  how this came out. I put a lot of thought into the quilting designs and did my best quilting to date on it. It is in a private collection.


Let's quilt.

Barbara

Sunday, March 14, 2021

MY JOURNEY: QUILT # 23

  Another quilt from the Special Exhibit My Joyful Journey, part of the Virtual Quilt Festival, December 3-5, 2020.

QUILT # 23: My Lifetime Quilt, 100" x 100". machine pieced, longarm quilted, 2016-2019 


The Story: This original design is based on several antique quilts using the humble half square triangle unit. It contains 12,800 triangles, 1.25" finished. It was machine pieced as a Leader/Ender project over 3 years. I called it My Lifetime Quilt because I expected it would take the rest of my life to finish, I couldn't die until it was done, so I was going to sew it VERY slowly. By early 2019, I knew I was close to finishing so decided to push on. I machine quilted it with a simple diagonal line pattern. It is subtitled "Wow!" because that is the one word I most often hear when people see it for the first time.  

I have written about this quilt several times, showing my construction method. Use the Search Box above for "Lifetime quilt" to find them:


For scale:

Let's quilt. 

Barbara


Wednesday, March 10, 2021

FACE MASK--Not Too Hard

 I have not been a fan of making face masks for the last year. But it is necessary and I will keep wearing mine in public until the virus is mostly contained. Even though I am fully vaccinated. Since we don't know what that means, or how long these first two shots will last, I'd rather be safe than sorry.

But I had not found a mask pattern I liked--and I tried at least a half dozen of them. It had to be easy to make, fast, but mostly it had to FIT. I recently saw a link to this one on the Kelly Cline Quilting Facebook page. Kelly made hers from old embroidered hankies and feedsack fabrics and it was really pretty. This one fits me, not Teddie, but you get the idea:


The 3D Fitted Face Mask pattern is on YouTube, originated by Maria, the Midnight Baker. She has several videos because she has tweaked the design over the last year. I suggest you start with the one labeled UPDATED, then review the earlier ones.  They provide more info on the adjustable ear ties using beads, or you can use elastic.

 UPDATED 3D Fitted Face Mask Pattern

The only problem I had with the videos was having to pause it or go back to get the measurements--the 8 minute video goes by quickly. So, to help you out, here are the measurements she provides: 

ADULT SIZE:                           CHILD SIZE:                 X-LARGE/BEARDS

2 rectangles 7.5" x 10.5"      2 rectangles 6.5" x 9"           2 rectangles 9" x 11" 

Trim corners 2"                         Trim corners 1.75"          Trim corners 2.25" 

Elastic 7-7.5" (2)                       Elastic 6.5" (2)                  8-8.5" (2) 

OR T shirt loops 9-9.5" (2)         7" (2)                             10.5" t-shirt loops  (2)

And 4 pony beads for the ear loops--the hole has to be large enough to fit two loops or elastic through.

Here are the adult rectangles with the corners trimmed--simply draw a mark 2" in from the corners and cut that triangle off. Have the fabrics right sides together. She recommends making two at a time for speed sewing and I agree. With the corners removed, sew all around the two fabrics with a 1/4" seam allowance, leaving an opening to turn right side out.

Turn right side out and press firmly, poking out all the corner points. Then just topstitch the two long edges, close to the edge. This is where making two at once speeds up the process:


Now it is simply a matter of folding the two long sides in, at the diagonal corners, and again press firmly:


The video shows this next part very well and I really recommend you watch it. It's only a little tricky to get the edges folded back as they need to be, secured with a clip and ready to sew in place. You will insert the elastic or ear loop made from strips cut from an old T-shirt into the opening on the edge as you stitch the entire folded edge in place. It sounds more difficult than it is:

Once both ear loops are sewn into the closed seams your 3D Fitted Face Mask is done. Honestly, it took me longer to write this post than it did to make my first two masks. You can see why this is called 3 D--it is sitting on the cutting mat:


Because of the extra room created by the 3D design, the mask is not resting on your mouth. Maria has additional instructions in her earlier videos on how to insert a pipe cleaner or twist tie across the bridge of the nose, which might help with foggy glasses but that was more work than I wanted to do. When my husband saw this one he said "That's pretty". It does help to use a fabric you like if you have to wear a mask. 

The 

The 3 D feature is created with those folded back edges--the sewing in this updated video she said is much easier to do than in her earliest version and I believe it--this was easy to sew:

So, if you are still seeking a better mouse trap, I mean, Face Mask Pattern, give this one a try.

Now, let's quilt! I will be heading out this week to the Second Annual Joyful Journey Retreat with wonderful women friends, and we will wear masks when close together in the dining line--can't wait!

Barbara