Wednesday, December 25, 2019

Christmas--Quilts and Joy!

If it's Wednesday, I try to have a blog post ready.

Today is Christmas. So, Merry Christmas to You! And Happy Hanukkah! And special wishes for whatever you are celebrating this time of year.

I decorate my home with quilts year-round. But at Christmas, a few special ones come out. Here are their stories.

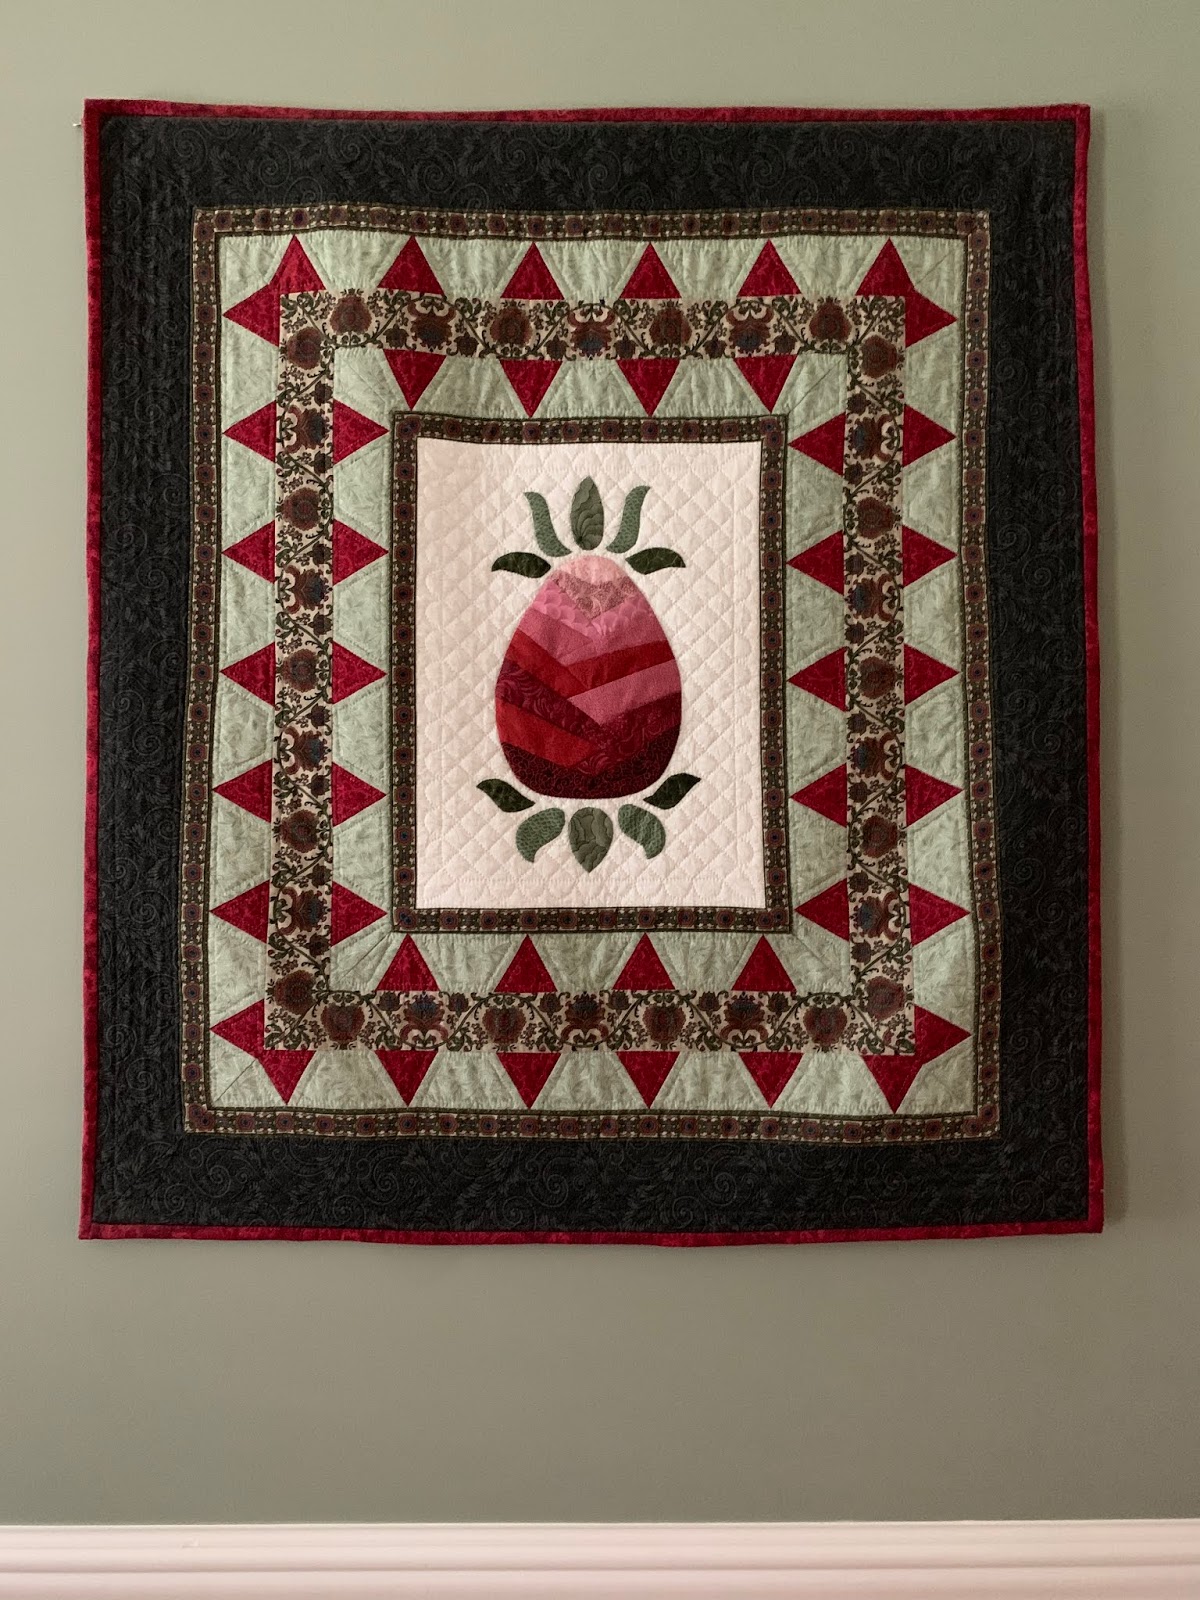
1. Sawtooth Stars: Found at a First Monday sale day in Scottsboro, AL, about 10 years ago. We went early, I turned left instead of right and ended up at a booth just being set up. This quilt was still folded, no price tag in place. I asked the vendor the price, she told me a really low number and I jumped on it. Fortunately, she took my check since I hadn't brought much cash. As we walked away I told my husband I got a steal. His response? "Flip it.". No, never, it's my treasure for now.


When I got it home and was able to study it more, I found two amazing motifs quilted in it. The first is an initial: this appears to be a "W" to me--since my husband's last name starts with a W, I'm going with that. If it was turned over it would be an "M"--no, it's a "W":


The second motif I found is a dragonfly. I LOVE dragonflies and have several of them on display in my home in quilts and paintings. This proves this quilt was meant to be mine. Such a kinship I feel to this maker from long ago:


And I love feathers--this wreath with heart in the center is quilted in each large block:


2. Christmas Around the Country:  I made this in 1989. I won the blocks at a guild meeting, added a couple more and pieced this top with a garden maze set. I was a baby quilter then, so everything was a learning curve. I designed the hand quilting motifs and spent about a year quilting it, so it was ready to use by Christmas 1990:

Old house, don't have that mauve sofa anymore, so 1980's


It was featured on the cover of Christmas Year 'Round magazine, 1991:


3. Cross and Crown: the one quilt that goes on the wall each year. I designed and made it in 1996. It is the first quilt I had longarm quilted:

Titled "Yuletide Elegance"


This quilt appeared on the cover of  McCall's Quilting, December 1997 issue:


4. Christmas Log Cabin: There is one more Christmas quilt I should mention. This Log Cabin I made in 1989 for Christmas Year Round magazine. It was a commission for them so I don't own it. When the magazine came out, they said a kit was available from Patches & Stitches, where I worked and bought the fabrics for this project. They neglected to mention this to Patches so when the phone started ringing with orders--this was WAY before the Internet--they scrambled to fill hundreds of orders. I suppose there are many of these quilts around the country but I don't have one, just this photo with my son's fingers and feet:


I would love to find someone who bought the kit and made the quilt. It appeared in the Premier issue of Christmas 'Year Round magazine, 1989:

That's all for red and green Christmas quilts.

A very Merry Christmas to you!

Let's quilt.

Barbara

Sunday, December 22, 2019

Holiday Festivies

Our guild had our annual holiday party recently--lots of great desserts and silly fun.

Quilters can cook--goodies galore:


Lovely table decorations--the gift bags were just for "atmosphere"--they were empty, faked us all out:

There were games and singing. Somehow, the 12 Days of Christmas song, complete with calisthenics, has become an annual tradition. There is video evidence on our closed Facebook group, so, no, you can't see it.

Even after almost 32 years, I still love our monthly Show and Tell the most. Here is just a glimpse:

Barbara B--Animal quilt, wool applique's, so pretty

The back--beautifully quilted by Patty Wilson

Beverly P--Sizzle Cool, made in our year-long class, quilted by Robin Price

Denise P--love this idea, Christmas quilts for  her 3 little granddaughters

Marianne C--cardinal quilt for her mother

Rhoda J--Don't Be Koi--great use of a panel

Vicky C--Hunter's Star made at a retreat for deaf quilters
There were door prizes for the lucky ones and lots of fun:

What did the Gingerbread Man put on his bed?

Cookie sheets!

What happened to Santa when he got too close to the fire?

He became Krisp Kringle!

You get the idea, right? We laughed a lot.

Lest you think I haven't been productive, here is my Tiny Tree--a quick, free pattern from Temecula Quilt Company.  The blocks are 2.25" finished, the quilt is about 12" x 14"--made up very quickly:


This week I started quilting my Sizzle Cool--this is so much fun!

I have a little baking to do but not too much. We get to enjoy Christmas day with our sons, their women, and our two adorable grandkids, Stella and Sam--so grateful!

May you all have a wonderful holiday season, however you and your loved ones celebrate. And if it's a quiet time for you, that's OK too.

Santa's watching...:

Let's quilt!

Barbara

Wednesday, December 18, 2019

Getting Ready for 2020

At this busy time of year it can be hard to think about what is just around the corner--a new year, with new projects. My focus is on Afternoon Delight, the FREE Block of the Month Quilt from www.thequiltshow.com. But there are lots of Block of the Month, or Sew A Longs, or other ongoing quilt projects on the horizon.

Let's get ready.  For Afternoon Delight we will be printing our patterns, beginning January 1, 2020, and on the first day of each month from January to December 2020.


Gather supplies:

1. A notebook to store the patterns--I like monthly dividers too

2. Page protectors make it easy to use the pattern each month

3. A printer that works.

NOTE: Staples, Office Depot, etc., have ways you can print from thumb drives or email directly to the stores if you don't have a working printer--they will likely be closed January 1

4. Ink, both black and color, for the printer--there are two pages in Month 1 showing color images of all the applique patterns that will be good to have in color

5. Paper for the printer

Inside my three-ring binder, I have a zip pocket with a small calculator, business cards, pens and pencils, etc. Since I take this with me to teach two classes a month on this project, it helps to  have these things handy. I also have some lined notebook paper for notes:


Prepare your Fabrics:

1. Pre-wash fabric if you choose to do that--I did since the reds and blues are  pretty deep colors. I was surprised how little bleeding there was on the Shout Color Catchers Sheets

2. Gather tools--things I like:
             Quilter's Select Print and Piece Fuse Light for Applique patterns
             Apliquick Tools
             Quilter's Select Fabric Glue Pen
              A variety of red and blue threads for applique


Create a Group?:

It is fun to work on these long-term projects with a group of friends. See if there are others local to you who want to do this with you. Please be aware, everyone in the group must be a Star Member of The Quilt Show with a paid membership.

My group, the Sunday Sew & Sews, got started just this way in December 2016 when one of my students asked if I thought she and her sister were "capable" of making Halo Star Medallion in 2017. I said they were, they would learn a lot, and it would require their best work. Quickly, 15 people jumped in and the group was born. Now we are all real friends who look forward to our time together, including the annual Christmas party:


Those two sisters not only made great Halo Star Medallion quilts, they won ribbons at our guild show in October 2019 and they are both semi-finalists for the AQS judged show in Daytona Beach, February 2020:

Brenda's Halo Star Medallion

Jo Anne's Halo Star Medallion
I'd say they were capable, right? They have come a long way in the last few years since they took their first beginning quiltmaking class. Everyone in the group has advanced their skills and their joy in this quiltmaking journey. I am proud to be part of this group.

For more information on Fabric Selection, see Fabric Requirements.

If you like working with Kits, some are still available but they are selling fast, check that option out here: Kits for Sale

I hope this helps you get ready for the big kick-off for Afternoon Delight. The patterns begin Wednesday January 1, 2020, and the Show that will help you see the overall plan, also airs that day--Show # 2601.

Remember, this year-long pattern is FREE for Star Members of The Quilt Show--the cost of annual membership is almost 50% less than the cost of buying the patterns alone--so why wouldn't you be a Star Member? Twenty six great shows a year, a new one every two weeks, AND Star Members have access to ALL the previous 12 years of shows!

Join Now  We have a lot of fun and we learn a lot. Membership makes a great gift--hint for Santa...

Let's quilt!

Barbara

Sunday, December 15, 2019

Sawtooth Swap Blocks

I love making 6" sawtooth star blocks. In 2016 I made 100 of them during Barbara Brackman's "Stars in a Time Warp" block a week sew-a-long:


So when I learned that Barb Vedder of Fun With Barb was hosting a swap I jumped in. Of course, I was at Houston when this was announced and saw it late so I was happy to be #38 out of 40 to make the reproduction list, phew!

Barb has a great tutorial for this block--try it, you might like it: Oh My Stars Swap Tutorial.

As soon as I got home from Houston I jumped on making these 40 blocks even though they aren't due until January. I'd rather get them done and sent to Barb before I start on the next project that awaits.

Here are mine on the design wall:


These go quickly and I enjoy working from small pieces of my repro fabrics.

I look forward to seeing what blocks I receive in return, early in 2020, when I will probably have forgotten all about it--the package will be an unexpected gift.

Thanks, Barb, for the Fun!

Let's quilt.

Barbara

Wednesday, December 11, 2019

Need a Fast and Easy Quilt?

About November 1 I received a request from the good folks at Road2CA to make a quilt for them using Souvenir Fabric they had printed to celebrate their 25th anniversary. This Show  is January 23-26, 2020, in Ontario, CA. I am teaching four classes there and look forward to that show. It is a very large show, attendance about 45,000, so it's a big show in the western US.

The request came at a busy time so I passed on the opportunity. Four weeks later they asked again so I agreed to help out. I asked for 3 yards of the fabric, having no idea what it looked like and absolutely no idea what I would do with it.

Wednesday December 4 the fabric arrived about noon:

During lunch I looked through my Pinterest boards for inspiration. The quilt had to be fast and easy and had to feature the souvenir fabric.

I found this Super Fast Baby Quilt Tutorial. It is a technique I was familiar with, having done it before with much narrower strips. These instructions are clear and the quilt is 36" x 48"--perfect for a baby quilt or small throw. And you could easily enlarge it, using more fabrics.

Cutting the strips 4.5" allowed the Souvenir fabric to be featured in squares large enough to be a focal point.

Wednesday afternoon I cut out the fabrics and began construction. Thursday morning I finished the top, basted the 3 layers and began a very simple quilting plan:

Matchstick quilting
Friday morning I finished the quilting, trimmed the edges, made the binding, sewed the binding to the back of the quilt, turned the binding to the front and used Elmer's glue to secure the binding to the front of the quilt. This makes it easy to machine stitch the binding in place. 

I used a decorative stitch, a buttonhole stitch, to catch the binding securely. It's a little bit noticeable on the back but almost impossible to see on the front since I used thread that closely matched the binding.

Before lunch Friday the quilt was completely done. Well, except for machine washing to get rid of some glue that got on the binding.  

Ta da! Less than 48 hours from concept to completion:


Since I had 3 yards, the back is one piece of the Souvenir fabric:


Easy peasy! I will remember this one for future baby quilts or "have to be done right now" quilts.

From the original 3 yards I have about one yard left. I cut it into four equal pieces and will use those as door prizes in each of my four classes. 

The matchstick quilting was fast and easy. I wanted the lines "straight-ish"--not perfectly straight. That way I could free-motion quilt it quickly on my Bernina Q20 sit-down longarm.  

If I wanted the lines perfectly straight I would have used a ruler foot and Line Tamer ruler. On  a domestic machine, a walking foot would be your friend for this process:

Here is the quilting plan:

1. Stitch in the Ditch down each vertical row of squares--those first lines are 4" apart. This helps stabilize the quilt--if you used pins for basting, many can be removed now.

2. Stitch a line a little more than an inch from the edge of the block--about one third of the block size. I started at the left, went down the first line, back up the next line, again a little more than an inch from the first line, then down again a little more than an inch from the second line. I continued this process all the way from the left to the right of the quilt. This put 3 lines in each square. No starting and stopping, one continuous line of quilting all the way across the quilt.

3. Again, starting at the left, I "split the difference" between the sewn lines, going down one line, traveling in the outside of the quilt, back up to the top, then down again, each time making the lines about halfway apart between the two lines already sewn. All the way across the quilt.

4. Now the lines are about 1/2" apart so I "split the difference" one last time, all the way across the quilt, from the left to the right, down, up, down, etc.

This is HARD TO EXPLAIN but EASY TO QUILT.  If you try to quilt all those lines about 1/4" apart from the beginning, you will likely get lots of bunching as you go. Doing the lines wider, then closer each time, makes the process fast and the results nice and flat. 

Glad I can check this one "Done" on the list. I will deliver it in January.

Let's quilt.

Barbara


Sunday, December 8, 2019

How a Quilter Decorates for Christmas

I put off decorating until I really have to then find it's not so bad. I don't do a lot, but I do enjoy seeing my special ornaments on my "Quilt Tree", many given to me over the years by special quilt friends.

Here is a little look at our home ready for Christmas:

The Quilt Tree--mostly quilt-related ornaments

I am probably the only person you know with an A-6 ornament--from my days in the Marine Corps--I love this thing!
The mantel--with two of my greatest treasures--tiny stockings made for me by Judy Murrah--the note she included with them are tucked inside

Two of my favorite photos of my boys with a couple Christmas characters--and a painting gift from Stella last year

Once the Quilt goes up, the living room looks ready for Christmas

A special gift from close friends who lived in Germany years ago and sent us the best gifts--a wooden Nutcracker is on the mantel

A housewarming gift from Ellen 20 years ago--this lives on the dining room year 'round but looks especially perfect there now
A fun mini-quilt I have made several times--the 12 Days of Christmas by Temecula Quilt Co--the first block has 1 fabric, the second block has 2, the third has 3, etc.

How do you decorate for the holidays?

Merry Christmas, Happy Holidays, Best Wishes--whatever makes you happy at this time of year.

Let's quilt.

Barbara

Wednesday, December 4, 2019

AFTERNOON DELIGHT--Fabric Requirements

So many people have told me and The Quilt Show how excited they are that Afternoon Delight, a pattern by the late Sue Garman, is the 2020 Block of the Month Quilt for The Quilt Show. So, I am not the only quilter who had this great pattern on their bucket list!

The patterns will start January 1, 2020, the same day the show that introduces the Block of the Month is released. If you are not a Star Member, join now so you will be ready to jump in.  Join Now   

If you join in December 2019 you have the added bonus of access to ALL 12 months of the 2019 Block of the Month quilt, Sizzle by Becky Goldsmith--just be sure you download and print all of those instructions you want because after December 31, 2019 they will no longer be available from The Quilt Show--you will have to buy the pattern from Becky when she has it available for sale. 

Here is my version, made from the Kit fabrics available at The Quilt Show Store.


The Kits have been very popular, if you want one, you should order right away. You can add on 3 different border choices, or decide on your own border a year from now when you'll be ready to assemble your quilt.

If you would rather use your own fabric, this pattern is a great stash buster!

Sue's quilt from the cover of her pattern features a red border:


Here is what Sue had to say about Fabric Considerations for this quilt:

1. Her quilt was made with an assortment of civil war reproduction prints, small prints, and tone-on-tones, combined with shirtings. You will need LOTS of them. Fat quarters are convenient but long quarter yards are just as easy to use. Except for the border finishing triangles and borders, none of the fabric needs to be wider than 9 inches. Scraps from previous projects are also great in this quilt.

2. You could just as easily use a different set of fabrics: assorted red or blue prints with white-on-white or cream/tan background prints--or batik prints with a tan or white background. Use what you love!

3. You could also choose to use a single background fabric for the entire quilt. Sue said "I have not calculated how much background fabric would be required for the entire quilt; you will have to use your own math skills for that task!"

4. Sue also said "I have intentionally not included exact fabric color choices for any specific blocks in this quilt. If you, too, want a scrappy quilt, use whatever fabrics you wish!"

Oh, Sue! How often I thought of you and knew you were laughing at me as I used my math skills to calculate all the yardage. I spent many hours going through all 12 months to be sure the Kit would have enough fabric. No wonder you didn't do that...

Here is what you will need and it is the amount of fabric in the Kit:

Background: 10 yards    The Kit has 10 one-yard pieces of light prints. If you prefer fewer, you can use one or a few. If you want a variety, the beauty of this quilt is you don't  have to have it all when you begin. You can add to your stash over the year.

Prints for Piecing and Applique':  13.5 yards  The Kit has 27 half-yard pieces. Again, use fewer or more. If using quarter yards, you would need 54. Start with the color families you want to use and add a variety of light/medium/dark prints of each family. If you have fat quarter bundles you've been saving, this might be the perfect time to use them.

Yes, that's a lot. There is almost as much seam allowance in the pieced blocks as there is visible fabric. All I can say for sure is, with this much fabric, you will not run out. If working scrappy, you can easily add more--one red or green is as good as any other when working with this many pieces.

How about a Red, White and Blue quilt? I quickly pulled from my stash--I call it "shopping in my closet". A few whites that total 10 yards and a bunch of reds and blues. Many of the reds are leftover from Red and White--By the Numbers that I made in 2012-2013:


Border Fabrics: 4 yards, this is enough for the inner and outer borders AND binding. There is a narrow black border between the inner and outer borders—the pattern calls for 1 yard but 1/2 yard will do, it’s a very narrow border.

Sue recommends pre-washing and these fabrics would be great candidates for that. While I am not making a second complete Afternoon Delight, I will be making samples each month that will create a small version so pre-washing might be in my future...

We would love to see your fabrics--post a photo in the 2020 Afternoon Delight Forum under Fabric Show and Tell:

Fabric Selection Show and Tell--Afternoon Delight

One more important NOTE about the Kit: the fabrics are not labeled or numbered--you will decide which fabrics to use in each block--your choice.  This means each quilt will be as unique as its' maker.

Enjoy the journey!

Let's quilt.

Barbara