Saturday, December 31, 2016

Five Years of Blog Posts

It's hard to believe, but I wrote my first blog post 5 years ago today.  It shows a few photos of my studio as it looked then--I've rearranged quite a bit since then.  If you want to read it, it's here.

I try to write a couple times a week, sometimes I even do more.  Hopefully, I can provide interesting and educational posts.  Mostly, this is my diary, the story of my Joyful Journey, through life and mostly about quilting.

My first header photo is still a favorite:


It features some of my favorite works.

So, what is up for 2017?  I will finish:

1. Stella's Splendid Sampler:


2. Rajah Revisited:


3. Ruffled Roses:


4. I'll make a gift for an old friend, from Ohio Star blocks--starting that soon.

5. I'll quilt a bunch of finished tops.

6.  I will travel to teach and work in the quilt industry--first trip has been confirmed, March 2-4, 2017 Panama City, FL, a two-day workshop and a lecture/trunk show with the St. Andrew Bay Quilters' Guild.

7.  I'll teach a lot of classes locally at Patches & Stitches--I'm working on a new sample right  now for Summer 2017 classes.

8. I'm starting a small group that will meet once a month at my home to work on The Quilt Show 2017 Halo Medallion Block of the Month:


AND 9.  I'll have my first Sew-A-Long here on the blog--I'm quilting it now:


Read more about that here.  Part 1 will appear Friday January 6 and will continue on four more Fridays--I hope you'll join in the fun and let your friends know about it too.

Thank you for coming along on my Joyful Journey.  Happy New Year to all.

Let's Quilt!

Barbara

Thursday, December 22, 2016

First Quilt on My New Bernina

The first project made on my new Bernina 765B is done:


Stella's Splendid Doll Quilt, 22" x 29".  Top made yesterday, finished today, machine quilting done on the Bernina Q20 sit-down longarm, and binding made and attached by machine on the 765B.

Stella recently got a doll bed and my first thought was "that doll bed needs a quilt" so I used fabrics from Stella's Splendid Sampler and here it is.  Stella's big girl bed quilt won't be done for at least six months but when it is, she'll have a quilt for her bed that matches her doll bed quilt.


There is always a learning curve when using a new machine, even though I've driven a Bernina since 1987.  I think I've got my beloved 1/4" seam allowance figured out.  The machine binding was a breeze, even without the walking foot which isn't in yet.  This machine has dual feed capabilities so I used that.  All I have to do is hand stitch the four corners, and stitch the sleeve down on the back.

That wraps up all my Christmas projects/shopping so now I can start wrapping gifts. We are so excited to have our kids coming for Christmas.

By the way, there was a good response to the small group who want to work on the   Halo Medallion Block of the Month.  We have room for about 5 more and I expect we'll get those as word gets around and life settles down for most after the holidays.

I wish you all a wonderful holiday, however you spend it.  Be safe and happy!

Let's Quilt!

Barbara

Tuesday, December 20, 2016

Small Group Forming and Why You Should Join The Quilt Show

For all my local folks, I'm starting a small group, about 12 people, who want to work on the 2017 Block of the Month pattern from www.thequiltshow.com, designed by the incredibly talented Sue Garman:


Find information about this quilt at The Quilt Show.  

You have to be a paid member of The Quilt Show, the cost is $42.95 for a one year subscription.  This cost includes everything offered on the site, all the shows, a new one is released every two weeks, many videos on tips and techniques, great instruction from many well-known quilt teachers, a terrific forum where you can learn so many things from so many people, and so much more. This Block of the Month pattern alone will cost more than $70 when it is available to purchase alone, in 2018.

If you join now, before January 1, 2017, you will ALSO have access to the 2016 Block of the Month Rajah Revisited, which I have been working on:

'
Almost Done, last borders still to go

You need to save or print all 12 of the monthly Rajah instructions BEFORE January 1, 2017 because they will disappear then.  

I often say that if I had to severely limit the money I spend on quilting the very last things I would give up are:  my Membership to my local guild, and my Membership to www.thequiltshow.com, my Worldwide guild. I have good friends in each of these groups and I learn SO much from both.  Recently, I received this email from a friend/student who has heard me preach the value of TQS for years:

I finally joined TQS, mainly for the BOM, and have been watching videos. I LOVE it! Wish I had done it years ago.

Just watched Sally Collins on precision piecing and she is amazing. She made templates too.

Thanks so much for the tip about TQS!

You can sign up for Free as a Basic member to see all the things available on the site but you want to sign up as a Star Member to have access to all the goodness, the shows and this Block of the Month.  To join as a Star Member, go Here.

Want to use different fabrics/colors?  Here is what I've just pulled from my closet:

There are about 12 yards of various taupe/light tan fabrics for background, a dark purple for the narrow borders, a Jacobean-style print for the focus fabric, two turquoises, two purples, four greens.  I may also dig in my fat quarter bins for the turquoise and purple to add even more variety.  It's your quilt, do what you want!

Back to my Small Group:

We will meet at my house one Sunday a month, 1-3 p.m.
You can bring your machine to sew if you like but it's not necessary
We will discuss the hows and whys of Sue's instructions
We will discuss fabric selection if you are not using the Kit--I am not, I'm shopping in my closet
There is no cost--just bring your printed set of instructions for that month

If you are interested in joining this small group, please let me know right away as space is limited and join TQS now so you are ready to receive your first set of patterns January 1, 2017.  You will learn so much from this quilt, things you will use in your future quilts as well.  While it looks complicated, we'll take it one step at a time and you can stop whenever you decide your quilt is "done".  See why this is called a No-UFO quilt pattern.

Let's Quilt!

Barbara

Sunday, December 18, 2016

Deck the Halls

The house is now officially decorated for Christmas and not a minute too soon.  Stella arrives with her Mom and Dad a week from now--we are so excited!  PopPop even put lights up outside to welcome her:

Made in 1997, this was a "Cover Girl Quilt" for McCall's Quilting Magazine, December 1997. It makes the house ready for Christmas and I look forward to hanging it each year,

The mantel with a few simple quilted stockings I've collected over the years

We mix the religious with the secular

Safe for Stella, if not, I'll move them 

How to cover  mauve 1980's cushions on a very old Morris chair

My A6 ornament, a gift from my last USMC Squadron in 1979
A gray and cold day--lights will look so much better at night

Hope Stella likes the little lights
For years now I have only decorated a small tree with mostly "quilty" things, many of which are gifts from friends.  Ellen, do you know how much a part of my Christmas tree you are--bunches!  And items bought on travels, Santa bells from Mexico, wooden ornaments from Hawaii, glass quilt blocks from a quilt shop in Ohio, and on and on.  If we ever dig out the "family" ornament boxes again, it will be fun to see things I haven't seen in more than a decade.  This house just doesn't have a good spot for a large tree.  My most prized ornaments are these "icicles" made by my father:


In the early 1940's as a teenager, my dad worked at a place that made medical thermometers.  At Christmas time the employees made these ornaments from the glass used to make the thermometers.  When I was growing up we had more than a dozen and my Dad was careful to put them way up high.  Now there are only four left and eventually my sons will get to share those.  Each year it is so nice to remember my folks and our Christmas trees--always a real tree in our home.  I can still smell it...

Now that all this is done, I can bake more cookies, prepare the Cranberry Chutney, AND set up my new Bernina 765 machine!  The 630 went to a new home yesterday and my husband and I wrestled the 50 lb new cabinet into the studio after wrestling the 40 lb old cabinet to the garage--that will be delivered to the new owner this week on a day without rain.   I have to rearrange things just a bit to accommodate the larger cabinet.  Then I can give the 765B a workout.  Exciting!

Merry Christmas, Happy Hanukkah, Happy Kwanzaa, whatever you celebrate. And let's Quilt!

Barbara

Thursday, December 15, 2016

Christmas/Holiday/Winter Baking

Pick your descriptive word, this is the time of year a lot of us bake stuff, mostly sweet stuff.  Today is extra cold here, high in the low 30's and blustery so it's a great day to bake.  Once these photos hit Facebook I got recipe requests so here are 3 of my FAVORITE recipes I love to bake this time of year.


CRANBERRY PISTACHIO BISCOTTI

1 1/3 cups dried cranberries, Craisins, about 1/4 pound
2 1/2 cups unbleached flour
1 cup sugar
1/2 teaspoon baking soda
1/2 teaspoon baking powder
1/2 teaspoon salt
3 large eggs
1 teaspoon vanilla extract
1 cup shelled pistachio nuts

Egg Wash:  one large egg and 1 teaspoon water

In a small bowl combine cranberries with enough hot water to cover and let soak for 5 minutes.  Drain cranberries and pat dry with paper towels.

In bowl of electric mixer fitted with paddle attachment blend dry ingredients until well combined.  Add eggs one at a time and the vanilla, beating until dough is formed.  Stir in cranberries and pistachios.  Turn dough out on floured surface--it will be very sticky.  Knead it several times and halve it.

With floured hands form each half of dough into a flattish log 13" long and 2" wide.  Arrange the logs at least 3" apart on a lightly greased cookie sheet OR use parchment paper or a silicone baking sheet.  Brush logs with egg wash. NOTE: DON'T FORGET THIS STEP,  I OFTEN DO!
 Bake in the middle of preheated 325 degree oven for 30 minutes.  

Remove from oven and cool on baking sheet on a rack for 10 minutes.  After cooling, on a cutting board, cut the logs crosswise on the diagonal into 3/4" slices.  Arrange biscotti, cut sides down, on the baking sheet and bake in 325 degree oven for 10 minutes.  Turn them over and bake for an additional 10 minutes or until pale golden.  Transfer to racks to cool and store in a airtight container.  Makes about 36 biscotti.

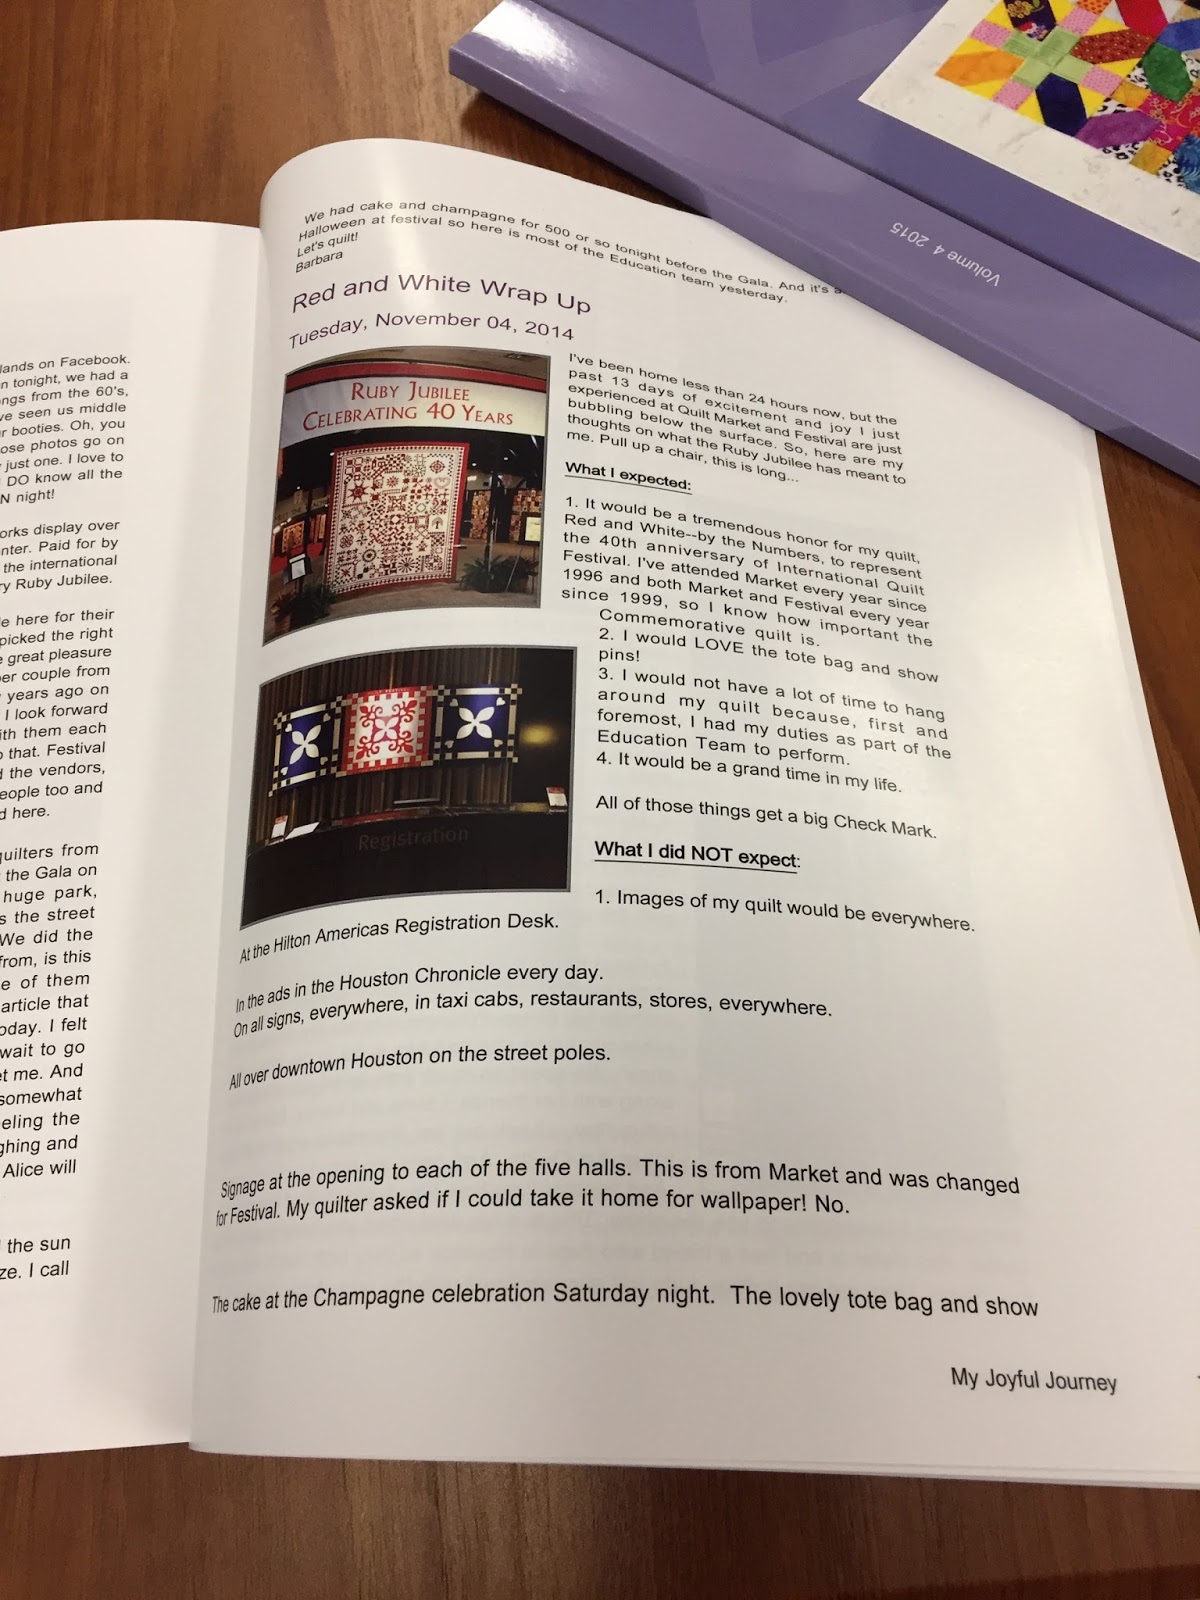
I received this recipe from a good friend, Sharon S., and the first time I made them she came over and we did a baking day together.  That was fun and I learned how to make them with her help.  It's really easy and now I make them every year.  


PUMPKIN CHOCOLATE CHIP COOKIES

1/2 cup butter or margarine                            2 1/2 cups flour
1 1/2 cup sugar                                                1 teaspoon baking powder
1 egg                                                                1 teaspoon baking soda
1 cup canned pumpkin                                     1/2 teaspoon salt
1 teaspoon vanilla                                            1 teaspoon nutmeg
                                                                         1 teaspoon cinnamon
                                                                          1 cup chocolate chips
                                                                         1/2 cup chopped nuts (optional)

Cream butter and sugar until light and fluffy.  Beat in egg, pumpkin, and vanilla.  Mix together dry ingredients; add to creamed mixture, mix well.  Add chocolate chips and nuts.

Drop by teaspoon onto well-greased cookie sheets OR use parchment paper or silicone baking sheets.  Bake at 350 for 15 minutes, or until lightly browned.  Remove from cookie sheets while still warm.  Makes about 6 dozen.  NOTE:  I double this recipe and chill the dough when first made, as it is really soft.  These cookies freeze well.

NOW, HERE are my MOST FAVORITE COOKIE OF ALL:


"FORGET 'EMS"

2 egg whites, room temperature                  1 teaspoon vanilla extract
1/4 teaspoon Cream of Tarter                      1 6 oz. package Chocolate Chips
1/8 teaspoon Salt                                         1 cup broken or chopped pecans
2/3 cup Sugar

Preheat oven to 350 degrees.  Beat egg whites, cream of tarter and vanilla.  Add sugar gradually and beat until sugar is dissolved--this may take 15 minutes.  Add remaining ingredients.  Drop by teaspoon on ungreased cookie sheets OR use parchment paper or silicon baking sheet.  Place ALL the cookie sheets in the oven at one time.  TURN OFF THE OVEN IMMEDIATELY.  Leave them overnight to dry out, in other words, "forget about them" until mornng.  Makes about 5 dozen.  Use food coloring if you wish, to make pink, blue, red, green, etc. cookies.

NOTE:  I make these two or three times each year because they are so easy.  As I am preparing dinner, I separate the egg whites from yolks when eggs are cold, let the whites come to room temperature while we eat dinner, and I discard the yolks.  After dinner I mix the cookies and put in the oven, clean up the kitchen and "forget 'em" until morning.  These store well in the freezer.

We all  have our favorite recipes, and I will make a few more different kinds but these are the first 3 I make each year.  I'll need an extra few minutes on the elliptical trainer today!

Let's Quilt!

Barbara

Sunday, December 11, 2016

My Christmas Gift

That I bought for myself--Blog2Print printed and bound annual editions of all my blog posts:


Several months ago I read someone else's blog about this company and thought it would be fun to do. The price depends on the number of pages and whether you want a soft bound cover or hard bound cover.  I went with soft bound, selected a different color cover for each year and had them printed as "annuals".   I did learn the hard way to edit the front and back cover photos the first time that option appeared--Blog2Print automatically uses the first photo in the first post in the book for the front cover and the second photo for the back cover.  That was fine for the first year, my studio shots, but for the other 3 years I wanted specific photos, like Red and White--By the Numbers for 2014.  Going back to edit the photos later was much more difficult for me so I now know to edit them first.

My first blog post was December 31, 2011 so I made that the first one in the 2012 edition:


It wasn't too hard to figure out how to select the posts I wanted in each book--I simply went from the first to last day of each year.  The price was reasonable to me  BUT there was a 35% off coupon sent to me when I first created an account, as I was figuring out how the site works.  So, I recommend you take a look, create an account, and wait a few days.  That 35% off coupon ended 11/28/16 but there might be another one sent directly to you by email.  You can select just certain posts, like your recipe posts, or a big family vacation post--soft cover 20 pages is currently $19.95, not bad for your very own "book".  Blog2Print

I enjoyed looking through each edition and reliving some of my moments.  My favorite post is still Red and White--the Wrap Up, November 4, 2014, which I wrote to help me remember the International Quilt Festival 40th Anniversary Ruby Jubilee:


I have no affiliation, just a satisfied customer.  In January I'll have the 2016 edition prepared so I'll be up-to-date with each year.

Let's Quilt!

Barbara

Thursday, December 8, 2016

Cleaning Up Leftovers and a Sneak Peek

After finishing Rajah Revisited:

Rajah Revisited

and Circa 2016:

Circa 2016 
 I have a big pile of leftover pieces, not really yardage, but chunks of many different fabrics, which were used or considered for both of those quilts:


To tame the chaos I decided to cut up all the chunks, the stuff not big enough to be folded and returned to bins in the closet, cutting into sizes I need for two or three ongoing projects.

First, I need more triangles cut for my Lifetime Quilt:


These require strips 1.75" wide and I use a Half-Square Triangle ruler to cut the pairs which finish as 1.25" squares.  More info on my process is here.  Some of the strips cut so far:


Then I decided to cut 1.25" strips for an eventual Log Cabin quilt, with blocks that finish at 5.25":


 AND, I decided to create a quilt for an upcoming Sew-A-Long that will begin in January 2017.  It will be a Teaching Tutorial, with 5 weekly posts that will take you from start to finish and teach things like:

How to Select Scrappy Fabrics OR Not So Scrappy
How to Perfect  Your Piecing
How to Make Two Different Blocks
How to Make an On-Point Setting
How to Float Your Blocks at the Border
How to Accurately Cut and Sew on Borders
How to Apply Binding for Hand or Machine Finishing

Here is your Sneak Peek:


Mine is 33" x 42",  but you can make yours smaller or larger, adjusting borders as you choose.  I guess it's the time of year that this one looks so Christmas-y.  I'll make another for step-by-step photos that will be completely different.  I hope you like it and will plan to join us in January 2017.

Having fabrics cut and ready for various projects is one of the ways I manage to get things done.  If I had to stop and prepare fabrics before I could sew, each time I wanted to sew, it would take a lot longer.  Because the fabrics are ready NOW, I can make use of even short amounts of time, sewing, not cutting or planning.  We'll talk more about those kind of tricks in 2017 too.

Let's Quilt!

Barbara

Saturday, December 3, 2016

UFOs, PHDs, PIGS, Ongoing Work

Whether you call them:

UFOs:  unfinished objects or
PHDs:  Projects Half Done or
PIGS:  Projects in Grocery Sacks

We all have  them--projects we start with good intentions that somehow get put on the back burner as something more exciting or more pressing has to get made.

Here are some of mine:


Diamond Jubilee--the quilt I intend to make to celebrate my 60th birthday--which happened two years ago.  This one is getting moved up the list, eventually...


I finished this top yesterday.  The hexagons are 1" and where made from a pack of 5" Charm squares, cut into quarters--the 2.5" squares fit the paper very well.  This was started at International Quilt Festival, Long Beach, CA 2009. For some reason, I didn't take any handwork with me and, of course, that was a mistake.  The great vendor, Cotton and Chocolate had a brilliant marketing plan:  They sold a "kit" packed into a plastic travel bag with their name and address on it, that included a Clover Desk Needle  threader, best notion ever, a spool of thread, a package of needles, and your choice of a packet of Paper Pieces shapes for English Paper piecing.  You purchased your choice of a MODA charm pack and they cut the 5" squares into 2.5" squares for you.  Sucked me right in.  All you needed to be sewing was a pair of scissors and they would be delighted to sell you those too, if you needed them.  They now include a Glue Pen for fast and easy basting of fabric to paper and today they even have a kit for machine sewing the hexagons, here.  This became my "take along" project for years until I finally buckled down to finish it.  Up next, it gets machine quilted. And, yes, I applique'd the hexagon top to the striped fabric borders; no way I was finishing it with the traditional hexagon zig zag edge.

Another favorite I am eager to return to:


Patriotic Pineapple blocks.  I really love this and lots of fabric strips are cut and ready, but, alas, it's not on the wall currently.

Today I took down my Lifetime Quilt to make room but here is what it is starting to look like:


This is my Leader/Ender lifetime project--I can't die until I finish it so I'm sewing it slowly...  Each half square triangle is 1.25" finished. Shown here are 5 blocks, each 20" square.  See the link above for step-by-step photos of my process.

Stella's Splendid Sampler needed more room so I  rearranged the design wall:


Only 16 more blocks to go, 8 weeks left.  I'm ready to see the end of this one.  The patterns are all free currently and available at The Splendid Sampler. A book is being printed for release after the project ends in early 2017.  It was more challenging than I expected but it's fun being part of a Facebook group of almost 24,000 members and who knows how many more who signed up with email.  Pat Sloan and Jane Davidson must be overwhelmed and amazed at the interest their little project has generated.

When Stella's Splendid Sampler comes down, here is what is going UP:


Sue Garman's Ruffled Roses--the Block of the Month quilt for The Quilt Show, 2011.  I still love it and am determined to finish it in 2017.  I wrote about my Turned Edge Applique' method here.  Having it prominently displayed on the design wall will be just what I need to get this one done. Guessing it will take me about two months to finish the top.  The pattern is still available from Sue's website:  here.

There are more projects I need to get back to, of course, but this is probably enough for 2017.

Let's Quilt!

Barbara

Thursday, December 1, 2016

Rajah Revisited

It's December 1 and I just finished the October borders for "Rajah Revisited", the 2016 Block of the Month from The Quilt Show.


Next up are the final outer applique' borders.  Two are cut and await hand applique'.  I don't have enough fabric for the final two though I have something close.  If my local shop has the fabric, I'll buy enough to finish.  If not, the close one will be used.  The women on the ship didn't run to their local quilt shop for fabric, they used what they had.  Works for me.

 Here is  info from the website about this quilt:

It was sewn by women convicts on board the ship Rajah traveling from England on April 1841 to the penal colony of Van Diemen's Land-now known as Tasmania.  The original quilt measured at approximately 128" x 128", but this version is recreated it in quarter scale with fabrics from the designers' stash. The designer, Leesa Siegele,  used many different scraps, imagining that's what might have happened when the original quilt was being made.  She followed the colors of the original quilt loosely, and tea dyed fabrics that didn't look old enough.  

The entire twelve month set of instructions for this quilt will remain available for members until December 31, 2016.  There is so much great information on The Quilt Show and the BOM alone is worth the $42.95 annual membership.  Every two weeks a new 1 hour show is released and I always learn something from each one.  You can be an Basic member for free but being a Star member is the best use of your time and money--in my opinion.  No connection to TQS other than being a perfectly satisfied paid member since the inception of the show.  The 2017 Block of the Month is a Sue Garman design, another fantastic medallion quilt I must not start--until I finish the 2011 quilt she designed, Ruffled Roses.  2017 is the year to finish that one, see my progress here.

Of course, I'm still plugging away at Stella's Splendid Sampler.  Block 84 was released today--I'll make it tomorrow.  Then just 16  more to go:


Let's Quilt!

Barbara