Sunday, March 29, 2020

Patriotic Pineapple Quilt

After 10 years, this red, white and blue Patriotic Pineapple quilt is done. I think. Maybe...


Border or No Border? What say you, Internet people? I got lots of suggestions from Facebook and Instagram--you will see below what I decided...

The particulars:

8" blocks
1" finished "logs"
2" finished red centers
set 8 x 10 blocks: 64" x 80" as is

I intend it to be a large throw size, not a queen-size bed quilt. As a throw, it is fine as is. For a Double bed, I could add a border, 4" all around. That would make it 72" x 88". But, who has a double bed?

Double bed batting I have on hand and plan to use is 72" x 93"--that wouldn't really work, it would be a bit too narrow for the quilt with 4" borders.  A 3" border would be 70" x 86"--that would be tight but I can make it work, I think.

I will quilt it on my Bernina Q20 sit down longarm. If I baste it carefully, the 3" border would work. But does it NEED a border?

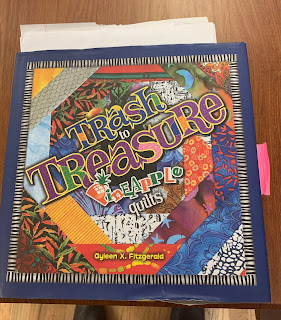
The book that started this whole project was published in 2010, Trash to Treasure  by Gyleen Fitzgerald. I bought her Trash2Treasure ruler too, and made about half the blocks with it:


When I finally got back to this, about 6 month ago, I began using the Creative Grids Pineapple Trim Tool Ruler, since most of the students I would be teaching would have this one:

Both rulers work fine. I found the Creative Grids ruler to be my favorite because of the grip-stuff on the back of CG rulers. Once you figure out the instructions, of course. One of the best things about Creative Grid rulers is the instructions for each ruler is on their website--helpful if you lose the pamphlet that came with the ruler. And they often have videos there to show exactly how to use some of the specialty rulers.

In January I wrote about Quilts I Should Finish This Year. This was #1. So, I am either finished or close to it--you decide.

Next up, $795, begun many years ago, 2006, I believe:
Geese 1.375" x .6875"--Paper Pieced.


There are little projects that will be fit in between this one but it will also be finished this year.

Are there long-term projects you are working on and plan to finish?

As for the Patriotic Pineapple? My husband suggested blue so blue borders it is, from four different blues, cut 3". Finished size is 70" x 85":


Let's quilt.

Barbara

Wednesday, March 25, 2020

Keeping Busy at Home

In this unusual time, when we are being asked to stay at home to "flatten the curve", I try to keep things as normal as possible.

As a quilter, I make quilts--that is who I am and what I do. The Patriotic Pineapple is almost done--one more row and this half is done and can be sewn to the other half:


My usual routine, that continues:

1. Be at work in my Studio from 9-4 most days
2. Lunch break about noon
3. Elliptical exercise after lunch, shower, fresh clothes
4. Cook the standard meals, nothing fancy
5. Keep a running list of groceries needed, hubby does the shopping
6. Turn off the TV at 9 a.m., keep it off until 5 p.m.

What I am doing that is not the "norm":

1. Staying home, since March 15 when I returned from Retreat.
2. Only going in the yard to snap Spring photos--pollen makes me cough and that is just not what we want to do right now.
3. Not spending time booking airfare and  hotels, preparing Supply Lists, and class samples--3 jobs have been canceled for April and May, waiting to see what happens with two trips in July and two August.
4. Calling one friend each day just to talk--we are usually too busy. No excuse right now.
5. Spending too much time on Facebook--working to cut that back. There are quilts to make and pretty much everyone is saying the same things.
6. Finding it hard to remember what day of the week it is--lots of folks seem to have that problem right now.
7. Missing my Littles--they only live 30 minutes away but we are all "sheltering in place" so won't get to hug them for a while yet--we do FaceTime most days:

Sam and Stella on St. Patrick's Day
Back to  quilting. I am trying the Starch Method with leftover Yarra Valley fabrics to make more Double 9 Patch blocks, even though my Sample quilt was completed last year and my smaller Demo quilt was completed last month.

Pros of Starching Fabric:

The precision on small blocks is better. These have .75" finished squares and the 9 patches are 2.25" finished. When I used a few strips that were not starched along with starched ones I could see a difference--the firmness of the starched fabric kept things in place while sewing.

Cons: 

It takes time to apply the starch and let it dry, overnight is recommended. When I want to sew, I want to sew NOW so waiting is not in my nature. I have been spraying the fabrics for the next round while sewing the current round and pressing them dry if needed. Do not press while still wet--this will dry the starch into flakes--not what you want.

The quilt will need to be washed when completely done, quilted and bound. Starch is made from corn and bugs can be an issue with starch that remains on fabric. I usually wash quilts when done, but not always.

Since I wanted to do something with these little 9 Patches, they have become my current Leader/Ender project--when I run out of starched strips, I'll stop making them and that will determine how big this little quilt will be:


Quilters are probably better able to fill their time, being at home for so long, than many people. I feel for parents of young kids who have to work from home, like my son and daughter-in-law. My concerns are for all those who still have to leave their homes: healthcare workers, grocery folks, restaurants trying to stay afloat. And for all those fearful of financial worries.

And for my brother-in-law who had a stroke March 14. March 19 all hospitals in Alabama went under a No Visitors Order so his wife and kids cannot see him at all. They live an hour away and can only get updates by phone with the nurses. Today he continues to breathe without assistance, so that is good news. 

Stay calm, make quilts, wash your hands. This will pass and we'll all be back together soon, I hope.

Let's quilt.

Barbara

Saturday, March 21, 2020

Starch Fabric for Precision

Over the years I have known people who like to use liquid starch to add firmness to their fabrics--they swear they get better precision because of it.

Many people working on Afternoon Delight struggle with precision on those tiny 3/4" finished squares.


At my recent Joyful Journey retreat, I was thrilled when my friend Margo Clabo decided to come. We have been friends since 2007, meeting on the Forum of The Quilt Show . We live only 4 hours apart, but we only see each other occasionally at International Quilt Festival Houston, and only for a few minutes then.

Margo fit right in at Retreat and when I saw her super-precise pieced Afternoon Delight blocks, I asked her to discuss her starch method with the group. She agreed and now we want to share her process with you.

First, you need liquid starch, Sta-Flo is a great brand. Find it in the laundry aisle, up high or down low, not at eye-level:

All you need is water and starch and a spray bottle. There are lots of recipes out there, some with vodka or distilled water. I just used tap water and Sta-Flo, in a 50/50 solution. According to the label, that is a "heavy" starch solution and that is just how Margo likes it.


Margo says "I “chunky cut” my fabrics (Sue’s instructions call for 8”x10” for these double nine patch blocks) then lay them out flat on an old beach towel. I use a 50-50 mixture of water and Sta-Flo liquid starch in a spray bottle to saturate the fabrics and leave them overnight to dry. I steam them for a crisp fabric that makes cutting and piecing a lot more accurate."

So I am trying it:

If it had not been raining, I would have sprayed on my back deck--a bit of overspray on my hardwood floors made a sticky spot--careful! Now they have to dry overnight.

You want to be sure they are bone dry before cutting. Then use steam, either with water in the iron or a spray bottle, to crisp them. Then cut those narrow strips, 1.25" wide for Afternoon Delight.

Margo continues:  " I still use Barbara’s recommendations to carefully measure each step of the way. The smaller the pieces, the more important it is to be accurate!"

Her blocks are so precise, and the fabric is not stiff like cardboard but is definitely firmer than you get from spray starch or sizing or Best Press or any other product.

You can't argue with her success, so if you are struggling with these small blocks, try it, you might like it.

Another tool the Sunday Sew & Sews have, and so does Margo now that I gave her a set, are these wonderful Templates:


Cindy B, one of the Sunday Sew & Sews came up with this idea and ordered them as gifts for each of us. She was very pleased with the company, they understood what she wanted and asked Cindy to send her a drawing for them to duplicate. Fast service too. TCR Engraving & Graphics, Terri@tcrengraving.com


BIG UPDATE: the company started receiving orders right away so have listed the set on their website, ships free in the US. They are a small family owned business and said they VERY MUCH APPRECIATE the boost to their business:

Double 9 Patch and Shoo Fly Template Set

At Retreat, Margo became a believer, see how little she shaved off her blocks for perfection. Using a small cutting mat makes it easy to turn the block/template for trimming:


Margo also likes to press her seam allowances with those twirly intersections:


Remember to read my tips for these blocks--or ANY small, precisely pieced blocks: Double 9 Patch Blocks   

I hope these tips will help those working on Afternoon Delight. But remember, precision piecing is important whether the blocks are 2.25" finished as these 9 patches are, or 12" finished.

Let's quilt.

Barbara


Wednesday, March 18, 2020

Joyful Journey Retreat #1--It's a Wrap!


Almost two years ago I had an idea to host a retreat for about 20 quilters. Finding an Admin person was essential as I am too busy to handle the paperwork, arrangements, registration, etc. I found the perfect person in my friend, Kathy Root, who liked the idea and agreed to help me.

If you missed my first post about the retreat, check it out From Retreat to Reality

Last week the big day finally arrived and we headed to the Red Rooster Retreat center in Crane Hill, AL.  Kathy and I arrived early to set up the sewing stations and put up room signs so everyone could find their spots:


At 2 pm no one had arrived. At 2:15, still no one. Did we have the right day? Finally, the first arrival, a woman who lives really close by. And then, her two friends, also local. Almost an hour past the 2 pm start, the rest started to arrive--a big crash on the Interstate created traffic problems and their GPS took them "over the river and through the woods" to our remote location. And it started to rain. We quickly got everyone's cars unloaded and the retreat was underway.

Did you notice the aqua Handi-Quilter bags on each seat? Goodie bags for all, full of lots of wonderful stuff. Kathy made ALL the fantastic coffee can bucket liners and a matching 22" x 14" design board for each person:

Thanks to the many vendors who offered support for this event, especially Handi-Quilter and Quilter's Select.

Most of these women knew only a few of the others. Two of the three locals knew no one but each other, I had only met one of them a year ago. My friend, Margo, only knew me and we rarely get to see one another--she lives 4 hours from us.

So, for me, one of the very best things I observed, was how ALL of these women made an effort to meet each other, talk to each other, get to know each other, and I could see relationships form and bonds grow. Even those of us who knew each other learned a lot more about who we are as people, not just quilters.

I was determined to make that happen so I created the only game we would "play"--20 questions. After each meal, two people, selected alphabetically, selected a number 1-20 and had to answer whatever that question was on my list, they did not know the questions. Here are a few:

Who do you love?
What is your greatest strength?
What is your greatest accomplishment so far?
What would you go back and tell the girl you were at 18?

You get the idea, all the questions were positive, all helped us learn more personal info about the others. There was lots of laughter and a few tears, especially as accumulated fatigue set in over the 5 days.

Now for some photos:

I created a small project, Charming Sampler. Not mandatory, but most people tried out some of the blocks--they are 3" finished:
Conna used indigo and shirtings

Sandra loves Christmas

Janey went bright, like her personality

Mazie--the "young 'un" who we all just love!
Joan used reproductions

Sue E went with batiks
Kim pressed on and completed all but an outer border, with sweet fabrics
My class sample, an original design, 33" square: 


 An antique top I bought from Cindy Rennels after mine was completely done, proving there is nothing new under the sun, especially in traditional quiltmaking--it sure feels similar:


More progress photos:

How about a 15 year Dear Jane project? Suzie is so close to completion--she got all but a few triangles done for her very last border--to say we were impressed with her work is putting it mildly:
Final border triangles
She brought the completed center with her
Ta-da!

Many worked on Afternoon Delight. More progress photos:

Margo
Brenda

Judi

Many worked on long-simmering projects and were thrilled to get them done or at least a lot farther along:

Terri's Dear Daughter

April--my absolute favorite, one of several completions for her!
And Sue E was determined to get this top to completion and she did--so happy for her:


The TV was never turned on and that was so smart. We all knew what was happening in the outside world, we all had 1-2 devices at the ready, news feed, social media, calls to/from home. But we were happy in our creativity and the friendships growing, not filled with anxiety about things we could do nothing about. Plenty of time for that at home.

I worked on a few things but mostly I just watched the fun happen. My progress:

Binding on the gift quilt I received in 2017

Sylvia's Bridal Sampler blocks

Flying Geese 1.375" x .6875"--begun more than 10 years

The layout, several more of these to go for a quilt I am calling $795

My goal was that each person get what she wanted from the Retreat--and I believe they all did. Everyone insisted we do it again next year, we hadn't really planned to. And all said they want to come back--a few wanted to give us money right then to be assured their space was safe. We will limit attendance to 19, that was perfect. It will be several months before we take reservations--the 17 who trusted us get first dibs on next year. If there are any spaces open, we will let you know...

Best line of the Retreat:  "I can tell you, it's like riding a bicycle" (you had to be there...)

Best meal of the Retreat: they were all good--we loved hearing the dinner bell ring 3 times a day, nothing to cook or clean up, those with special dietary needs were well accommodated.

Best part: new friends were made--in fact, the 3 local women joined the Huntsville guild on the spot so they can see many of us again.

Too soon it was time to say goodbye. We highly recommend the Red Rooster Retreat Center and are on their calendar for March 10-14, 2021. They are having a special for this summer, 2020, as they have a few openings on their calendar--$25 off per person. You need a group of 12 minimum, and they can sleep 22 maximum. In the summer the pool, hot tub and lake are all available to guests.

Check out their website and Facebook page:

Website

Facebook page


Let's quilt.

Barbara

Sunday, March 15, 2020

AFTERNOON DELIGHT--Month 6--EARLY RELEASE!!!

This pattern is the 2020 Block of the Month pattern offered FREE to Star members of The Quilt Show--join today to receive the entire year of patterns free. 

This month we introduce the other pieced pattern: the Double 9 Patch:


There are 64 total of these blocks in the quilt and the instructions are for making 12 each month for 5 months, then the final 4 blocks. Of course, if you want to make them all as soon as possible, that is fine too.

NOTE: VERY IMPORTANT CUTTING INFORMATION--Sue's instructions have us cutting strips 1.25" x 10" for making the 9 patches. Once sewn into groups of 3 fabrics, we cut SIX SEGMENTS--if you cut and sew perfectly, those six segment use 7.5", meaning you have 2.5" leftover. That leftover amount can be used in the NEXT set of 12 Double 9 Patch blocks. OR CUT THE STRIPS 1.25" x 8" allowing a half inch extra for straightening the segments as you cut. The choice is yours. 

These blocks have little squares--3/4" finished, just like the Shoo Fly blocks. However, the Shoo Fly blocks were a little forgiving in that the tiny 4 patch "floated". These blocks will require you to do the best you can on the three things that can go wrong: the CUTTING, the SEWING, and the PRESSING. 

THE CUTTING:

Make sure you cut the strips carefully, 1.25" wide. Cut straight and slow. There is not much wiggle room for less than perfect cutting with these blocks. Lay out the prints and backgrounds as shown in the pattern--there are twice as many Print/Background/Print units. 


My strips laid out for this second quilt I am making

THE SEWING: 

I encourage you to check your piecing accuracy right from the beginning. Sew the first two strips together, sewing as straight as you can. It's not a matter of how fast you can sew them, it's how accurately you can sew. Press toward the darker fabric, away from the background.

MEASURE NOW: the strips should be 2" wide--.75" + .75" = 1.5" plus the .5" seam allowance:


If they are slightly wide, it is easy to trim off the excess. If they are slightly narrow, STOP. Fix this now. It might be the thread is too thick--I use Masterpiece 50 wt or Quilters Select 60 wt or Aurifil 50 weight. Want more information on thread?  Thread--It Matters

It might be you sewed too fast or went crooked instead of straight. Figure out what caused the strips to be less than 2" wide when sewn together. Once you know how to achieve that 2", you are good to go.

ANOTHER NOTE: You get to decide how perfect your piecing has to be. If "close is good enough" is your motto, that's perfectly fine. No quilt police here.

I wish I had taken my own advice. I know how to piece accurately, right? I simply chained, chained, chained, then turned the two strips into three strips BEFORE I measured. Guess I was in a hurry because my strip units were too narrow, by at least 1/8". It was difficult to get my 9 Patch blocks the right size, 2.75" UNFINISHED.  So there was a lot of un-sewing for me. Believe me, you want to find out at the first  possible moment that you need to adjust your seam allowance, not several hours in.

THE PRESSING:

When pressing the print strip away from the background strip, use the edge of the iron to press the print away from you. Press as flat as possible, don't wiggle the iron back and forth across the seam. Just use a firm pressing motion to press the print up, away from the background.


CUTTING THE SEGMENTS:

I put the middle strip on top of the other strip, right sides together, being sure the seams were nesting. Then I cut them into 1.25" segments. To be sure I got the maximum amount of scrappiness, I worked with 5" cuts at a time, cutting 4 segments:  4 x 1.25" = 5". Now they are ready to chain through the machine:


PIECING THE SEGMENTS:

To pin or not to pin, that is the question? I started out pinning but found I could get the intersections precise enough without pinning. You decide whether you need to pin or not.

Be sure to sew straight to make your center square a real square. Again, speed is not as important as accuracy.

After sewing the first two segments, check to see if they are 2" wide by 2.75" long. If now, figure out why. If so, great--add the outer segment to finish the 9 patch.

Pressing the seam allowances--you have 3 choices. Press the seams OPEN--I rarely do that so I didn't show it. OR twirl the intersections as shown on the left. OR press away from the center. You decide. I like those twirled seams and how flat they  make the block so that was my choice:

Check that the 9 patches are 2.75" square, unfinished. If they are not the right size now, they will not miraculously become the right size when you do the next step.

CREATE THE BLOCK:

Add the 2.75" background squares to create the block. It will be 7.25" unfinished when done, the same size as the Shoo Fly blocks made earlier.

Pressing the seam allowances on the blocks--again, you have a choice. You can twirl the seams again or press to one side, (or open). Here is what I did--I pressed toward the middle so those seams will nest with the Shoo Fly blocks:


There are two applique blocks this month. Here are mine from the sample quilt:

Block 21
Block 22

We enjoy seeing your blocks so post them on the SHOW AND TELL--Your Blocks Topic

Let's quilt.

Barbara