Monday, February 27, 2017

Texas Braid and Ohio Stars

Recently I taught a Texas Braid quilt class, based on the Texas Braid quilt in Bonnie Hunter's book Adventures in Leaders and Enders.  My sample is King-size:


One of the students was in this class the last time I taught it, five years ago.  She put it aside.  When she saw the class was back on the schedule she knew this was the nudge she needed to get it done:

Joyce hard at her task

Success!  The first two braids are sewn together!
She was so happy to get to this point and is now determined to keep going.  She told the other students, several times, "Don't put it away, keep working on it."

Linda came to class very organized:


She had a plan--this quilt is for her daughter and is going in a very specific bedroom so more retail therapy was required:


Ruth was also organized, almost too organized, as she agonized over every fabric, is it dark or is it light or is it both:


 Once I showed her that it is "contrast" that does all the work, while "color" gets all the credit, she was able to relax and start sewing:


Holly is not afraid of color.  She jumped right in and starting piecing those braids, doing two at a time for speedy piecing:


It was a good day and I think everyone achieved what they hoped to in the class.  I had fun too.

Now I'm working on Random Ohio Stars, a gift for an old friend.  Today it was small 6" stars:


I even made 2 itty-bitty 3" stars.  And my Lifetime quilt leader/ender project saw some action as well--it practically makes itself.

Then I started putting blocks on the wall, hadn't planned to do that today but it's like Doritos:  you can't stop at just one.  Once you start you have to keep going until all the blocks you have are up there.  Layout 1:

Layout 2:


Layout 3:


There are seven more 6" blocks to make, that's tomorrow's task.  Then I'll play some more with the layout until I'm satisfied.  It gets a border print border as well, so I think I need to put that up there too before the decision is made.  Seeing the quilt in a photo helps SO much to see things you miss with the eye.  I'm leaning toward Layout 2 but see a few 6" solid blocks I want to move...

Let's Quilt!

Barbara

Thursday, February 23, 2017

Easy Things and Others, Not So Much

I needed a break from tedious, really careful work so I started on a simple quilt that will be a gift for an old buddy. Random Ohio Stars, a free pattern from Bonnie Hunter:


The twelve 12" stars are done, now I need to make 13 more 6" stars and I'll also make two 3" stars.  I  must say, those 12" blocks feel huge to me, so much bigger than I usually deal with.

Then there are the four flying geese for Temecula's Wild Goose Wednesday project.  I love flying geese and always make four at a time.  Their size is 6" x 3" but after making a few of those I scaled down to 4" x 2"--I like this size much better:

I am getting a bit tired of my "Lifetime Leader/Ender Quilt" so decided to start joining it together. These are 1.25" finished Half Square Triangles, read more about this project here.  This is about one quarter of the finished quilt, I think. The Front:


The Back, more careful pressing is still required:


This week I've been free-motion quilting on Stella's Splendid Sampler.  Not the best quilting ever but this will be one of those "finished is better than perfect" quilts, full of love. There is a long way to go yet.  Here are  a few shots:

Stitch in the Ditch with the Line Tamer ruler

More Stitch in the Ditch

Stitch in the Ditch done

More Stitch in the Ditch

Free-Motion

More Free-Motion

Today I picked up "Stars in a Time Warp" from the quilter, Mechelle Armstrong of Magnolia Longarm Quilting.  She did a great job and I love the wool batting we selected, soft and with lovely loft.  I am eager to get the sleeve made and then sew it and the binding in place.  The label is ready and waiting:


Tomorrow I teach all morning, Saturday I teach all day, Sunday afternoon is a Quilt Show meeting I am involved in--when will I get more quilting done?  Next week...

And the next weekend:  Stella herself will be here--can't wait!  She is 22 months almost, scrumptious!

 She eats really well:  hummus, tomato, cucumber, peppers, yum!

Let's Quilt!

Barbara

Friday, February 17, 2017

Basting a Quilt for Machine Quilting--and the Giveaway Winner

If you are going to machine quilt a quilt on your home machine, you need to baste the three layers together.  When we hand quilt, we most often baste with thread, large stitches basted in by hand across the surface of the quilt.  But with machine quilting you would be sewing in all those threads, then have to remove them, or they would get caught on the presser foot, so thread-basting is not a solution for machine quilting.  Most quilters use safety pins:


For a small quilt, I often just use straight pins until the basic grid quilting, like stitch in the ditch, is done.  But on a large quilt that wouldn't work:  the pins would come out or, worse, you'd get bloody sticking yourself as you manipulate the quilt through the machine.

Here is my process. (I know there are other methods, spray basting, basting guns, etc.--this is how I do it.)  First, I need to find a room with tables that will fit my quilt--no crawling around on the floor for me any more.  If you have access to a church Fellowship Hall,or a business or community center lunchroom, see if there is a time you can use that space to baste your quilts.  After teaching a class this morning at Patches & Stitches, Huntsville, AL, I put 3 classroom tables together to baste Stella's Splendid Sampler.

The back was pieced from two lengths of fabric, after removing the selvages, then the seam was pressed open.  I carefully laid the back out, RIGHT SIDE DOWN.  I centered the seam on the middle table.  I used small plastic clamps to secure the back to the table, clamping firmly but not stretching the back.If you don't have clamps, bulldog clips, also called black binder clips, often work.  At home on my dining room table I use painters tape.

Luckily, most of the back fit nicely on the table, the left and right sides hang over about 6-8":


Then I gently added the batting:


Twin Size Batting is somewhat larger than needed
 This is my favorite batting. Quilters Dream Cotton batting, Request weight, the lightest. It comes in white or natural, use white if you have a predominately white background:


After smoothing the batting carefully across the back, keeping the left side even with left edge of the back, I spread out the quilt top.  This whole process is much easier with another set of hands but it was only me so I did it myself:


An important point:  I didn't intentionally center the seam on the center of the quilt--it pretty much happened by accident.  For a competition quilt, I would have carefully lined up the center seam of the back with the center of the quilt top.  NOTE: For a larger bed quilt, the back would have been made from 3 pieces, about 40" across the middle, and two pieces sewn to either side.  OR I would use a wide-goods back, 108" or wider--then you only need the length of your quilt plus a bit for the back. This quilt is 81" square.

How much bigger is the back and batting than the top?  If you are quilting it yourself, on a home machine, with a fairly flat/thin batting like this, 4" extra all around is enough--at least 85" in both directions for my quilt.  If you are giving your quilt to a longarmer to quilt, they need 8" extra all around, this means, your quilt top plus 4" extra on the left and right sides, 4" extra on the top and bottom edges.  The thicker the batting, the more back and batting you need beyond the top.

Once I was satisfied I had the quilt as flat and straight as I could make it, it was time for the safety pins.  I was afraid I would run out so I placed them about 7" apart--they really should be closer, about 3-4" apart.  As I plan to stitch in the ditch first, on either side of all the turquoise sashing strips, I purposely did not put any pins in the 1" finished sashings.  Once the stitch in the ditch is done, I can remove all the rest of the pins to quilt in each block, whatever I think that block needs.

Put the safety pins in BUT DON'T CLOSE THEM, until all the pins are in place.  I did run out of pins when I got to the borders, I'll add more once I get home. For now each block has a pin and there are a few in the borders.  After ALL the pins are in place, remove the clamps that have been holding the back securely flat on the table:


Now you can close the pins. On a large quilt there can be more than 300 pins and that can be tough on your hands.  I used my hands but you can use a grapefruit spoon, a chopstick or a Kwik Klip tool:


Once all the pins are closed, turn it over to the reverse side and check to see if there are any pleats or tucks.  If there are, now is the time to fix them.  If you forget to fix them, you will sew them in place, just ask me how I know...

Stella's Splendid Sampler Back

Next one in line for machine quilting
Basting is not my favorite part of the process--having a friend or two to help makes it go faster--but you can do it yourself.  If your quilt is larger than the tables you have, after doing the middle portion on the table, close those pins, and slide the quilt to the side, do that side, close the pins, carefully slide the quilt back to the remaining side, and complete the basting.  Now you can quilt it!

And it's time to announce the Giveaway for the Sew-A-Long.  The Random Number Generator selected number 2:  congratulations, Donna D!  We'll get together soon to give you the prizes.  Thanks to everyone who posted their photo.

Let's Quilt!

Barbara

Monday, February 13, 2017

Stella's Splendid Sampler

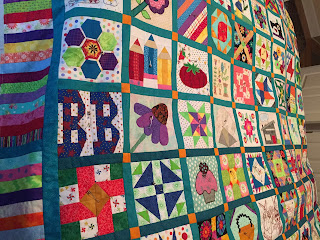
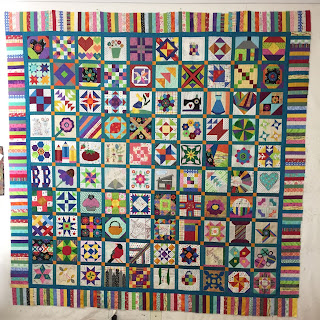
Happy Day--Stella's Splendid Sampler top is done!


I first wrote about this last February when the project first started:  The Splendid Sampler.  At that time, the Facebook group numbered just over 10,000, today, at this moment, it's at 25,622. That doesn't include the people around the world who signed up by email.  Pat Sloan and Joan Davidson can be very proud of the project they put together with a lot of work, effort, planning and coordinating of more than 80 designers.  A book is due for release soon.

My quilt, by the numbers:  100 blocks, 2757 pieces, 132 different fabrics, finished size 81" square,  I replaced 6 blocks, one with a "bonus" block that was provided, and 5 that I drafted or added myself.

This quilt is for my beloved grand-girl, Stella LeAnne, who is only 20 months old now but will move up to a "big girl bed" later this year.  As I worked on this, I thought it is possible she will take this to college years from now, it's not overly childish.  Time will tell.

What I learned from this: First, this is a mystery project--if you don't know what the finished quilt will look like when you start, that's a mystery.  Not everyone does well under those conditions--if you want to plan everything from the beginning, this isn't for you.  I was surprised at the number of embroidery blocks, though I shouldn't have been, we knew there would be lots of techniques introduced.  There were some true beginners who tackled this--I hope they learned a lot and weren't discouraged.  There was so much support online by the various designers, every skill level could learn something.

Had I known what it would look like before I began, I wouldn't have made it.  BUT I'm glad I did--I thought of Stella with every block and I hope she will like it.  Here are my favorite blocks:

 
I created the BB block, my grandma name, and the Coneflower I hand-appliqued while on a family beach vacation with Stella in August:

Her "surprised" face she did on command and her PopPop


This embroidery block I simply colored with crayons and heat set.  Loved the design, didn't want to spend weeks sewing it. 
 This embroidery block took me 3 weeks to complete, I do like it but, 3 weeks--I just couldn't get motivated to finish it.

 I substituted this block with a 6-pointed star--Stella means "star" in Italian, and added the embroidery

 I liked the design of this simple sawtooth star and interesting border treatment

 This was the first block with embroidery and I liked how someone added fabric to the "quilt", and colored the face and toys with crayons--I learned I could do that.


 I substituted this block I created for one that had 3 black birds on it--I love flying geese so just drew the paper pattern and made 3 "geese"

This heart block was one of the many paper pieced blocks and one I'll use again--it would be great for those gift quilts made to show love to a friend in need.

Here is Stella having a look at  her quilt in progress in October:


Here are the fabrics I started with:

I intended to use the large print as borders, having saved it after making Smitten:

BUT, a couple weeks ago I saw a wonderful strip-pieced border on Bonnie Hunters' blog and thought "What a great way to use up these fabrics!"  So, how come I seem to have just as much fabric left from this project as when I started??  I added more and the scrap stash just seems to grow.  See what I did with some of the scraps here:  Baby Quilt.

So, it's done, except for the quilting which I will do myself.  Now to baste it and get started.  And I have plenty of projects to get back to now.

Let's Quilt!

Barbara