Sunday, February 25, 2024

PICK A PETAL -- MONTH 3

 PICK A PETAL is the 2024 Block of the Month quilt designed by Jen Kingwell exclusively for The Quilt Show. It is FREE to Star Members, join today to take advantage of this great bonus. WATCH Jen's Show to see how she makes this quilt--it is FREE for EVERYONE all of 2024: Jen Kingwell Show 3401

Month 3 introduces Block 2, a unique block with curves and petals, ideally made with hand piecing:

Jen's block from the sample quilt, all hand pieced 


I studied this block for a while, trying to find an easy way to machine piece it. I made several: 

1. Completely hand pieced, following the pattern instructions--too slow for me

2. Machine pieced the first 2 curves and center square, hand pieced the petals. I call this the "Hybrid Method" --that works but not real fast

3. Re-designed to eliminate the curves, applique the petals on top--much faster and a good alternative

4. Substitute a completely different block--I declare that a fail, I tried several alternative blocks but none supported the basic, excellent design of the quilt

So, my personal solution is to do some with idea 2 and some with idea 3:

Curves joining green, aqua, and background sewn by machine, center square added by machine, Petals added with hand piecing 

Alternative block, straight lines by machine, petals hand appliqued on top--before trimming to the correct size, 8.5" including seam allowance

If you prefer hand piecing, simply follow the pattern instructions to make 20 Block 2, using a wide variety of prints. Block 2 is more controlled than Block 1, which used a different print for each position. This Block uses only 5 fabrics.

For the "HYBRID METHOD", using both machine and hand piecing, here is what I did: 

As always--I add at least 1/2" extra to the outside edge for "insurance". That outer edge is only 1/4" FINISHED, pretty narrow:

Fabrics selected, templates traced

A gentle curve I found easy to machine piece, sewing Edge to Edge is fine on this seam, Dot to Dot is NOT NECESSARY here 


Jen demoed a clever trick on her Show, using the corresponding template to draw the actual sewing line should you want to have that line. 

To draw the sewing line for joining Template J (the dark print) to the Background, you will need to do it in two steps. First, place the curved template on the wrong side of the Background, placing the curved edge on  the two dots drawn on the background. I used a mechanical pencil.

The outer curve is larger than the sewing line so you need to work from right side to the middle, Step 1: 

Then shift the template to the left side, put the curve on the two dots, left and middle, to complete the curve: 

Middle curve drawn

To add the curves for the petals, simply use the Petal Template to draw those lines. Be sure the template is right up to the dots drawn when the background pieces were cut out:


Five pins show you how this will be sewn. I found it easier to use only 3 pins, middle and outer edges. Sew SLOWLY, it's not how fast can you sew it, but how accurately. I use a Stiletto to keep the outside edges aligned as I sew SLOWLY:

Although this photo shows I sewed "dot to dot" when joining the background, that is NOT NECESSARY with this seam, edge to edge is fine. It is faster and does not require backstitching. Dot to Dot sewing is most helpful where multiple seams come together:


One of the great things about the FORUM is all the things you can learn. I don't know everything. Sonia showed how she has made several Jen Kingwell quilts using curves like this. She showed a little different "path" for piecing. Make 4 units with templates I, J, and K, add the center square to two of those, piece the Petals to the other two. Now you have a long, gentle curve to add the left and right sides to the center shape: 


Another tip Jen mentioned in her Show is that she cuts a lot of the pieces from a wide variety of prints before she makes the block. This gives lots of choices for fabric selection. I think most of us just cut for each block, one at a time. Here is my original plan for this block:


When I got to that stage, I didn't love it. My advice: if you don't love it, don't sew it. Find another option. The Lime green shown above was an option, this purple is what I ultimately chose. Now I have a couple extra sets of Petals for future blocks:


Once the block is sewn and pressed beautifully, it has to be "trimmed to perfection", 8.5" including seam allowance. Take your time and carefully line up the diagonal lines, getting the petals exactly at the 1/4" mark. I fiddle with it BEFORE picking up the rotary cutter. A mistake now could be really bad: 


Before trimming, showing how I pressed this block


AN ALTERNATIVE BLOCK:  I mentioned on the FORUM, in December, I was trying to find an alternative block. HelenW showed what she worked out in Electric Quilt, a block that looks similar but uses straight lines instead of curves. She shared her design with me, I printed it from EQ8 and was ready to give it a try. 

I like it for speed and that from a distance, it resembles the original. In my center I used two of them, do they jump out? 


If you like it, give it a try:


Made in 4 sections, it is easy to use the eighths fabric cuts in the Kit. Jen discusses the importance of grain in her Show so I was sure to cut pieces on the Lengthwise grain, along the selvage:

Cut BACKGROUND    1.5"  X  10.5"  (4)  this includes an extra 1/2" for insurance
        OUTER ROW       1.75" X  8.5"   (4)
        INNER ROW        1.75" X  6"      (4) 
        CENTER SQUARE   2.5", use the Template (1)
        PETALS, use the Template (4)   I added the Dots on the FRONT for needle turn hand applique.

Sew the strips staggered, fold in the middle 

IMPORTANT PRESSING TIP: Press two sets in toward the middle strip, press the other two sets away from the middle strip--this allows the seams to "nest" when sewing the diagonal mitered seams: 


Fold in half, carefully aligning seams. Draw a DOT 1" from the FOLD, that is the DOT for the center Square

Use a Half Square Triangle Ruler to accurately cut BEYOND THE DOT. The dashed line on the ruler sits on the dot, the seam allowance is to the right of the dot. Keep the sewn lines straight as you make this all important angle cut

Ready to join the 4 strip sets to the center square

Dot To Dot Sewing with backstitching is important here

All 4 strips sets sewn to the center square
I sewed from the center square out to the edge, backstitching at the center. Press seams open


I made a Petal Template without seam allowance so I could draw the sewing line for the hand applique. Using a mechanical pencil gives a light, thin line

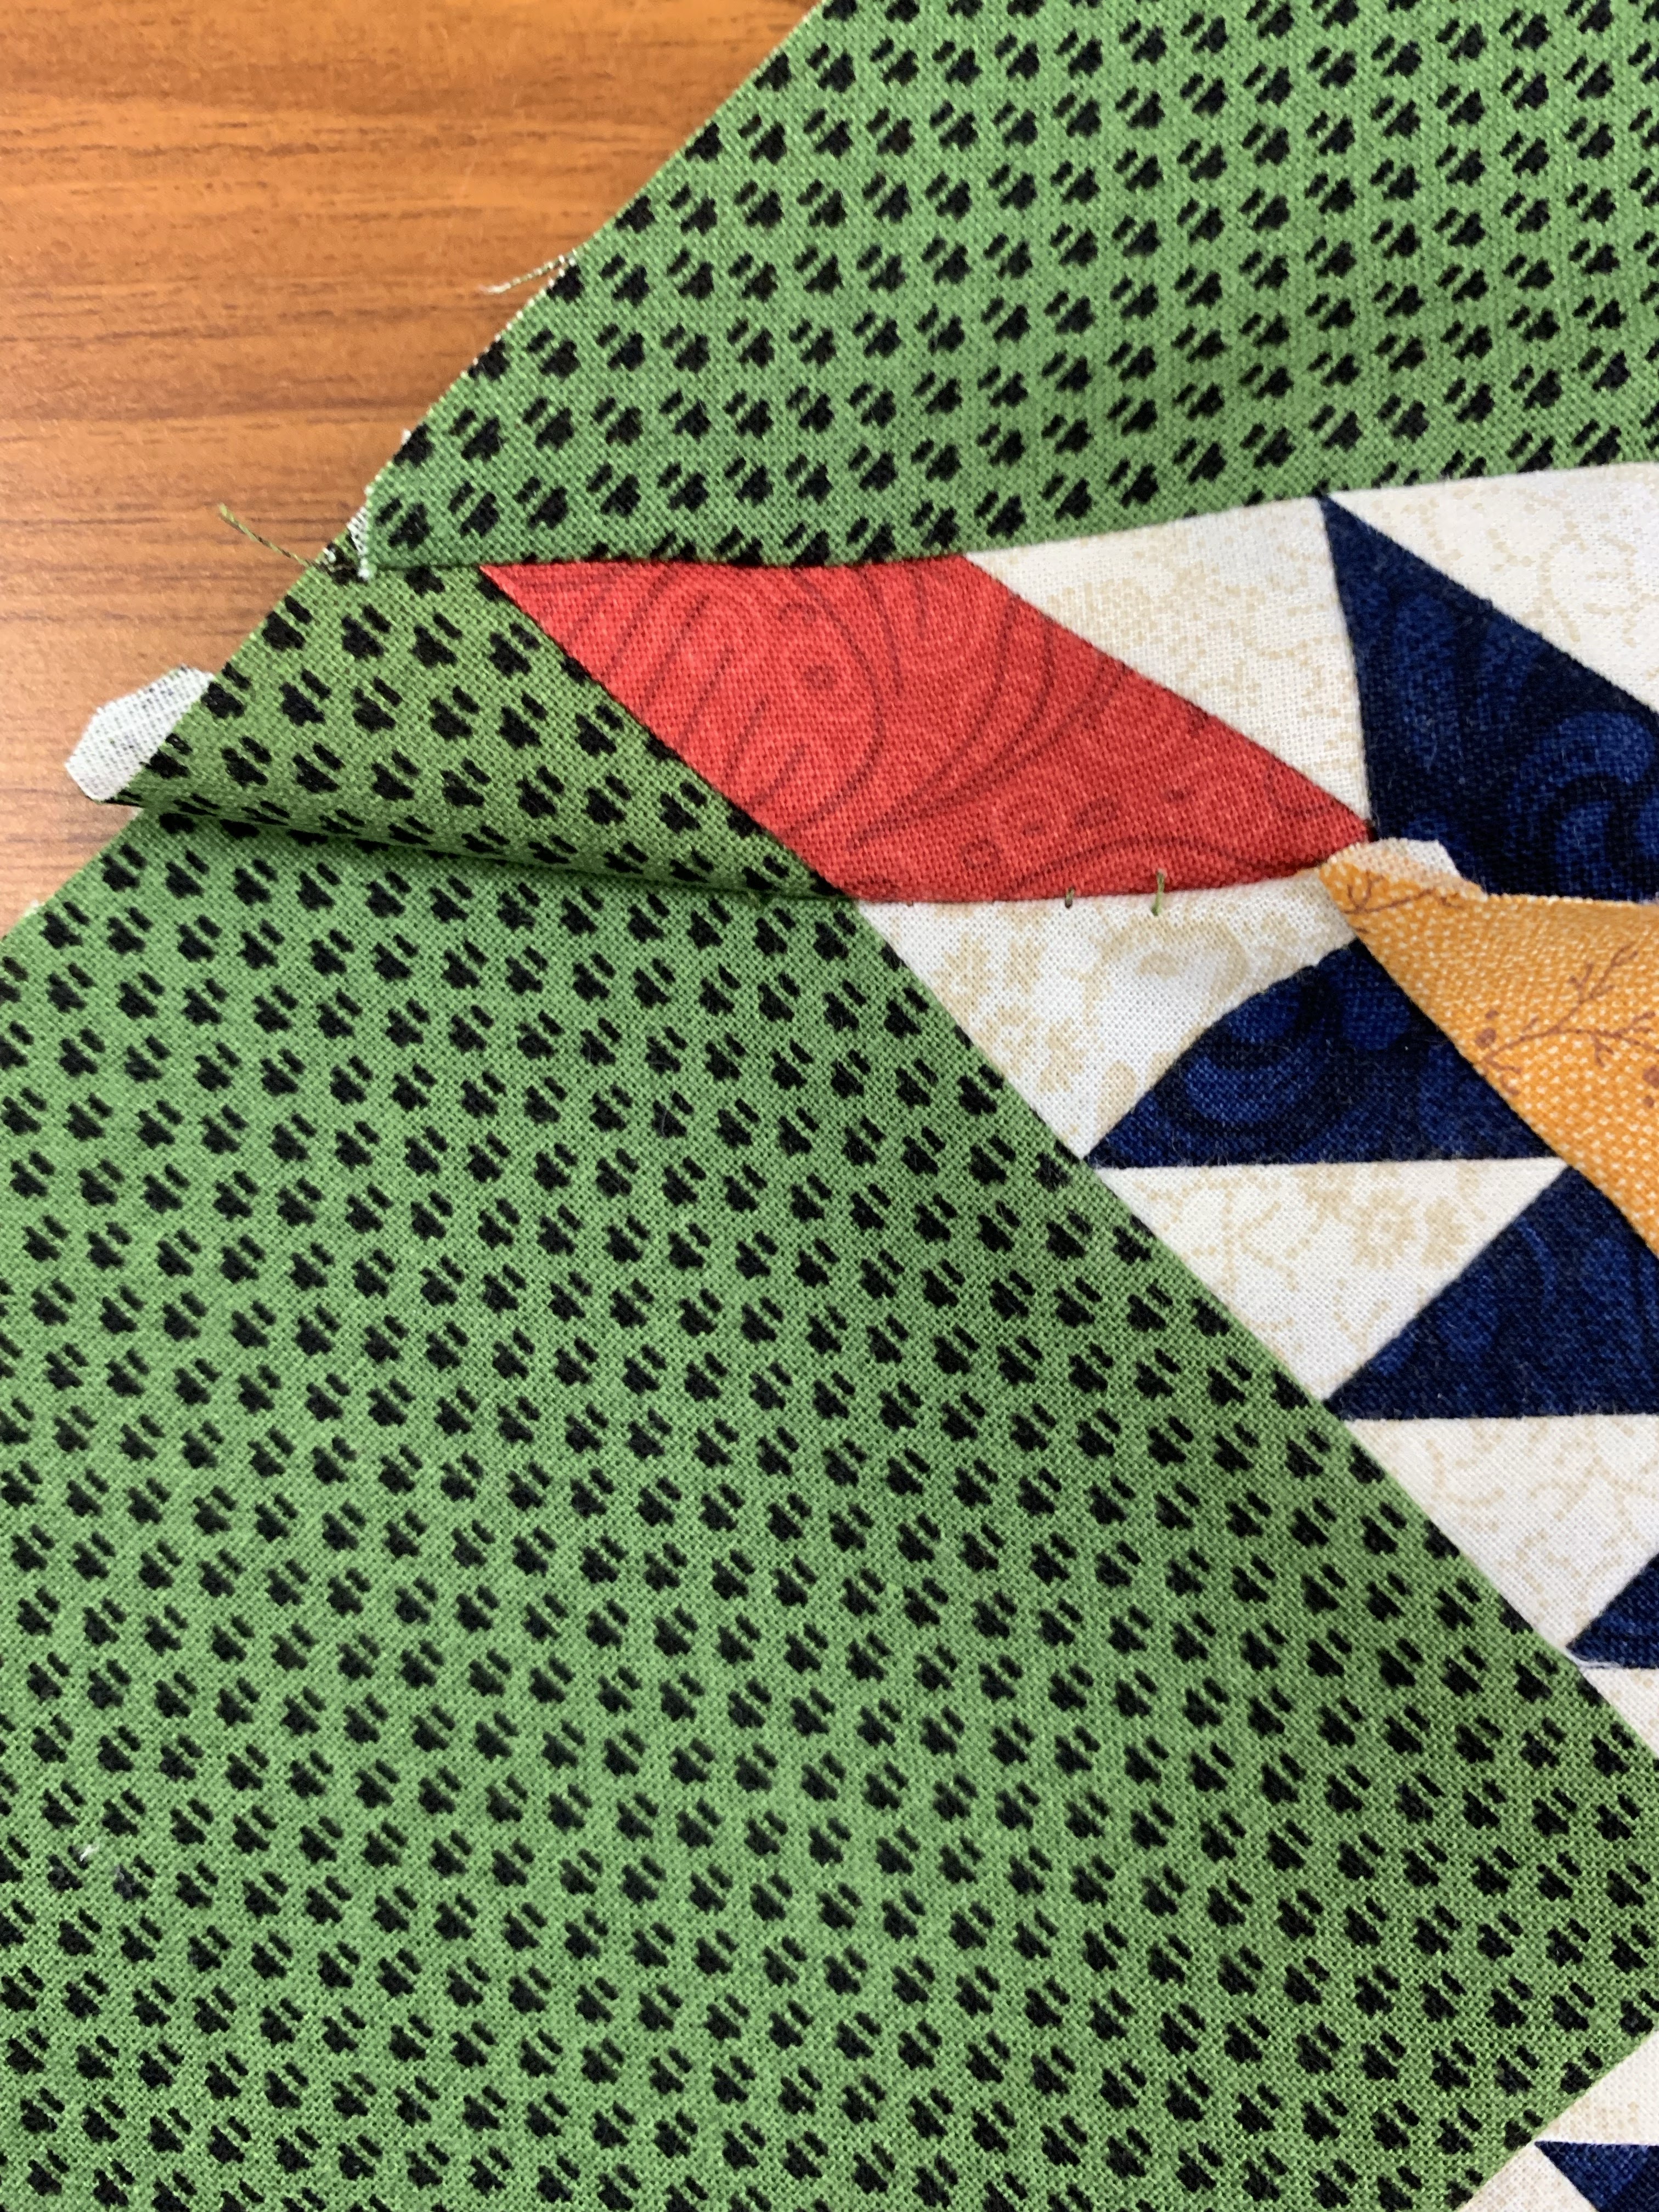
Auditioning Petal options

Here is this block except for one last petal ready to be appliqued on. I  will do that in the MONTH 3 LIVE, scheduled to air March 1, 2024:


Wow! That is a LOT of information this month. It gets easier next month when we move to the Log Cabin blocks.

Let's quilt.

Barbara

Sunday, February 18, 2024

WHAT I'VE BEEN UP TO

 I keep busy all year. Winter has less travel so I am sewing a lot. Thought I would show you a few projects in the making. 

A few weeks ago I took an online class with Ricky Tims. Papaw's Choice is the block his dad used almost exclusively to make many quilts. I enjoyed the online format. The block is simple to make and Ricky's pattern is excellent. It will be ready for sale in the future. I decided this was a great time to use a lot of the hand-dyed fabrics I have, many I got from Ricky, and I am happy with the result.

My TOP, before adding borders, this is 72" square:


To enlarge it and use up more fabric, I added a 5" finished border all around, now it's 82" square:


Another project coming along nicely is PICK A PETAL, the 2024 Block of the Month for The Quilt Show. I only have the outer border of fans to finish piecing for the basic sewing to be done. Then we will spend Months 5-10 on the appliques and embroidery added to the Log Cabin inner border:


Next up is preparation for teaching classes soon. Wednesday February 21, 2024 I teach ON THE LILY POND, at Southern Charm Quilting. There are a few openings left, if you are local, don't miss it.

This is my replica of an antique I own and will bring to class. I am teaching this on a New England/Canada Cruise in September 2025--when registration for that cruise opens, I will make an announcement--that cruise will sell out quickly as  my Alaska cruise did, it's August 9-16, 2024.

ON THE LILY POND:


In less than two weeks I will be teaching at Empty Spools Seminar held at the beautiful Asilomar Conference Center on the Monterey Peninsula in California. FULL CIRCLE will keep almost 25 students busy, entertained and learning for 5 and a half days. I am so excited for this true BUCKET LIST JOB, and am pleased to say I am already under contract there again for 2025, with my wonderful TWO FOR ONE class. My supplies are shipped already and all I have to do is pack and get on 3 airplanes February 29, 2024 to get there:

FULL CIRCLE, pattern by Wendy Williams, quilting by Patty Wilson:


Another class I am very excited to teach is ANTELOPE CANYON DIT DOT EVOLUTION:


This class is March 19 and April 2, 2024 at Southern Charm Quilting. Many people have told me how much they love this quilt and want to make it but only a few have signed up. This is one of those quilts I want to say "Don't try this at home". It requires being very organized and I have that all figured out for you--come and join us--this will most likely not be offered again. The shop has the complete KIT available for purchase--even if you can't take the class because you are not local, buy the KIT while you can. When those two Jelly Roll sets needed for this quilt are gone, they are gone.

We have a new grandbaby due in mid-March to our 45 year old son, Joshua and his love, Cait. We are very excited, of course, and I finally knew it was time to dig out the baby/kid stuff I have been saving for 45 years. All has been washed and will go to their house soon. It was so fun to see these amazing things I am glad I saved for so long:

Marine kids get Marine t-shirts

My son is very eager to get these boots, I made the Tooth Fairy pillow for Joshua

Hand made sweaters I loved and a couple favorite items

A great friend made this circus quilt, her first, and a wonderful neighbor made the incredibly soft baby blanket

Every day I walk, rain or shine, except for the week we had an ice storm that shut everything down. Those days I used the elliptical trainer. When it's really cold, I am bundled up:


Most days a sweatshirt does the trick, with hat and gloves if it's below 45. One and a half to two hours a day keeps me happy in the winter when I am not as busy with lots of travel.  

I am easily maintaining the healthy weight I want to be and feeling great. It is fun to know that everything in my closet fits. Pulling outfits together is a joy, not a struggle, any more:


 Seeing wildlife almost every day is partly why I love walking outdoors. Singing along to my playlists is another reason my walk is so important to me each day. I am sure I am considered the "crazy singing woman" as I walk and sing for 6-8 miles a day:


For more information on my joyful journey to health, see my blog from August 20, 2023: 


There is the usual daily stuff I do for The Quilt Show, checking and answering FORUM questions, writing the monthly blog for the Block of the Month, and preparing and recording or going LIVE on Facebook and YouTube once a month. The next one is a "not so LIVE" as I will be at Asilomar the first week in March. It is already recorded and ready to air March 1, 2024: 


I was amazed to learn that so far 13,000 people have watched the Month 1 LIVE that aired January 1, 2024 and 7500 people have watched Month 2 so far. Our worldwide community is an awesome thing I am happy to be a part of. 

Another quilt idea is swirling in my head. And it is time to start another Feathered Star for that long-running project.

Each day is a new day and I am eager to jump out of bed to get the day started. My motto this year is: BE STRONG, BE PATIENT, and BE HAPPY. 

Let's quilt.

Barbara


Sunday, February 11, 2024

FEATHERED STARS PERFECTLY PAPER PIECED -- PART 2

 This is a little "class" on making Feathered Star blocks with a paper foundation. Find the first lesson here:

PART 1

My block is now done. Let me show you how I did it:


Once all the units are made, I laid them out where they go. The paper is still on the back of each unit now:

Starting with one diagonal row I removed the paper from units just before sewing those units. Tweezers can help remove tiny bits of paper that may be stuck in seam allowances.

Joining these two units shows how those outer edges fit perfectly with the blunted off corners printed on the pattern:

Once those units were sewn, I pressed away from the feathers and added the "kite" shape. I did re-press the blue triangle seam toward the gold kite so the unit would "nest" nicely with the other pair of units:

There are places where multiple fabrics come together and I want those intersections to be as good as I can get them. I pin them, fiddling to see they are really accurate and then MACHINE BASTE. The stitch length is turned way up, about 5.25 here. Easy to remove and try again if the intersections could be better: 


These looked good enough. Getting these angles aligned can take a few attempts. This shows what the basting achieved:


At the place where the outside diamonds are has that same angle issue. I really want this spot on because it is a focal point and high contrast. Again, here you see the basting: 


You simply continue on in this manner, making two outer diagonal rows and the center row. Here they are complete and ready to be joined into the block:

Front side

Back side showing how I pressed the seams

Now it's time to be well-rested and ready for the most important part, making the full block  Only 2 seams, right? How can that take so much time? 

I machine  baste ALL the intersections that really matter. Every where there is a pin, I have machine basted. It takes a little while. But I would much rather take out basting stitches to fix intersections that are off than to remove real stitches:


Ta-da! When it's all done and you are happy with it you can pat yourself on the back. You have made a "really hard block that takes a long time to make", Marsha McCloskey's description of Feathered Star blocks. 

I am very happy with this. It is the right size, 15.5" including seam allowances. And all the intersections are as good as I can make them:


Now it's time to spend a couple hours cutting out the next one.

Let's quilt.

Barbara