Welcome to our first Sew-A-Long. If you missed the earlier posts you can find them here:
Part 2 The Shoo Fly
For years I have called this block the "X" block. In searching for a real name I found it in Barbara Brackman's Encyclopedia of Pieced Patterns, #2881: The Old Italian Block. So that is what we call it:
We'll be making 6 of these 6" finished blocks. You can make them scrappy or all the same fabrics, your choice. Each block uses 3 fabrics, one large square for the background triangles, one small square for the center, and four rectangles for the "X":
I am using a small polka dot for all of the background quarter square triangles, the same stripe for the center square that I used in the Shoo Fly block centers, and 6 brights for the "X"'s.
Quarter Square Triangles (QST) have the straight of grain on the long side of the triangle. Half Square Triangles (HST) like we made for the Shoo Fly blocks, have the straight of grain on the short side of the triangle. For best results in quilt block piecing, you want the straight of grain on the outside edges:
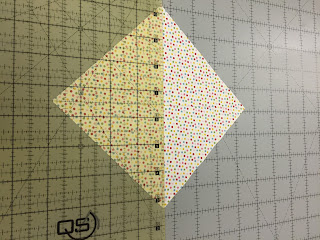
Cut the background squares 5.5" square--you need 6 of these. Cut each in half on the diagonal, then carefully move the ruler and cut the other diagonal, creating 4 Quarter Square Triangles.
I cut two layers of fabric at a time since I can be accurate that way. You can stack up all 6 squares if you like, but it takes more pressure on the ruler to cut 6 at once and if you mess them up, you messed up 6 instead of 2. You decide.
Next cut 6 center squares, each 2":
 |
| 2 layers, 2" x more than 6", trim one edge |
 |
| Rotate and trim other edge, now this is 2" x 6" |
 |
| Slide the ruler to the 4" line, cut, slide the ruler to the 2" line, cut |
 |
| 6 squares, 2" each,, 2 layers |
Cut the sets of four rectangles, 2" x 5", in the same way. Here are my cut pieces all ready to sew:
Time to
SEW. Lay out a block near your machine:
Flip the middle row over, on top of the row on the left:
I use a leader/ender set of small squares, then chain piece the 3 units in order. Pin if you like. NOTE: The rectangle is longer than the triangle it is sewn to. Be sure the 90 degree corners of the rectangle and triangle are lined up, the end of the rectangle will hang over the point of the triangle by more than an inch. Sew slow, steady and straight.
Here are the units that have been sewn, on the left:
You can press them now, or wait until the right side row has been added. I like to press now. Be
careful--the cut edges of the triangles are
BIAS edges and they can be distorted if you press them aggressively or use too much steam. A dry iron is better at this point:
 |
| Lay out so you can press toward the rectangles |
 |
| Use the edge of the iron to open the seam toward the rectangles |
Now we'll add the final 3 pieces to the block, flipping the triangles and rectangle over on to the previously sewn units. Here you can see how the triangles are smaller than the rectangles and it is the corners of each you want to have lined up:
Once sewn, it is time to press, again, toward the rectangles:
 |
| Front view |
 |
| Back view |
We're ready to sew the three rows together to complete the block. Turn the middle row over on the left side row, pin, and sew. I pin IN FRONT of the intersection, one seam is going up, one is going down. This pin will keep the intersection in place as you approach and then sew it:
 |
| Ready to sew |
 |
| Check those intersections |
 |
| Pin the right side row onto the previously sewn rows |
 |
| I leave the bottom pin in place to help me sew straight all the way to the end |
 |
Check those intersections
|
Before I leave the machine, I check the intersections to see if they meet as I want them to. If they are off just a little I can leave them alone or un-sew a few stitches, fiddle with the intersection, re-pin and re-sew. When I am happy with the intersections, I get up and go to the iron. Press toward the rectangles:
 |
| Lay the seam at the top you want to press TOWARD--open and press |
 |
| Front view |
 |
Back view
|
We are almost done. It's time to "trim to perfection". The block is now too big, you will trim it to a precise 6.5". Using a 6.5" square ruler makes this easy. Place the 3.25" marks at the four intersections of triangles and rectangles. This also puts the center markings of the ruler down the center of the upper right/lower left rectangles:
Trim the excess from the right and top sides:
Rotate the block, again place the 3.25" marks at the intersections, be sure you are cutting a precise 6.5" square, trim the remain two sides and you are done:
Ta da! Perfectly pieced 6.5" Old Italian Block:
Lather, rinse, repeat until you have 6 Old Italian Blocks done. My little pile of leader/ender 4-patches is growing too:
Next time we will sew 18 blocks together with a diagonal or "on-point" setting.
Let's Quilt!
Barbara


 I am using a small polka dot for all of the background quarter square triangles, the same stripe for the center square that I used in the Shoo Fly block centers, and 6 brights for the "X"'s.


I love the fabric you are using. I also love the name of that block!
ReplyDeleteYour instructions are thorough. I wish I'd had the benefit of such instruction when I was starting out.
ReplyDeleteWhat an interesting block. Great instructions. Yes, your fabrics are so pretty. Having a lot of fun with this quilt-along :)
ReplyDeleteSuch pretty colors you're using. I will always think of that as the Home of the Brave block since we made SO MANY HOB quilts using JUST THAT BLOCK! Funny to think of it as the Italian block but my DH was Italian and his father immigrated alone at the age of 9 to the US. Cool for several reasons!
ReplyDeleteIndeed it is. This is such a fun block to make.
DeleteLoving the way this is coming together!
ReplyDelete