Showing posts with label feathered star. Show all posts

Sunday, February 23, 2025

RECENT FINISHES

 Getting both a quilt TOP and a small QUILT finished this week makes me feel very accomplished.

As February has me home I am working hard every day to get as much work done as possible. In March I will only be home a few days all month so now is my time to "get it done"!

DIAMOND JUBILEE--a BUCKET LIST quilt for more than 12 years, this is finally done. And I am so glad. It will get basted while at my Joyful Journey Retreat March 5-9. Then I will quilt it.


Diamond Jubilee 72" x 89" 


Inspired by a great quilt made by Catherine Butterworth,  I knew it was the perfect project to celebrate a BIG birthday.  After seeing her quilt in a magazine, I tracked Catherine  down in Australia where she lives. We became "friends". When we were both at Road to California in January 2020, me to teach, she to attend, we got to meet in person. It was as if we had known each other for years, soul sisters:

Catherine and I January 22, 2020


I planned to have this made for my 60th birthday so I started it two years before that. Now that I am approaching that and 10 + 1 it was time to get it finished. For more information see some of the previous posts I have written about it:


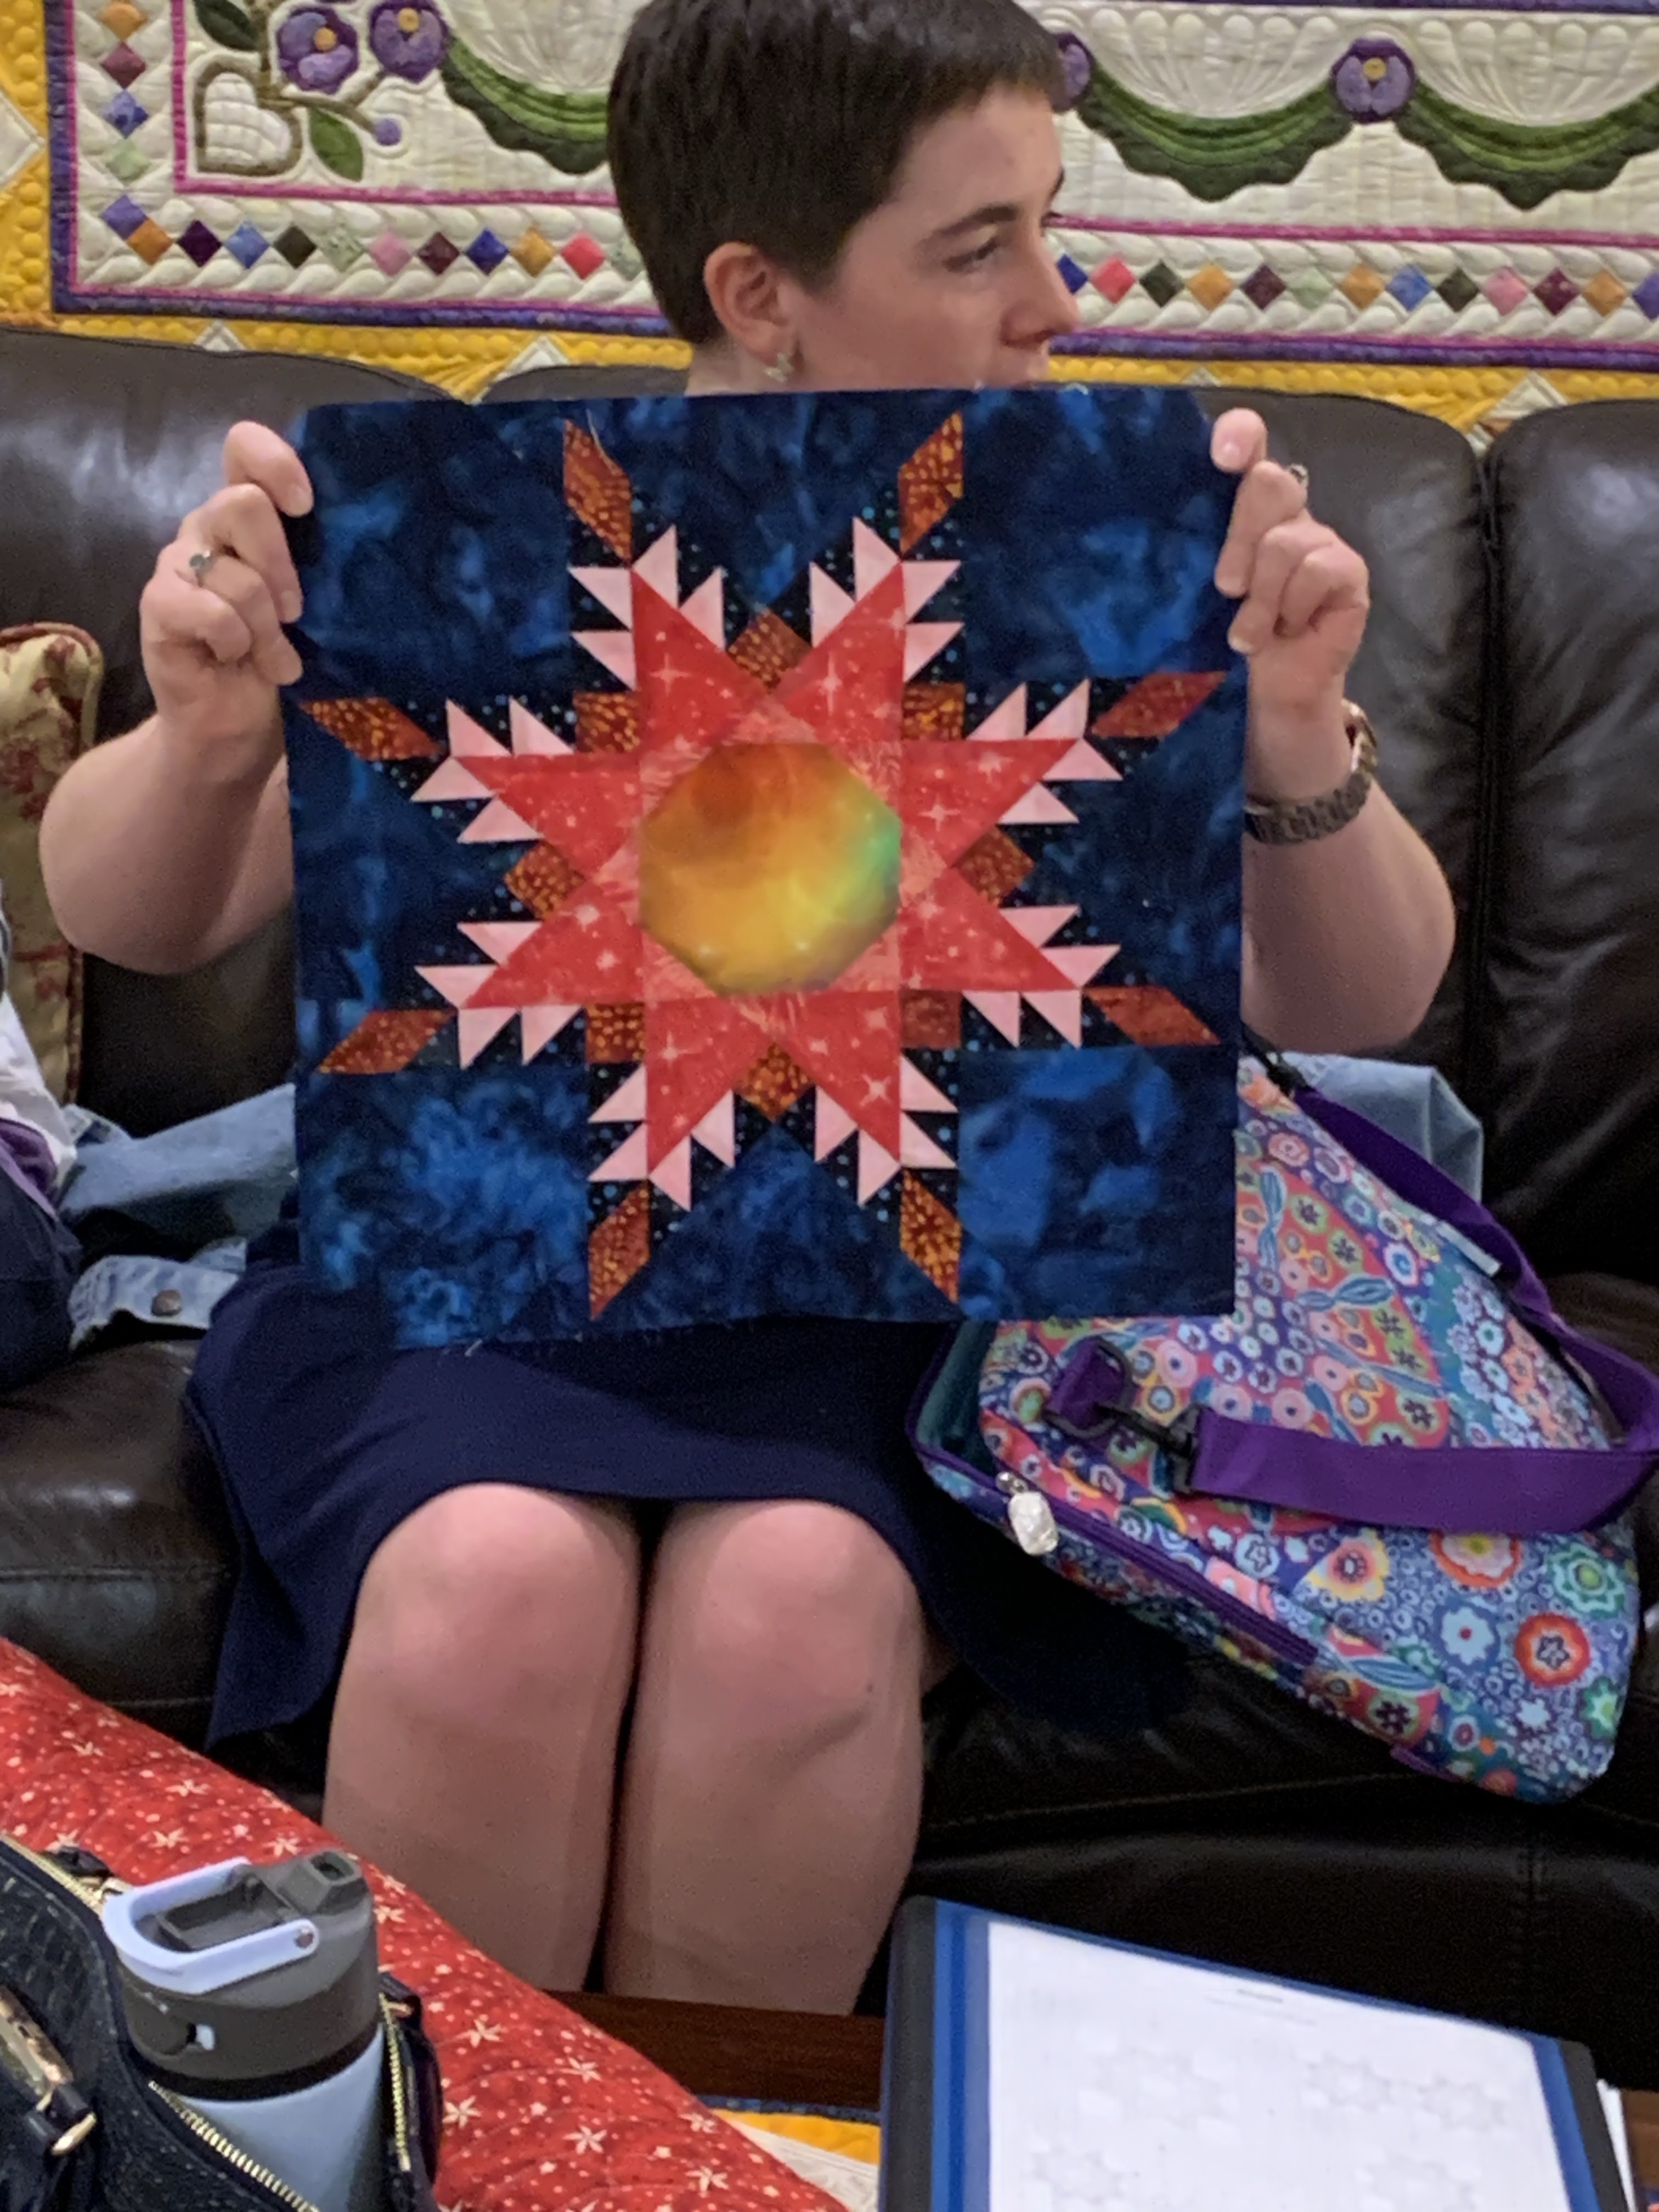
My other finish this week is a small quilt that will be a sample for an upcoming class. OH, MY SMALL STAR: 

32" x 32" 


My top is 97" x 97" and is currently at the longarm quilter:


The full pattern is by American Jane patterns. I fell in love with it and had saved it to my Pinterest board of favorite quilts:


I made a few changes to the original pattern to provide options for students. In the SMALL sample I changed the construction of the star to avoid the Y-Seam method in the pattern instructions. Students will learn how to do both methods and choose their favorite.  

This will be a GREAT CLASS for guilds--those who want to MAKE a big bed size quilt can get started, those who want to LEARN the process of making this somewhat challenging block, can do so by making only ONE star.  And learning a fun and EASY way to make those small stars is icing on the workshop cake.

Read a few of the blogs I have written on this project:


I am teaching Oh, My Stars at my Retreat March 5-9, 2025 AND at EMPTY SPOOLS SEMINARS in 2026--April 29-May 4.  Empty Spools Seminars should be on every quilters Bucket List--it was on mine. It will change you as a quilter, teach you SO MUCH, and provide a lifetime of wonderful memories. Registration starts April 26, 2025--set a reminder on your calendar as these classes can fill in the first few days. 

For more information, see the 2025 Registration Information: EMPTY SPOOLS SEMINARS  TODAY 
February 23, 2025 is the LAST DAY to register for the 2025 Seminar. I LOVE the class I am teaching March 30-April 4, 2025: TWO FOR ONE, there is still room for YOU:


Time to get back to work! And I still get 2 hours of exercise every day. When it's below freezing as it has been two days this week, I power walk at the mall. Above freezing, I bundle up and hit the sidewalk. Next week it will be in the 60's and I am SO looking forward to that! Stay warm and dry, Spring is coming...


Let's quilt, 

Barbara

Sunday, February 9, 2025

DIAMOND JUBILEE PROGRESS

 You may remember I decided to greatly alter my plan for my "Diamond Jubilee" quilt. It was begun 12 years ago in anticipation of my 60th birthday. This year I will be 10 +1 more than that so it was time to get this done.

Here is  where I am today:


Still to come is a pieced border of half square triangles and an outer border of the paisley print used in the center of each star and the sashing between the stars. 

Here is the original plan--to replicate a quilt made by Catherine Butterworth I saw in a magazine years ago. It won a big award at the Sydney Australia quilt show, where Catherine lives.  I tracked her down and we became "friends".  My colors would be much different but I LOVED her design. Her stars are almost 20", with 4 "feathers" on each side, mine is 15", with 3 feathers on each side:

"Julie's Quilt" by Catherine Butterworth, 96" square

A year ago I only had 4 stars done of the 13 needed. So I got back to this project in earnest. I made 5 more Feathered Star blocks, using the detailed color plan I developed 12 years ago.

Over time, things change. I decided I didn't need a king size quilt. And I didn't want to make 8 HALF STAR blocks and 4 QUARTER STAR blocks. I had 9 Feathered Star blocks done, 15" square each. So what to do???

I played around in Electric Quilt 8 (EQ8), quilt design software, to get an idea of what I might want to do. Sixteen Feathered Stars set straight would look like this:


That was ok, I already had 1 star done with the light yellow background. I would still have to make 7 more Feathered Stars. And 80" x 80" is still a pretty large quilt.

Ultimately, I settled on this:


BUT, the yellow stars look way out of place. I made 3 more Feathered Stars, each with darker backgrounds. Putting them on the design wall gave me this--the yellow one is still a problem:


SO, I made ONE MORE FEATHERED STAR: with a GREEN background. Now I had this and I liked it  much better:


OK, on to the sashing. I pulled one fabric after another out of my deep stash closet, auditioning many options: light, dark, striped, solid. Nothing seemed to work:


Sometimes you just need another set of eyes to help you see. My friend, Jan Davis, was out of state at the time but I was able to send these photos, and others, to her for her opinion. Jan is making several of these same stars to finish up her own "long brewing" quilt project. I knew she would understand my dilemma and how I wanted to get it "right".

Jan agreed with me about the yellow star--it had to be replaced. Then she suggested the idea I had been toying with: what about the big paisley print that is the "focus" fabric for all the fabrics included in the quilt? Would it be busy? Yes. Would it be unexpected? Yes. Would it WORK? Maybe... I have a BOLT of it so that wasn't a problem:

It's not awful


It was so much better than anything else I had tried I declared it the winner. The cornerstones really help to break up some of the "chaos" a busy print brings to the table:


Now it was time to make the half square triangle borders. I had designed them to be 3" so I made a bunch of the 80 needed. When I put them on the wall beside the top I knew they were JUST TOO BIG. I made a few that were 2" finished, much better.  I need 130 of those but they are quick to make so that is my new plan:


There will be a large outer border of the paisley once the half square triangle borders are done. The quilt will  be about twin size when done, significantly smaller than the original plan. But that will make it a good size as a class sample to teach the paper pieced Feathered Star block. I already have a YELLOW sample block done!

The pattern is FEATHERED STAR HEAVEN by Sue Garman--all the papers you need to make 9 blocks are included in the pattern. Sue's instructions are excellent. I recommend it highly. The Star is 15" finished. See my TUTORIAL on FEATHERED STARS here

So, you have to be prepared to change your mind on a long-term project when it no longer sings to you. Right now, I am happy to charge ahead to get this top finished before my Joyful Journey Retreat March 5-9. There I will be able to baste it so I can quilt it later this year.

I really look forward to having this BUCKET LIST QUILT finished.

Let's quilt.

Barbara


Sunday, April 21, 2024

SUNDAY SEW AND SEWS 2024

 The Sunday Sew and Sews meet at my house once a quarter for friendship and to show off progress on their Feathered Star quilts. Read more about that project here:

FEATHERED STARS PERFECTLY PAPER PIECED Part 1 

As this was the weekend just before the total eclipse, three of our group had gone "eclipse seeking", two to Texas, one to Kentucky. They all saw a great sight, and I am glad for them.

Here is our Show and Tell:

Cheryl's Patchwork Barn top ready for quilting

Donna's precise Feathered Star, the first of many

Victoria's Roger and Rita, a loving pair

Victoria has an "out of this world" plan for her Feathered Star quilt
Mazie has her first 2 FS blocks done


Holly's Two-For-One--I am teaching this class locally this Summer at Patches & Stitches AND at Empty Spools Seminar March 2025


Holly's first 2 FS blocks

Jodie has 2 FS blocks too


Jan is making 4 Feathered Star blocks as corners for a long term project of Baltimore Album blocks, all needle turn hand applique. The FS are perfect as corners, Jan saw such an antique quilt which gave her the idea to incorporate the Feathered Stars with beautiful applique blocks.

This very special block flew in space on a shuttle mission with Jan. All the details are beautifully written in hand calligraphy by Elly Sienkiewicz--a most important block. Jan designed it herself. 

Terri is working on her first FS block, she got some good tips for getting everything to fit together perfectly

My first 9, only 4 or 7 more to go. Time will tell.

Making Feathered Stars with Sue Garman paper piecing patterns is a great way to make a complicated block precise and perfect. Each unit is perfect in size once made on the paper foundation. Then I remove the paper and precisely piece the various units together. See more about that here:

FEATHERED STARS PRECISELY PAPER PIECED PART 2

What I find most time consuming is selecting the various fabrics for a block and then cutting them all out. This might not look like much but there is more than a hour of work right here in this pile:


I wrote a detailed blog on the cutting process, find it HERE:


It's not too late for you to make your own Feathered Star block, or many. Sue Garman's patterns are available at her website, managed by her daughters:  FEATHERED STAR HEAVEN and WASHINGTON MEDALLION.  Washington Medallion is a slightly easier version of Stars for a New Day and Feathered Star Heaven. All are great patterns with excellent instructions.

Let's quilt!

Barbara

Sunday, March 3, 2024

FEATHERED STARS PERFECTLY PAPER PIECED: THE CUTTING PART 3

As this posts, I am teaching at EMPTY SPOOLS SEMINAR  at the Asilomar Conference Center in Pacific Grove CA. I am sure we are having an awesome time, more than 20 students with me for 5.5 days learning to make FULL CIRCLE. The pattern is by Wendy Williams and has a lot to teach. I am sure I will have much to report when I get home.

The Sunday Sew and Sews are a group of friends who meet at my home to support and encourage each other with quilting projects. Usually we are working on one project, the Block of the Month from The Quilt Show, for example. It's fun to see how everyone selects fabrics to create a similar but unique quilt. 

This year the Sunday Sew and Sews are making Feathered Star quilts. If you want to sew along with us, look back at the two previous posts about this project: PART 1 and PART 2

This might be a bit backwards, but today I'll talk about cutting the many pieces that are required for the 15" Feathered Star block designed by the late Sue Garman. You shouldn't be surprised that it takes a while to cut all this out:


When I first started my Diamond Jubilee quilt about 12 years ago, I created a chart to keep track of my fabric selections with hand written cutting directions. For students, I had to make a much more legible, organized chart for cutting sizes: 

Paper piecing requires pieces be cut oversized, then they are trimmed to the accurate size after adding each piece to the paper foundation. While it uses more fabric, it is fast and accurate. And why do I have all this fabric if not to use it?!

My blocks have two fabrics that are the same in each block: the center paisley and the off white feathers. The other fabrics change in each block. First, I decide on a background color. Then the color of the feathers. After that, I just figure out the rest: the kites, tips/squares and the fabrics that surround the center octagon.

Cutting Steps:

1. I didn't fussy cut the center squares as it would make little difference but you could:


2. One big QST cut in quarters, 4 squares are the Background fabric: 


3. I like to cut feathers with a Half Square Triangle Ruler, it saves a little fabric and is fast. I cut the green feathers in the exact same way: 

4. 45 Degree diamonds are easy to cut, start with a 45 degree cut on the outside edge of the 2" strip:

5. Cut 2" wide Diamonds using the 2" line on the ruler: 

6. Kites are easy and FUN to cut. Start with four 5" squares cut in half: 

7. Turn the long side of the triangle like this, place the 5" measurement on the left corner, trim away the little triangle on the right side--it is trash unless you save pieces that small:


8. Viola! Now you have 8 Kites:

9. A lot of useful cutting instructions can be found in this book. Each shape has its' own page and both left-handed and right-handed instructions/diagrams are provided:

10. For some of the small pieces, I don't cut them apart until I need them so they don't get lost. On the wrong side I have used a pencil to draw the cutting lines so I'll remember what they are for--these 8 triangles will surround the center, 4 are HST and 4 are QST: 


11. Here are all the pieces cut for another Feathered Star. Now I am ready to sew:


Feathered Stars are marvelous blocks! One can be the center of a great quilt--I have made several quilts with a Feathered Star as the center medallion. Many are amazing in one quilt.  Give it a try. 

Let's quilt.

Barbara