Showing posts with label beginning quiltmaking;. Show all posts

Sunday, January 27, 2019

Quiltmaking 101

For thirty years I have been teaching the beginning quiltmaking 5 week class at my local shop, Patches & Stitches.  This has allowed me to work with well over a thousand local students who want to learn to quilt.

For the last 13 years the project has been this quilt, Mix n Match Stars by
Glad Creations patterns:

Class Sample, 48" x 60"
The 9" block is made with basic units: half square triangles, quarter square triangles and squares. The pieced border is optional, about 25% of the students tackle that. They can use "super simple borders" if they choose--I teach that too.

Students come from all age groups, the youngest being a very motivated 14 year old, to those much older, even older than me. Many are women but over the years there have been a few men. Some are young mothers eager to make a baby quilt for their child. Some are newly retired women who say "now is my time, I want to learn to quilt". As I live in Rocket City USA, Huntsville, AL, many of the students are engineers or are married to them. The engineers take to the precision of piecing a quilt pretty quickly. Some are more "laid back"--whatever their style, the desire to learn what I can teach them is all that matters to me.

I am not the quilt police. When asked how perfect something has to be, I give them the 3 tests:

1. How does it look from 6 feet away?
2. How does it look to a man going by on a galloping horse?

and the MOST IMPORTANT TEST of all:

3. Can YOU live with?

This is supposed to be fun, not stressful, and everyone gets to decide their level of perfection as they learn.

Some student work:

Donna

Stacy

Sophie, on the right in the photo

Peggy
Beverly

I could post hundreds more photos--this just gives an idea of how the student can make the quilt her own. 

Currently, one of the students is really making this project her own. Catherine has taken several classes from me and is most definitely not a beginner. She showed me a quilt she found on Pinterest  that inspired her fabric selection. Her blocks take much longer to make than the other students since she cuts all the pieces separately, arranges the block, takes a photo--very smart!--then sews the block together--every piece in the block is a different fabric but a specific color:

I think she is right on target with the look she wants. She is not in a hurry, and is taking her time to enjoy these blocks. I am so eager each week to see what she has done so far.

Having taught beginners for 30 years, I usually change the project every few years but this one has proved to be such an excellent project for those who really want to learn as much as they can. AND I have kept it because in 2009 I was asked to work with a film crew to create a "class" for the website Monkey See. Over the course of 6.5 hours we recorded 7 three-minute videos that supposedly teach you How To Quilt.  I jokingly say "I can teach you how to make a quilt in 21 minutes."

The block I am making in the video is the block from this class, Students have found it so helpful to go home and have me continue to "teach" this block online. I still find it pretty hokey, BUT students tell me they really benefit from it. So, this is the project I'll stick with for now.

Many of the students have become friends, many have joined local guilds to continue to learn and find support. It is really my honor and privilege to teach all these students. My goal for every class is that I addict ONE of them, completely and totally to quiltmaking--so the industry will continue to grow and we all benefit from that. And I am always successful at that.

Let's quilt!

Barbara

Wednesday, December 19, 2018

Local Classes--Winter 2019

The new year is upon us and I have several local classes scheduled for the next few months. If you are near, I'd love to see you in class.

At Patches & Stitches, my perpetual Quiltmaking 101 class will be offered twice:

I have taught a 5 week beginners class for 30 years--the quilt has changed many times over those years. This one has stuck for a while--it is based on a pattern from Glad Creations and teaches ALL the basics of good quiltmaking skills. Many people who have taken this class get "hooked" on quilting--that is my goal.

A new class: Spectacular Scraps, will be a fun way to work with half-square triangles to create your own design:

When I posted this quilt several months ago, the positive response inspired me to offer this class again--I made this quilt more than 15 years ago and taught it then.

In the years when my guild, the Heritage Quilters of Huntsville has our quilt show, I offer a 3 hour lecture/demo class on Beautiful Borders and Bindings. Many quilters don't enjoy the binding process or don't do it as well as they could because they don't know the tricks. A poor binding really hurts a great quilt and you can improve your binding technique--let me show you how.

Trying something new, My Favorite Things will be offered as a 2 part class, 7 hours each time. Part 1 is in March, Part 2 in May:

An original design, I recently taught this as a 6 month lecture/demo class and the students loved it. This time it will be an all-day sewing class, moving through each of the 6 lessons at a good pace. Allowing a month and a half between classes will allow students to do most of their sewing at home, while getting started sewing in the classroom. This also will make a great multi-day retreat class and is being considered by several groups for their students.

At Huntsville Sew Creative, the wonderful quilt SIZZLE will be taught as a year-long lecture/demo class. The pattern is the 2019 Block of the Month from The Quilt Show --it is FREE to Star Members--that membership costs $49/year--just last night one of my students told the rest of the class that was money well-spent--she found so much content throughout the site that was valuable. I have written before about why I think this subscription is one every quilter should seriously consider: Why Join the Quilt Show?  


You can purchase a Kit if you want to make either of these beauties or select your own fabrics. This class will teach you so much and there is still room for a few more--I hope you will join us if you are local. No sewing machines--I do the sewing, while students learn and ask great questions.  Huntsville Sew Creative has recently moved locations and their website is under construction--call 256-536-3757 to sign up before space is gone.

That is all I have time for this winter--lots of sewing will be happening for future classes and preparation for 10 away-from-home trips this upcoming year. I hope to see you in class.

Let's quilt!

Barbara

Sunday, October 14, 2018

Class Progress

It's always fun to see how far students get on a class project. Recently, Spellbound was an all-day class. This is a great pattern from Calico Carriage Quilt Designs, home of Debbie Maddy.

A few shots from class, starting with their progress by the end of the day:


The morning was spent organizing, then cutting the various size strips in the proper order. After lunch it was time to sew. They all did great and will continue to sew until their top is done. I encouraged them to add borders if they want the quilt larger and I hope someone does.

In class progress:

Rhonda with her Featherweight

Marilyn has her first several rounds laid out 

Judy made fast progress
Here is mine, all done:


In another class, a student brought her finished Quiltmaking 101 quilt to show me. This is the beginning class I have taught locally for 30 years, this particular quilt has been the project for 10 years. I love it when a student makes changes, making the quilt her own. Nikki added additional wider borders:


Sunday was the monthly Sunday Sew and Sews class, focused this year on The Patchwork Barn from The Quilt Show. We are getting toward the end of this year-long Block of the  Month, designed by Edyta Sitar. It is not too late to get all the patterns for this quilt. They remain FREE for Star Members to The Quilt Show until December 31, 2018. In addition, this year, the 2017 Halo Star Medallion, designed by the late Sue Garman is still FREE for Star Members, until December 31, 2018. Download and/or print them before it's too late.

Three of the Sunday Sew and Sews show off their work:

Janet's before lovely  borders, still to come. She added sashing between the blocks.

Terri used the Crystal Farms fabric kit and she also added sashing between the blocks

Here is Donna's top, all finished. Don't you love how she made the center HER house?!:


My top is done. Now to figure out a quilting plan:


We are getting excited about the 2019 Block of the Month from The Quilt Show: SIZZLE, designed by Becky Goldsmith. Find more info here.

Yesterday, we had Session 5 of My Favorite Things--a 6 month lecture/demo class featuring the quilt I designed just for this class--it is made of my favorite blocks. Here are a few photos of the works in progress from some of the students:

Rhonda's is done--AND her husband loves it so it will be his Quilt of Valor

Holly got hers done too

Joan has a wonderful selection of fabrics--we all say OOOOHHH! when we see her blocks

More of  Joan's

Kathy has used a lot of Kim Diehl prints along with other lines

More of Kathy's blocks

Sally has a quiet reproduction palette--so lovely

Cyndi is wild, about Kaffe and Tula and lots of  everything


More of Cyndi's work 
It is so fun to see what each student comes up with and I love when they make the quilt their own. My Favorite Things ends in December, I hope to have more finishes to show. Here is mine:


Let's quilt!

Barbara

Wednesday, April 25, 2018

Starts and Finishes

I worked at it to the exclusion of all else last week so I could count this one done:


It is the Block by Block quilt made for the Patches & Stitches 40th anniversary. It uses 40 fabrics and has 40 blocks. The first 40 to bring a completed quilt to the shop wins $40 and I was determined to be in the top 20. #17!  Photo of the top here. Quilted on my Bernina Q20 sit down longarm, I enjoyed doing the big loopy designs across the top. I chose 4 different designs for the borders. Finished is better than perfect.

Time for a new start. My Favorite Things is a new quilt/class I am designing that will run for 6 months, from June to December, 2018. It will feature my favorite blocks and students can either make a small quilt each month or make "parts" that will be combined at the end into one large quilt. It's a lecture/demo class, no machines to drag to class, just learn several blocks each month, different ways to make them and ways to use them in quilts. More about the class here.

My fabric pull for this project:


Where did this palette come from? How about the chickens of Kauai?

I often save photos that feature colors I love together. This has been saved since 2006 when my husband and I made a trip to Hawaii to celebrate our 30th anniversary. This will be fun.

The beginning class I teach at Patches & Stitches finished last night--only two students attended the last of 5 sessions but had great quilts to show for their efforts and both are hooked on quilting now, always my goal:

Sharon, her top is complete

Tricia, made 30 blocks and still has two more borders to go. She plans to lengthen it a bit.
They both enjoyed seeing my Block by Block and decided to try that next. I love when students get excited and say "What can I make next?"  Both of these women have their next bed-size quilt projects picked out.

From time to time I participate in online swaps. Lori of Humble Quilts has done a doll quilt swap for several years. I received this one from Judith B along with a pin cushion and photo of her Featherweight machine which she used to make it,  a great touch:


And I gave this one, to Katy S:


It's fun to share small quilts with like-minded quilters.

Time to get a few things done so I can play with My Favorite Things.

Let's Quilt.

Barbara

Monday, June 26, 2017

Learn to Quilt in Two Days

For 30 years I've been teaching quilting classes, many of those to beginners. I've become a much better quilter because of that--we always learn from our students. My Quiltmaking 101 class is 5 weeks long, and the students end up with a quilt top, approximately 48" x 60", although some make a larger quilt. Most of their sewing happens at home, there is LOTS of homework.

In the Summer, I don't offer the 5 week class because most people aren't home for all 5 weeks. This year I decided to offer a 3 day class I called "Learn to Quilt This Weekend". The plan was: Friday and Saturday, 9-4, Sunday 12-4. The students would make a top, baste it and start quilting it, all in that one weekend.

Three people signed up and I was eager to try out this experiment. Two days before class, two of them, friends, dropped out. I contacted the remaining student to see if she still wanted to come, being a "student of one". Not everyone likes being the only student, some get nervous with too much attention. She said she was happy to get what would be essentially private lessons, as she was looking forward to the class.  I learn a lot about what can and can't be accomplished in the time available the first time I teach any class so we went forward.

The pattern is my 2017 Sew-A-Long project. They would have all the instructions and step-by-step help should they want to make another one of these later 2017 Sew-A-Long:


Melinda starting learning from the beginning--selecting her fabrics. At first she wanted me to do it, but I walked her through the process, selecting 6 fat quarters, one background, a border, and then getting to work. We decided to wait to select the perimeter fabric, mine is yellow, until she had a few blocks done to see how they would look on various fabrics.

Quickly, she was cutting fabrics and was soon ready to sew. The advantage of having me as her personal assistant, is that, once I knew she understood how to carefully cut strips from her fabrics, I took half of them and cut too. In  no time, she was ready to sew the Churn Dash blocks. She had a brand new sewing machine so we took a few minutes to figure out how to achieve the 1/4" seam allowance we strive for and then she was off and running.

I quickly realized she didn't want me to hover, just to be available to answer questions as they came up. By lunch she had 4 of the 12 Churn Dash blocks done and was pleased with her progress. After lunch, she started on the Old Italian blocks, and had all 6 of those done by 4 p.m.--it was a very productive day.

The next morning she got back to work on the remaining 8 Churn Dash blocks--they were done by lunch. It was time to select a perimeter background fabric. We tried blue, green, yellow and, the winner:  RED!

After lunch, I explained the process of sewing a quilt together "on-point", a diagonal set. She cut the triangles from the red, both half-square triangles for the corners and quarter-square triangles for the edges, and put her quilt top together. Here it is before the borders:


With a striped border, there are several options for how to address the corners. She could put the borders on left/right, then top/bottom., like my sample. Or she could use a corner block:


Or she could go the extra mile and miter the border, a bit more work with the cutting and sewing but it makes a striking finish.  The choice was hers.

Melinda opted to keep it simple and was very happy with her finished top, complete by 3:30 p.m. the second day:


As this was a new machine, Melinda didn't have a walking foot yet. I explained how that would be very helpful with the quilting. She decided to wait until she had that foot before we meet again for 4 hours of quilting/finishing instruction.  She has a baby quilt she had previously made that is basted and ready for quilting--she will practice some free motion quilting on that before we meet again too.

All in all, Melinda was very pleased with all she learned. I learned that 3 solid days is too much for most students so if I teach this again, we'll put a week between the first 2 days and the final half-day session. Had there been a full class, there would have been at least a couple students who didn't get this far on the first two days--they would benefit from the extra time to complete their tops.

I love teaching, both beginners and more experienced quilters. I have 3 goals for my beginning students:

1. They feel their time and money was well-spent at the end of the class
2. They actually finish the project
3. I addict one of them, completely and totally, to quiltmaking--so the industry/craft/art can continue to grow.

I am happy to say I am always successful with that 3rd goal. With Melinda as the only student, it was more of a challenge, but I think we did it.

Let's quilt!

Barbara


Friday, January 13, 2017

Sew-A-Long Part 2 The Shoo Fly


Welcome to our first Sew-A-Long.  If you missed the earlier post you can find it here:

Part 1 Introduction

I am hoping you are after precise piecing, intersections that intersect, points that are sharp.  Now, having said this, you should know that I describe myself as a "95% quilter"--close is good enough most of the time.  If you are planning to enter international competition, that is NOT good enough.  If you are making quilts for people you love, it is fine AND you get to decide how precise it has to be.  I started 30 years ago as a "50% quilter" and was happy with that.  You will get better the more quilts you make.

One more DISCLAIMER:  I am not the quilt police and there is more than one way to complete any task.  I will show you what works for me and what has worked very well for the more than 1000 beginning quiltmaking students I have taught over the years.  If you have a different method that works well for you, I am happy for you and encourage you to keep at it. That is why there is chocolate AND vanilla--you get to choose. If you want some tips on how to improve, keep reading..

One of my favorite quilt blocks, the Shoo Fly and its' variations go by a few names:  Churn Dash, Monkey Wrench, Hole in the Barn Door, etc.  We're calling it Shoo Fly.

We'll be making 12 of these 6" finished blocks.  You can make them very scrappy, with different neutrals and colored fabrics, or very planned with few fabrics.  I am using several printed fabrics, with one polka-dot neutral and one gray/white stripe for the 12 blocks:


PLEASE NOTE: this post is photo- and word-heavy.  If you are an experienced precision piecer, you will zip right through these 12 blocks.  If you are new to precision piecing, or struggle a bit to get blocks made to your satisfaction, hopefully, all these photos and words will help you improve.

There are only three things you can do wrong in piecing a quilt block:
      the cutting,
      the sewing,
      and/or the pressing.

We will focus on all three of those with this first lesson.  We want to cut precisely, then sew accurately, and finally press firmly.  Let's start with the cutting.

There are many ways to make Half Square Triangle units (HST). I'm going to show you two ways.  The first method starts with 3" squares of both neutral and colored fabrics, 24 of each will yield the 48 HST needed for 6 blocks:

FIRST METHOD: Cut the neutral fabric into 3" strips. First, I clean up the outer edge of the fabric with two cuts. I'm right-handed so I place a long ruler on the left side of the fabric, then place a small square on the right.  This is a fat quarter of fabric, approximately 22" long, and is folded in half.  The fold is near my body, the cut edges are at the top.  The process is the same for width of fabric, 42" long, except that I would use a 24" long ruler, not the 12" shown here:


The small square ruler is placed carefully along the fold line, creating a 90 degree angle against the longer ruler.  Carefully cut this straight, creating a clean edge on the left. NOTE: I am not using any of the lines on the mat:

Now carefully move the long ruler in place, putting the 3" line on the newly cut edge on the left:


Cut enough strips to give you 24 3" squares--I needed 3 strips.  Do the same with the colored fabrics.  I used several different prints and cut as many strips as needed to create 24 3" printed squares.

I paired up the neutral strips with the printed strips, placing them right sides together, and cut a total of 24 pairs. For speed, I used a 6" square.  Here you see the reverse side of a gold fabric, right sides together with the polka dot.  First, I placed the ruler just past the messy edge of the fabric, on the left, and cut on the 6" line, on the right:


Then I rotated the fabric/ruler and cleaned up that messy edge.


Then I cut the 6" rectangle in half, creating 2 pairs of 3" squares, gold and polka dot.  Because I was using small strips of leftover prints, you can see there is still enough gold fabric at the top of this photo, so I cut that into a 3" square pair as well.  I continued to pair polka dot/prints, until I had 24 pairs of 3" squares:


Once the pairs are cut, you need to draw a pencil line on the reverse side of the light fabric.  A plain mechanical pencil is my marking tool of choice as long as I can see it:


If you have a 1/4" presser foot on your machine, one line is enough.  You will sew a 1/4" away from the pencil line on both sides of that pencil line.  If you don't have a 1/4" presser foot, it may help you to draw two more lines, 1/4" away from the center diagonal.  I know there are other methods and rulers for this  job but you already have a ruler that will work so let's use that:


SECOND METHOD:   If you are using one neutral and a limited number of prints, this method is faster and saves you a bit of fabric.  Cut strips of both fabrics 2.5".  That is .5" larger than the finished size of the HST (2").  Pair them right sides together:


 Use a Half Square Triangle Ruler to cut them.  This is the Creative Grids HST ruler. Place the 2.5" line at the bottom of the fabric strip:


Make the first cut, creating a pair of triangles.  Rotate the ruler--don't flip it upside down, simply rotate it bottom edge to top.  Cut the straight edge on the right, creating the second pair of triangles:


 Continue cutting the pairs until you run out of fabric or have cut 48 triangles:

Let's compare these two methods.  The first requires the drawn pencil line and is slightly larger than needed to create 2.5" unfinished HST.  But it's quick to figure out how much fabric you need.  People without a 1/4" foot like this method.   I also find beginners really benefit from that little bit extra as they learn to master precise piecing. The second saves .5" of fabric and there are no lines to draw.  But you must be able to sew a 1/4" seam accurately.  Try them both, pick your favorite. And yes, there are other methods but these two are enough for now.

Let's Sew  for a bit:

Before starting to sew my blocks, I begin stitching on a "starty/stoppy", "thread kitty", "leader/ender"--this can be as simple as a small scrap of waste fabric or small units being made for another project.  This allows any thread tangles, called a"bird's nest" to happen on fabric that is not so important.  I wrote about leader/enders here.

To keep this simple, my leader/enders are 1.5" squares, a dark and light pair.  Eventually, one pair is put with another to create a four-patch.  We will be "chain piecing", where we sew one unit after another, feeding them through the machine.  This saves time and thread and the leader/enders become another quilt someday.  If you prefer, just use a scrap of fabric.

With the 3" squares, they will go through the machine twice, on BOTH sides of the drawn line.  If you have drawn 3 lines, sew on the outer two. You will "air sew" for just a couple stitches between the units, don't sew them on top of each other:


 If you have drawn one line and have an accurate 1/4" foot, sew on both sides of the center drawn line, using the edge of your foot as a guide:


With the triangles cut with the HST ruler, you will sew an accurate 1/4" seam down the cut edge.  The blunted corners on one end help to prevent the point from being "eaten" by the machine, it goes into the machine at the top.  Here you see how they feed one after the other:


When all the sewing is done, you have long chains of squares or triangles:


Cut these units apart and we're ready to Press:


Many quilters like to use steam in their iron.  If you do, just be careful not to distort the pieces as you press.  That sewn seam is on the bias and can get wonky if you are heavy-handed with the iron.

First, press the seams as they are sewn, this helps to release any tension issues you may have and sets the seam.  We are going to press each HST toward the printed fabric, away from the neutral background. Lay the sewn triangle as you see here, the long edge running parallel to the edge of your pressing surface, the point facing down:


Use the edge of the hot iron to press the printed fabric up and away from you. Press with a firm, smooth motion, not back and forth over the seam:


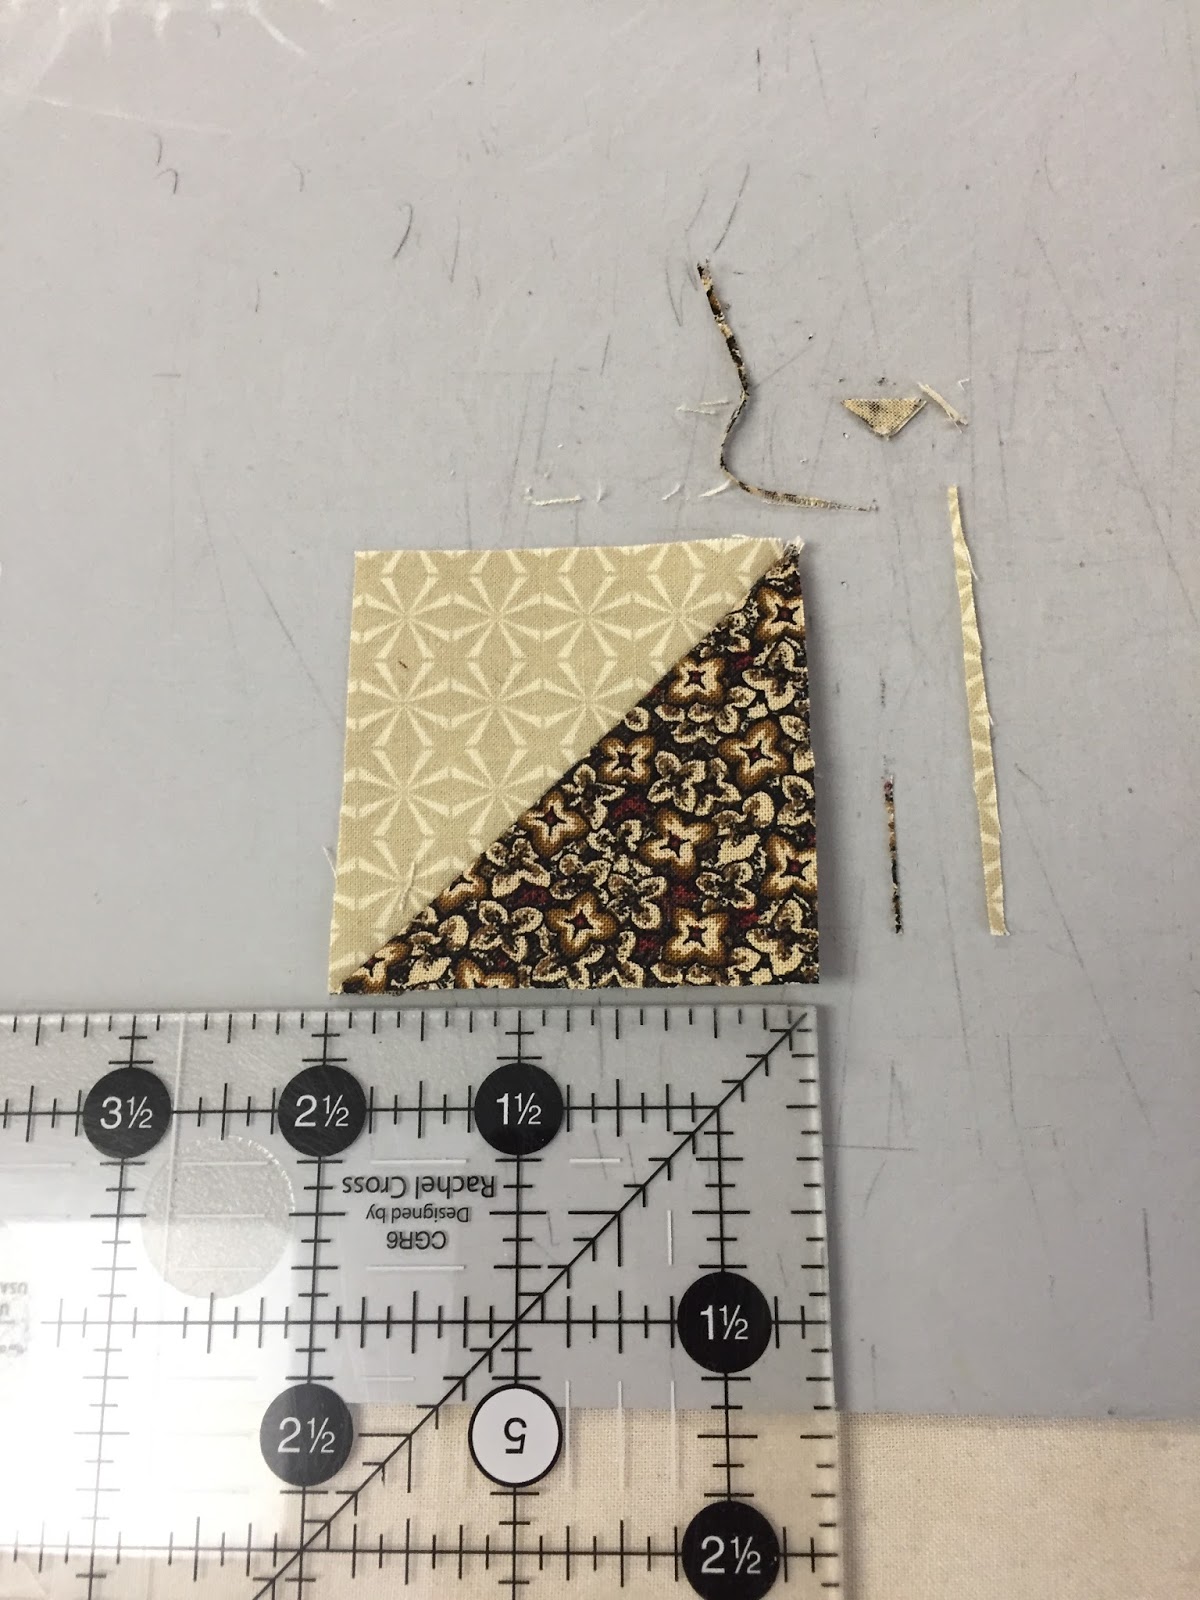
Now we are ready for some more trimming.  The 3" squares are oversized to begin with so these half square triangle units are now too big.  They need to be precisely 2.5" edge to edge.  Using a square ruler that has a center diagonal line, place the diagonal line on the seam and make sure the lower left edge is at least at the 2.5" mark:

This square is about 2 5/8"
 Trim up the right hand side, then carefully lift the cutter and trim across the top edge, holding the ruler firmly in place:


The first cut is important but the second cut is critical, it will determine what size your HST is.  This time as you place the square ruler on the HST be sure the 2.5" marks are exactly in  place on the left and bottom edges.  Trim the right and top edges for a perfect 2.5" Half Square Triangle unit:


Perfection!  I am willing to throw that much fabric away to have perfectly precise units:


With the triangles that were cut as pairs with the HST ruler, in a perfect world no trimming would be necessary, IF they were cut perfectly, sewn perfectly, and pressed perfectly.  I don't require that much perfection of myself, I simply have to "Trim to Perfection".  First cut:


Rotate and make the second cut:


 Perfect 2.5" HST, very little waste:


Here is the most important lesson about piecing units for quilt blocks:

If your unit is not the correct size now, it WILL NOT miraculously become the right size when you do the next step.  So work on that precision, the cutting, sewing, and pressing, until you are satisfied you have a 2.5" unfinished Half Square Triangle unit, one that will become 2" when pieced into the quilt block.  It takes practice, you can do it!

More Cutting: 

We need squares for the Shoo Fly block too.  Four squares of background, and one center square. Backgrounds can be scrappy or all the same.  This time I chose one gray/white neutral stripe for the background and one colorful stripe for the center.  I can lay out those stripes lots of ways:


As I am usually a very symmetrical girl and like all my lines going in the same direction, I was surprised that after laying four blocks out with the stripe in various orientations, I actually preferred the one in the lower left, with the stripes going in both directions.  Lesson learned: don't overthink it, especially in a scrappy, bright, kids quilt.

Piecing the Blocks:

Here's where the rubber meets the road.  It's time to piece the blocks.  Lay out your blocks near the machine.  I use a small design board,  16" x 20", covered with flannel. You could use cotton batting instead.  This makes it easy for me to move the blocks from the cutting surface to the machine to the pressing surface.  Here are four, ready to go:


I use Masterpiece thread by Superior.  Read why on this post I wrote entirely about thread. My stitch length is about 12 stitches/inch, a 2.0 on my metric machine.  Small enough to hold firmly at the edges, large enough to remove when I've made an "oops".

First, flip the middle row over onto the left side row:


Begin by sewing a leader/ender.  Here you see two small squares that have been sewn together.  Pick up the middle square placed on top of the left HST, right sides together (RST), feed it into the machine, carefully sewing an accurate 1/4" seam.  In this photo you can see there is a small line on the throat plate that is the 1/4" guide mark and this presser foot is 1/4" wide from the needle to the right edge:


Next pick up the center square placed on top of the middle square RST and feed through the machine:


Here you see the third pair, bottom middle square and lower left HST,  RST, has been sewn, and the leader/ender small squares are being sewn:


Now to press these seams.  Place the sewn pieces so you can press toward the square, away from the HST.  This is because the triangles points don't like to be pushed back over on top of themselves so if you don't have to do that, don't:

The seam  is at the top, making it easy to press the square up, away from the triangle

Squares have been pressed up, away from the triangles and center square
OK, now it's time to check your 1/4" seam.  If you are new to precise piecing, or struggle, or have a new machine you are getting used to, as I do, it's a good idea to check at this point to see you are sewing accurately.  

Place a unit on the cutting  mat, use a small ruler, and measure the width of the unit.  Place the 2.25" line in the center, measure from the center out to the right edge, trim if necessary:


Rotate the unit 90 degrees and measure again from the center, 2.25" mark, to the other edge:


I trimmed just a bit from this unit:


If you are way off, a lot to trim, your seam allowance is too narrow.  If the unit is less than 4.5" wide, your seam allowance is too wide.  Try again, until you are happy with results. Remember:

 IF THE UNIT IS NOT THE RIGHT SIZE NOW, IT WILL NOT MIRACULOUSLY BECOME THE RIGHT SIZE WHEN YOU TAKE THE NEXT STEP.   

Lay out the units again, by the machine.  Turn the right side units on top of the left/middle sewn units:


Chain piece this row, adding the third unit to each row.  Place them on the pressing surface so you can press toward the square, away from the HST:


Now I will use a few pins.  If you want to use pins for the earlier steps, that's fine.  I don't need them until now.  Joining the top and middle rows, put a pin at each intersection, in front of the intersection.  Place an additional pin along the bottom edge, well out of the way of where the presser foot will be:


Feed this through the machine, being careful at the intersections--the seam allowances should "nest", meaning one is up, one is down,  Remove the pins as you get to them.  If you MUST sew over pins, sew slowly so you don't damage your machine.  Stay straight all the way down, it's easy to let go at the end and have a less than straight seam:


Open up and check those intersections:


Pin the bottom  row to the first two rows and sew:


Check those intersections:

Press the rows toward the middle, away from the HST:


Here is the front:


Here is the back:


Precisely 6.5" square, nice and flat:


Lather, rinse, repeat until you have 12 Shoo Fly blocks made, each 6.5" square, or as close to that as you want them to be:


Next week, we'll make the Old Italian Block.

Let's Quilt!

Barbara