Showing posts with label 2020 Block of the Month quilt. Show all posts

Sunday, November 1, 2020

AFTERNOON DELIGHT--Month 11

The end is in sight! As you are getting all your blocks done, you are probably thinking about the layout for your blocks.

In the Month 12 instructions, Sue writes about the "circular" applique blocks and the "X" applique blocks. That was when I realized they were made like that--on purpose. Remember, my sample quilt was made start to finish in 5 weeks--with the help of my Sunday Sew and Sews.

Here is Sue's original quilt. She placed the circular and X blocks in alternating positions. And I am sure she worked with her fabric choices as she decided which to place where:


When it came time to lay out my blocks, I used Sue's as a guide--you have to start somewhere, right? Then I moved blocks as I needed to based on fabric choices. Even if you used the Kit Fabrics that I used, your blocks will be different and you may want to lay yours out differently from mine:

There is no right or wrong way to lay out the blocks. The way  that makes you happy is the right way. So decide what you like, take a PHOTO, then ask your family and friends for their suggestions, if you must. I guarantee they will want to move things around--so the photo you took will allow you to correct their changes. It's your quilt, you decide.

If you have stuck with the monthly instructions, there are a few Double 9 Patches to finish. If you charged through them, you can move directly to the last of the applique blocks.

This month brings more applique blocks and there are 6 of them! I often wish I could ask Sue why--why are there 6 now when there were only 2 each month for the past few months? Sue was a very fast quiltmaker--making 6 applique blocks in one month was a snap for her. Not for everyone, though.

Here are my applique blocks for this month:

Block 31--notice how the maker centered the design on top of the fabric so the center circle is perfectly placed--fussy cutting at its' finest! Sue suggests you omit the center hole if you find it too challenging.


Block 32


Block 33
                                                                    
Block 34
Block 35--if you want the swirls to go in the opposite direction, print the pattern in reverse

Block 36--Tip in the pattern says to sew 4 squares together before cutting out the entire design

Next month, the last 4 applique blocks will be revealed and  you will be on your way to assembling your quilt!

And, today, November 1, 2020, the 2021 Block of the Month quilt will be revealed on Facebook Live at 1 pm PST. Be sure to tune in to see it--it is such an amazing quilt and very different from this!

Let's quilt.

Barbara

Wednesday, July 1, 2020

AFTERNOON DELIGHT--Month 7

We are moving right along and this month there are only two applique' blocks to do. One of those is a variation of the "Twirly Ball" we did previously in Months 3 and 5. If you want a refresher on how I made the first one of those go to Afternoon Delight--Month 3

For those working on Double 9 Patch blocks, those continue this month too. I gave important cutting info about the Double 9 Patches when we released Month 6 early, in March, so if you haven't started them yet, be sure to take a look at that post: Double 9 Patches.  Remember, there are 64 Double 9 Patches in the quilt.


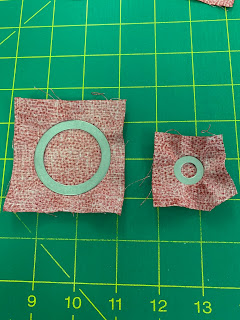
Both of the applique blocks this month feature circles. Recently, I learned about a new product, Applipops. They are metal disks that fit together, making it very easy to create round circles.

Take a look at their short video from the website to see the process: Applipops Video

I got 2 Pro Packs so I could try them out and used them with the 3 different size circles needed this month. 

UPDATE--Applipops has a discount for YOU--use BARBSFRIEND as a discount code to get 10% off your order. 

The process is very easy. The instructions say to use undiluted liquid starch and I should have. I had a 50/50 starch/water mix in a small spray bottle so used that. The edges would have been stuck down better with straight liquid starch.

First step: cut a hunk of fabric and place it between two disks:


 Trim to about a 1/4" seam allowance, less on very small circles. On the largest circle, I left too  much seam allowance so the edges have a few little puckers on the back.


If I were hand-appliqueing these, I could easily smooth out the little puckers:

Note I sprayed this red fabric on a washcloth as I just recently changed my big ironing board cover and knew the red might run--it clearly did:


The only down side I can see is you  have to wait for the metal disks to cool before handling them, and the starch to dry before removing  the disks. With two sets I can make two of each size at the same time. Since I didn't need a lot of circles, that was OK. If you need to make 20 of the same size, at the same time, it might take a while.

My usual method of making small circles is with Karen Buckley's Perfect Circles, sets of Mylar circles. That method requires basting around the template. If making a lot, that would take some time. On the Forum recently, someone posted she machine basted instead of hand basted and I thought that was brilliant! You can't go fast but it would still be faster than hand-basting. See Karen demo her process on Show 2007

Be sure to look at the Forum to see some of the fabrics being used by our members. Also, some people are choosing to change from an On-Point set to a Straight Set.  Forum--Show and Tell Your Blocks

This month's blocks on my sample quilt:
Block 23

Block 24
Next month there are two more applique' blocks and more Double 9 Patches.

Let's quilt,

Barbara