Showing posts with label sawtooth borders. Show all posts

Wednesday, September 5, 2018

An Alternative Center for The Patchwork Barn

Instead of the Patchwork Barn, I made an alternative center. It is made from half square triangles and is easy to construct. The star is 24" square, including the sawtooth borders. This design is Barbara Brackman #2165, The Twinkling Star, published under the name of Nancy Cabot in the 1930's:


Here are the instructions I  have written:

My Alternative Center 2018 BOM
The Patchwork Barn
MONTH 9

Instead of the Barn, I made a Sawtooth Star Block for the center of my quilt. I used the leftover fabric from my blocks.

NOTE--I used 3 yards of Kona Snow, an off-white, for all the sashing. The full cutting instructions for this layout will be given in Month 11. For now, save 2.5 yards of your sashing fabric for the vertical sashing and narrow sashing between blocks and use .5 yard for the center block construction.

Center Block Construction:

From a half yard sashing fabric cut:

(1) 5” x width of fabric (WOF)
Sub-cut into four 5” squares for the block corners
For 
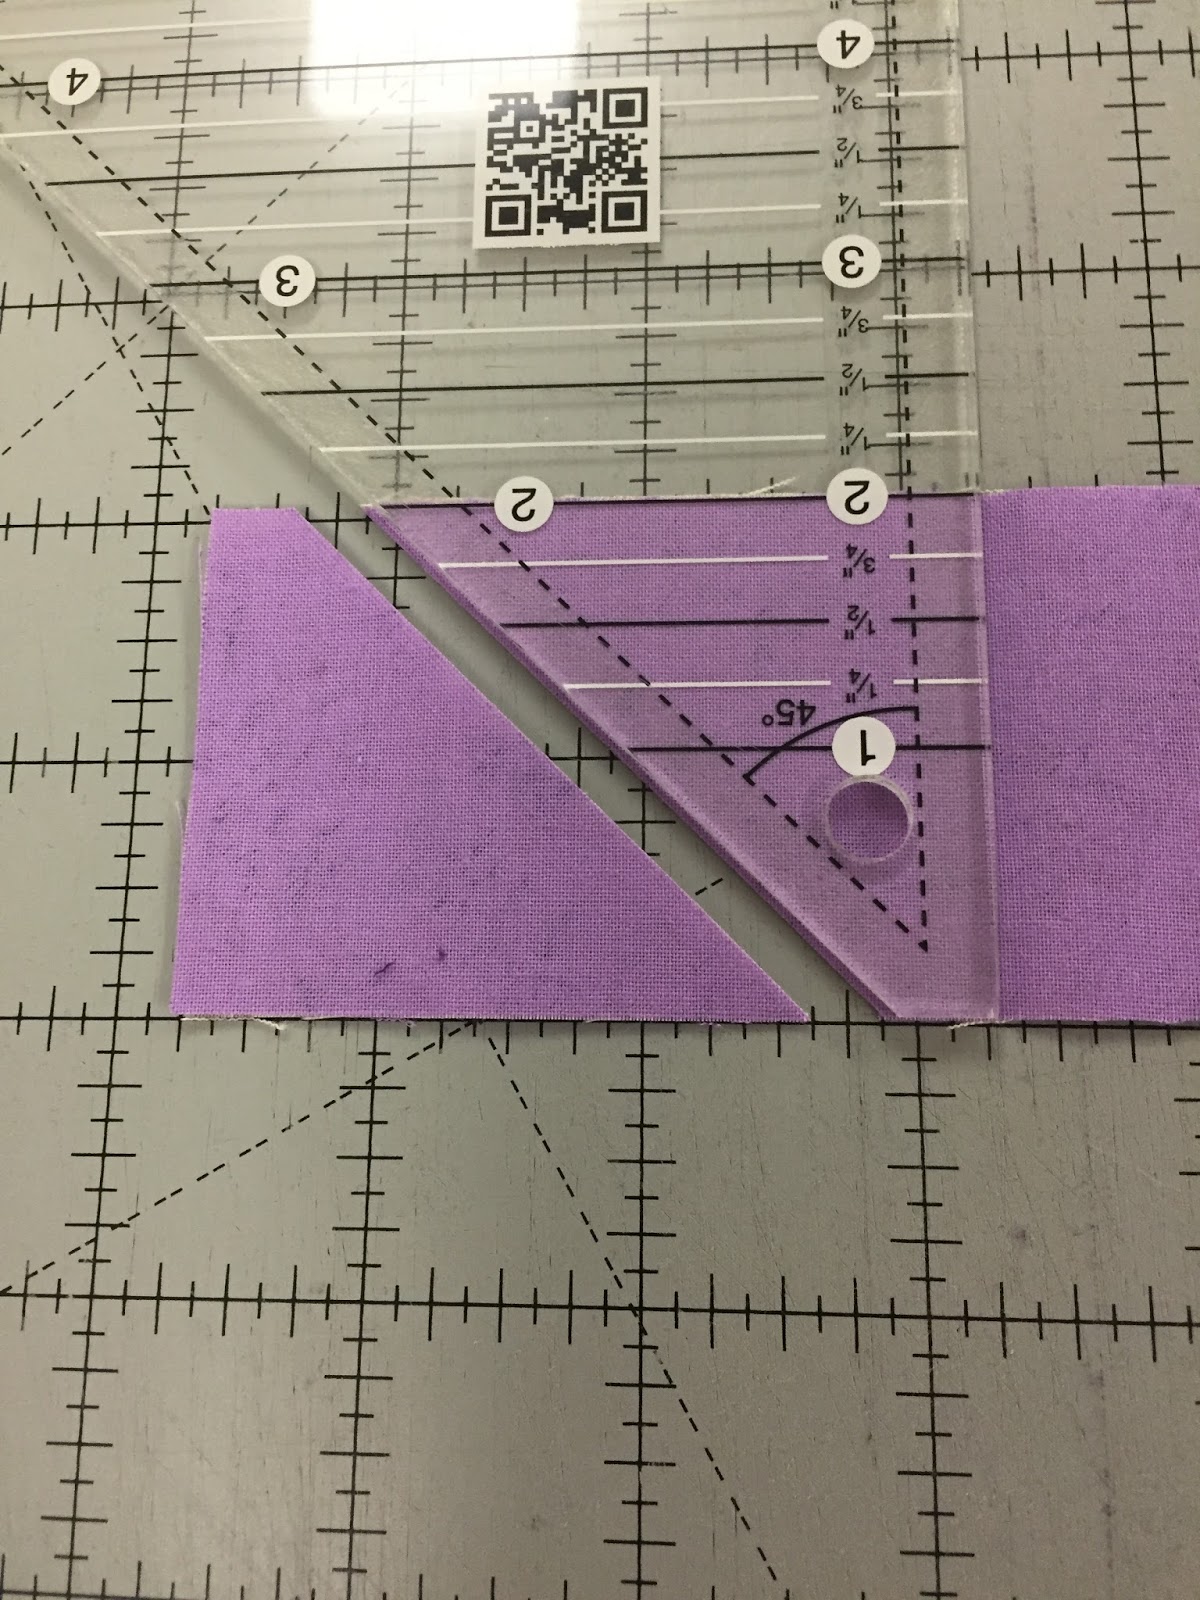
the 12 light solid triangles for pieced blocks, you have a choice:
            Use a Half-Square Triangle ruler to cut (12) 4.5” FINISHED half-square triangles--this will require one additional strip of 5” x WOF
 OR:
            Cut a 5.5” x WOF strip of sashing, sub-cut into (6) 5.5” squares, cut each in half to get 12 half square triangles, these are slightly larger than needed.

To Piece triangle units for the center block: I worked from leftover fabrics from the quilt:


            Make 36 1.5” FINISHED half square triangle units
               I used a half-square triangle ruler and 2” strips,
                        Right sides together, cut triangle pairs, sew them.
     
 Cut 36  1.5” FINISHED half square TRIANGLES, mine were all red--I used 2” leftover strips and a half-square triangle ruler. You could cut (18) 2.5” squares in half.

            Join 3 HST units and 3 triangles to form half of the pieced squares.
                  Make a total of 12 of these
Join the 12 pieced triangles to 12 solid white triangles to make 12 pieced squares that FINISH at 4.5”, they will be 5” raw edge to raw edge

Lay out the 12 pieced squares and the 4 corner squares, sew into 24” block.
            I pressed all seams open, press them however you prefer.

From remaining sashing fabric, cut two strips 2” x WOF for inner sashing.
            Sub-cut into (2) 2” x 18.5” and (2) 2” x 21.5” sashing strips

Join left and right sashing to left and right of pieced block, press toward sashing

Join top and bottom sashing to top and bottom of pieced block, now your block should be 21.5” square, raw edge to raw edge

SAWTOOTH BORDERS:

To create the sawtooth borders, make 56 1.5” FINISHED half square triangle units. I used a half-square triangle ruler and 2” strips, lights and darks placed right sides together, cut and sewn into squares. They should be 2”, raw edge to raw edge. You could cut them from 2.5” squares, trimming them to perfection after sewing the triangle pairs together.


Cut (4) light 2”squares for the four corners of the borders.

Left and Right borders: sew 14 HST units together--I changed direction at the mid-point, you may prefer to have all the diagonals go in the same direction

Top and Bottom borders: sew 14 HST units together, add one light square to each end.

When sewn together, the center block is 24” FINISHED, 24.5” raw edge to raw edge.

IMPORTANT TIP FOR SEWING SAWTOOTH BORDERS:

It is very easy for these borders to “grow” as you join them together. I strongly recommend, you “ruler check” your work, with each pair you sew. Chain piece the 14 HST into 7 pairs. Decide how you want to press them--I pressed open.


Measure them carefully--they should be 2” x 3.5” now--two 1.5” FINISHED HSTs, and .5” seam allowance. If they are that size, join these pairs into units of four. Press and ruler check--they should now be 2” x 6.5”. Continue to create the border, ruler checking as you go. If you are off two threads every seam, your border will really grow.


Remember when piecing units: If your unit is not the RIGHT SIZE NOW, it will NOT MIRACULOUSLY become the right size when you do the next step.

The more you ruler check yourself, the better your piecing will be. Eventually, your piecing will be spot on, congratulations--you can stop checking now.

I check every time I make these kind of units--it is very easy to get careless. A metal tape is a good way to check the borders if you don't have a ruler that is at least 24.5" long. Do not use a paper or fabric tape--they stretch over time and are not accurate.

MY LAYOUT:

I also added 1" finished sashing between the blocks to lengthen the quilt. This layout will be provided in Month 11 if you are interested. My quilt has no applique'. The finished size is 74.5" x 97.5".


Let's Quilt.

Barbara

Wednesday, May 31, 2017

Halo Star Medallion--Month 6

This month we make sawtooth borders--the reward for doing all those wonderful curved flying geese:


Mine are totally scrappy, using the fabrics I used in the curved flying geese.

I know some people really do not like paper piecing. This border is one you can easily choose to piece in the regular fashion. I did that with the left border. Then I used paper piecing for the right border so I could choose which method I preferred for the top and bottom borders--more on that later.

Here are some tips for piecing the half square triangles (HST) by regular piecing. There are several different methods you can use, I'll show you what I did. IF you are making the HST from only one fabric, it would be faster to use a grid method to create a bunch of them at one time. I will discuss using a HST ruler and how to make HST from squares--there are detailed photos of both those methods on an earlier blog I did for our Sew-A-Long, earlier this year.

I like to use a half-square triangle ruler; there are several brands. The one I use is from Creative Grids, CGRT45. The advantages to this method are:

1. It uses less fabric--for 1.5" finished HST, strips are cut 2".
2. It is easy to check completed sizes as you sew.
3. It's not paper-pieced, important if that is not your "thing".

The disadvantages:

1. It may be slower.
2. The seam allowance is critical.
3. You make the units, then sew them into a border, two different steps.

Here I have 2" strips of a lavender and background, placed Right Sides Together. With this ruler you place the line that corresponds to the cut size of the strip on the bottom--each ruler has it's own instructions, some use the finished size of the HST, so be sure you know which line to use with your ruler:

Ready for the first cut

Ready for the second cut

Two HST ready to be chain pieced

The blunt edge on the top makes it easy to feed through the machine, no point to get "eaten" and saves a bit of trimming. I cut lots of these units, then chain piece them in one long chain:

"Chain, chain, chain..."

A bunch of HST chain pieced

An easy way to separate the units--a Clover thread cutting disc set in a child's wooden block

A new tool: Sunflower Quilts thread cutter, new to the Market


Pressed toward the darker fabric and ready to trim


I use a very scant seam allowance with units this size, more than an 1/8", less than a 1/4". It works for me. That makes these units a tad bit larger than 2" so I get to "Trim to Perfection". Above is the first trimming, below I have rotated the unit 180 degrees and trimmed the other side:


A bunch of perfect 2" unfinished HST
With the HST ruler, if you cut the strips EXACTLY 2", and sew EXACTLY a 1/4" seam, and press EXACTLY flat and square, in theory, your units should need no trimming. That's more perfection that I want to perform, I am happy to make the units slightly bigger and then trim them to the perfect size.

Once you have 34 HST you are ready to sew them into the Left border:


Here is the most important tip:  As you make pairs, check to be sure they are 3.5" unfinished. You will see quickly if your seam allowance is too narrow or to wide. Then join those pairs into units of 4--these should be 6.5", check to be sure. Then two units of 4 become 12.5".  Remember, if they are NOT THE RIGHT SIZE NOW, they will not miraculously become the right size in the next step:

Two HST = 3.5" 

Eight HST = 12.5" 

When all 34 are joined together your border should measure 51.5 (34 x 1.5"=51" + .5" seam allowance).  I was zipping right along, checking as I sewed the units, then got too sure of myself and stopped checking.  The border was 52" when I got done. I used a ruler to see where the culprits were, then snugged up four seams and Voila':


Perfect!

I did not keep track of how long this process took, only whether I liked the method. To compare, I did the right side border by paper piecing.  The advantages of this method:

1. As the units are sewn, the border is also being sewn, it's one step.
2. If the papers are the right size, the border units should be accurate.
3. It is easy to lay out the fabrics I wanted in each position.

The disadvantages:

1. Some people just don't like paper piecing, it's upside down and backwards--that's OK.
2. It requires a good bit more fabric.
3. Taking out those tiny stitches when you make a mistake is tough.
4. Seam allowances among the HST may be different sizes, that bothers some people.

If you want detailed instructions, with step-by-step photos, go back to Month 2.  That sawtooth border was 1" finished but the process is the same.

Let's talk about what SIZE to CUT the triangles. Sue's instructions say to cut squares 3", then cut those in half.  First, I started with 2.5" squares because I had 2.5" strips left over from the curved flying geese. That was TOO SMALL. The "drop-dead, has to be sewn perfectly" measurement for cutting 1.5" finished triangles from a square is 2 3/8" squares. So, 2.5" squares leave only 1/8" extra and when you cut the square in half, that means each triangle is only 1/16" larger than the space it has to fill on the paper.  Not good. I found I was a lot happier with squares cut 2.75". The larger the square, the more waste you have but being too small is just not fun. You decide what size to cut the squares, just make them bigger than 2.5"--and 3" works just fine.

One paper unit of 6 HST sewn

Trimmed

Paper has been removed and unit should measure 9.5" 

Join units of 6 HST with a 1/4" seam
Join 2 units of 6 HST--they should now measure 18.5"

Once you have all 6 paper pieces made, the paper removed and the units sewn together, your side border should be 51.5". Mine was so I was good to go.

What I decided about the two methods:

1. I was more accurate with the paper piecing.
2. I was faster with the paper piecing.
3. I am willing to "waste" a bit of fabric to achieve the accuracy I wanted.

So, I also did the top and bottom borders by paper piecing.  That's why there is chocolate AND vanilla--you get to decide which method you prefer. My motto, in life and in quilting is "I want the fastest method that gives me the result I want.". For me, with this border, it is paper-piecing.

IMPORTANT NOTE: Sue changed her design, replacing the top and bottom corner pieces with ONE WHITE SQUARE, instead of a half-square triangle, probably to make them the same as the Month 2 half-square triangle borders. We were not able to change her pattern so here is my workaround for pages 7 and 9, the bottom unit on the right hand side of the pages:


The top and bottom borders have 35 HST and ONE white square--they should measure 54.5" when sewn together, including the seam allowance.

Whichever method you choose to sew the sawtooth borders, when all four are done, you are ready to follow Sue's directions on page 3 to determine the size your floater borders need to be. They join the center of the quilt to these borders, filling in the space needed. Another name for these borders is "Coping Borders"--they help us "cope" with the different size borders.

Next month we will be making Pinwheel blocks for the next border. One of the members of my small group, the Halo Sunday Sew and Sews, said she really doesn't like Pinwheel blocks. I'll give you some alternative suggestions for the next border if you want something different in that space.

Let's Quilt!

Barbara