
It's January 1, 2018 and the first month's pattern is now available.
 |
| Blocks 1, 2, and 3 |
Previous instructions are here:
Introduction and Preparation
PRINTING NOTE: I only printed the complete quilt in color for the front of my notebook and the first page of my patterns. The actual pattern instruction pages I printed in black/white. Each month the first page is the full color quilt pattern and the last page is a "For Notes" blank page--I did not print either of those pages. Instead, I selected a range of pages to print: for example, 2-3. If you want to print it all each month, that's fine too. Be sure you have "actual size" selected when printing PDF patterns.
I won't be discussing the exact sizes for these blocks--that is all carefully laid out in the pattern. I'll provide tips to help you make the blocks as quickly and accurately as you can. My motto is "I want the fastest method that gives me the result I want." What is fastest for me, may not be fastest for you--try a variety of methods to find out what works best for you.
The Basics:
There are 24 blocks, each will be made 3 times, and those instructions will fill months 1-8. Month 9 introduces the central barn block and the start of the appliques. Several people have asked me for an alternative central block and I'll talk more about that next month--I will provide a few alternatives if you prefer something different and of course, you can create your own center block to personalize your quilt, if you like.
How to Succeed:
The 3 things that can go wrong in quilt block piecing is the:
CUTTING: are the pieces cut accurately?
PRESSING: is the block flat, without puckers or pleats?
SEWING: is the 1/4" seam done so that the pieces finish at the correct size?
Let's look at each of those 3 skills in detail.
1. The Cutting: I have a complete tutorial on Perfect Piecing Like a Pro that provides lots of photos of careful cutting with your ruler and rotary cutter. Check that out if you struggle with your cutting.
The pattern provides the sizes to cut all the individual pieces for all 3 of the blocks you make from EACH pattern. That means we'll make 3 of Block 1, 3 of Block 2, 3 of Block 3, etc. I will be making each block from the same fabrics--the amounts given to cut 3 make that easy and with 72 blocks, I think the quilt will be busy enough without my adding more fabric choices to each block. Do as you like.
If you choose to cut out each individual piece then sew the blocks together piece by piece, just follow the pattern instructions to the letter. I added up the linear inches needed for each piece and then cut that size strip, so that I could strip-piece where helpful. For example, in Block 2, it was easy to cut strips of fabrics A, B, and C in the width shown in the pattern--I just added up how much of each fabric I needed for each strip. Then I sewed B and C together in one long strip:

I could have added strip A to the yellow but since it was a large floral I thought I might want to fussy cut it so I only made the B/C strip set. Also, if I made the "strata" of all 5 fabrics, I would have alternated sewing from the top, then from the bottom, then from the top, etc. This helps prevent the "bends", where the strata bows almost into a curve. It was just easier for me to only strip-piece B and C.
After pressing, which I'll discuss below, I cut the B/C strip set into 6 pieces, the size needed for 3 of these blocks.
I often use a skimpy seam allowance when working with small blocks, so the next step is very important. "Ruler Check Your Work": make sure each sewn unit is the correct size before going on. I always check from the center out. Here I have the ruler set on the center seam, at the mid-point of the width of the unit:


Remember, if the unit is not the right size NOW, it will not miraculously become the right size when you do the NEXT step.
Units cut and ready to sew:

2. The Pressing: I don't use steam in the iron. It is easy to distort these small pieces and can lead to "incontinence" problems with many irons. A spray bottle of water is handy when you need to remove a wrinkle, and the product "Flatter" is nice for getting crisp units. Same with Best Press or Sizing. Some people are sensitive to the scents in these products and some find their fabrics may "run" if not pre-washed. You get to decide whether to use steam or these products.
The first thing I do is set the seam--this means pressing the sewn seam flat on the reverse side:


After you press, when Ruler Checking Your Work as described above in Step 1 Cutting, if you find the strata is too small, check first for a pressing problem. If there is a pleat pressed in, it is very easy to fix now.
Which way to press seam allowances? The pattern shows you the way Edyta recommends you press--follow the little arrows. For example, on Block 3, when sewing the rows together, she shows the top and bottom rows pressed into the center, the seams behind Fabric C, and the middle row has the seams pressed away from the center, again toward Fabric C. Once each row is sewn, the pattern shows the seams of the rows pressed in toward the center row. This makes for a flat block. Press seams open if you prefer.
In Block 1 I changed the way the seams were pressed because I just love that cute little four-patch I get in the center when I twist the seams. So that the seams will "nest", meaning one goes up and one goes down, I pressed the seams differently than the diagram in the pattern. I look at the back of the rows when deciding which way to press. Be sure you watch Show 2201 to see how Edyta twists even more seams than I did. I'll try that next time. Whatever works:

Here is how you "twist" those seam intersections:
3. The Sewing: now it is time to construct the block.
Many quilters agonize over the "scant 1/4" seam allowance" and how to find it on their machine. There is no such thing, there is only the seam allowance you need to use to get the pieces sewn together the correct size. Seam allowances are determined by the thickness of the fabrics, the weight of thread used, and finally, how wide you sewed the seam. Figure out what you need to do to get the seam that gives you the correct size pieces. Is it a line on the throat plate? Is it a 1/4" foot for your machine? Do you need to add a line on the bed of the machine to guide you in correctly?
NO ONE WILL SEE YOUR SEAM ALLOWANCE: they will only see if your intersections intersect and your points are not "hidden".
Often the problem starts at the very beginning of the seam--we look away or let go and the start of the seam is often a bit narrow. The same thing happens at the end, we let go to pick up the next piece, or our attention slips and, again, the very end can be a bit narrow. Somewhere in the middle, you had a perfect seam but the sewn unit does not have a straight seam all the way down. Fix that with a Leader/Ender.
The easiest way is to use a scrap of fabric folded in half--start sewing on that to lead you in to the seam at the right place. As you come to the end, use a second scrap, sew off of it, then cut the quilt pieces off the back of that scrap--the scrap stays in the machine. This is also called a "thread kitty" or a "starty/stoppy". It also saves gobs of thread--I watch students all the time sew one little seam, then pull out a foot or more of top and bobbin thread to remove the piece from the machine. Good thread isn't cheap, let's not waste it.
I go one step further and have small pieces ready to sew as my Leader/Ender. Right now, they are small triangles; in past years, I've used 1.5" cut squares, light and dark, then those pairs became four-patches. This simply takes a few minutes of prep, cutting from fabrics used on current projects or carefully planned for the next quilt, you decide. Read more about this process here.
Here you can see Block 1 being sewn--at the beginning is a small triangle Leader/Ender and at the end is another pair of small triangles. I will reach around to snip the thread between the end of the block and that last triangle pair to remove the block from the machine:

 |
| See the bent pin at the bottom? I should throw that out. |

 |
| One pin about an inch down from the top and the one off to the left at the bottom |
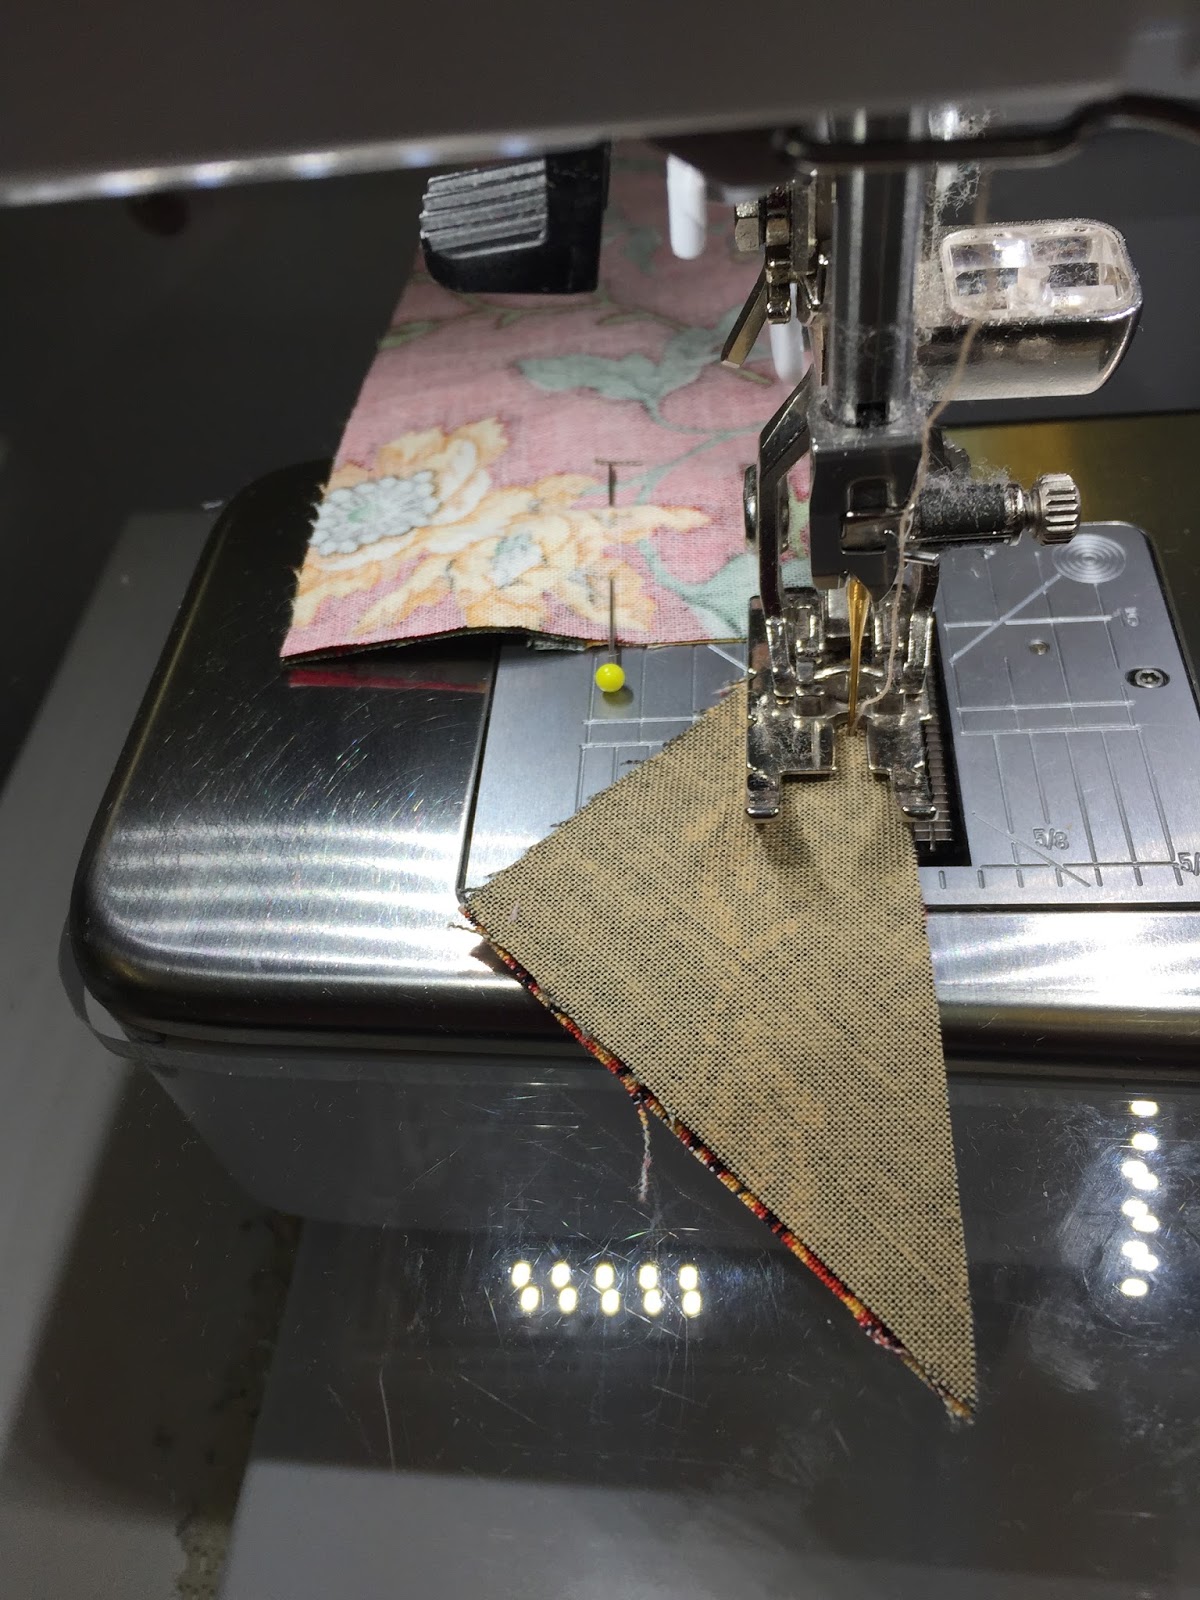 |
| Sewing off the end onto my triangle Leader/Ender |

Here is Block 3 after its' final "ruler check" and slight thread trim. The green arrows show the points that get double-checked, to be sure the block is square:


When you have all three sets of Blocks 1, 2 and 3 done, you are done until next month. My third block of each pattern will be made in the Sunday Sew and Sews class I'm teaching next week:

I would love to hear if these tips are helpful to you--please comment below or on the Forum on The Quilt Show. And please share any tips you find that really help you be successful piecing your quilt blocks.
Future posts won't be this long. Careful cutting, pressing and sewing will apply to all the blocks. There will be some extra info, like when a block lends itself to paper-piecing, for instance. Stay tuned.
Let's Quilt!
Barbara
Sorry if this is a duplicate. My computer is acting up. Yes, your tips are very helpful. I’m always excited to read your new posts. Thank you!
ReplyDeleteI learn things from your posts, and I'm not even making the quilt! :)
ReplyDeleteThanks for your advice. I always like to hear others tips. I wonder if any anyone else is unsure how Edyta and you "twist the seams" to get the seam allowances to lay flat. Could you explain? I thought Alex was going to and then she just said she would have to try it. LOL!
ReplyDeleteI would like to know about that "twisting the seams," too. I keep looking for a reply to this question in the comments, but have not yet seen one.
DeleteI plan to do a little video today to show this--I'll let you know when it's been added.
DeleteThe video has been added here--it's less than a minute--hopes it helps. Just try it and see how easy it is. If your stitches are long, you may have more of them come out than you want--watch out!
ReplyDeleteThanks for the video! The four-patch comes out so well!
DeleteThanks for the video!
ReplyDeleteYou're welcome!
DeleteQuestion, on block 3, piece C is shown as a light in the cutting directions. But in the picture, it is a dark. Given I have purchased the kit, I don't want to risk fabric shortages by cutting the wrong fabric. Should C be light or dark. There is the same issue with D. Dark in the instructions but light in the picture.
ReplyDeleteThank you in advance for you assistance.
Yes, it appears the photo and cutting instructions don't match. The good news is Edyta said in show 2201 there is enough fabric to make at least 4 of each block. Why not make one of each layout and decide which you prefer for the 3rd block? Either layout is fine.
DeleteThanks for sharing that there is enough fabric for 4 of each. I was waiting until the end to see if I can make another Block 3 with light center.
DeleteI have been going crazy trying to make each block 6.5 inches when done.
ReplyDeleteI use the 1/4 inch foot and move the needle all the way to the right.My intersections are perfect using the feel of the seams instead of pins. Maybe this is a problem. I will try again with your method.
Are your blocks too big or too small? Check every seam to determine the problem. If the blocks are too small, are you using a fine thread or is "fat" thread part of the issue? If the blocks are too large, perhaps your seams are too skinny or the fabrics are not aligned at the raw edges, one may have slippped. You will get there as you sew and the "ruler check" your work.
DeleteI'm so very appreciative of your guidance and tips for sewing these little blocks. I've done very little machine piecing - being a bit of a needleturn applique and hand piecing afficionado! Your tips and photos are really what have encouraged me to take on this charming 2018 BOM. I know I am going to continue learning so many valuable pointers from you as the months progress. Lucky ladies in your Sunday group!
ReplyDeleteMany thanks.
Marilyn