Showing posts with label precision piecing. Show all posts

Sunday, May 25, 2025

SUMMER SEW A LONG 2025

 Let's do a SEW A LONG! 

The Old Italian Block is one of my favorites, simple, easy, classic, the perfect block for a Scrappy Quilt.
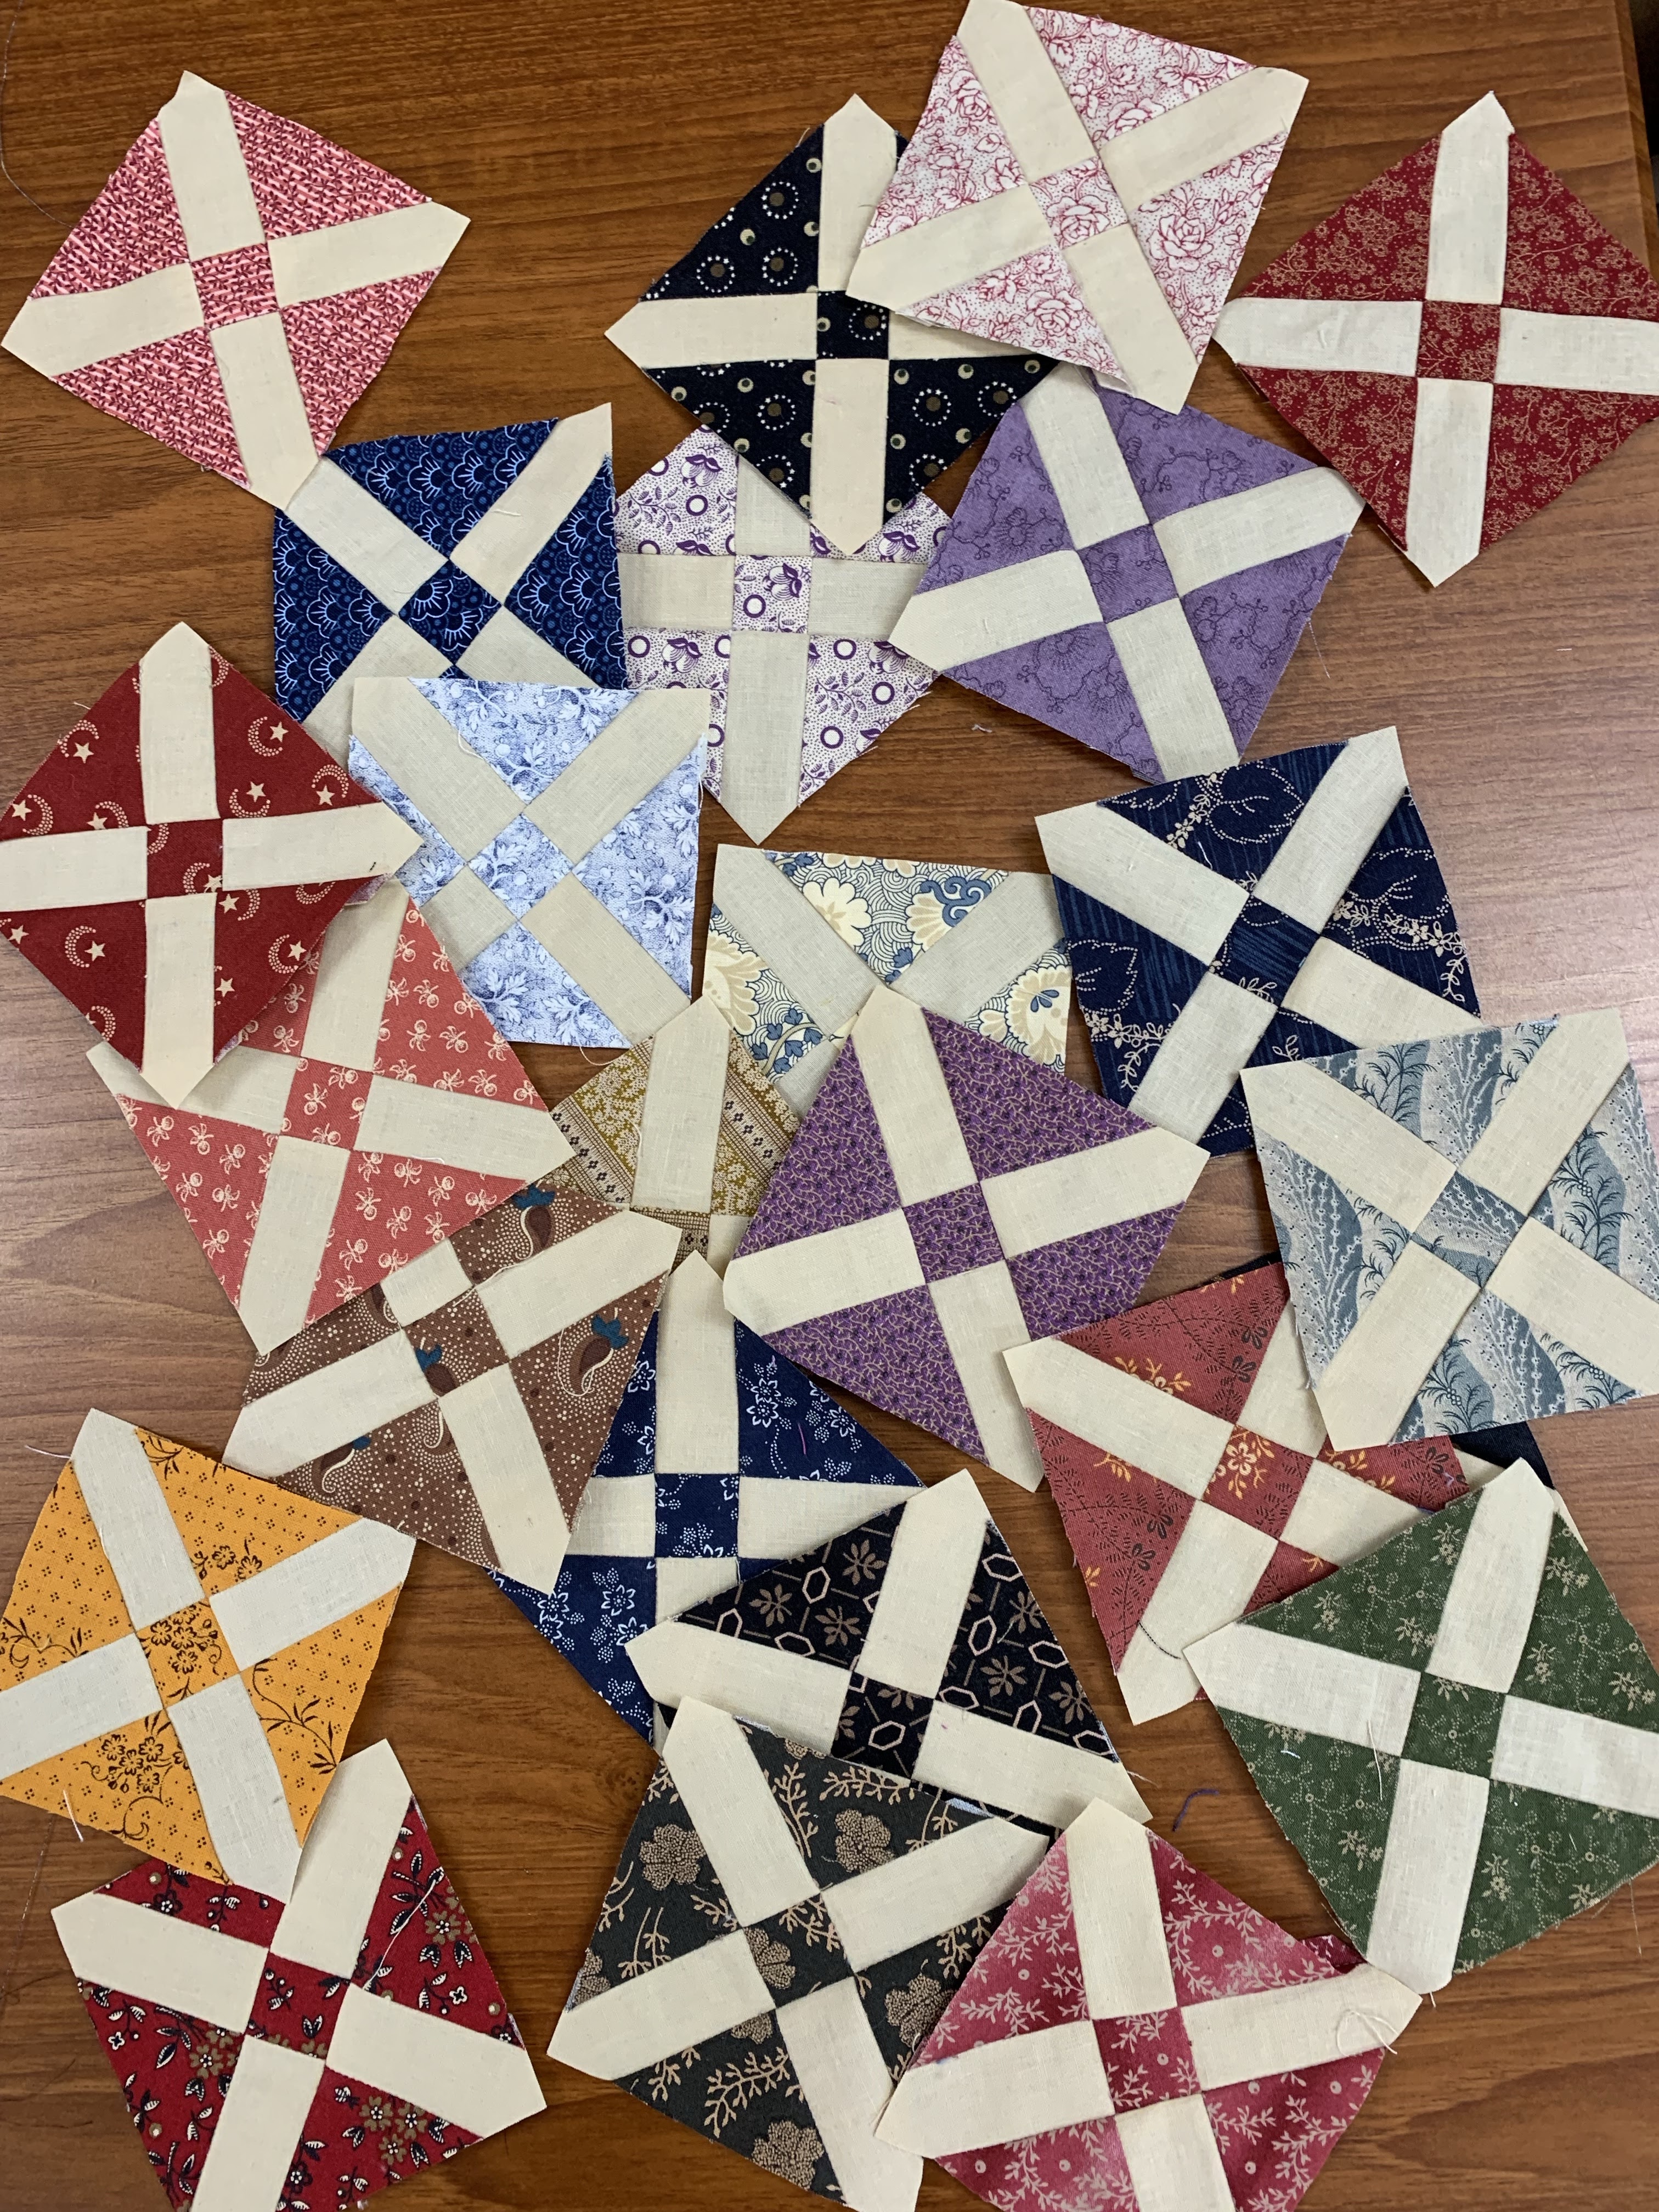
 And it is the block in my antique top I am replicating:

Detail shots: 


When I first wrote about this project, My Next Lifetime Quilt, there was a lot of interest in doing this as a Sew A Long. So, here you go.

I am providing the cutting sizes for 3 different size blocks: 3", 5" and 6". You are free to make any other size you like. Either use design software like EQ8 or simply draw the block size you want on paper and figure out how to cut the pieces the correct size. My TUTORIAL SIMPLE MATH FOR QUILTERS makes that easy.


SHAPE

3” BLOCK

5” BLOCK

6” BLOCK

Triangles  4  

3.25” square

cut QST 

5” square

5 7/8” square

Center Square  1

1.25”

1 3/8”

1.5”

Bkgnd Strips  4

   1.25” X 3”


1 3/8” x 4”

   1.5” x 4.5”


Originally, I planned to make 4 of each block, so I cut rectangles 6.5" x 8". That would provide 4 squares 3.25" each for the Quarter Square Triangles, and 4 Center Squares, 1.25" each. As I am making 289 of these that would use 73 fabrics. After cutting ALL OF THOSE, I changed my mind and decided each block would be a different fabric. 

To make ONE 3" block I cut a rectangle 3.5" x 5". This allowed me to carefully cut the square 3.25" for the QST and one center square 1.25". You could be more precise, cutting 3.25" x 4.5" but your cutting would have to be perfect. It was faster to cut a hunk 3.5" x 5" from 289 fabrics as preparation for the project.


I stacked up two fabrics for faster cutting. As I am using only one background fabric I cut strips of it 1.25" x WOF, cutting that into 3" lengths, 4 needed for each block. Here are TWO blocks cut and ready, the dark fabric is under the print:


Here is the way I sew these blocks, three rows on the diagonal. And my pressing plan. Since I know I am not sewing these block to block, I am pressing them all this way. If I were sewing block to block, I would press half like this and half the opposite way so the seams would nest:


There is SO MUCH MORE INFORMATION on my earlier post I hope you will go read it first:


The ONLY SPECIAL TOOL I RECOMMEND for this project: a quality SQUARE RULER the size you will trim your blocks: 3.5", 5.5", or 6.5". The best brands are Quilters Select and Creative Grids.  I used a black Sharpie Fine Line marker to draw a diagonal line on the back from the upper left to lower right--that makes it easy to see the ruler is aligned properly:


I find these the perfect LEADER/ENDER blocks so I always have at least two of them cut and ready to sew while working on other projects. To understand that process, see my Tutorial about it: TIME MANAGEMENT FOR QUILTERS

To test the sizes for the larger blocks I made 5" and 6" blocks:

5" block

6" block

Here are 3" blocks in brighter colors than my 1800's reproduction fabrics, these would make a good baby quilt: :


There are many ways to set these blocks so I will offer those options next month. For now, choose your size and start making blocks. It's scrappy, you can't run out of fabric. 

Feel free to ask any questions you may have. Have fun using your favorite fabrics. AND if you want to post your progress on social media please use this hashtag:  #olditalianblocksewalong 

Please share this with all your quilty friends--the more, the merrier. It is easy to share this blog on your Feeds: Facebook, X, and Pinterest; or you can email it directly to anyone you like. Click on the icons at the bottom of the page to do this:


Let's quilt.

Barbara

Sunday, March 9, 2025

BUCKET LIST QUILT # 5 AKA MY NEXT LIFETIME QUILT

 As I try to make a list of the quilts I REALLY WANT TO MAKE, and EXPECT TO MAKE, it allows me to sort through the huge stash of fabric I own and make a plan to use it or lose it.

Here is the NEXT QUILT on on the list:


I bought this antique top in 2014 from quilt dealer Cindy Rennels,  of Cindy's Antique Quilts. I remember clearly buying it at her booth in Paducah--to treat myself for my "retirement" from H&R Block, and my 60th birthday. There was something about it that just spoke to me. The tag says "from Pennsylvania, 1860-1880 fabrics" Well, I'm from Pennsylvania too and I LOVE a quilt with lots of fabrics.  See many detail photos BELOW.

Once I decided to replicate it, I thought about the easiest way to cut fabrics for the 3" blocks.  Questions I asked myself:

1. What size quilt do I want? The original is 16 x 16 blocks.  Mine is 17 x 17, so I will have a CENTER block, more about that later.

2. Should each block be a DIFFERENT FABRIC? I have more than 289 Civil War reproduction fabrics, that's not the problem. At first, I decided to go with making 4 blocks exactly alike and then spreading them around the quilt. This requires 73 fabrics. Then I changed my mind. All of the blocks will be different. 

3. What background fabric to use? It will take 6-7 yards. The original used all the same cream solid. I only had one solid fabric in that quantity--Paperbag. Pulling the bolt out to the closet I found it had 7 yards on it--decision made!

It didn't take long before I was pulling fabrics and cutting. This makes the perfect LEADER/ENDER PROJECT. These 3" blocks practically make themselves as I am working on other projects.

One fabric I absolutely had to use was a small scrap--just enough to make ONE block. I decided it would be the CENTER BLOCK--which is when I changed the layout from 16 x 16 to 17 x 17. Here is the sketch from EQ8, when I learn how to make it that size, I will fix this layout:

;

This block is called the OLD ITALIAN BLOCK, Brackman # 2881. Here is that center block, laid out, ready to sew:


Here are ALL THE FABRICS NEEDED for all 289 blocks, all cut into the size needed, 6.5" x 8" to make 4 blocks from each. Then I pulled out the next big tub of reproduction fabrics and cut many more 3.5” x 5” pieces, enough to make ONE block, 289 DIFFERENT fabrics. No photo of that pile: 


Before I committed to making this I used completely different fabrics to test my plan. If it becomes another Workshop offering, I will need a smaller sample in more contemporary fabrics:

3" finished blocks

These are so much FUN to make!  

I was eager to make a few from reproduction fabrics--here are the first few done:


The only problem? If the idea here is to USE UP FABRIC, this is a fail! It didn't make a dent in the stack I pulled from the closet. At least I'll use up 7 yards of solid.  Here is what went back IN the closet after all cutting was done:


As promised, here are more photos of the original antique top. If you love 1800's fabrics as I do, it's quite a treat for the eye:


There is one SPECIAL BLOCK I am trying to research. I believe it is CENTENNIAL FABRIC, printed to celebrate 1876 in America. If you know this to be authentic Centennial Fabric, please let me know:


I am considering offering this as a Sew-Along project here on the Blog. I would provide instructions for cutting several different sizes, 3" might be a bit too small for some. It will teach you the 3 important BASICS OF PRECISION PIECING: the cutting, sewing and pressing. Let me know if you're interested...

UPDATE: here is the Sew A Long post:


There is no rush to get this quilt done fast. As a Leader/Ender project I can allow it to take years. It's my NEXT LIFETIME QUILT. Since I  can't die until it's done, it is smart to make it REALLY SLOWLY.

Here are more Blogs I have written on LIFETIME and LEADER/ENDER quilts:


Lifetime Leader/Ender

Having a leader/ender project is always part of my quiltmaking journey, with every quilt I make. With this one, I can achieve BOTH  a BUCKET LIST completion and have a Leader/Ender project ready.  Isn't life grand?!

Let's quilt.

Barbara

Saturday, March 21, 2020

Starch Fabric for Precision

Over the years I have known people who like to use liquid starch to add firmness to their fabrics--they swear they get better precision because of it.

Many people working on Afternoon Delight struggle with precision on those tiny 3/4" finished squares.


At my recent Joyful Journey retreat, I was thrilled when my friend Margo Clabo decided to come. We have been friends since 2007, meeting on the Forum of The Quilt Show . We live only 4 hours apart, but we only see each other occasionally at International Quilt Festival Houston, and only for a few minutes then.

Margo fit right in at Retreat and when I saw her super-precise pieced Afternoon Delight blocks, I asked her to discuss her starch method with the group. She agreed and now we want to share her process with you.

First, you need liquid starch, Sta-Flo is a great brand. Find it in the laundry aisle, up high or down low, not at eye-level:

All you need is water and starch and a spray bottle. There are lots of recipes out there, some with vodka or distilled water. I just used tap water and Sta-Flo, in a 50/50 solution. According to the label, that is a "heavy" starch solution and that is just how Margo likes it.


Margo says "I “chunky cut” my fabrics (Sue’s instructions call for 8”x10” for these double nine patch blocks) then lay them out flat on an old beach towel. I use a 50-50 mixture of water and Sta-Flo liquid starch in a spray bottle to saturate the fabrics and leave them overnight to dry. I steam them for a crisp fabric that makes cutting and piecing a lot more accurate."

So I am trying it:

If it had not been raining, I would have sprayed on my back deck--a bit of overspray on my hardwood floors made a sticky spot--careful! Now they have to dry overnight.

You want to be sure they are bone dry before cutting. Then use steam, either with water in the iron or a spray bottle, to crisp them. Then cut those narrow strips, 1.25" wide for Afternoon Delight.

Margo continues:  " I still use Barbara’s recommendations to carefully measure each step of the way. The smaller the pieces, the more important it is to be accurate!"

Her blocks are so precise, and the fabric is not stiff like cardboard but is definitely firmer than you get from spray starch or sizing or Best Press or any other product.

You can't argue with her success, so if you are struggling with these small blocks, try it, you might like it.

Another tool the Sunday Sew & Sews have, and so does Margo now that I gave her a set, are these wonderful Templates:


Cindy B, one of the Sunday Sew & Sews came up with this idea and ordered them as gifts for each of us. She was very pleased with the company, they understood what she wanted and asked Cindy to send her a drawing for them to duplicate. Fast service too. TCR Engraving & Graphics, Terri@tcrengraving.com


BIG UPDATE: the company started receiving orders right away so have listed the set on their website, ships free in the US. They are a small family owned business and said they VERY MUCH APPRECIATE the boost to their business:

Double 9 Patch and Shoo Fly Template Set

At Retreat, Margo became a believer, see how little she shaved off her blocks for perfection. Using a small cutting mat makes it easy to turn the block/template for trimming:


Margo also likes to press her seam allowances with those twirly intersections:


Remember to read my tips for these blocks--or ANY small, precisely pieced blocks: Double 9 Patch Blocks   

I hope these tips will help those working on Afternoon Delight. But remember, precision piecing is important whether the blocks are 2.25" finished as these 9 patches are, or 12" finished.

Let's quilt.

Barbara


Sunday, March 15, 2020

AFTERNOON DELIGHT--Month 6--EARLY RELEASE!!!

This pattern is the 2020 Block of the Month pattern offered FREE to Star members of The Quilt Show--join today to receive the entire year of patterns free. 

This month we introduce the other pieced pattern: the Double 9 Patch:


There are 64 total of these blocks in the quilt and the instructions are for making 12 each month for 5 months, then the final 4 blocks. Of course, if you want to make them all as soon as possible, that is fine too.

NOTE: VERY IMPORTANT CUTTING INFORMATION--Sue's instructions have us cutting strips 1.25" x 10" for making the 9 patches. Once sewn into groups of 3 fabrics, we cut SIX SEGMENTS--if you cut and sew perfectly, those six segment use 7.5", meaning you have 2.5" leftover. That leftover amount can be used in the NEXT set of 12 Double 9 Patch blocks. OR CUT THE STRIPS 1.25" x 8" allowing a half inch extra for straightening the segments as you cut. The choice is yours. 

These blocks have little squares--3/4" finished, just like the Shoo Fly blocks. However, the Shoo Fly blocks were a little forgiving in that the tiny 4 patch "floated". These blocks will require you to do the best you can on the three things that can go wrong: the CUTTING, the SEWING, and the PRESSING. 

THE CUTTING:

Make sure you cut the strips carefully, 1.25" wide. Cut straight and slow. There is not much wiggle room for less than perfect cutting with these blocks. Lay out the prints and backgrounds as shown in the pattern--there are twice as many Print/Background/Print units. 


My strips laid out for this second quilt I am making

THE SEWING: 

I encourage you to check your piecing accuracy right from the beginning. Sew the first two strips together, sewing as straight as you can. It's not a matter of how fast you can sew them, it's how accurately you can sew. Press toward the darker fabric, away from the background.

MEASURE NOW: the strips should be 2" wide--.75" + .75" = 1.5" plus the .5" seam allowance:


If they are slightly wide, it is easy to trim off the excess. If they are slightly narrow, STOP. Fix this now. It might be the thread is too thick--I use Masterpiece 50 wt or Quilters Select 60 wt or Aurifil 50 weight. Want more information on thread?  Thread--It Matters

It might be you sewed too fast or went crooked instead of straight. Figure out what caused the strips to be less than 2" wide when sewn together. Once you know how to achieve that 2", you are good to go.

ANOTHER NOTE: You get to decide how perfect your piecing has to be. If "close is good enough" is your motto, that's perfectly fine. No quilt police here.

I wish I had taken my own advice. I know how to piece accurately, right? I simply chained, chained, chained, then turned the two strips into three strips BEFORE I measured. Guess I was in a hurry because my strip units were too narrow, by at least 1/8". It was difficult to get my 9 Patch blocks the right size, 2.75" UNFINISHED.  So there was a lot of un-sewing for me. Believe me, you want to find out at the first  possible moment that you need to adjust your seam allowance, not several hours in.

THE PRESSING:

When pressing the print strip away from the background strip, use the edge of the iron to press the print away from you. Press as flat as possible, don't wiggle the iron back and forth across the seam. Just use a firm pressing motion to press the print up, away from the background.


CUTTING THE SEGMENTS:

I put the middle strip on top of the other strip, right sides together, being sure the seams were nesting. Then I cut them into 1.25" segments. To be sure I got the maximum amount of scrappiness, I worked with 5" cuts at a time, cutting 4 segments:  4 x 1.25" = 5". Now they are ready to chain through the machine:


PIECING THE SEGMENTS:

To pin or not to pin, that is the question? I started out pinning but found I could get the intersections precise enough without pinning. You decide whether you need to pin or not.

Be sure to sew straight to make your center square a real square. Again, speed is not as important as accuracy.

After sewing the first two segments, check to see if they are 2" wide by 2.75" long. If now, figure out why. If so, great--add the outer segment to finish the 9 patch.

Pressing the seam allowances--you have 3 choices. Press the seams OPEN--I rarely do that so I didn't show it. OR twirl the intersections as shown on the left. OR press away from the center. You decide. I like those twirled seams and how flat they  make the block so that was my choice:

Check that the 9 patches are 2.75" square, unfinished. If they are not the right size now, they will not miraculously become the right size when you do the next step.

CREATE THE BLOCK:

Add the 2.75" background squares to create the block. It will be 7.25" unfinished when done, the same size as the Shoo Fly blocks made earlier.

Pressing the seam allowances on the blocks--again, you have a choice. You can twirl the seams again or press to one side, (or open). Here is what I did--I pressed toward the middle so those seams will nest with the Shoo Fly blocks:


There are two applique blocks this month. Here are mine from the sample quilt:

Block 21
Block 22

We enjoy seeing your blocks so post them on the SHOW AND TELL--Your Blocks Topic

Let's quilt.

Barbara


Sunday, January 5, 2020

Watch The Quilt Show for Free

NOTE: I really won't post about Afternoon Delight and The Quilt Show all year. As this is kickoff week, please indulge me with this one final post for January about this quilt--thanks!


Show #2601 is now on The Quilt Show. It features the 2020 Block of the Month pattern, Afternoon Delight, by Sue Garman, and made by my friends and I.

Ricky Tims on set

Prepping On  Set
Some of the Team who "Got It Done"

As the guest artist on this show, I have a link anyone can use to watch this show for free:

Show # 2601

Please share this information with all your quilting friends. Usually, only Star Members who have subscribed to The Quilt Show can watch most shows--a few shows are always free so those thinking of joining can see the great value to being a Star Member.

This show will  be one of the free shows all year--we want people to know about the 2020 Block of the Month--they can start any time this year. 

This show is full of tips and tricks for Precision Piecing and Machine Applique. Even if you are not working on Afternoon Delight, I think you will pick up some good information for piecing and applique on your own projects.

Yes, I do get some compensation for the work I do for TQS but I have been a fan since the show first began in 2007. Here is why I think you should join in the fun too:

What The Quilt Show Offers You  Think of it as an international quilt guild community you don't have to leave your house to join.

I hope you watch "my" show and, even more, I hope you join us.

Let's quilt.

Barbara

Sunday, June 10, 2018

Links for Students


I recently started teaching a brand-new six-month class locally, called My Favorite Things. During this journey, my goal is to teach the 12 students ways to improve their quiltmaking and become a bit more creative in their work. They can follow my pattern for the class quilt project, or make smaller quilts on their own, whichever they prefer.

The first session features Basic Pieced Units--Half Square Triangles, Four Patches, Quarter Square Triangles and Nine Patches, the building blocks of thousands of pieced quilt blocks. Once you can make these accurately, you are set.

Students receive handouts of the pattern and the class instruction, with links to helpful online videos or blogs. To make it easy to access those links, here they are, for anyone to find.

For those who are less experienced with piecing, I recommend:

Perfect Piecing--the Cutting--the First Step to Accurate Blocks-- it all starts with the cutting, strips or individual units. There is lots of info here to help make your cutting as accurate as possible.

Thread--Why Quality Matters--good thread makes for good piecing results

We use half square triangles a lot, here are three ways to make them:

Two Methods for Making Half Square Triangle Units

The Grid Method for Making Half Square Triangles--when you need a lot of the same two fabrics. This post also contains LOTS of tips/tricks for precise pieing.

One of the fun things I showed the class was the Fast Method of Making Nine Patches:


This method makes these two blocks, one with four neutrals and one with five neutrals. It's fast and fun and if you can work with those two block designs, well worth a try.

Here I made two sets at once and shuffled them up a bit:


The other skill that I preach about often is using Leaders/Enders, or Thread Kittys or Startie/Stoppies, at the beginning and ending of chain piecing. Find out why here: Time Management for Quilters.  I make "free" quilts from the small units made as Leader/Enders, I improve my piecing, save thread, and could not chain piece without this method. This link also takes you to Bonnie Hunter's info on this method--she is the Queen of this method. I can often convince new quilters to establish this habit more easily than I can convert more experienced quilters--but if you try it, I think you will see the advantages. Many tell me "I wish I had learned this trick years ago" once they do it.

Nothing is as good as being in a class, seeing the actual sewing demos, and hearing the answers to students great questions. But these links will help provide a taste of the skills this group of students will learn.

We also talked about fabric selection--I showed many quilts in class to see how these units, even though simple and basic, can make great quilts. The one that got the most attention was this one. I call it Hot Summer Nights, made it in 2000, and it's only half square triangles with a quarter square triangle border. What they liked the best was the rich, saturated colors. I used the one multi-print fabric to help me select the palette:


Find out how I selected fabric for the class project quilt, My Favorite Things, here.  The class project quilt will look like this--I am making this as we go, I just have to keep ahead of the students:


This should give you plenty to read for a while.

Let's quilt!

Barbara