
 |
| Edyta Sitar and the Patchwork Barn |
Month 2 Blocks: #4, 5, and 6:

This is the FREE Block of the Month pattern "Patchwork Barn", designed by Edyta Sitar exclusively for The Quilt Show. You must be a Star member of this world-wide quilt guild/show/internet community to receive the free patterns each month, beginning January 1, 2018. Join today and get started on this journey.
Previous instructions are here:
Introduction and Preparation
Month 1
PRINTING NOTE: I only printed the complete quilt in color for the front of my notebook and the first page of my patterns. The actual pattern instruction pages I printed in black/white. Each month the first page is the full color quilt pattern and the last page is a "For Notes" blank page--I did not print either of those pages. Instead, I selected a range of pages to print: for example, 2-3. If you want to print it all each month, that's fine too. Be sure you have "actual size" selected when printing PDF patterns.
Block 4 is very similar to Block 3 except that it has Half-Square Triangles (HST) in place of solid blocks:

My favorite method is to use a Half Square Triangle Ruler. This saves a bit of fabric--you cut strips 1/2" larger than the finished size of the unit, place light and dark fabrics right sides together, and use the ruler to cut the pairs, ready to feed through the machine.
Another method has you add 7/8" to the finished size of the unit, place light and dark squares of that size right sides together, draw a pencil line on the diagonal of the light fabric, then sew 1/4" away from the pencil line, on BOTH sides. I don't like this method because you have to do everything perfectly to get a good result: cutting, drawing the line, then sewing precisely on either side of the line.
Here is a detailed blog post I did a year ago showing both of these methods--it is photo-heavy. You can decide how you want to make your HST:
Half Square Triangle Units
Block 5 is a Square in a Square, sometimes called Twelve Triangles.
NOTE: There was an error in the pattern instructions. After Step 2, Unit B should measure 4.75" square. The pattern will be corrected but if you printed in the first two weeks of February you will want to make this change to your pattern.
This pattern lends itself to paper foundation piecing. I used Electric Quilt 8, a great software program I have used since it began with EQ1 many years ago, to create a paper pattern:

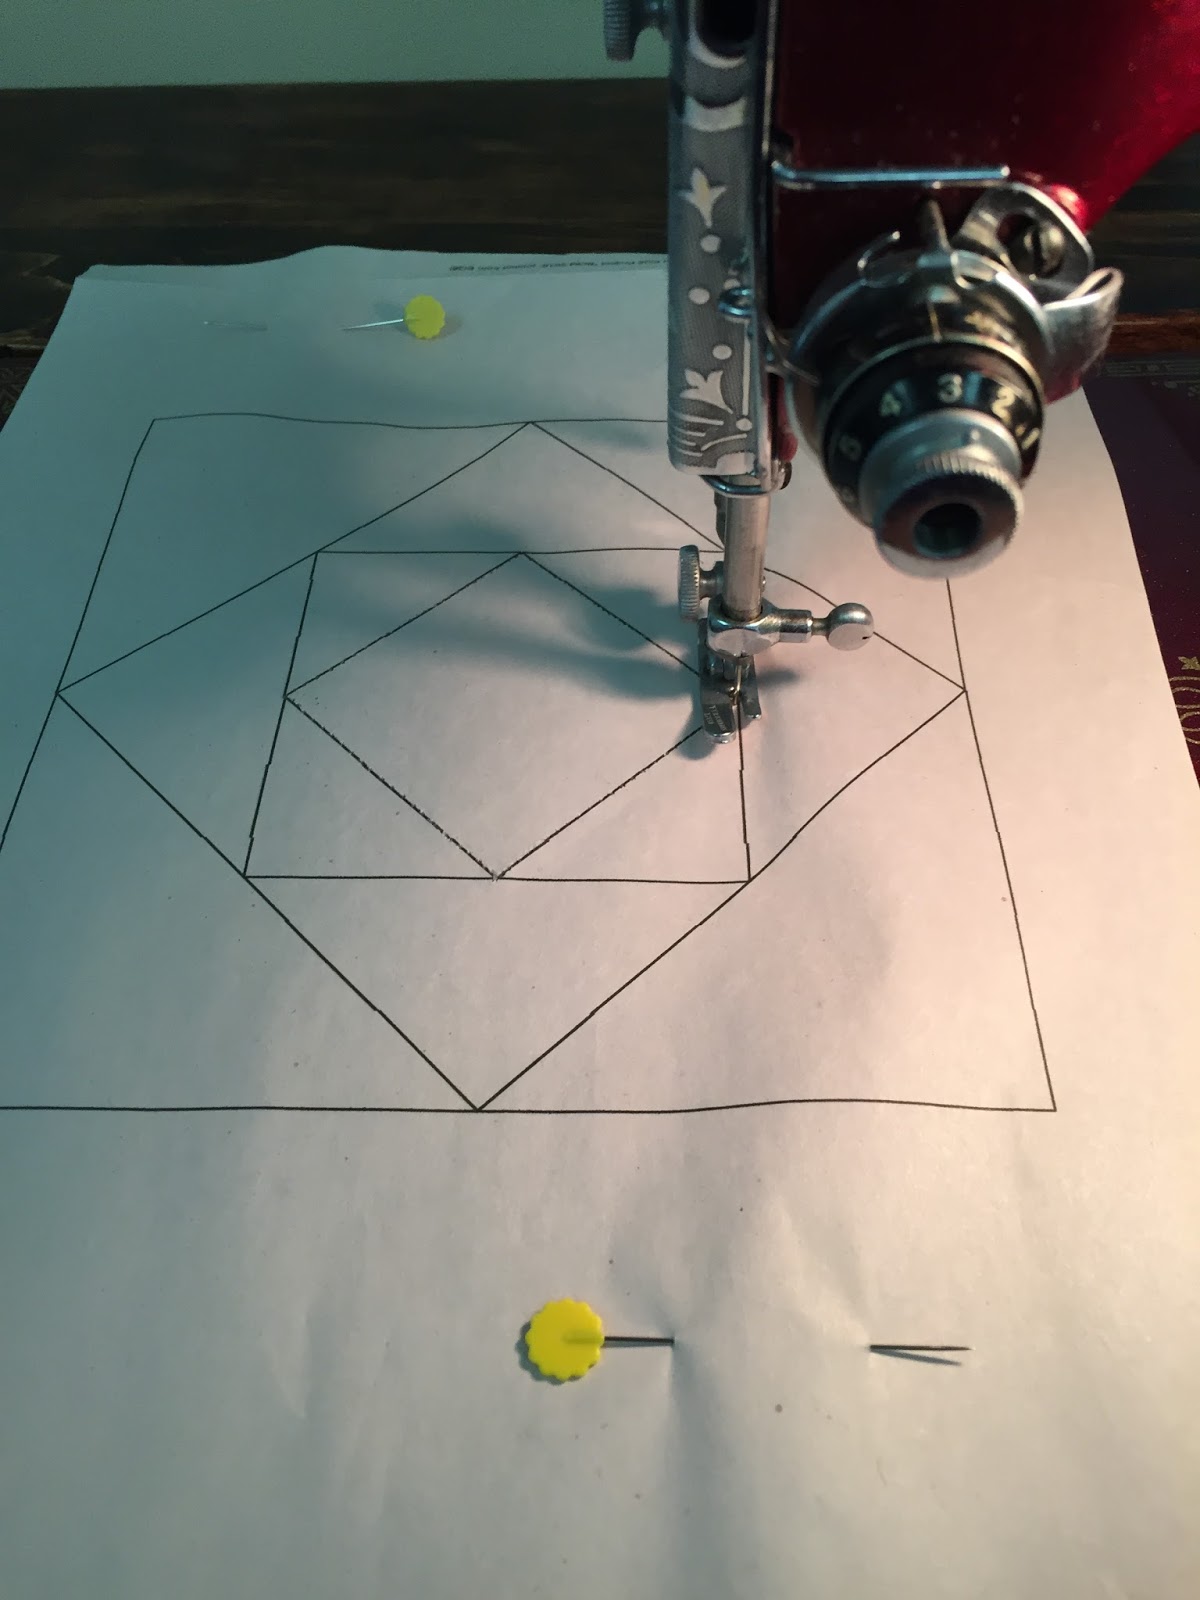
A trick for making several of these patterns at once is to draw or print ONE, stack up several more blank pages, remove the thread from your machine and stitch on all the lines. This perforates the papers, giving you exact copies of the pattern. The perforations have an added benefit of helping the fabric stay in place as you are sewing.
My fancy sewing machine doesn't think I should sew without thread so I used a Singer Featherweight who lets me be the boss. LENGTHEN THE STITCH: if you perforate too closely the whole pattern may fall apart. When using one of these papers for the demo below, I found my stitches for this step should have been longer, as long as I can get on the Featherweight.
Starting on an inside point, you can go around and around without stopping, pivoting at each corner:

After the center square is done, just pivot and continue doing the next square, when it's done, pivot and do the next, etc.:

The back--you can clearly see the design you need to follow:

1. Your piecing will be as precise as you drew or stitched your lines, great for complex patterns like Feathered Stars OR easy blocks like this. It's fast and easy.
Cons of Paper Piecing:
1. You must cut the fabric pieces somewhat larger than called for in regular precision piecing. I add 1/2" to the cut size listed in the pattern to give me wiggle room when placing the fabrics on paper. I waste a little fabric in return for excellent piecing results.
2. This method doesn't lend itself to chain piecing or using leader/enders. I usually only do one or two at a time. Trim all the thread ends as you sew each seam--there will be a lot if you wait until the block is done.
Helpful hints for paper piecing:
Thread: I use only a fine, high quality thread for piecing. My favorite is Masterpiece from Superior Thread or Aurifil 50 wt. thread. I wrote about thread here.
Set the stitch length to 22-24 stitches/inch. On my Bernina 765 I'm using 1.5. This makes the paper easy to remove. Having to pick out stitches when you make a mistake, and you will from time to time, is a challenge but it can be done, carefully.
Do Not Use Steam: a dry, hot iron is your friend. We don't want to make pulp.
Use an Add-A-Quarter ruler: this is a great tool to help in this process.
The Process:
Center square is placed on the pattern, 1/4" up approximately from the first line to be sewn. A pin can be used to hold it in place, well away from the sewing line. The first triangle is centered on the square, with the raw edges aligned:


Using a small stitch, the first seam is sewn and flipped open.

To prepare the square for the second seam, I need to trim some of the excess square fabric, remember the square was cut extra-big. Use a postcard placed on the next line to be sewn, fold the paper pattern back on that line, put the Add-A-Quarter ruler against the folded paper, which is snugged up to the postcard, and trim the excess square fabric:


Sometimes you get an OOPS:

Since you are sewing on the paper side with the fabric under the paper, if the piece being added moves or gets flipped, as happened here, you won't see it until you have sewn the seam. Using a sharp stitch ripper, carefully remove the few stitches that need to be removed; don't dig so that you rip the paper.
Here I have added a pin to keep that wayward guy in place--be sure the pin is on the top side where you will see it. I did not have to remove the entire piece, just a few stitches, then I stitched that last part of the seam a second time:

All four round-one triangles are in place and trimmed so the round-two triangles can be added:


Measure from the fabric side, NOT the paper side. The sewing will most likely have "shrunk" the paper just a bit and if you use that side you will probably cut your block slightly too small. I always measure from the center out, trim the right and top side, then rotate the block and trim the remaining two sides:

All done, with the paper removed.

Block 6 is comprised of Flying Geese units and Parallelogram units. Both of those can be paper pieced but there are faster ways to do them.
I love to make Flying Geese four at a time. My detailed tutorial on that is here: Four Flying Geese. It works well for me and I like being able to "trim to perfection". This block uses 4 flying geese so it makes sense to me to use that method.
The parallelogram units can be made several ways. To me the easiest is the way the pattern is written using rectangles and squares. I did a "cut first" method, using the Simple Folded Corner Ruler Video here. The first thing I messed up was not paying attention that all four parallelograms in each block are all made in exactly the same orientation. I cut the rectangles from two layers, wrong sides together and whacked off the corners. This means I had some going left and some going right:

Oh, my. At least I was making two blocks at once SO, one will go left and one will go right. I also decided to add a third fabric for the center, the gold, and what a surprise when I got the units done and this is what I got:

The back--I did press these seams open as that was best for this block:

Here are Month 2 blocks, waiting for their 3rd friends to join them. Those are made as demos in my Sunday Sew and Sews class I am teaching locally.

Let's Quilt!
Barbara
Thanks for the suggestions. I have just been working my way through the EQ8 lessons and block 4 will give me a chance to practice.
ReplyDeleteAgain this month I see such great tips along with great closeup photos and clear explanations. Thanks, Barbara! I’ve already improved my skills with your tutorials.
ReplyDeleteYou just made my day!
DeleteThank you so much for your instructions Barbara - they are invaluable to me. I appreciate the work and time it takes so much.
ReplyDeleteThank you!
ReplyDeleteI paper pieced Block 5 using Creative Grids 6 1/2” square ruler to draw my template. Stitched with my machine to makes a couple practice and final blocks. Used scrap stash fabric to practice. All went very well until I measured my final practice block - it is 7”, and was off square. I trimmed but doing so left it a bit wonky. I used both diagonal and center lines on ruler and saw I was off even tho’ points were good on each round until the last. Could you please tell me where you think my mistake(s) occurred?
ReplyDeleteDraw a 6" square, then draw the diagonal lines from the center out. If you start with a drawn 6" square you should be fine, just remember to trim the block to 6.5" after you have sewn it.
DeleteGreat tutorial on the flying geese making 4 at a time! I had to do some thinking on sizes of squares to cut with the chart since the 3 1/2 x 2” wasn’t listed but I got it right. They turned out perfectly. Thanks, Barbara!
ReplyDeleteThe chart lists the finished sizes, so 3" x 1,5"
DeleteYes, thanks.
DeleteThanks, Barbara. I never found this page. It will be a great help.
ReplyDeleteFollow me by email or on bloglovin' and you'll get it as soon as it's published.
Delete