Luckily, Alex Anderson did a segment on several of these methods at the start of Show 2303. Take a look at that to see several applique' choices.
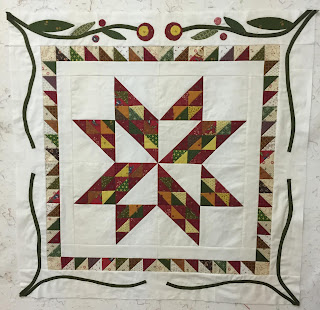
I can do needle-turn hand applique' and like that method a lot. But it is pretty slow and I needed to get this demo piece done so I chose Machine Turned Edge Applique'. The project I am adding the applique' to is a 24" alternative center block, with a 3" border added. This will become a 30" small wallhanging BUT it could be the center of your quilt:.
The product I used is similar to the Quilter's Select product Alex demonstrated. I had this on hand and have used it successfully in the past:
Using template plastic, I made templates from the pattern. Those were used to draw on the matte side of the Wash-Away Applique' sheet. I stacked several leftover pieces together, put a pin through to hold them, then used paper scissors, not my good fabric scissors, to cut out the shapes. This circle template had the size circles I needed, easy to draw them correctly:
There are various methods you can use to make the stems. Bias bars are commonly used. For this project, I chose the fastest method I know--I cut 1" bias strips and simply folded it in thirds and really pressed them hard to form the narrow, turned edge stems:
Here are some of the pieces prepped, ready to be trimmed to about a 1/4" seam allowance and the stems are ready to be stitched in place. The Wash-Away paper has a light fusible on the underside, be sure that is the side you place on the back of the fabric:
I used the glue stick Alex recommended, as I had one of those, and it worked very well:
For the small circles, I used Karen K Buckley's Perfect Circle Templates--they were so small it would have been difficult for me to turn them over the paper and get a good result. Karen is Show 2007.
Since I was creating my own pattern, I used two sheets of vellum, drew the border space I wanted to fill, and used the templates I made to trace the leaf and circle shapes. For the stem, I just drew a single line as a guide for placement of the stem:
Once I had drawn the design the way I liked it, using a pencil, I traced over the pencil lines with a Sharpie, so I could clearly see the design, on both sides. Because I can see through the vellum, I only had to design one half of the border--then I just turned the pattern over for the mirror image other side.
The only marks I made on the white border fabric was the curved stem placement line--drawn very lightly with a pencil. I pinned the stem over the placement line and stitched it. To place the other applique's, I set the vellum pattern on top of the border and slid the pieces in place, pinned and sewed them.
The machine stitching I did exactly as Alex demonstrated in Show 2303--go look there for her excellent video. I used a very small blanket stitch using thread to match the applique's. First, I stitched all the stems in place. Then I added the leaves--since I still had green thread in the machine. The red berries and red center flowers were added next, changing to red thread:
A couple of tips:
1. The edge of the borders get handled a lot--I wish I had cut them wider during construction, then trimmed to the finished size after the applique's are in place--I mentioned this in Part 1 also.
2. For the two-piece flower bud, I appliqued the yellow center on to the larger red flower before putting the flower on the quilt--less handling of the whole quilt this way. I found a stiletto helpful for turning the edge over and those Mylar circles are Karen K Buckley's Perfect Circles--I still have to make a few more of those:
So, I still have 3 more sides to go but the pieces are almost done--once I start the stitching, it goes pretty fast.
Whatever method you choose, I hope you enjoy the process and the way your Patchwork Barn is growing.
The next post in a few days will be the instructions for my alternative center block.
Let's quilt.
Barbara


Nicely done ... I picked up some applique tips for a future project. Thanks for sharing! :)
ReplyDeleteSo how do we get the pattern for /your alternate center
ReplyDeleteAs it says at the bottom of the post, in a few days I'll post those instructions. Look for it September 5.
DeleteThank you Barbara for sharing your knowledge and for your hard work.
ReplyDeleteThanks.
DeleteBarbara, how do I send you a picture of my Patchwork Barn quilt?
ReplyDeleteYou can email it or upload it to the Forum Show and Tell board so everyone can see it.
Delete