Showing posts with label Homeward Bound. Show all posts

Monday, November 6, 2023

HOMEWARD BOUND -- MONTH 12

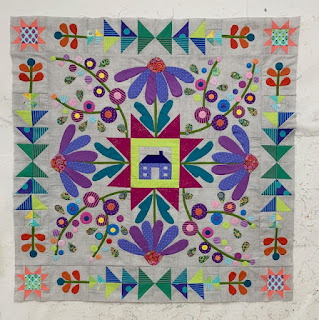
 This quilt is the 2023 Block of the Month quilt for The Quilt Show. It was designed by Sarah Fielke exclusively for The Quilt Show and is only available at The Quilt Show. The best news is it's FREE for Star Members of The Quilt Show. Each month in 2023 a new part of the quilt is released for download to Star Members. 

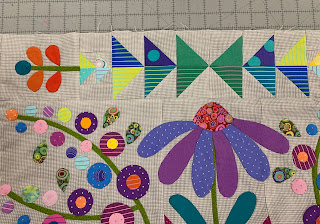
We made it to Month 12! It's time to finish the final border with a stair-step unit. Then your top will be done!

As always, watch any videos that have been provided to supplement the pattern instructions.

Homeward Bound by Sarah Fielke


There are 6 fabrics used for the pieced borders. If using the Kit  they are:

Fabric 1  Tiny Dots PEACOCK

Fabric  2 Tiny Stripes FERN

Fabric  3 Tiny Dots  FLARE

Fabric  4 Tiny Stripes WILDFIRE

Fabric  5 Tiny Dots Blueberry

Fabric  6 Tiny Stripes PETAL

The strips are cut 1.5" wide x WOF. Be careful to cut these accurately. 

I am an impatient person. I want to see units start to come together. SO, I cut HALF the strips needed, and then cross cut those into HALF the required number needed so I could start making units. There are a total of 16 sets for the whole quilt--I made 8 the first two days so I could see progress.

Be very careful with the cross cuts--there are lots of measurements and you want to cut each fabric the correct size. 

I laid mine out on a design board. At the top are the strips ready to sew. At the bottom, one completed section with one Cabin unit attached:

MY TIPS:

1. Press the  seam of each strip toward the Background fabric.

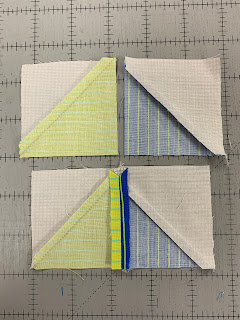
2. When joining the strips to each other, BE SURE to backstitch at the top and bottom of each pair. These will get a lot of handling as you create the entire border and you don't want those seams to start to pop open. They will, trust me.

3. Pay attention to Diagram 1 so the fabrics are kept in the correct order.

4. I pressed the seams open except for the two seams on Fabric 6--the pink. I found those easiest to press toward Fabric 6. You may want to press all to the left or right--you decide. It really doesn't matter.

THINGS TO UNDERSTAND: 

1. It isn't obvious from looking at photos of the quilt, Fabric 1, Peacock, the aqua, is sewn to the Cabin and the Star B units.  The directions are clear, please follow them. 

2. When making the Cabin unit, be sure to backstitch at the top and bottom as you join the aqua/background unit to either side of the 2.5" background square--Diagram 2. 

3. When making the Star B unit, follow the directions so you get Fabric 1 where it needs to be.

4. Cabin A is pink, there are 8 of those. Cabin B is peach, there are 4 of those. They were made in Month 11. The PEACH cabins go in the center of each border, the PINK cabins go on either side of center, with a pieced border unit between. 

5. Refer to a photo of the quilt to be sure you get all the parts in the correct place. It is easy to get them mixed up. 

Once all four borders are done, add the left and right borders to the sides, then add the top and bottom borders. The top and bottom borders include a Large Star C made in Month 6 to outside ends of those borders. 

Here is my completed top:


You made it! The top is done. And if you are not done yet? 

The MOST IMPORTANT ADVICE I  HAVE FOR YOU: be sure to SAVE, COPY, PRINT, whatever method you prefer, ALL THE PATTERNS before DECEMBER 31, 2023. After that, all rights to the patterns return to Sarah Fielke, the designer. We cannot give anyone these patterns after that date, and no one else here can legally give them to you either. Please be proactive in saving what you still need so you can finish without having to BUY missing months.

Let's quilt.

Barbara


Sunday, October 29, 2023

HOMEWARD BOUND -- MONTH 11

This quilt is the 2023 Block of the Month quilt for The Quilt Show. It was designed by Sarah Fielke exclusively for The Quilt Show and is only available at The Quilt Show. The best news is it's FREE for Star Members of The Quilt Show. Each month in 2023 a new part of the quilt is released for download to Star Members. 

As always, watch any Videos that are provided to supplement the pattern instructions. 

This month we add the 4 Hearts to the pieced borders made last month. Then we complete those borders and add them to the center of the quilt:


Follow the directions in the pattern to create the pieced border. Take care to have the light fabrics facing into the center of the quilt and the darker fabrics facing out, if you want your quilt to look like Sarah's. I did not do that with the Month 5 border and I also didn't have the Kit at that time so some of my fabrics in Month 5 are different from the Kit. My Month 10 HST units are exactly like the pattern. 

You will add 4 of Star A made in Month 6 to the four corners of the pieced borders. Nice to have those done already, right?

Now we make the 12 Cabins for the last border, Cabins A and B.

CABIN A Wall Fabric: Tiny Dots CANDY    make 8 of these

CABIN B Wall Fabric: Tiny Dots PEACHY  make 4 of these

CUTTING SUGGESTION FOR THE ROOF: The pattern shows how to make the Roofs from Flying Geese units, FOUR AT A TIME. The cutting measurements are EXACT SIZES--everything has to be perfect for the roofs to come out the correct size--the marking, cutting, sewing and pressing. I prefer to use larger sizes so I can Trim to Perfection. 

I cut the Roof Fabric 5.5" square. The background fabric squares need to be 3 1/8" square. To QUICKLY DRAW THE DIAGONAL LINES on the background fabric, I cut the square 6.25", drew the diagonal lines on the wrong side, then cut the 6.25" square into FOUR small squares, each 3 1/8". 

The Roof units are made Four at a Time, just as I showed for making the Star Point units in Month 6. Find that blog here: Four Flying Geese at Once That blog also has a direct link to my full TUTORAL on this method. 

Similar to the center cabin, these little cabins have SMALL PIECES. I found it helpful to create a pattern in Electric Quilt so I could be sure of the cut sizes. We are not providing this pattern--you can always draw it out for yourself if you like. My page shows the sizes of the 4 units:


I did not paper piece the units as each was small and I didn't want to make all those little units with paper. I pieced it just as the instructions say.

When piecing such small units, accuracy is so important.  I strongly recommend you check EACH SEAM as it is sewn. This tip I learned from Sally Collins, the master of making small blocks. To IMPROVE ALL YOUR PIECING, watch her show:


Here are photos showing how I checked each seam as I went. You want to find the mistake as soon as it happens, not after you do the next step:

A 1" piece sewn to a 1" piece should be 1" x 1.5"--this needs trimming on the peach side

Adding the 1" x 1.5" peach piece makes this 1" x 2.5", more trimming needed 

Adding a 1" x 2.5" wall makes this 1.5" x 2.5" 

Adding the other wall makes this 2" x 2.5" There are TWO of  these units

The Door unit is 1.5" x 2.5" Some trimming needed here on the peach

The bottom half of the Cabin is 2.5" x 4.5" Trim to perfection


The back of the units showing how I pressed the seams

Completed Cabins are 4.5" square, including seam allowances 


When checking for accuracy, use the FINISHED SIZE OF EACH PIECE, then add the 1/2" seam allowances to determine what size the unit should be. 

That is it for this month. Next month we make the stair-step pieced units for the outer border and it's all done!

We are getting toward the end of this year. The MOST IMPORTANT ADVICE I  HAVE FOR YOU: be sure to SAVE, COPY, PRINT, whatever method you prefer, ALL THE PATTERNS before DECEMBER 31, 2023. After that, all rights to the patterns return to Sarah Fielke, the designer. We cannot give anyone these patterns after that date, and no one else here can legally give them to you either. Please be proactive in saving what you still need so you can finish without having to BUY missing months.

Let's quilt.

Barbara


Sunday, October 1, 2023

HOMEWARD BOUND -- MONTH 10

This quilt is the 2023 Block of the Month quilt for The Quilt Show. It was designed by Sarah Fielke exclusively for The Quilt Show and is only available at The Quilt Show. The best news is it's FREE for Star Members of The Quilt Show. Each month in 2023 a new part of the quilt is released for download to Star Members. 

After spending 3 months on the wide applique border, you will like how quickly the pieced border goes in Month 10. There is just a small amount of applique, leaves, stems, and  berries. 

As always, watch any videos provided to supplement the pattern instructions. The Month 5 video may also be helpful:  Month 5 Video


The Half Square Triangle units are the exact same size as those made in Month 5. The fabrics to use for the Large Triangles and Small Triangles are spelled out clearly in the Fabric Requirements so I won't list them here. Just pull out the 6 fabrics for the Large HST and the 4 fabrics for the Small HST and you will easily be able to see where they go.

I make HST with a Half Square Triangle ruler, like the one in the Accessory Kit. You can also make them from squares--I cut the squares 3" vs 2 7/8", I prefer that so I can "trim to perfection".  My blog for Month 5 discusses how to make the HST units: Month 5

The applique is simple this month, leaves, stems and berries:

ROUND LEAF  Sweet Pea SWEET  32 using the Round Leaf Template from Month 3
ROUND LEAF Dragon's Breath AMEYTHST 32 using the Round Leaf Template from Month 3

BERRIES  Paperweight PAPRIKA  8 using the Template B circle from Month 2

IMPORTANT NOTE: My large rectangles are DIFFERENT FROM THE PATTERN. There was a cutting error I discovered after machine appliqueing the wrong size Bias Stems to both ends of the 4.5" x 10.5" Background Rectangles. The error has been corrected. Rather than spend hours removing and replacing those short stems, I simply added a berry to the end of each to cover up the raw edge. The stems are supposed to go under the Heart, which will be added in Month 11. Because I used the same fabric for the berries that is supposed to be used for the Heart, I changed my hearts to a lighter fabric. My own personal Design Decision. It's your quilt, you get to decide.

Here is mine--this is NOT THE SAME AS THE PATTERN:


I think you will find this a fun and easy month. The end is in sight! Next month we add the 4 Hearts, and complete the HST borders, adding them to the quilt center. Then we make the 12 Cabins for the last border.

We are getting toward the end of this project. The MOST IMPORTANT ADVICE I  HAVE FOR YOU: be sure to SAVE, COPY, PRINT, whatever method you prefer, ALL THE PATTERNS before DECEMBER 31, 2023. After that, all rights to the patterns return to Sarah Fielke, the designer. We cannot give anyone these patterns after that date, and no one else here can legally give them to you either. Please be proactive in saving what you still need so you can finish without having to BUY missing months.

Let's quilt.

Barbara


Friday, September 1, 2023

HOMEWARD BOUND -- MONTH 9

  This quilt is the 2023 Block of the Month quilt for The Quilt Show. It was designed by Sarah Fielke exclusively for The Quilt Show and is only available at The Quilt Show. The best news is it's FREE for Star Members of The Quilt Show. Each month in 2023 a new part of the quilt is released for download to Star Members. 

This month we finish the wide applique borders by adding the Birds and more leaves.

As always, I strongly recommend you watch any videos prepared for this month. They are important additions to the pattern instructions. 


First, we add the remaining leaves to the four borders. If using the Kit, here are the fabrics to use:

VINE LEAF SMALL: Tiny Stripes Moonglow  8
                                     Tiny Stripes Fern             8
                                     Tiny Dots Lilypad           8
                                      Dragon's Breath Matcha   8

VINE LEAF LARGE:  Roman Glass Emerald      4
                                      Paperweight  Lime           8
                                       Tiny Stripes Fern            8 --these go on the ends of the 8 vines
                                       Dragon's Breath Shire     8

Once all the leaves are in place, you can add the FOUR BIRDS on the top and bottom borders. 

BIRD BODY: Tiny Dots Bluebell     4 Right Side Up  4 Reversed
FRONT WING: Tiny Dots Candy    4 Right Side Up  4 Reversed
BACK WING: Roman Glass Pastel  4 Right Side Up  4 Reversed


I used Print n Piece Fuse Lite to make the birds, printing four of them and drawing the other four, which are Reversed. If your printer will print in Reverse, you could print all 8 of them. This product serves as a template and a stabilizer. Most of it will wash out when the quilt is completely finished and quilted. 


Print n Piece Fuse Lite fused to the wrong side of the bird parts: 

I used Quilters Select Fabric Glue Pen to turn the seam allowances over onto the back of the PNPFL patterns. Note a few places you need to clip to be able to smoothly turn over the seam allowance:


There are several previous blogs I have written about this "turned edge machine applique" technique. Here is the TUTORIAL and another with MORE DETAILS The product used in these earlier blogs is very similar to Print n Piece Fuse Lite.

I did all the Bird applique by machine. You can do it by hand with the turned edge prepared shapes if you prefer. I was in  a hurry.

I chose not to do the very tiny Heart that is reverse appliqued to the bird. My birds just don't have a heart. I also chose to omit the very tiny eye--mine will be either hand embroidered OR I will use tiny black buttons. Sometimes you just have to say "I am not up to that."

UPDATE: Here is how I solved the "sightless bird" issue: I used small black snaps for the eyes. You could also use a permanent fabric pen to draw them:


OK, now to add the Left and Right borders to the center of the quilt so you can:

1. Complete the Vines
2. Add the four remaining birds

When joining the Left and Right borders to the center of the quilt, be careful to keep the loose ends of the vine out of the way as you join the Left and Right borders to the quilt.

Before you can place the four birds that are on the Left and Right borders, you need to complete the vines as they travel around the the corners of the quilt. 

I used a ruler to be sure the vines cross each other on a 45 degree angle, right in the middle. This also shows how I placed the birds so they would each be about the same distance away from the Star points: 


This isn't perfect but it is pretty close and from any distance looks fine. Much better than if I had just "hoped" I got them close to the middle:

There is a lot of work to finish these four wide applique borders, but once done, you are in the home stretch. I found the rest of the quilt went together quickly, relatively speaking...

Next month we made the next pieced Half Square Triangle borders, very similar to Month 5. 

Let's quilt.

Barbara

Sunday, July 30, 2023

HOMEWARD BOUND -- MONTH 8

 This quilt is the 2023 Block of the Month quilt for The Quilt Show. It was designed by Sarah Fielke exclusively for The Quilt Show and is only available at The Quilt Show. The best news is it's FREE for Star Members of The Quilt Show. Each month in 2023 a new part of the quilt is released for download to Star Members. 

This month we continue to add leaves and flowers to the wide applique borders. 


I had a bit of a struggle with the Petal Flower--which I really like. I wish I had drawn some registration marks on the  background for the petal placement so they were stitched as they should have been. The one in the photo above is particularly wonky. This one is better: 


The other thing that was a challenge was selecting the various fabrics from the Kit and knowing how many of each to cut. I made a few "wrong" choices. So they became "Design Decisions". 

To assist you with the Kit fabric selection, here is what is needed for Month 8 from the Kit:

TULIP FLOWERS:  Tiny Stripes Aster 4

                                     Tula Pink Solids Divax  4

PETALS: Tiny Dots Bluebell  16   (listed as Flower for Month 8 in the Fabric Requirements

FLOWER CENTER:   Dragon's Breath Snapdragon   4

VINE FLOWER:  Tiny Dots Peachy  8  NOTE: this is a correction, pattern says 4 of each orange

                                 Dragon's Breath Snapdragon  8  NOTE: this is a correction, pattern says 4 

VINE FLOWER TOP:  Tiny Stripes Mystic  8  NOTE: this is a correction, pattern says 4

                                           Tiny Dots Thistle   8  NOTE: this is a correction, pattern says 4

TULIP LEAF:   Tiny Dots Lilypad    8

                             Tiny Stripes Fern   8

FLOWER LEAF:  Dragon's Breath Matcha  4

The pattern often says to refer to photos of the quilt for placement. I have saved the photo so I can find it easily and it is also in my FAVORITES in the Quilt Gallery--find the photos here:  SEE QUILTS  If you are logged in as a Star Member you can save it to your FAVORITES to find quickly.

There is a lot of applique in months 7-9. I chose to do the bias stems by machine applique, the flowers and leaves by needle turn hand applique, and the birds by prepared turn edge machine applique--I will discuss that in Month 9.

Whatever method you chose, enjoy the journey.

Let's quilt.

Barbara


Friday, June 30, 2023

HOMEWARD BOUND -- MONTH 7

 This quilt is the 2023 Block of the Month quilt for The Quilt Show. It was designed by Sarah Fielke exclusively for The Quilt Show and is only available at The Quilt Show. The best news is it's FREE for Star Members of The Quilt Show. Each month in 2023 a new part of the quilt is released for download to Star Members. 

It's time to start on the wide applique border that features lots of flowers, leaves and birds. We will work on these borders in Months 7, 8 and 9.


The first TIP is to WATCH THE SHOW that introduced this quilt on January 1, 2023. Sarah Fielke, the designer, shows how to create the paper pattern that is used for placement of the long stems. It is a FREE SHOW FOR EVERYONE, not just Star Members. Find it here: 

Show 3201

The first decision is how wide you will cut the four borders. The pattern says to cut them the actual size needed, 8.5" wide. As I handled them for many hours, I got a LOT of fraying at the edges and wished I had cut them 9" or wider, allowing me to trim away the frayed edges after all the applique was done.

Another idea suggested by a member watching on a LIVE broadcast, is to cut the long edges with a wavy blade rotary cutter. Again, I would still cut the borders wider than needed. 

Yet another way to deal with fraying from all the handling is to use Terial Magic, a liquid stablizer, that adds stability. A light spray is all that is needed. Again, I would still cut the borders a bit wider. And some people simply use starch or sizing to stiffen their background fabrics. 

It is a little tricky to cut the borders wider because a star and square of background are added to both ends of the Top and Bottom borders. They will be the exact size needed.  I did oversize the first border I cut but then changed my mind.  I wish I had left the border like this, so I could trim it to the correct size AFTER all the applique was done. Your quilt, you decide:


WATCH SHOW 3201 BEFORE PREPARING THE PAPER PATTERNS. There is a LEFT SIDE and a RIGHT SIDE. Be sure you know which is which.

In laying out the vines, I made a note of where the ends came to in relation to the Star points and bottom of the border fabric:


Here is the top border. I marked lines for the stems with a Crayola Washable marker so I could see the line but that was a mistake. The pen bled and I will have to wash it out later.

The paper pattern so you can see how it is used.

The stems are added before the vine is sewn in place:


Here are the borders marked, and one with the vines in place:

Remember to leave enough unsewn vine on the left and right side borders--they will be completed once the sides and top and bottom are sewn to the middle of the quilt:


I machine appliqued all the stems and vines, using a small blanket stitch and matching green thread. That was the fastest way to get them done. 

To help with Fabric Selection for those using the Kit fabrics, here are the MONTH 7 fabrics:

Large Circle       Tiny Dots Sky       4
Middle Circle     Background          4
Small Circle       Unicorn Poop Shimmer--used on the Tabs    24
                           Petal flower center does not appear on the Fabric List--it could be Unicorn Poop                                         Dazzle--simply use your favorite for this small circle   4
Petal                   Paperweight Paprika        24
Tab                     Roman Glass Pink           24

Feel free to change these fabrics if you like. I changed the small circle on the petals to a vibrant yellow/gold. Here you can see both choices. In hindsight, I would also make the small circles on the Tabs a deeper color as they disappear on the tabs:


I did all the flowers and leaves by hand applique. For me, the Tabs were easier once I prepped the edge by lightly gluing the tabs to freezer paper templates I made. It was easy to remove the freezer paper with tweezers since the bottom of the Tab was open:


I used a Circle Template to draw the circles the size needed to cut. This one was sold years ago for quilters but you can easily find this tool in the drafting section of an office supply store. I use Perfect Circles by Karen K Buckley for making the circles. Watch her show you how here.:


Next month we will add a lot of flowers and leaves.

Let's quilt.

Barbara

Wednesday, May 31, 2023

HOMEWARD BOUND -- MONTH 6

  This quilt is the 2023 Block of the Month quilt for The Quilt Show. It was designed by Sarah Fielke exclusively for The Quilt Show and is only available at The Quilt Show. The best news is it's FREE for Star Members of The Quilt Show. Each month in 2023 a new part of the quilt is released for download to Star Members. 

This month we make ALL the stars that will complete the entire quilt. Here you see 4 of them added to the pieced borders made in Month 5:

There are 3 Stars, two are small and one is large. It can be confusing to figure out which fabrics are used for which stars, especially if you are using the Kit. This information should help.

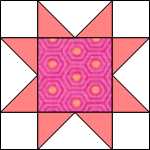
First, I need to say I CHANGED THE SMALL STARS CONSTRUCTION for my blocks.. The pattern makes the star points from two Half Square Triangles, like this:


I prefer star points made from Flying Geese, like this:


There is a detailed TUTORIAL on this Blog for making four flying geese at once, oversized so you can "trim to perfection". All my TUTORIALS are listed above in the TUTORIALS tab. You can also find it here:

Four Flying Geese
 

This photo shows the FABRICS for the TWO DIFFERENT SMALL STARS. STAR A has peach points and the blue background ladybugs in the center. STAR B has purple points and the white background ladybugs.

NOTE: I used a different background for my quilt so I could start before the Kit arrived. The BACKGROUND SQUARE is cut 3 1/2":

BIG TIP: the fastest way to draw diagonal lines on the back of 2 1/8" squares is to CUT A 4 1/4" SQUARE. Use a mechanical pencil to draw two diagonal lines from corner to corner. Then carefully cut the 4 1/4" square into 4 small squares, each 2 1/8" with the pencil line already drawn. Much faster than cutting MANY very small squares and drawing the lines separately:


IMPORTANT NOTE: cutting 4.25” squares requires more fabric than the half square triangle method. If using the Kit, this might be a factor. Especially with dark purple. I will choose another dark purple for the cabin roofs in month 11 if I don’t have enough.

Here is STAR A showing the various steps to making four Flying Geese at once. Refer to the TUTORIAL for specific info:


Here are the completed SMALL STARS. Make 12 STAR A and make 8 STAR B:


The final star is LARGE: STAR C. It is a Friendship Star block. Make 4 of these. 

I have a love/hate relationship with this Star. I am usually quite unsuccessful at making the "Star Point" unit for this block. NOTE: These are NOT 60 degree triangles. Use the template in the pattern.

If I  had to make a lot of these I would simply create a Paper Piecing pattern for that unit. This time I stuck it out, trying to make at least one of these stars accurately. Once again, not real successful. I must have a mental block against it. These will have to do.

The secret must be using the TEMPLATES as accurately as possible. Hold the template firmly in place as you trim. And be sure to trim off the very small angular cuts on the bottom of the points--they help with aligning the points to the background triangle. 

If you are cutting your own templates from the pattern, make them as accurately as possible. If using the plastic templates from the Accessory Kit, hold them firmly in place as you cut. 


At least ONE of those outer points will be HIDDEN when the Star is sewn into the quilt. Oh, well...

Once you have ALL 24 STAR BLOCKS made, you are done for the Month. 

In Month 7 we start on the wide applique borders that feature the birds and lots of leaves and flowers. We will work on these four borders in Months 7, 8 and 9.

Here is my TIP for those borders: cut them wider than needed so they can be trimmed once sewn. I had a lot of fraying on all four of the borders--there is a lot of time spent handling them--I did mostly needle turn hand applique. It is a bit tricky to do because the top and bottom borders include a STAR A and a square on either end--those are made the exact size needed. More info on all that next month.

While on my recent TEXAS TOUR, I met Venetta M, who is making her Homeward Bound by machine applique, with a narrow zigzag stitch. Her work was spectacular! The background was crisp and firm, no fraying at all. She had cut the background slightly bigger than needed and marked the seam allowance so she could place the circles inside the design area correctly.

She explained she treated the background fabric with TERIAL MAGIC --buy it from the Quilt Show Store! She said a light spritz was all that was needed. I sure wish I had done that:


So, that does it for Month 6--enjoy the  process. Here is Sarah's quilt with Star A in place:


Let's quilt.

Barbara


Sunday, April 30, 2023

HOMEWARD BOUND -- MONTH 5

  This quilt is the 2023 Block of the Month quilt for The Quilt Show. It was designed by Sarah Fielke exclusively for The Quilt Show and is only available at The Quilt Show. The best news is it's FREE for Star Members of The Quilt Show. Each month in 2023 a new part of the quilt is released for download to Star Members. 

This month we make the pieced border that surrounds the center of the quilt:

With ONE EXCEPTION--the stars in the corners are made in Month 6--when ALL THE STARS for the entire quilt are made.

Sarah gives instructions for making the Half Square Triangle units (HST) two ways. The first is using squares cut in half on the diagonal. These are then sewn to background triangles and made the correct size.

In her Month 5 VIDEO she shows how to use her HST ruler to make the correct size HST. Any HST ruler will work if you don't have the Homeward Bound Accessory Kit.

I start with 3" squares, not 2 7/8", easier to cut and allows for trimming

After pressing seam to one side I trimmed to 2.5"

I pressed seam allowances in opposite directions

I pressed the center seam open


The smaller HST are made the same way and rectangles of background fabric completes them:


The applique little leaves and berries are fun to make. Watch Sarah's Month 3 VIDEO to see how she places the leaves  in the correct spot. 

After all the applique you have done so far, this month will seem like a breeze.

Here is a partial image of Sarah's middle: 


NOTE: While I am using the Kit, I worked on Month 5 before I received the Kit so some of the fabrics I used are not Kit fabrics.

Next month it's on to the STARS!

I am GONE TO TEXAS from April 30-May 9, teaching for 3 guilds. Info is in the TEACHING CALENDAR schedule, right up there on the top bar.

Let's quilt.

Barbara