
One of the original "Sunday Sew and Sews" had a pattern she created for the perfect baby quilt. Janet Noever called this her SAWTOOTH STAR BABY QUILT.
Here are two of her creations. Janet usually started with a panel or kid themed fabric for the center:
 |
| As simple as it gets, one star block, one border |
 |
| Janet loved Seminole Piecing and often added it to the baby quilt |
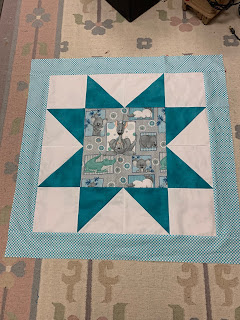
Donna D, one of the Sunday Sew and Sews has made several of these, here is her latest, designed for the newest ALABAMA fan:

At the time of Janet's unexpected death in 2020, Janet was in the process of making 50 baby quilts to donate to Huntsville Hospital to be given to children patients. The Sunday Sew and Sews took on completing this project and several months later Janet's quilts were presented to the hospital. I wrote about that here: A Quilter's Legacy
The other quilt Janet loved to make for donations was this one, she called it "My Favorite Donation Quilt". Various strips/widths of kid-themed fabrics couldn't be easier so I am not providing instructions here, but I do have a TUTORIAL:


 |
| A little Seminole Piecing for interest makes this a bit more work |
Here are 3 mockups I made in EQ8 to give you ideas for Janet's SAWTOOTH STAR BABY QUILT:
 |
| Janet's original design, 36" x 43" |
 |
| Super Simple, 36" x 36" |
 |
| Border Variation, 32" x 44" |
INSTRUCTIONS FOR JANET'S SAWTOOTH STAR BABY QUILT, 36" X 43" finished
Fabric Required:
Center Focus Fabric Fat Quarter
Star Points Fat Quarter or 1/4 yard
Background Fabric 2/3 yard
Top/Bottom Accent Border 1/6 yard
Border Fabric 1/2 yard

Cutting Instructions:
Center Focus cut 14.5" square
Star Points cut FOUR 8" SQUARES for Half Square Triangles
Background cut FOUR 8" SQUARES for Half Square Triangles
cut FOUR 7.5" SQUARES for Corners
cut TWO 2" x Width of Fabric (WOF) strips for top and bottom borders
Accent Border cut TWO 2.5" x WOF strips for ACCENT BORDER top and bottom
Outer Border cut FOUR 4.5" x WOF strips for outer borders

QUILT ASSEMBLY INSTRUCTIONS:
1. Make 8 HALF SQUARE TRIANGLES:

Pair 8" squares of STAR POINT and BACKGROUND fabrics, right sides together
On the WRONG SIDE of the BACKGROUND fabric draw a diagonal line
Sew 1/4" from BOTH SIDES of the DIAGONAL LINES
Cut apart on the drawn line, press toward the Star point fabric, OR press the seam OPEN, your choice
Trim to 7.5" square
2. Sew the EIGHT Half Square Triangles into PAIRS:

3. ASSEMBLE THE QUILT CENTER using the quilt diagram as a guide:
Sew the Star Block by adding corners to TWO of the Star Point Pairs, press toward corners
Sew Star Point Pairs to each side of the Center Square, press toward center
Join the THREE rows to create the middle of the quilt
4. ADDING BORDERS--from here on MEASURE YOUR QUILT to determine what size to cut the borders:
Accent Borders: Cut TWO borders from strips previously cut 2.5" x your quilt measurement. In a perfect world it is 28.5" wide, yours may differ a little
Attach Accent Borders to Top and Bottom of Star Block, press toward Accent Borders
Background Borders: Cut TWO borders from background fabric strip, 2" x your quilt measurement
Attach Background Borders to Top and Bottom Accent Borders, press toward Accent Borders
Outer Borders: Cut TWO borders for the Left and Right Sides. MEASURE YOUR QUILT to determine what size to cut them, 4.5" x your measurement. In a perfect world they are 35.5"
Attach Left and Right borders, press toward the outer borders
Cut TWO borders for the Top and Bottom. MEASURE YOUR QUILT. In a perfect world they are cut 4.5" x 36.5". It is MOST IMPORTANT borders be cut to the SIZE NEEDED so the quilt will be flat and square.
Feel free to change your borders, add more or less. Create Pieced Borders if you like. Keep in mind, it is best to keep the finished size to no WIDER than 40" so regular quilt fabric can be used as the backing without the need to enlarge the back.
This quilt is fast and easy to make. It is easy to alter in many ways. We are all thankful to Janet for her friendship and her great organizational skills that made it easy for us to complete her important project.
See the earlier post to see Janet's great notebook: Janet's Donation Quilt Project . See the post that shows all the finished DONATION QUILTS
Let's quilt!
Barbara
Wonderful blocks. Thanks for including instructions. Happy Stitching from me!
ReplyDeleteThank you for keeping my Mom’s love of quilting alive. I will forever be grateful to you and the Sew n Sews for their help in completing her quilts. My experience is that quilters are a generous bunch and the Sew n Sews personify that. Thank you!
ReplyDeleteThank you, Nancy!
Delete