Showing posts with label pieced quilt. Show all posts

Sunday, January 18, 2026

SECOND LIFETIME QUILT TOP COMPLETE!

 It took a lot of sewing but the top is done:

85" square

I am pleased with this top and glad it is done. There are 289 pieced Old Italian blocks, 3" square.

It is a replica of an antique top I bought in 2014 at Paducah from dealer Cindy Rennels:


It was my intention to have no repeats but there are at least TWO. There might be one more pair but I haven't found them yet. 

With the few leftovers I made a small quilt so I can hand quilt. It's been a while since I did any hand quilting and I am eager to get back to that. It would take me years to hand quilt the large quilt so this small one will have to do:

Leftovers 18" square

For more information on this quilt see these post:

MY SECOND LIFETIME QUILT

The 2025 SUMMER SEW ALONG provides information for making this block in 3 sizes:

2025 Summer Sew A Long

Now I have to decide which of my next BUCKET LIST quilts gets started...

Let's quilt.

Barbara

Sunday, June 15, 2025

LONE STAR BLOCKS WITH NO Y SEAMS

I like Star blocks like Lone Star and Lemoyne Star. Traditionally they are made with Y-Seams. While that is not particularly difficult, it is not fast, it takes time to stop at the right place, backstitch, double check it's all right, etc.

Here is a way to make the Lone Star block without Y-seams. It does require an extra seam in each of the background pieces. Essentially, it is made as a Four Patch:


I found a great video you will find helpful for this process. It is for a much larger star made from 2.5" strips but the process is pretty interesting. It does waste a bit of background fabric but it only requires one size of background squares. I used two different sizes to minimize waste. I just needed to keep the two sizes organized where they needed to go.  

LONE STAR QUILT BLOCK WITH AMANDA CASTOR

 I was very glad I found this great video--I am planning to make a Quilt of Valor from these blocks with the instructions in this video.

Back to our 10" LONE STAR BLOCK. I only used 3 fabrics for the star, the green outer tip, the yellow inside tip (center) and the blue middle round. 

The star fabrics are cut 1.5" wide. Green and yellow each require one half a full strip, about 21". Blue requires a full strip since it is used twice.

The background squares I cut 4.5". There are 8 of those needed.

Be sure to watch the video above. Here are photos of my process:

Press toward the green, and toward the yellow

Be sure to cut at a 45 degree angle, 1.5" segments

Pin and Peek--be sure the center is as good as you want it to be. It is helpful to machine baste the intersection if you have trouble getting it to align with just a pin, an inch of basting stitches is easy to remove and retry if necessary

Maintain the 45 degree angle and trim off the tails

I decided to sew the background triangles on two different ways--the way shown in the video, and the way I did it on my previous 4 blocks. 

The Video method

One half sewn together with the Video triangle method

My original method--I just changed it to use one size triangle

One half sewn together with my method

Two halves

Sewn together

Very carefully trim the complete block to 10.5". Using a large square ruler really helps. 

Here is my Laurel Ridge top. This shows where I used the four 10" star blocks to replace four 5" blocks in each section:

Let me know what you think of this block. It is the way I made the one star block for my small sample of Oh My Stars!:

All of the stars in this large quilt were made the traditional way, with Y-seams:


The "No Y-seams method" is so much easier to me. It's your quilt, you get to decide.

Let's quilt.

Barbara


Sunday, February 16, 2025

THE PERFECT BABY QUILT

 One of the original "Sunday Sew and Sews" had a pattern she created for the perfect baby quilt. Janet Noever called this her SAWTOOTH STAR BABY QUILT. 

Here are two of her creations. Janet usually started with a panel or kid themed fabric for the center:

As simple as it gets, one star block, one border

Janet loved Seminole Piecing and often added it to the baby quilt

Donna D, one of the Sunday Sew and Sews has made several of these, here is her latest, designed for the newest ALABAMA fan:


At the time of Janet's unexpected death in 2020, Janet was in the process of making 50 baby quilts to donate to Huntsville Hospital to be given to children patients. The Sunday Sew and Sews took on completing this project and several months later Janet's quilts were presented to the hospital. I wrote about that here: A Quilter's Legacy

The other quilt Janet loved to make for donations was this one, she called it "My Favorite Donation Quilt". Various strips/widths of kid-themed fabrics couldn't be easier so I am not providing instructions here, but I do have a TUTORIAL:


A little Seminole Piecing for interest makes this a bit more work


When I make this quilt, I start with backing and batting, then "flip and sew" each fabric in place through all three layers. This means it is quilted as it is created. I did a TUTORIAL for my method here: STRIPPY QUILT 

Here are 3 mockups I made in EQ8 to give you ideas for Janet's SAWTOOTH STAR BABY QUILT:

Janet's original design, 36" x 43"

Super Simple, 36" x 36" 

Border Variation, 32" x 44" 

INSTRUCTIONS FOR JANET'S SAWTOOTH STAR BABY QUILT,  36" X 43" finished

Fabric Required:

Center Focus Fabric                Fat Quarter

Star Points                                Fat Quarter or 1/4 yard

Background Fabric                     2/3 yard

Top/Bottom Accent Border          1/6 yard

Border Fabric                             1/2 yard


Cutting Instructions:

Center Focus        cut 14.5" square

Star Points            cut FOUR 8" SQUARES for Half Square Triangles

Background          cut FOUR 8" SQUARES for Half Square Triangles

                              cut FOUR 7.5" SQUARES for Corners

                              cut TWO 2" x Width of Fabric (WOF) strips for top and bottom borders

Accent Border      cut TWO 2.5" x WOF strips for ACCENT BORDER top and bottom

Outer Border        cut FOUR 4.5" x WOF strips for outer borders


QUILT ASSEMBLY INSTRUCTIONS:

1. Make  8 HALF SQUARE TRIANGLES:

 Pair 8" squares of STAR POINT and BACKGROUND fabrics, right sides together

On the WRONG SIDE of the BACKGROUND fabric draw a diagonal line 

Sew 1/4" from BOTH SIDES of the DIAGONAL LINES 

Cut apart on the drawn line, press toward the Star point fabric, OR press the seam OPEN, your choice

Trim to 7.5" square

2. Sew the EIGHT Half Square Triangles into PAIRS:


3. ASSEMBLE THE QUILT CENTER using the quilt diagram as a guide:

 Sew the Star Block by adding corners to TWO of the Star Point Pairs, press toward corners

Sew Star Point Pairs to each side of the Center Square, press toward center

Join the THREE rows to create the middle of the quilt

4. ADDING BORDERS--from here on MEASURE YOUR QUILT to determine what size to cut the borders:

Accent Borders: Cut TWO borders from strips previously cut 2.5" x your quilt measurement. In a perfect world it is 28.5" wide, yours may differ a little

Attach Accent Borders to Top and Bottom of Star Block, press toward Accent Borders

Background Borders: Cut TWO borders from background fabric strip, 2" x your quilt measurement

Attach Background Borders to Top and Bottom Accent Borders, press toward Accent Borders

Outer Borders: Cut TWO borders for the Left and Right Sides. MEASURE YOUR QUILT to determine what size to cut them, 4.5" x your measurement. In a perfect world they are 35.5"

Attach Left and Right borders, press toward the outer borders

Cut TWO borders for the Top and Bottom. MEASURE YOUR QUILT. In a perfect world they are cut 4.5" x 36.5". It is MOST IMPORTANT borders be cut to the SIZE NEEDED so the quilt will be flat and square.

Feel free to change your borders, add more or less. Create Pieced Borders if you like. Keep in mind, it is best to keep the finished size to no WIDER than 40" so regular quilt fabric can be used as the backing without the need to enlarge the back. 

This quilt is fast and easy to make. It is easy to alter in many ways. We are all thankful to Janet for her friendship and her great organizational skills that made it easy for us to complete her important project.

 See the earlier post to see Janet's great notebook: Janet's Donation Quilt Project . See the post that shows all the finished DONATION QUILTS

Let's quilt!

Barbara

Saturday, December 28, 2024

LAUREL RIDGE -- MONTH 1

Laurel Ridge is the 2025 Block of the Month quilt designed by Lynn Wilder exclusively for The Quilt Show.  Star Members have FREE access to the patterns starting January 1, 2025. Made in two colorways, the complete patterns are excellent. You will love making this quilt. Lynn supports the pattern instructions with Videos too. 

Be sure to watch Lynn's Show, #3601, airing December 29, 2024. It is FREE TO ALL, so tell your friends to watch. 

Find the Monthly Patterns under LEARN--DOWNLOAD the pattern to your device before printing. 

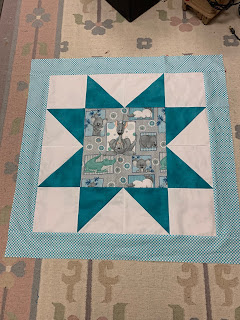
Month 1 has us making FOUR PATCH IN A STAR blocks, 4 each in TWO colorways. 

IMPORTANT CAUTIONARY NOTE: While I am using the SPRING KIT, I have added a few additional fabrics and occasionally selected different Kit fabrics for certain blocks. I cannot guarantee the Kit has enough fabric when I use one in a place not intended by the designer. If you are concerned about that, simply follow the design instructions exactly as written for either of the Kits. 

My FOUR PATCH IN A STAR BLOCKS:

The pattern instructions are excellent. I offer tips when I have a suggestion that saves time for ME. 

This month I suggest these cutting adjustments:

1. Letter D--the instructions say to cut 2 strips--you will definitely need 1 but may not need the second one this month. I did NOT NEED the second one to make all the 4-patches required. This depends entirely on how wide your fabric is. Some  WOF may be 40", others are 42" or more. 

2. Letter E--the instructions say to cut 2 strips, then sub-cut into squares before drawing the sewing line on the wrong side. I prefer to cut larger squares, draw the lines, then cut them apart. I cut 1 strip 4 1/2"  but next time I will cut it 4 3/4" for a little more "insurance". NOTE: 4 3/4" worked much better for me.

8 larger Squares provide the 32 smaller squares needed this month. Using a mechanical pencil I carefully drew diagonal lines from corner to corner on the WRONG SIDE of the fabric. Carefully cut the large square into 4 smaller squares--the lines are already drawn, it's like magic:


The instructions and Lynn's Video show how to draw the diagonal lines using a small 1/2" wide ruler. I have one of those somewhere! Once I learned this trick for quickly drawing lines on four squares at once I never looked for that little ruler again.  With an accurate 1/4" presser foot, I only need to draw the center line. If you prefer to draw the SEWING LINES, draw 1/4" away from the center on both sides of the diagonal.

Yes, I know there are other ways to make Flying Geese (FG). This is my preferred method. The measurements are slightly oversized so you can "Trim to Perfection".

It is VERY IMPORTANT to trim these Flying Geese units to 3" by 1.75"--they FINISH at 2.5" x 1.25"--that is when sewn into the block. Lynn's Video for Month 1 shows how to trim using the Bloc Loc ruler.

When I made these first Flying Geese units I didn't have the Bloc Loc ruler in that size. To use a square ruler, place the 1.5" line at the middle of the unit, being sure the height is at least 1 3/4".  Trim the right and top sides to that size--this is the FIRST CUT:


Turn the unit completely around, place the 1.5" line at  the middle again and trim the remaining two sides. The first cut is IMPORTANT,  the second cut is CRITICAL. It will determine what size the Flying Geese unit is: 


What if you have a Bloc Loc Ruler that is NOT THE RIGHT SIZE? Can you use it? Yes, sort of. The 45 degree angle at the peak of the Flying "Goose" is the same angle, regardless of size. You can use a larger Bloc Loc ruler to cut the TOP EDGE of the unit.

In the photo below, the top FG unit shows the accurate ruler size and the bottom FG unit shows a much larger ruler:

 
The larger ruler can help you cut the TOP EDGE only of the FG. Use a square ruler as described above to cut the remaining 3 sides. BE SURE TO TRIM TO 3" X 1.75":


Notice the FG unit is now turned upside down. Place the 1.5" mark on the ruler at the V of the FG, keeping the diagonal line on the seam. The unit must be 1.75" high to be cut accurately so be sure to look at the lower edge BEFORE CUTTING: 

Trim the right and top sides:

Turn the FG unit  again so you can trim the remaining edge. The unit needs to be 1.75" x 3":


Lucy K made a post on the FORUM that the Deb Tucker Wing Clipper II ruler had the markings for the correct size Flying Goose:  1.75" x 3" cut size, 1.25" x 2.5" finished size. My local quilt shop had this ruler in stock so I bought it to try:


It was successful if I was careful to hold the ruler tightly in place while trimming. Having gotten VERY USED to quality rulers with non-slip stuff on the bottom, Quilter's Select and Creative Grids, I found it easy for the ruler to slip as I was trimming. Putting solid pressure on the ruler prevented that, I just had to remember I really had to press down firmly. 

AVAILABLE NOW:

First I watched the video on the Deb Tucker Wing Clipper II page. Very simple to understand. Here are photos of my process:

The diagonal line goes on the right diagonal seam. Remember to CUT 1 3/4" x 3". Trim the right and top sides:


Turn the unit upside down. The X sits exactly at the Point of the goose, the 1 3/4" line is now at the bottom and the 3" line is on the left side. HOLD tight as you trim to exactly 1 3/4" x 3":


So it is clear you don't have to have specific rulers to make Flying Geese.  As it is difficult to find the 1.75" x 2.5" Bloc Loc Flying Geese Ruler most will be using another type of ruler to trim the FG units. Once you get the hang of your preferred method you will be all set. The EXACT SIZE BLOC LOC FG Ruler just makes the trimming process easy, accurate and fast. If and when more of these rulers become available I will announce it on the FORUM

I love making Four Flying Geese at once and always make them the way Lynn describes in the pattern and her video. Making them OVERSIZE allows for insurance. You just have to know what size to cut the squares for the specific size Flying Goose you want to make. I have a TUTORIAL here you might also find helpful: Four Flying Geese

Here is a GREAT CHART that shows the sizes to cut squares needed for a variety of Flying Geese units Four at a Time Oversized: The Crafty Quilter

The 4-Patches are simple to make. The pattern instructions say to press the seams open. I don't usually do that. I "twirled" the center:


The pattern instructions clearly show how to assemble the block with the Flying Geese and 4-Patch units. I pin at all intersections and sew carefully. It's not a race, sew as slowly as needed to be successful. Double check your blocks to be sure they are the correct size when complete.

The pattern instructions also say to press seams open in the block construction. I will be interested to hear what Lynn says about this. For now, I pressed mine like the one on top, the one on bottom is pressed open:


At the time I made these blocks I did not have access to Lynn's show or videos. After I watch those, I may change my mind about pressing. 

Next month the first applique blocks are made. I am working on "optional alternative pieced blocks" should you prefer not to do applique. The choice is completely yours.

Let's quilt.

Barbara


Sunday, November 17, 2024

BUCKET LIST QUILT # 3

My "BUCKET LIST" of quilts I still plan to make includes a few I started years ago. This is one of those,  STAR OF TEXAS. 

I am enamored of all things TEXAS, I was probably meant to live there, but for now I want a "TEXAS" quilt:

STAR OF TEXAS was started at least 25 years ago when I saw a tiny little image in a magazine of the center square made up of many small five-pointed stars. Using graph paper and a calculator, I drafted the center using 64th's of a inch. Yes, crazy, I know, but I am a numbers person and it was fun. 

I played around with Electric Quilt--whichever early version I had then, long gone now, and got the center made. The off-white background was what I had on hand and seemed the best choice at the time.

Once the red border was added I knew the yellow-ish cream muslin center fabric was wrong. And I didn't know what I wanted to do next so I packed it away, with a big bundle of red, white, blue and gold fabrics and left it. 

About 10 years ago I tackled it again, taking off  the red borders and carefully removing the background fabric. I had created full-size paper templates of the 5 background shapes so it wasn't too hard to cut new ones and replace them with white Grunge--much better!  

Now I had this. NOTE: the red borders are just on the design wall for inspiration--they haven't been sewn in place yet. I expect to cut them down a bit:

Now that I have looked at it a few times  I know what to do next. Playing with EQ 8 I came up with this design. I did not take the time to draw the actual center star as it is made--this simply allows me to get right to playing with border ideas:

62" square

But wait. What if I want it larger? Here is another possibility:

71.5" square

For now, I will make the red and blue stars for the borders since they are definitely going to be used. They are 5" standing with the star center point at the top but 7" if I set them on point as shown in these border ideas. Does it make a difference to Texans if the star is sideways?

This one has moved up to the top of the list of quilts to make/finish.

Let's quilt,

Barbara


Sunday, June 16, 2024

MORE STARS, OH MY!

 I have been having so much fun making Stars for my latest project, Oh, My Stars!, a pattern from American Jane. I wrote about it last week, find that post here:

Oh, My Stars!

Here is just a peek at the process. This is not the final arrangement--when the rest of the 13 full stars are made I will decide who goes where. This just lets me see the general idea:

Picking fabrics is my favorite part! The latest fabric "pulls":


Here they are ready to sew. Having them all set helps me make the most of my time the next sew day--just start sewing, these are cut and ready for assembly:

The actual sewing is slower and requires careful pinning and sewing. I make two diamonds first to be certain I like the 5 fabrics together, then I finish the star. Once that is done, I sew the other half of the strips and finish making either full stars, half stars or corners.

Each set of fabrics makes either TWO full stars, or ONE star and TWO halves, or ONE star and TWO corners:


The pattern quilt. There are 132 little 4" stars for sashing. I make the star points unit from flying geese, using my TUTORIAL for 4 Flying Geese at Once. Those geese are 1" x 2" finished, that's small. I am making them as I go, using them as Leader/Ender projects. I prefer that to having to make 132 all at once.


Let's quilt.

Barbara