Wednesday, February 13, 2019

For SALE #2

Today, I have books you might like. It is hard for me to get rid of  books and on more than one occasion, I have sold a book and later searched online to buy another copy because I NEEDED it again.

Maybe you will find a title here you NEED:


Books are grouped by type but are available as singles. Each book is $4 plus shipping, discounts for multiple purchases.  Shipping will be kept as low as possible, Priority is about $8, Media is about $4.

First, this one is brand new--I got two of them and it's so good I want to get this into your hands:  SOLD

$20 plus shipping

Now for my Classics:

1. Basics:


SOLD

2. Little/Miniature Quilts:


SOLD

3. Oriental/Curved/Artsy:


4. Design/Beading/Embroidery:


5. A Classic--I have a duplicate of this. The very first title from C&T Publishing:

6. Hand Applique':

7. Miscellaneous:

Reference book, Quilt History
Yvonne Porcella made wonderful clothing, here is how, a duplicate--SOLD


Every quilt deserves a label--SOLD

Great designs for quilting motifs and applique'

Use the Square in a Square Technique for speed
Set of great pieced blocks with Template Sets A, B and D--$8 total
If you see something you like, want or need, just let me know. Local, no shipping, of course. If I am coming to your guild in the next 6 months, I am happy to deliver to you.

Let's Quilt!

Barbara

Sunday, February 10, 2019

Lessons We Can Learn

I believe every quilt can teach us something, even if it's "I don't ever want to do THAT again".

Let me tell you a story about a simple quilt I own and how that came to be:


About 15 years ago, I was teaching a beginning class of Quiltmaking 101 at a local shop. We had reached the 6th and final class and before class began, one of the students showed this old quilt to us. I raved about it and explained how it would be difficult to determine exact age because the tiny red/white gingham check print had been made for many years--you can probably buy something like it today. I showed them the small cotton seeds visible from the back--homegrown cotton, for sure. Tiny hand quilting stitches, and many of them, are icing on the cake of this very simple quilt.

The woman who brought it said it had been given to her husband by his secretary when the secretary's mother's things were being distributed. The secretary felt sure her boss and his wife would like to have this keepsake. As I went on about what a nice, simple quilt this was, well-loved and worn in spots, she said:

"Well, if you want it, you can have it, I don't want it."

I said "OK", folded it up, put it with my belongings and said "It's time for class." The students stood there with their mouths open--what just happened here? They asked her why she didn't want it and this was her answer:

"I don't want it, it has a mistake."

I got the quilt back out and we studied it hard. It's a very simple quilt of nine patches, 4 red gingham, 5 muslin, set in large blocks, with plain muslin blocks set between:


We looked and looked and FINALLY:

We found the ONE nine-patch that has 5 red gingham and 4 muslin squares. I explained the legend/myth/story that it was customary in olden days for the quiltmaker to include an intentional mistake, because only God is perfect and it would be pretentious to make a perfect quilt. This is almost certainly not true but it can't be proved or disproved today and still makes for a good story. And when I tell students this, we all laugh and say we have no need to make an "intentional" mistake, they always seem to find their way in on their own. Our personal "humility block".

Surely, the quiltmaker didn't run out of muslin or think she needed to make a humility block for religious reasons. I like to think she did it just to keep us guessing, these many years later. It makes me like the quilt and the maker even more. It was intentional but not a mistake.

After class, the donor left and the other students asked to see the quilt again. One of them asked "How could you take that from her?"  My answer "It was easy. She didn't deserve to have it." She didn't appreciate it, seeing only the flaw, not the overall beauty.

Today, this is one of my greatest treasures. I like to think the maker is now resting in peace, as her quilt has a safe home, stored in a pillowcase in a dark closet, only coming out from time to time to teach a lesson.

LIFE LESSONS WE CAN LEARN:

1. Nothing is perfect, appreciate what is good about things.

2. Even though old and worn, there is still value and  usefulness in things.

3. Not as beautiful as it once was, it is still worthy of being treasured.

4. If you look for the flaw, you will find it and it will kill the joy.

5. Simple is sometimes better than complex.

6. Be prepared, when opportunity presents itself--you may just get a treasure you weren't expecting.

Substitute "people" for "things" and the lessons are more broad, but still true.


And, Quilters, please sign, date and label your quilts. How I would love to know the who, what, when, where and why of this quilt. Don't make them guess 100 years from now.

Remember, too, as I always tell students, "There is nothing wrong with your quilt that 100 years won't solve."  Today, if we see pencil marks on an old quilt, we exclaim "Look! You can see the hand of the maker!".  So, be gentle on yourself, dear quilt friends, with any luck your quilts will be loved by generations yet unborn.

Let's quilt.

Barbara

Wednesday, February 6, 2019

For SALE #1

For the next few weeks, the Wednesday blog will feature items I have for sale, fabrics, books, notions, maybe even quilts. They are great items I have simply been storing for too long and it is time to pass them on to someone who will love them anew.

Today it is Fabric Kits or Bundles:


1. Robyn Pandolph Fabric for MODA: SOLD

9.5 yards Total.  Beige floral 2 yards
                           Focus, large roses on mint green 2.25 yards
                           Green small floral tone-on-tone  2.5 yards
                           Small green/pink floral print 3/4 yard
                           Soft pink floral 2 yards
$50 plus shipping

2. Downton Abbey First Edition Complete Collection with Quilted Tote and original Literature, from Andover--remember, Downton Abbey the movie is coming this Fall:  SOLD


$100 plus shipping

3. Vintage Made Modern by Amy Barickman for RJR Fabrics, 22 fat quarters: SOLD


$45 plus shipping

4. McKenna Ryan "At Home in the Woods" Block of the Month Kit. SOLD Twelve patterns, complete instructions, Batik fabrics as Kit packed and sold by the Rushin' Tailor quilt shop in Skagway, Alaska--patterns never opened or used:


$100 plus shipping--less than half what I paid for it.

5. Dr. Seuss " Bump Thump Panel Quilt" Kit, 75" x 88". SOLD Free pattern instructions available at  Robert Kaufman.com


$80 plus shipping, somewhat less than what I paid for it.

6. 6+ yards Oriental Cotton Sateen Prints:


$40 plus shipping

If you see something you like, just let me know. If you are local, no shipping. If I am coming to your guild in the next 6 months and you want me to deliver, I will be happy to do that.

Let's Quilt!

Barbara

Sunday, February 3, 2019

Comfy Quilts

Comfy quilts, also called Charity quilts, are often made by groups of quilters to donate to local organizations to support the community. They can be simple to elaborate, small to bed-size. Each quilt donated will find an appropriate home in time.

My guild, the Heritage Quilters of Huntsville, has done this for years. At a recent meeting a few of the agencies we support spoke to the guild about how well-received these quilts are by those who are given one. Veterans, NICU babies, those dealing with domestic violence, children in distress due to family issues, those who have lost their homes to fire, anyone who could use some comfort may receive a quilt. Fire, police and EMTs all carry quilts in their vehicles so they can be given to those who need them immediately.

Our Comfy Quilt coordinators were ready--they presented more quilts to the three agency spokespeople who were there. AND they had a supply of comfy quilts that needed work: some just needed a binding, some needed to be quilted and bound, a few only needed labels. That was smart because, after hearing how important these quilts are to those who have gotten them, all of the projects that needed work were picked up by members.

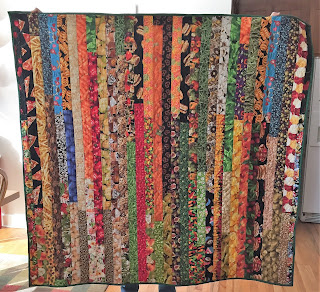
I selected this top to quilt and bind. It is a simple design, made from a "Jelly Roll"--2.5" strips of fabric packaged in a roll. Each print has some kind of food--I think every food group is represented. The top was done by someone else, the backing was provided, all I needed to do was add batting, baste, quilt and bind it. The strips were the perfect place to practice machine quilting.

First, I "stitched in the ditch", between all the strips. Here is the back after that step was done:


Then I stitched Free Motion Quilting (FMQ) in every other strip. I  tried a variety of designs, some I am pretty good at and some I want to get better at. That stitching was quick and it was fun to decide how I would quilt each strip.


In the remaining strips, I quilted with Rulers, more correctly called Templates. Using a Ruler Foot and a variety of Longarm Rulers, I created lots of designs, some straight, some curved. This is a slower process but with careful stitching, the quilting designs can be very consistent in size and shape. It took more work to come up with those designs.

Over the course of 3 days I worked on the quilting, then created and attached the binding by machine. It will be turned in at our next meeting and eventually find its' way to a recipient who, I hope, will enjoy it.


If your organization makes Comfy Quilts, ask some of the agencies who receive them to speak to your group about what they do with them. You will see a definite increase in the participation by your members.

Let's quilt!

Barbara


Friday, February 1, 2019

SIZZLE--Block 2

This is the  2019 Block of the Month from The Quilt Show. This quilt pattern designed by Becky Goldsmith is FREE to Star Members. Join today  to be part of the fun.

See Previous Posts:

Block 1  Tips there apply to this month also

If you made Block 1, you will really like Block 2. The Wedges only have 3 pieces, not 4 and the Diamonds are made of 3 sections. The process is very similar to Block 1.


FIRST,  a note about Fabric Selection: If you are using one of the kits, just use the fabrics Becky has designated for each space and the design will be  perfect. If you are using your own fabric, take note of the fabrics Becky selected in either the Warm or Cool Kit. 

For example, in the Cool Kit, Fern, one of the woven cottons, appears in Sections 1, 2 and 3. Whatever fabric you want to use in its' place, be sure you put your fabric everywhere Fern is--this will ensure you get the pattern design. Seaside is used in Sections 2 and 3, the same applies here.  In the Warm Kit, Fern is in Sections 1, 2 and 3 and Sangria is in Sections 2 and 3. Your colors may be completely different, but it is the placement of those fabrics that creates the pattern. 

In the Cool Instructions, Becky writes NOTE: The values in parentheses on the foundation paper-pieces may not match the values of the fabric in the Cool Colorway.  

If using your own fabrics, I suggest you use the words light, medium, dark as a simple guide--as long as there is contrast between the fabrics you choose for the block, the pattern will work. Whether you start with a light or dark fabric for piece #1 in Section 1, just be sure the fabric you choose for pieces #2 and 3 contrast with it--and remember, fabric 2 and 3 have to be the SAME fabric.

WEDGES:

Align the #1 fabric on the pattern, being sure the entire piece that needs to be covered, is covered. Remember, butt side of fabric 1 to the butt side of  the paper:

Align #2 fabric with the raw edge of fabric #1, sew, and press toward #2 fabric:

Paper side up, ready to trim #1 Fabric so I can sew #3 Fabric:


I use and love the Add-A-Quarter ruler. Fold back the #3 paper piece on the sewing line, using a post card, then place the lip of the ruler snug against the paper edge, and trim 1/4" away from the sewing line:


This triangle is the excess #1 fabric that is removed--I am saving these for some future project--it meets my "big enough to save" rule--each person has their own standard for this:


 Ready to add #3 Fabric:
 Ready to sew #3 Fabric:


Use a dab of glue stick on the paper, to secure #2 and 3 pieces--this makes cutting the curved edge easier and more accurate:


NOTE: I've been asked about the vellum paper curling--it does. I lowered the heat of the iron just a bit, that helps, and I use those small dabs of glue stick to keep the larger pieces in place. Another trick that can help is to put something on top of the units after pressing--a ruler, a book, a clapper, something to hold the paper flat as it dries from the heat of the pressing. The paper is only on the fabrics for a short while so I have learned to cope with the curling--being able to see through the paper is such a help. Usually, I use newsprint, which does not curl this much, but you can't see through it like you can with vellum.

DIAMONDS:  NOTE--Becky has a great video for the Diamonds--be sure to watch it before sewing this block:  Tips for Making Block 2

The diamonds are made from 3 small sections. For some reason, I found it easy to get confused with Section 2 as to which fabric went where. SO I wrote on the paper with a pencil:  BL for blue, AQ for aqua. GR for green. This really helped me. The one time I didn't, I sewed the AQ where the GR goes--not good, I had to remove them both and re-sew.

HOT TIP: I bet you have colored pencils--quilters love office and school supplies. Here is my Block 2 Warm/Cool combo Diamond pieces--I used colored pencils to quickly mark which fabric goes where on the 3 small sections that make up the Diamond unit. You might notice, the fabric that is FERN in the Kit quilts, is HOT PINK in this version I created. As long as I use it everywhere in the Block where FERN appears, my finished pattern will be correct.

The pencil is marked on the TOP side of the paper so the markings will not touch the fabric:


Back to the Cool Kit Block 2:

The first thing I did was cut out all the fabrics. Keeping them organized with the paper sections they are sewn to helped. After making all the sections, they are trimmed. Because they have 90 degree angles, I carefully set the square ruler with the 1/4" line on the ruler on top of the sewing line, and cut two sides away at a time:

Be sure you trim the point off as shown on the pattern. This makes it very easy to attach sections 1 and 3 to section 2:


Becky has a brilliant way to be sure you sew the sections together in the correct order. Sections 1 and 2 are sewn so the two STARS in the seam allowance are aligned. Sections 2 and 3 are sewn so the one STAR in the seam allowance is aligned. Here are the sections trimmed and ready to be joined:

Remember, every time you sew one paper unit to another, REMOVE  the paper in the seam allowances before the next step.

NOTE: If you want to be sure your Diamonds are the correct size once you have sewn the 3 sections together, compare them to the Diamond pattern from Block #1--they are identical in size.

Once the Wedges and Diamonds are made sew them together exactly as we did with Block #1. This time I followed the directions and sewed the Wedge to the right side of the Diamond:


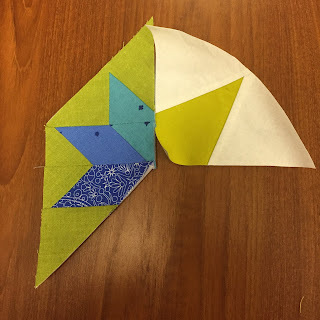
Four Wedge/Diamond units become a half circle, just like last month:


Make the other half and complete the block exactly as we did last month.

If using either of the Kits, be sure you select the correct Block Corners for the background. The Cool Kit uses two English Cream and two Mist block corners so the block will go on the middle row, left.

As I said last month, if you want to change the block positions, you certainly can--just wait until the circles are all done to decide which you want to place where on the quilt.  If you are using your own fabrics and have decided to only have one background fabric, you can put the blocks wherever you like.

Be sure to post photos on the Forum to share your progress. I also encourage you to check the Forum frequently--that is the first place new tips are posted. And you can ask questions there--you might get several good answers. We want you to be successful and happy with this quilt--it really teaches us a lot.

The first day someone asked for a Coloring Page/Line Drawing to play with arranging fabrics, not from the Kits. Becky made that available and that news was posted on the Forum right away. The drawings will remain available under the Month 1 downloads.

Let's quilt!

Barbara