It is interesting to look back at some of the quilts I made in my early years as a quilter.
The Journey #1
The Journey #2
The Journey #3
Remember, you can still VOTE for Best OVERALL Blog until August 31! National Quilters Circle Awards. I am counting on you.
Today I'll tell the story of one of my favorite quilts and how it came to be.
Pieces of the Past--Circa 1875:
We moved to Alabama October 2, 1988 when my husband retired from the Marine Corps. A good move, this put us closer to his family, it rarely snows here, there was a large quilt guild and a wonderful quilt shop here--all good for me as a quilter with 3 years under my belt.
However, Friday October 7, 1988, my former guild in Virginia was having a workshop with Jinny Beyer--I had made all the arrangements with her and as a huge fan of hers, I really felt glum that day in Alabama that I had to miss the workshop.
On the way home from dropping off my sons at school, I stopped at a neighbor's yard sale. I didn't see anything right off but I heard a man say "How much you want for that quilt?" YES, that quilt top I had just walked right by, it was hanging on a ladder. I grabbed the other one, it was brown, he had the blue one. She said "$5"--he paid it and I chased after him, offering him $10 if he'd just let me have it. He said "What do you care? You got one." and that was that. I begged him to take good care of it, not use it as drop cloth or worse. I paid my $5 and took the less-than-lovely brown quilt top home.
My mood did not improve. Not only was I not in Jinny Beyer's workshop, I lost the blue quilt and had to settle for the brown one, my least favorite color. But, sometime later that day, I was stricken with a dose of reality. As I studied the quilt top a bit, I realized it was really old and completely hand-pieced, pretty well. The outer border is shredded, almost in tatters as it is very crunchy. But the blocks are full of wonderful old fabric prints and in it's day, it must have been a beauty. I clearly remember saying to myself: "You have a treasure here and all you are fretting about is the one that got away. Appreciate what you have and let the other one go." Good lesson to learn.
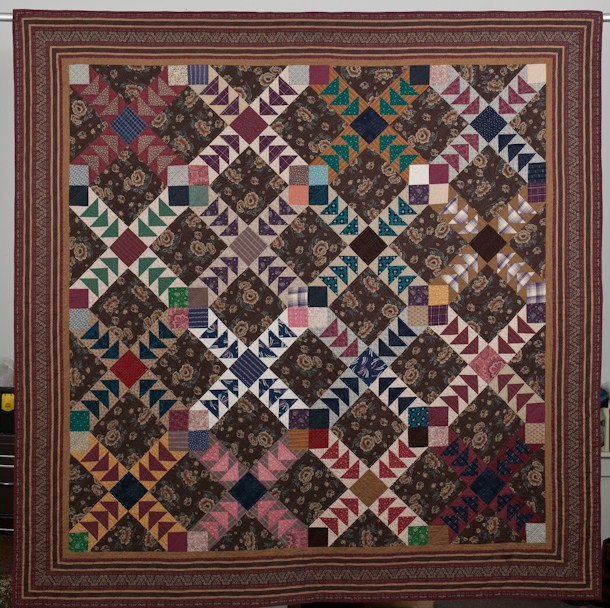
As a new quilter, I thought every quilt top had to become a quilt and planned to hand quilt this one. It soon became clear this top would not hold up to such handling so all I should do is protect it. And reproduce it. In 1993 I found a wonderful reproduction print that strongly resembled the floral fabric in the top and it came in brown. I ordered several yards.
The Original:
The Reproduction:
Not exactly the same, but as close as I could ever hope to come. After drafting the pattern, I pieced the quilt by machine and had a new-found appreciation for the long-ago quiltmaker--all those four-patches at the block intersections had to be set-in, they are not sewn straight across--that would be easy. I worked on this one for several weeks, added a brown striped border, and hand-quilted it myself, using wool batting--how wonderful that is! So easy to hand-quilt and so comfortable to sleep under.
About this time our guild brought quilt historian and fabric dating expert Merikay Waldvogel to give a program on antique quilts. In advance, we were told to bring any old quilts we had as she would incorporate them in her lecture. She placed the quilts we brought chronologically and this top was the second from the oldest--she dated it to 1875. I was even more amazed at my treasure.
Here is the label:
When my husband saw the label, he asked if I was planning to give this quilt away, as the fact that it has 100% wool batting was listed. I said "No, but I'm not going to live forever." I would hate to have someone way in the future throw this in the dryer and have it come out much smaller.
I wanted to teach this quilt as a class but no one but me would be willing to piece it by machine with all those set-in four-patches, too challenging. So, I re-drafted it, eliminating that design feature and made a second quilt in 1995. I called it "Five Easy Pieces:
Detail shot:
Now, there is one more funny story to tell about this quilt top. In the late 1990's the guild brought Liz Porter and Marianne Fons to do a lecture and Liz did two workshops, one of which was to make a quilt that looked old from today's fabrics. I brought this top to show her during our lunch break and as she studied it carefully, she said "You know, this brown fabric used to be purple." Everyone listening started laughing--they knew my favorite color is purple but brown, not so much! Sure enough, looking at the seam allowances on the back, the original floral fabric was a purple--time and light had darkened it to brown. Since that day it has been my goal to replicate this old top one more time, in purple. That might be what's on tap next.
Lessons learned from an old quilt:
1. Appreciate all the treasures in your life
2. Don't fret about what you don't have and don't need
3. Honor the past with the work of your hands today
4. If the path is difficult, find an alternative route that is easier but still gets you there
5. In your old age, you may not be as beautiful as in your youth, but you still deserve to be loved and treasured, for in age there is wisdom and a life well-lived
6. Document your quilts and tops--how I wish I knew the story of this quilt top
7. Stop at yard sales--you never know what you're going to find
Over the years I have replicated several old quilts--more coming up in my Journey look-back.
Let's quilt.
Barbara
Showing posts with label antique reproduction. Show all posts
Wednesday, August 29, 2018
Sunday, February 21, 2016
Joining Rows to Create a Quilt Top
I've been asked to explain my process when joining rows of blocks to create a quilt top.
This tutorial applies to a "Straight Set quilt". For information about an "On-Point Set quilt" go here.
This is a design done in EQ7 of a simple pieced quilt top with rows of blocks and sashing with cornerstones:

First, I design the layout, choosing which blocks go where. As I usually make quilts with lots of fabrics, this can take a little time. In this example, all the blocks are the same so I just put them on the design wall and start sewing.
We will start with the first row of sashing/cornerstones and call this Row 1.
There are a total of 8 of these rows: 1, 3, 5, 7, 9, 11, 13, 15.
There are rows of pieced blocks, let's call this Row 2:
There are 7 rows of pieced blocks, Rows 2, 4, 6, 8, 10, 12, 14.
Working from the top, I sew the first row of sashing, from left to right. Row 1. This goes quickly.
I then sew the first row of blocks. Row 2. This takes a little more time, as the seams are longer.
Now I join Row 1 to Row 2, carefully matching the intersections where the sashing and cornerstones meet. Yes, I pin all those intersections.
Unit 1/2:
Now I put that unit back on the wall and sew the next set of these units, Row 3 to Row 4. When I have that done, Unit 3/4, I join them to Unit 1/2:
Now I repeat with the next set of sashing and block rows:
This tutorial applies to a "Straight Set quilt". For information about an "On-Point Set quilt" go here.
Using this antique top I bought last year as an example, I will show you my process.
| Garden of Eden blocks |
First, I design the layout, choosing which blocks go where. As I usually make quilts with lots of fabrics, this can take a little time. In this example, all the blocks are the same so I just put them on the design wall and start sewing.
We will start with the first row of sashing/cornerstones and call this Row 1.
There are a total of 8 of these rows: 1, 3, 5, 7, 9, 11, 13, 15.
There are rows of pieced blocks, let's call this Row 2:
There are 7 rows of pieced blocks, Rows 2, 4, 6, 8, 10, 12, 14.
Working from the top, I sew the first row of sashing, from left to right. Row 1. This goes quickly.
I then sew the first row of blocks. Row 2. This takes a little more time, as the seams are longer.
Now I join Row 1 to Row 2, carefully matching the intersections where the sashing and cornerstones meet. Yes, I pin all those intersections.
Unit 1/2:
Now I put that unit back on the wall and sew the next set of these units, Row 3 to Row 4. When I have that done, Unit 3/4, I join them to Unit 1/2:
Now I repeat with the next set of sashing and block rows:
Unit 1/2/3/4 + Unit 5/6/7/8
=
This is the TOP HALF of the quilt. I put it back on the design wall and proceed in the same manner to create the bottom half of the quilt. NOTE the final row of sashing/cornerstones on the bottom:
Then I simply join the top half to the bottom half:
All that is left to do is add the four borders and this top is done. Why don't I just start at the top and keep going? Because as the quilt grows it gets more awkward to deal with the whole thing. By breaking it down into sections, I only have the entire quilt under the needle for that final seaming, joining the two halves. If you want to start at the top and just keep going, that's perfectly OK, it's your quilt, do it your way.
IMPORTANT TIPS FOR BORDERS: Do not just cut a long piece of fabric (or piece a long border), sew it on and whack off the extra. This will pretty much ensure your quilt is out of square. MEASURE your quilt and cut the borders the actual size they need to be to precisely fit your quilt. In this example the sashing rows finish at 2.5 inches and the block rows are 11" high.
In a PERFECT world, my seams would all be exactly 1/4" and the top would now measure 97.5" x 84", before adding that outer border. That is raw edge to raw edge. Measure your quilt to find out what size yours really is before proceeding. Cut borders to fit YOUR quilt.
The left and right borders are cut (or pieced to become) 5.5" wide x 97.5" long. After they are sewn to the left and right sides of the quilt, I measure again and cut the top and bottom borders 5.5" x 94". Sew on the top and bottom borders and you have a completed quilt top, that will finish at 93.5" x 107".
NOTE: I mark the center of each border and pin each outside edge and the center. Then I use as many pins as necessary to keep the border neat and tidy while sewing. With borders this long, I put pins about every 5". The more pins you use, the more likely your borders will fit nicely. We are using the accurately cut borders to create a quilt top that is square, not wonky.
ANOTHER NOTE ABOUT BORDERS: While it is generally best to cut your borders on the lengthwise grain for more stability of the borders, I often cut them crosswise and piece them to the correct length. The most common reason for this is I don't want to buy more fabric just so I don't have to piece a border and can have it all on the lengthwise grain. I use what I have. It would take 1.75 yards to cut these borders crosswise, but you would need at least 2.75 yards to cut lengthwise. And you would have a long piece leftover, approximately 18" x 99". Yes, you could use that for the binding, but the point is: Do what makes sense for YOU and this quilt. If this will hang on the wall, use lengthwise cut borders. But if it's going on a bed I don't think it makes a lot of difference. You get to choose.
If you are still with me, I hope this makes sense and gives you a road map to follow as you piece your next quilt top.
Oh, and I had to use diagrams from EQ7 for this tutorial because here is where I stand with my reproduction quilt so far:
Let's Quilt!
Barbara
Tuesday, December 8, 2015
My Lifetime Quilt
The other day I posted about this wonderful antique quilt I have to replicate:
So I got started by making a plan. The half-square triangles (HST) in the antique finish at 1.25" and that was fine by me. I thought I would start with 2" squares and sew a very narrow, small seam allowance. That didn't work out so well--the blocks were a smidge too tiny. I increased the square to 2.25" or even 2.5" if that was the size square I already had cut. Here is the process:
| Chain, chain, chain... |
| Trim precisely |
| Make units of 4 HSTs |
| I pressed seams open across the middle seam, do as you like |
| Yes, I pin a lot with these small units-the pin at the bottom helps keep me straight all the way to the end of the seam |
| More open seam pressing, again, do as you like |
| Only 286 more of these blocks to go... |
| As these fill up, I'll make more 5" blocks, no rush |
1. Pair up 2 squares, 2.25", place right sides together
2. Draw a diagonal pencil line on the back side of the lightest square.
3. Sew a narrow seam on both sides of the diagonal line.
4. Cut apart on diagonal line.
5. Press toward the darker triangle.
6. Trim to 1.75" precisely.
7. Join 4 HSTs into a block--it should measure 3" raw edge to raw edge.
8. Join 4 of those blocks into a larger block--it should measure 5.5" square, raw edge to raw edge
9. Lather, rinse, repeat... My plan is to make this quilt 16 x 18 blocks, 80" x 90".
NOTE: It didn't take long before I changed the way I made the 5" finished blocks. Find that UPDATED PROCESS here:
Because this is a Lifetime Project, all I'll do from here on out is cut 2.25" squares of leftover fabrics that I want to incorporate into this quilt. When I need a "leader/ender", I'll grab 2 paired squares and sew them at the beginning or end of my sewing. Then I can cut and trim the HSTs as I get time, and throw them into a box or bag until I feel like making more blocks.
If I had to do nothing but this quilt over and over, I'd hate it before I was close to done. This way, I just get to play with favorite fabrics over time and eventually it will get done. Assuming I live that long. And if I don't, someone else can finish it.
Let's Quilt!
Barbara
Tuesday, August 25, 2015
What's New Pussycat?
Back from Portland and there is a new project: rearrange the studio to accommodate the Bernina Q20 sit-down longarm that will be arriving soon. Mostly, I just look around the room and say "oh, my, where do I put this stuff?" It's time for a major purge again...
Instead I worked on this:
This is a replica of an antique top I bought at Spring Market in Minneapolis, read about it here. I think I will make twenty more blocks and add a border. Time will tell. It's going on the back burner for now. Patches gave it her seal of approval.
And I worked on Smitten:
This is not the final layout, just a grouping of the blocks I have done. Some are hand-pieced, some machine-pieced. The pattern is by Lucy Carson Kingwell--I first saw it on Instagram. Most are doing this by English Paper Piecing. I am using Marti Michell's Perfect Patchwork Template Set H--cutting out for regular piecing, either by hand or machine. This, too, is now going on the back burner...
What I have to do right now:
1. prepare a Power Point Presentation I am giving in early September--I'll be much more relaxed when that is in the can
2. Figure out the 3 garments I have to make for Houston now that the fabrics and patterns have arrived
Great manufacturers donate fabrics each year for the Education Team to make garments--we wear specific garments on specific days. This helps make us visible as Staff, people able to help and answer questions from the many hundreds of folks we see each day, and makes it easier for us to plan our wardrobes for 1-2 weeks living out of a suitcase. This year we have Vintage Made Modern by Amy Barickman for RJR, Zen Chic from Moda, and Shimmer by Jennifer Sampou for Robert Kaufman Fabrics. In addition, Indygo Junction has graciously allowed us to select patterns to make our garments. Part challenge, part wardrobe manufacture, it's fun but time-consuming.
3. As co-chair for our guild quilt show October 9-11. 2015, there is much work to do in the next 6 weeks. Five of us met for 6.5 hours yesterday planning the quilt layout for 201 quilts, an exhibit of Inspired By Gee's Bend quilts that are for sale, and a big Silent Auction. I've been heavily involved in most of our 14 shows, in charge of 3 of them. This will be the last I plan to be in charge of. If you're involved in a volunteer organization, you cannot thank the people who make things happen enough--most members simply have no idea what it takes to pull off an event like this. By the way, our show will be FABULOUS--it's a not to be missed event in the Southeastern US. Information on our website: Heritage Quilters of Huntsville. Here is the raffle quilt--you are not too late to get tickets:
Time to get to that Power Point--let's quilt!
Barbara
Instead I worked on this:
This is a replica of an antique top I bought at Spring Market in Minneapolis, read about it here. I think I will make twenty more blocks and add a border. Time will tell. It's going on the back burner for now. Patches gave it her seal of approval.
And I worked on Smitten:
This is not the final layout, just a grouping of the blocks I have done. Some are hand-pieced, some machine-pieced. The pattern is by Lucy Carson Kingwell--I first saw it on Instagram. Most are doing this by English Paper Piecing. I am using Marti Michell's Perfect Patchwork Template Set H--cutting out for regular piecing, either by hand or machine. This, too, is now going on the back burner...
What I have to do right now:
1. prepare a Power Point Presentation I am giving in early September--I'll be much more relaxed when that is in the can
2. Figure out the 3 garments I have to make for Houston now that the fabrics and patterns have arrived
3. As co-chair for our guild quilt show October 9-11. 2015, there is much work to do in the next 6 weeks. Five of us met for 6.5 hours yesterday planning the quilt layout for 201 quilts, an exhibit of Inspired By Gee's Bend quilts that are for sale, and a big Silent Auction. I've been heavily involved in most of our 14 shows, in charge of 3 of them. This will be the last I plan to be in charge of. If you're involved in a volunteer organization, you cannot thank the people who make things happen enough--most members simply have no idea what it takes to pull off an event like this. By the way, our show will be FABULOUS--it's a not to be missed event in the Southeastern US. Information on our website: Heritage Quilters of Huntsville. Here is the raffle quilt--you are not too late to get tickets:
![]() |
| Celtic Solstice Fanfare 94" x 94" pattern by Bonnie K Hunter, used with permisson |
Time to get to that Power Point--let's quilt!
Barbara
Thursday, June 4, 2015
Stars In a Time Warp and More
I love making these 6" blocks from Barbara Brackman. Called "Stars in a Time Warp", each week on Wednesday Barbara's blog talks about a specific type/style/color of historic fabrics. We learn a lot this way and the block is every easy to make. I am making 2 each week so I really use my stash, or at least really get to search through it, as the blocks don't take much fabric.
Here is this week's style: Neat Stripes:
In addition, I started reproducing the antique top I bought in Minneapolis--read about it here. A few blocks so far, being made as leader/ender blocks:
I'm off to meet my granddaughter, Stella. Can hardly wait! Until then,
Let's quilt!
Barbara
Here is this week's style: Neat Stripes:
In addition, I started reproducing the antique top I bought in Minneapolis--read about it here. A few blocks so far, being made as leader/ender blocks:
| Four Economy Blocks with sashing |
It's been fun digging through my stash looking for blues, double pinks, plaids, reds, similar fabrics to the original. No rush on this one, I am always eager to get a project started then let it sit for awhile as I finish something started before it.
I'm off to meet my granddaughter, Stella. Can hardly wait! Until then,
Let's quilt!
Barbara
Subscribe to:
Posts (Atom)


