
Once the Stems are in place, it's time to add flowers, leaves, berries and the vase. Irene's Month 1:

Irene Blanck used Needle Turn Hand Applique. I used Turned Edge Machine Applique. You can even do Raw Edge Machine Applique. Compare the preparation BOTH Turned Edge and Raw Edge Applique using Print & Piece Fuse Lite in this detailed post made for the 2020 Block of the Month: Afternoon Delight
PREPARATION OF THE SHAPES Irene's method, Needle Turn Hand Applique:
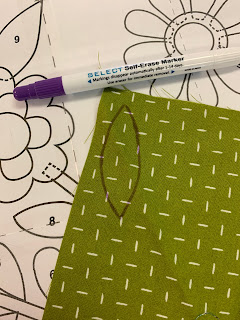
Using a lightbox, trace the shapes with a suitable marking device on the FRONT SIDE of the fabric. Markers to try might include a mechanical pencil, chalk pencil, washout marker, or Quilters Select Self-Erase marker. Different fabrics require different markers so you can see the line to turn it under.
Fabric on top of pattern with lightbox turned on:

After tracing the leaf, lightbox turned off:


All shapes are prepared in this way. Let's discuss Flower C. It is designed to be made with 9 individual petals, sewn to the background, then a circle is sewn to the center.
PREPARATION OF THE SHAPES--Turned Edge Machine Applique
Because my method is turned edge machine applique, I found it easier for me to make those as one Flower, then make a slightly larger center circle if needed to cover any edges at the place where there is very little seam allowance.
I used Fabric Glue stick and the Appliquik tools to turn the seam allowance under:


There are Videos on the 2022 BOM Month 1 page showing both hand and machine stitching. Show 3001, available for all to watch for FREE, shows machine stitching.
Irene likes to use about 5 neutral threads ranging from light cream to medium brown for all her applique. I usually prefer to use thread that matches the applique--probably because I love color. It's
your choice, try both to see which you like best.
your choice, try both to see which you like best.
Irene uses Wonderfil 60 wt Egyptian cotton thread. This a Wonderfil 100 wt polyester set in similar colors to those she uses:

Quilters Select 80 wt polyester Prewound Bobbins. When doing hand applique or hand sewing a binding, I rarely find this not to have exactly the color needed:

While I enjoy needle turn hand applique, I usually chose the speed of machine stitching these days. In Show 3001 I show how I tried several machine stitches before settling on a small zig zag stich for GPDU #1. Width is 1.5 and Length is 1.0. That worked well for me and I am using it again for GPDU #2.
Since I had 9 of us making blocks for the sample quilt, I wanted to give everyone the same thread. It was eye-opening to the Sunday Sew & Sews that green thread could be used on so many different fabrics and it worked fine. They were skeptical at first. We used Quilters Select 60 wt Perfect Cotton Plus thread, color #208 Chartreuse:

I think both the Neutral threads and this green work so well because they are so fine. On a few of the darker fabrics I will use a darker thread. Try different threads to find you favorite.
NOW COMES THE SCARY PART:
When all the stitching is done, carefully trim your oversize block to exactly 18.5" square. There is a Video on this task in Month 1 Videos. BUT--note the CHANGES I had to make on how to accurately cut my center block--see the photos and explanation below.
Trimming the Applique blocks to the correct size after all the stitching is complete is important. Having a big square ruler helps but you can use any ruler that is at least 9.25" long. Simply be sure you know where the exact center is and measure out 9.25" in all directions. I use an erasable marker for this method, double checking before making those cuts
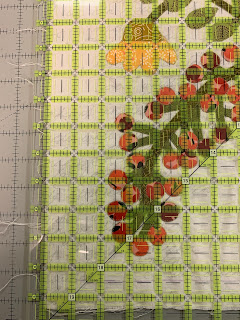
VERY IMPORTANT NOTE: BEFORE YOU MAKE THE FINAL CUTS TO SQUARE UP THE CENTER BLOCK, check to see that ALL the appliques are far enough inside the area of the Block.
Notice HERE the outside berry will be right at the seam allowance if I trim it here:

Instead, I moved the ruler over to have about 3/4" space from the outside cut edges to the appliques on BOTH the left and right sides:

You also want to be sure the bottom edge of your vase is sitting straight on the block:

Once your lovely center applique block is 18.5", it's time to add the Dogtooth borders. See that process in Part 3.
Let's quilt.
Barbara
How do I find part 3???
ReplyDeletePart 3 has not been published yet.
DeleteIt posts January 5.
DeleteThis comment has been removed by the author.
DeleteThank you Barbara! You are a great help to me.
ReplyDeleteThanks so much for the great photos & explanations. I always find, too late, I've cut too close.
ReplyDeleteDo you have tips for making stems smaller than 1/4 inch?
ReplyDeleteThe 1/4 inch clover bias maker is the smallest I’ve seen.
Karen K Buckley has a product called Perfect Stems, plastic bias bars and one makes 1/8” stems. See her demo this on The Quilt Show Master Class on Appliqué Part 1. Also on her website.
Deletestitching the berries - they are so tiny - can they be done properly by machine?
ReplyDeleteYes. The smaller the circle, the slower the stitching, hand or machine. By machine, you may have to pivot after every stitch because the curve is so tight. Just go slow. Larger shapes are faster to stitch. Some are using ultra suede for the smallest circles--no edges to turn under, just stitch closely on the edges.
Deletethank you. I have already made all the berries and small circles using the mylar templates. Now it is just a matter of sewing them down. This is a definite change out of my comfort zone, but I am having fun. So Far.
DeleteHi Barbara, Again I don't know where to ask you, so I'm here. I bought a few different ways to do this quilt, as didn't know which I was doing. One thing I bought was a "Garden Party Paper pieces". It claimed to have the complete piece pack. It isn't, it's only 3 different pieces, a bunch of each. A big diamond, a smallish circle, & a petal. I don't get it. They fit nothing in our pattern. Can I return it for credit? It's OK if not, but it didn't make sense. It even shows the pic of this pattern. Patty
ReplyDeleteThose are the Paper Pieces for the outer Diamond border and the Dresden plates that are the center of the 6 pieced blocks. No need to return. The Dresden Plates start in Month 3. Did you watch the Show? I explain the pieced blocks with Dresden plates and Diamond border on show 3001–the overview of the entire project.
Delete