Showing posts with label hand applique. Show all posts

Friday, May 30, 2025

LAUREL RIDGE -- MONTH 6

Laurel Ridge is the 2025 Block of the Month quilt designed by Lynn Wilder exclusively for The Quilt Show.  Star Members have FREE access to the patterns starting January 1, 2025. Made in two colorways, the complete patterns are excellent. You will love making this quilt. Lynn supports the pattern instructions with Videos too. 

This month Applique returns--with the large spray of flowers and leaves. There are 8 of these blocks, and each is 5" x 7.5" FINISHED. 

NOTE: Half these blocks tilt LEFT and half tilt RIGHT--they are reverse mirror images of each other. Make 4 LEFTs and 4 RIGHTs. 

Watch Lynn's Video for all her great tips. She strongly recommends using starch/Best Press/Terial Magic, for the background piece. It stabilizes the block so it doesn't "shrink" as the applique is done.

I have chosen not to include any applique in my quilt. But I have written about Applique many times here on my blog. Needle Turn Hand Applique was my favorite method for years. Now I often do Turned Edge Machine Applique. Find my Tutorials here:

NEEDLE TURN HAND APPLIQUE:  Afternoon Delight


TURNED EDGE MACHINE APPLIQUE: Ruffled Roses,   WashAway Paper for Applique Motifs

Turned Edge vs. Raw Edge Machine Applique--and how to Stitch Them.

When working with patterns like these for applique, I like to print them on either wash-away paper or freezer paper. This avoids having to trace all those shapes by hand, just cut them out and you have templates for all the shapes. Quilters Select Print n Piece Fuse Lite works well, C&T Washaway Applique Sheets are similar. The washaway papers are left in and will dissolve once the finished QUILT is washed. The freezer paper has to be removed when the BLOCK is finished:


The usual problem with printing patterns like this is the shapes will be REVERSED--that's not an issue with these blocks--remember, we have 4 LEFTs and 4 RIGHTs. 

The best way to have applique stitches that don't show, whether by hand or by machine, is to use fine thread in a color that closely matches the motif being appliqued. My favorite is Quilters Select Pre-Wound bobbins, size 80 wt polyester thread:


Silk thread is lovely too--100 wt, fine as baby hair, but more expensive to gather a large number of colors. 

For Machine Applique, there are several stitches often used. Blanket stitch, Blind hem stitch, Feather stitch, Sewn-Out Zig Zag stitch, etc.. Play with your machine to see which stitches you have that appeal. 

Here is a GREAT VIDEO from Alex Anderson giving a lot of information on how she does machine applique: Alex Anderson Machine Applique  See LESSON 5 at this link. Take a look if you haven't done much machine applique. 

So, what am I doing instead of the applique? One 5" block with 1.25" added to each end makes a 5" x 7.5" block--this is FINISHED SIZE, the block shown below is 5.5" x 8" with seam allowance at the moment. Right now I am playing with the 8 extra Four Patch in a Star blocks I made in Month 1, but I have another idea so this may change: 

As I often say, it's your quilt, you get to decide. Make yours exactly as the pattern instructs or make some modifications to suit yourself. Your quilt will still be "INSPIRED BY LAUREL RIDGE", designed by Lynn Wilder for TheQuiltShow.com

Next month it's back to those Four Patch in a Star blocks, from Month 1, with different fabric placement for those using the Kits.

Let's quilt.

Barbara

Sunday, July 28, 2024

PICK A PETAL -- MONTH 8

PICK A PETAL is the 2024 Block of the Month quilt designed by Jen Kingwell exclusively for The Quilt Show. It is FREE to Star Members, join today to take advantage of this great bonus. WATCH Jen's Show to see how she makes this quilt--it is FREE for EVERYONE all of 2024: Jen Kingwell Show 3401

This month we work on more appliques for the Log Cabin borders. Border 3 for me is the Right Side of the quilt. Which it is for you depends on what photo you are using as your guide--it's a square quilt. 

Jen's blocks from the sample quilt:


My blocks:


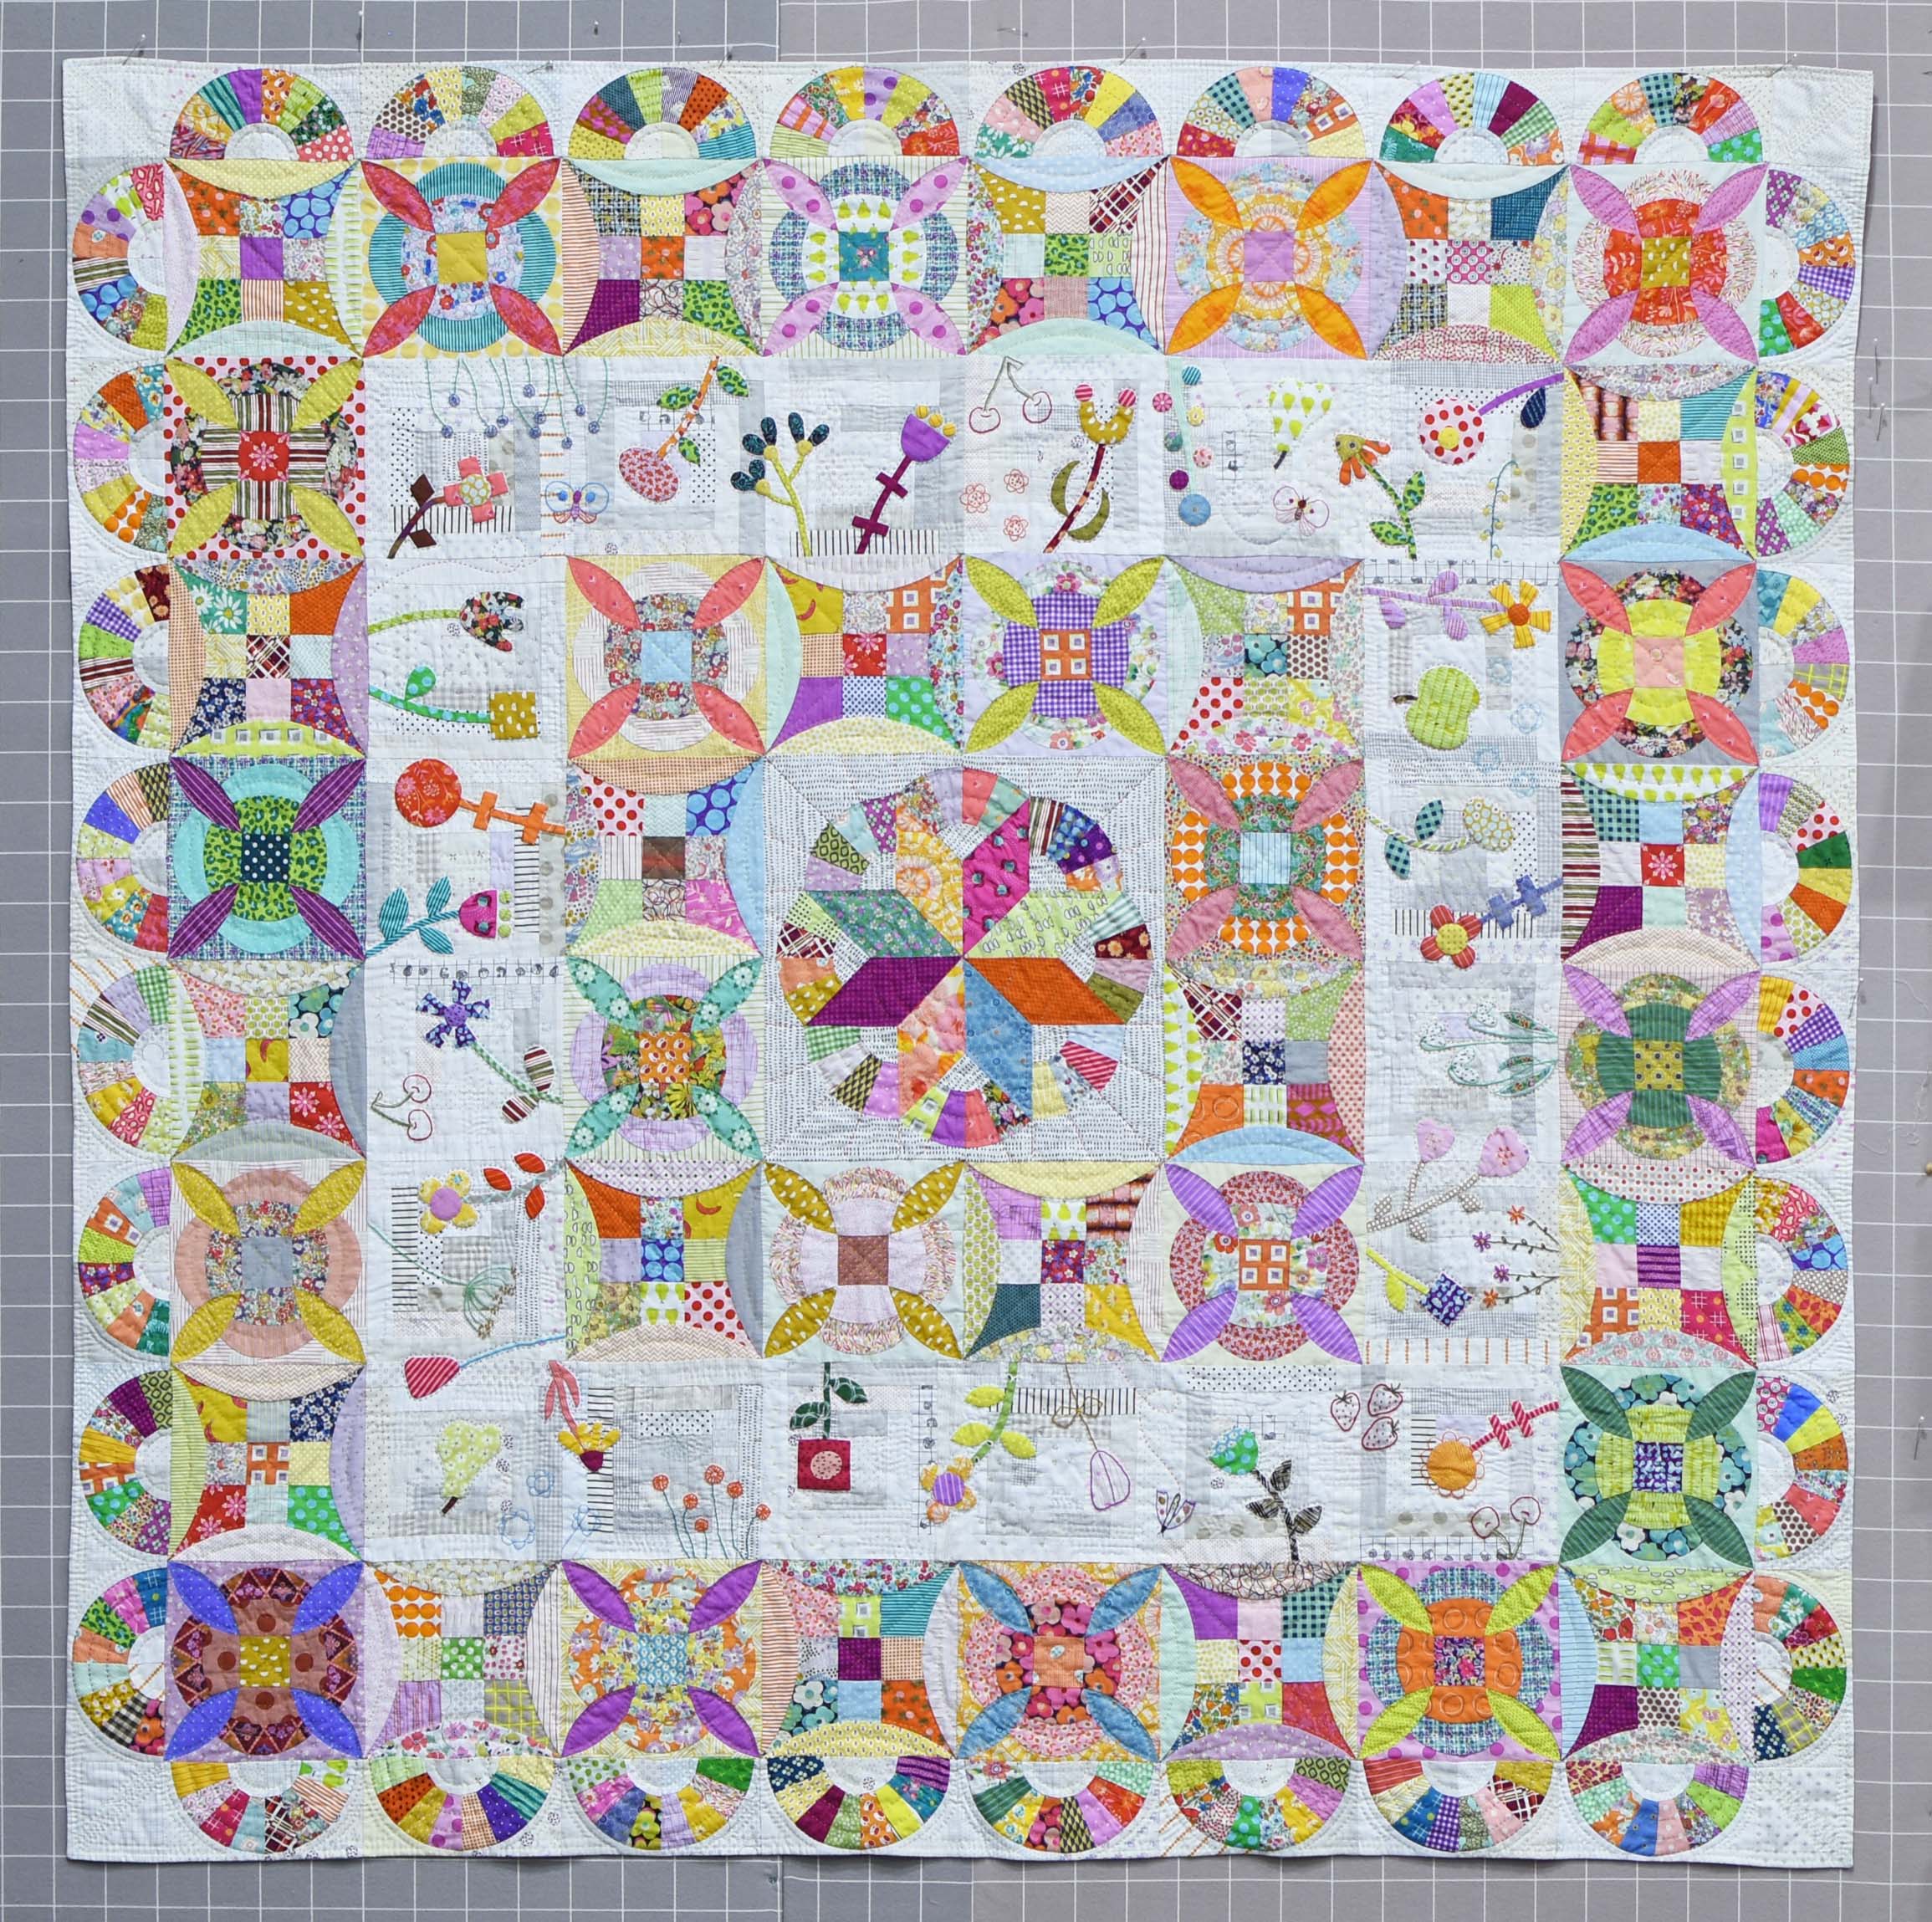
Happily, I FINISHED MY TOP this month! It will be going to it's new owner in October when I go to Houston. Alex will enjoy doing all the remaining embroidery. It wasn't my favorite part of making this quilt. I did enough to know it's not my favorite thing although I do enjoy handwork and will do more embroidery when it is appropriate. 

My finished top at this point:


I have been asked about the quilting instructions. The pattern doesn't provide any information on the hand quilting Jen Kingwell did on her quilt. She discusses the quilting in the Show #3401--you will want to watch that again.  

In December I will post many photos of her quilt so you can see the many ways she quilted hers. It is very free-form, no real specific plan would be possible to describe. 

Now I am eager to start work on the 2025 BOM--it's still a secret until later this year but it's a great quilt. And it's big: 90" square. Stay tuned...

Let's quilt.

Barbara

Friday, May 31, 2024

PICK A PETAL -- MONTH 6

PICK A PETAL is the 2024 Block of the Month quilt designed by Jen Kingwell exclusively for The Quilt Show. It is FREE to Star Members, join today to take advantage of this great bonus. WATCH Jen's Show to see how she makes this quilt--it is FREE for EVERYONE all of 2024: Jen Kingwell Show 3401

This month we do more whimsical applique on another Log Cabin border. Which border it is on YOUR quilt depends on which photo you use as a reference. 

I discussed this on the MONTH 5 LIVE, see it again here: MONTH 5 LIVE

This photo is on The Quilt Show website. Find photos under SEE QUILTS.     Notice the bright aqua/purple block on the LEFT SIDE:


Here is the photo that was used with the KIT--I used it on the cover of my 2024 BOM Notebook:


My Notebook.  Now the aqua/purple block is on the bottom:


All this means is for ME, Month 6 is the TOP border, upside down. It doesn't matter what it is for YOU, we're going to make them all eventually. 

Here is mine in progress. All the stems are sewn by machine applique, blanket stitch with green thread. I wrote about that in detail in MONTH 5. Some shapes were sewn by machine, some are prepared for needle turn hand applique--the border travels with me so I can hand stitch while on the road:

Hearts and leaves waiting for hand applique

The apple and leaves ready for hand applique

Green gingham leaf ready for hand applique,
bottom motif to be sewn by hand, stem is done


Feel free to add your own whimsical flowers/shapes. This is a "magic" garden, anything goes.

On the LIVE for MONTH 6, Friday June 7, noon central, I will demonstrate how I secure the very thin 80 wt Quilters Select thread to the fine needle so it doesn't get unthreaded and how I hand applique. If there is anything specific you would like me to discuss or show, put a comment here or on the FORUM

As always, please share your progress or ask questions on the FORUM--everyone learns there.

Next month Jen introduces us to hand embroidery. I encourage you to WATCH THE SHOW--it is FREE FOR EVERYONE all year, not just Star Members. Tell your friends to watch. Jen discusses hand embroidery on the show:


Let's quilt,

Barbara


Sunday, February 25, 2024

PICK A PETAL -- MONTH 3

 PICK A PETAL is the 2024 Block of the Month quilt designed by Jen Kingwell exclusively for The Quilt Show. It is FREE to Star Members, join today to take advantage of this great bonus. WATCH Jen's Show to see how she makes this quilt--it is FREE for EVERYONE all of 2024: Jen Kingwell Show 3401

Month 3 introduces Block 2, a unique block with curves and petals, ideally made with hand piecing:

Jen's block from the sample quilt, all hand pieced 


I studied this block for a while, trying to find an easy way to machine piece it. I made several: 

1. Completely hand pieced, following the pattern instructions--too slow for me

2. Machine pieced the first 2 curves and center square, hand pieced the petals. I call this the "Hybrid Method" --that works but not real fast

3. Re-designed to eliminate the curves, applique the petals on top--much faster and a good alternative

4. Substitute a completely different block--I declare that a fail, I tried several alternative blocks but none supported the basic, excellent design of the quilt

So, my personal solution is to do some with idea 2 and some with idea 3:

Curves joining green, aqua, and background sewn by machine, center square added by machine, Petals added with hand piecing 

Alternative block, straight lines by machine, petals hand appliqued on top--before trimming to the correct size, 8.5" including seam allowance

If you prefer hand piecing, simply follow the pattern instructions to make 20 Block 2, using a wide variety of prints. Block 2 is more controlled than Block 1, which used a different print for each position. This Block uses only 5 fabrics.

For the "HYBRID METHOD", using both machine and hand piecing, here is what I did: 

As always--I add at least 1/2" extra to the outside edge for "insurance". That outer edge is only 1/4" FINISHED, pretty narrow:

Fabrics selected, templates traced

A gentle curve I found easy to machine piece, sewing Edge to Edge is fine on this seam, Dot to Dot is NOT NECESSARY here 


Jen demoed a clever trick on her Show, using the corresponding template to draw the actual sewing line should you want to have that line. 

To draw the sewing line for joining Template J (the dark print) to the Background, you will need to do it in two steps. First, place the curved template on the wrong side of the Background, placing the curved edge on  the two dots drawn on the background. I used a mechanical pencil.

The outer curve is larger than the sewing line so you need to work from right side to the middle, Step 1: 

Then shift the template to the left side, put the curve on the two dots, left and middle, to complete the curve: 

Middle curve drawn

To add the curves for the petals, simply use the Petal Template to draw those lines. Be sure the template is right up to the dots drawn when the background pieces were cut out:


Five pins show you how this will be sewn. I found it easier to use only 3 pins, middle and outer edges. Sew SLOWLY, it's not how fast can you sew it, but how accurately. I use a Stiletto to keep the outside edges aligned as I sew SLOWLY:

Although this photo shows I sewed "dot to dot" when joining the background, that is NOT NECESSARY with this seam, edge to edge is fine. It is faster and does not require backstitching. Dot to Dot sewing is most helpful where multiple seams come together:


One of the great things about the FORUM is all the things you can learn. I don't know everything. Sonia showed how she has made several Jen Kingwell quilts using curves like this. She showed a little different "path" for piecing. Make 4 units with templates I, J, and K, add the center square to two of those, piece the Petals to the other two. Now you have a long, gentle curve to add the left and right sides to the center shape: 


Another tip Jen mentioned in her Show is that she cuts a lot of the pieces from a wide variety of prints before she makes the block. This gives lots of choices for fabric selection. I think most of us just cut for each block, one at a time. Here is my original plan for this block:


When I got to that stage, I didn't love it. My advice: if you don't love it, don't sew it. Find another option. The Lime green shown above was an option, this purple is what I ultimately chose. Now I have a couple extra sets of Petals for future blocks:


Once the block is sewn and pressed beautifully, it has to be "trimmed to perfection", 8.5" including seam allowance. Take your time and carefully line up the diagonal lines, getting the petals exactly at the 1/4" mark. I fiddle with it BEFORE picking up the rotary cutter. A mistake now could be really bad: 


Before trimming, showing how I pressed this block


AN ALTERNATIVE BLOCK:  I mentioned on the FORUM, in December, I was trying to find an alternative block. HelenW showed what she worked out in Electric Quilt, a block that looks similar but uses straight lines instead of curves. She shared her design with me, I printed it from EQ8 and was ready to give it a try. 

I like it for speed and that from a distance, it resembles the original. In my center I used two of them, do they jump out? 


If you like it, give it a try:


Made in 4 sections, it is easy to use the eighths fabric cuts in the Kit. Jen discusses the importance of grain in her Show so I was sure to cut pieces on the Lengthwise grain, along the selvage:

Cut BACKGROUND    1.5"  X  10.5"  (4)  this includes an extra 1/2" for insurance
        OUTER ROW       1.75" X  8.5"   (4)
        INNER ROW        1.75" X  6"      (4) 
        CENTER SQUARE   2.5", use the Template (1)
        PETALS, use the Template (4)   I added the Dots on the FRONT for needle turn hand applique.

Sew the strips staggered, fold in the middle 

IMPORTANT PRESSING TIP: Press two sets in toward the middle strip, press the other two sets away from the middle strip--this allows the seams to "nest" when sewing the diagonal mitered seams: 


Fold in half, carefully aligning seams. Draw a DOT 1" from the FOLD, that is the DOT for the center Square

Use a Half Square Triangle Ruler to accurately cut BEYOND THE DOT. The dashed line on the ruler sits on the dot, the seam allowance is to the right of the dot. Keep the sewn lines straight as you make this all important angle cut

Ready to join the 4 strip sets to the center square

Dot To Dot Sewing with backstitching is important here

All 4 strips sets sewn to the center square
I sewed from the center square out to the edge, backstitching at the center. Press seams open


I made a Petal Template without seam allowance so I could draw the sewing line for the hand applique. Using a mechanical pencil gives a light, thin line

Auditioning Petal options

Here is this block except for one last petal ready to be appliqued on. I  will do that in the MONTH 3 LIVE, scheduled to air March 1, 2024:


Wow! That is a LOT of information this month. It gets easier next month when we move to the Log Cabin blocks.

Let's quilt.

Barbara

Wednesday, October 26, 2022

MY FAVORITE QUILTS # 2

In the 1990's I made a lot of bed size quilts and when I think of how busy life was then, with kids, the house, several jobs, and a husband to keep happy I really don't know how I did it all.

Of course, I was younger then, a lot younger. And quiltmaking was absolutely my passion by then. I HAD to  make quilts, there was no other option. That remains true to this day.

Here is the story of another of My Favorite Quilts. 

LONE STAR GARDEN, 1997, 90" X 90" 


Detail 

The center star was inspired by an antique quilt in the book Star Quilts  by Mary Elizabeth Johnson. Each of the 8 very large diamonds is cut from a border stripe fabric, and each has to be cut exactly the same as the rest. I bought 5 yards of the Jinny Beyer border stripe and got started.

I had to return to the store to buy more yards--those diamonds are huge. I finally got all 8 diamonds pieced together, each is a single piece of fabric. The beauty of using a border stripe is the center will be a big surprise. I didn't know what it would look like until all 8 diamonds came together. I loved it.

I designed the applique blocks/triangles with inspiration from the book Jacobean Designs  by Pat Campbell. Using some of my most favorite fabrics, I cut flowers and leaves and stems for weeks. The hand applique process took months of stitching at night, mostly. 

When the center of the quilt was done it was time to figure out a border. It would have been simple to throw more of the border stripe on and call it done. But, no, this quilt deserved something more challenging than that.

Jinny Beyer had developed a technique she called "Soft Edge Piecing" and had written a book by that name. I knew that was just perfect for this quilt. So I went back to the store and bought the rest of the bolt--by now I had purchased close to 15 yards of this one fabric for this quilt.

I  hand basted the border stripe to a length of the pink background fabric. Then did that 3 more times to prepare the borders. Over many hours I slowly cut on a line on the border stripe, turned it under and hand appliqued the border stripe to the background. This is "soft edge piecing", an appliqued edge on a base fabric.

While it was completed in 1997 I know I worked on it for about two years. I marked it for quilting and took it to a woman who has doing hand quilting for the public back then--she quilted quite a few quilts for me in those years. She liked my quilts because I brought them marked and basted so all she had to do was quilt them. And regardless of the price she asked, I paid her in cash, the amount she asked, AND fabric. She didn't drive and getting out to a store was difficult so she loved having a big bag of fabric to use for her own quilts. 

This quilt was the first I  had exhibited at International Quilt Festival in Houston, It was included in the Special Exhibit "Traditional Treasures" in Houston, 2013. It was a thrill to see it hanging there.


This quilt taught me that a great quilt doesn't get made in a day. Lots of stitches, and time, will make a great quilt, just keep going. Learn new techniques, read a lot of books, get inspired by quilts from the past. And make it your own.

Let's quilt.

Barbara