Wednesday, October 10, 2018

The Journey #6


A bit more of a look-back at some of my early work:


By the turn of the new Century I had two young men in college and was working full time during tax season, and part-time at several jobs, mostly quilt-related, the rest of the year. A lot of my quiltmaking involved making class samples--if I wanted to make it, I would create a sample to teach it.  Another passion that was developing--replicating antique quilts, in my collection or those I saw in publications or exhibitions. 

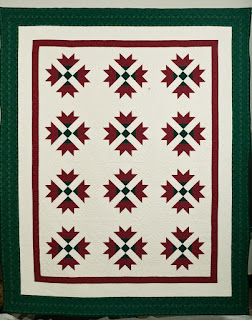
Yuletide Elegance, 1997, an original design for a simple Christmas quilt. One 12" block, a Carolina Lily, set on-point, with beautiful quilting designs on the large white alternate squares makes this an easy quilt and one that says "Christmas!" each December when I hang it in the living room. I have taught it several times. It was thrilling to have it featured on the cover of McCall's Quilting, December 1997.


Devil's Claw,  1999,  a replica of an antique quilt I bought. This taught me how much I love scrap quilts, those using lots of fabrics. I call it "Planned Scrappy" because each block has one fabric in common with all the rest and the star points, squares and rectangles in each block are the same, though different from every other block. It is hand quilted and one of my favorites:


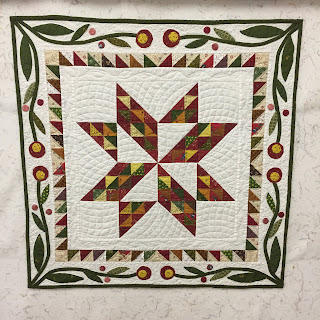
Living in the Past, 2005, 70.5" square, based on a pattern by Alice Berg published in American Patchwork and Quilting, October 2000.  I hand quilted this quilt, using a feathered wreath in the large squares--which you cannot see because those are print fabrics. One of my most favorite quilts that I  made completely myself--and today it looks like a great Fall quilt:


A-Symmetrical Six-Pence, 2005. 93" x 109", made in a group swap of 13 quilters. We traded "units" with each other, specifying what colors we wanted, each person then cut the units to the size she wanted and created her own quilt design. This one spent a lot of time on the design wall as I worked to get the design flowing in one direction, then making a turn to the opposite direction: 

Bountiful Blocks,2006,  the pattern is Summer Rose by Glad Creations. Another quilt with lots of fabrics, long-arm quilted by Lisa Marshall. This hangs in my living room and brightens it up:


These are just a few of the many quilts I made in those years. At least another 12 bed size quilts and many wallhangings, crib and throw size quilts. Over the years I  have given away or sold many of the old class samples, there just isn't enough space to store them all. But I have lots more to make so stay tuned...

Let's quilt!

Barbara

Sunday, October 7, 2018

Sewing for Houston

This is the time of year I get busy sewing garments for my work at International Quilt Market and Festival in Houston, TX.

The Education Team is given fabric from one or two manufacturers each Fall to create our choice of garments--jackets, tunics, blouses, dresses, even aprons, whatever we want. to make. We wear these garments on specific days, looking similar but not the same, as colorways and garment designs are individual.

This helps identify us as "staff" on the 3rd floor of the huge George R. Brown Convention Center: Here is a group photo from 2015, when we used a bright pink from MODA in recognition of Breast Cancer Awareness:


These garments sure help with "what to wear" for the 12 days I am there. Several pair of black slacks, a variety of tops, and I'm good to go. This year I will wear 6 different garments over those days.

This year I made one of my favorite patterns, one I have used twice before:


It is an easy, kimono-style jacket. I usually line it and that makes it faster to construct, no need to finish the inside seams. Added bonus with this pattern--no buttonholes. This time I made the first one without a lining, using Metropolis fabrics, from MODA:


Now I know I really do prefer this jacket lined so the second one has a lining. The fabrics are Road Trip and Kaleidoscope by Allison Glass for Andover Fabrics:


Since we wear these for 3-4 years, I create labels for everyone to add to their garments--it helps to remember which garment was for which year. It is always fun to see the various garments everyone makes--there are 20 of us on the Education Team.

My friend, Lori D, has just started a Quiltalong on her blog:  Humble Quilts. As this is a small project, I jumped in. She says hers is only 18" square, we may decide to add more borders to our own. She gives instructions once a week, just little steps over time get the small quilt made. She is using French General fabric from MODA. I have a layer cake of French General's Rue Indienne so decided to see how far I can get with that--each week is a mystery. Here is my Part 1, 8.5"  square at the moment::

Now that the garments are done, I can concentrate on a few upcoming quilt projects that need work.

One other little thing that has kept me busy--our grandson was born a couple weeks ago in St. Louis--we took a quick trip up there to meet him, 8 hours each way. Meet Sam:


Big Sister Stella is doing just fine:


Let's quilt!

Barbara


Wednesday, October 3, 2018

Get Ready to SIZZLE!


Recently, the 2019 Block of the Month for the The Quilt show was announced. Sizzle is a quilt designed by Becky Goldsmith, of Piece 'O Cake Designs. It features nine 20" blocks that are paper pieced with Becky's terrific, easy method and four applique' borders. And it is FREE for Star members of The Quilt Show--join now if you are not a current member, so you can get ready to SIZZLE with us.

I want to encourage you: IF you love this quilt and want to make it, you CAN! Becky will provide wonderful videos to show you her process, step-by-step. throughout the year. I will have a Blog Post on the first of each month, showing my progress and that of the Sunday Sew and Sews--yes, they are on board too. It is NOT a quick, slap-it-together quilt project, but it is one that will teach you so much if you take the time to READ the directions and WATCH  the videos.

Kits are currently available while supplies last from The Quilt Show Store. The Cool Kit is for me, those colors are just so beautiful. Of course, I love the Warm one too, so if I had time to make two, I'd get them both.

Now the Fabric Requirements  have been published so if you want to use your own fabric, you can start getting your palette together. Introduction--Fabric Requirements

 Just for fun, I have pulled fabrics from my stash to create a possible palette. One of the things about this design that is different from how I usually work is, the fabrics are all SOLIDS. I have a substantial stash of prints, but not a lot of solids. Here is what I came up with, all the fabrics just have to "read" as solids. The white background is only a possibility, the Warm quilt does not use a white. The Cool quilt uses 3 white to gray backgrounds:


One of the things you can do NOW to get ready is to prepare a Notebook, a place to keep all the pages of Instructions and Patterns you will print. Now you can print the Fabric Requirements--there are two, one for Warm, one for Cool--pick the one you prefer and print that, they are about 8-9 pages and the colors will  help you select your own, if you choose not to use the Kit:

3-Ring Binder--mine is 1.5" wide size

We will have General Instructions, Applique' Instructions, and Patterns in addition to the Fabric Requirements pages

Monthly Tabs help me stay organized

At the end of the Fabric Requirements, you will find the suggested NOTIONS for this project. It lists specific products by  name, making it easy for you to get the exact item Becky recommends. You may already have some of these items that are similar. You can try them to see if you get a good result or buy the recommended products.

For example. Becky recommends using Translucent Vellum paper. I agree--you need to be able to see through the printed patterns to place the fabrics correctly. While I prefer to paper-piece with newsprint, for this quilt I will use Vellum. I bought two to try. This tracing pad came from my local Hobby Lobby--it was on 50% discount that week, making it worth the need to trim the  pages from 9" x 12" to 8.5" x 11". We will need 71 pages so it would take two of these 50 sheet pads for the quilt:


 This package of paper came from Amazon, 100 sheets, 8.5" x 11". This is enough for the quilt:


I test printed a Block with each paper. Neither smeared, and each is thin and very easy to see through. Once I can start sewing, I will test each and decide which I prefer--I really expect it to be a toss-up. The pattern is designed in eighths that fit on one page, so we will print 8 copies of each pattern each month:


Other notions on the list apply to the applique' borders--these appear after the nine blocks are completed, so there is no rush to buy those notions right now. If you do needle-turn applique', as I like to do, your supplies will be different.

Plan now to watch the show, premiering December 30, where Becky will show you how easy this can be with her method. The pattern for Block 1 will be available January 1, 2019--as always, the first of each month we get a new pattern.

My last TIP--be sure you have printer paper and ink on hand January 1--the General Instructions are comprehensive--about 30 pages. I think you will want to print them rather than looking at your computer frequently for that information. It is your "Instruction Book" for this paper-piecing process.

I hope you will join us on this year-long journey while you make a wonderful quilt. Why not find a few others in your area who want to work together--having a group is fun and a great way to learn a new technique.

Let's quilt!

Barbara


Sunday, September 30, 2018

Month 10 The Patchwork Barn

This is the FREE Block of the Month pattern "Patchwork Barn", designed by Edyta Sitar exclusively for The Quilt Show. You must be a Star member of this world-wide quilt guild/show/Internet community to receive the free patterns each month, beginning January 1, 2018. Join today and get started on this journey.

Previous instructions are here:

Introduction 
Month 1
Month 2
Month 3
Month 4
Month 5
Month 6
Month 7

NOTE: On The Quilt Show, the Forum is the best place to ask questions, find answers, or find out if there is a change in the pattern.  I recommend you check in there frequently. And there is a Show and Tell Topic--show us your blocks. Forum Patchwork Barn


NOTE: This instructional blog is posting one day early--the pattern for Month 10 will be released October 1, 2018, as usual. 

In Month 10, you will make the two applique' borders. The pattern has the borders cut 78.5" x 7.5". This is the size the borders need to be AFTER they are applique'd and are ready to be added to the left and right sides of the quilt. 

Things to consider BEFORE cutting the borders to applique':

1. There might be shrinkage due to the applique', making the borders shorter than 78.5" once all the appliques' are sewn in place.

2. Do you plan to lengthen the quilt by adding additional sashing between each block? If so, be sure you make the borders longer to allow for that.

I always start my applique' projects with background fabric that is bigger than the size it will be when the applique' is done. For this quilt I would cut those borders 8" wide and 79" long. Make a light pencil mark 1/4" in from the top and bottom edges to show you where you will ultimately cut the long borders--they will be trimmed to 78.5" when the applique's are done.

I changed my quilt by not adding applique' at all and adding 1" finished sashing to separate the blocks. The Sunday Sew and Sews asked how to increase the size of  this project and this is what I came up with:

My Final Layout 75" x 98"

In Month 11 you will get all the instructions for putting the rows of blocks together and then adding these final applique' borders.  In my blog I will provide the measurements for my setting. 

I did make a wallhanging with the Twinkling Star center block and the same applique' shapes. I wrote about the applique' technique for Month 9, here.


We are getting  near the end of this project--I hope you are enjoying the journey.

Let's quilt.

Barbara

Wednesday, September 26, 2018

Busy Week = New Finishes

In the last week I have quilted, bound and put labels on four quilts, fairly small ones. It's good to have them in the "Done" column:


The X-block, or Old Italian Block is one of my favorites. I love to teach it and I love to make it. More information in this tutorial:  X Marks the Spot  This one has 3" blocks, it is 16" x 20" and was made from a charm pack of "Rachel Remembered 1820-1850" by Betsy Chutchian for Moda:


Twinkling Stars is my applique' sample for the Patchwork barn instructions--find it here.


I was eager to get it completely finished so I could wash it to see: 1.if it shrunk and 2. how the applique's feel after washing--they were made with Wash-Away Applique' Sheets by C&T Publishing:


It was 29.5" square before washing and 29" square after washing. It has wool batting so I laid it out to air dry after washing. The applique's feel very soft, not stiff at all like they were before washing. The Applique' Sheets package says "Sheets dissolve into tiny fibers leaving no residue".

Temecula Quilt Company had a weekly sew-along this year that drew me in. The 1880's Sampler Sew Along has 4" blocks, mostly made with half square triangles. It is a replica of an antique quilt. Mine is 31" x 40". I thought I would add another border but decided to stop with just one, like the original quilt:

Finally, Kisses + Hugs., AKA Japanese X and + is done. I have taught this several times, and really enjoy these very scrappy blocks. When I decided it would be the quilt to bring to Houston to help decorate the Education office, I had to quilt and bind it. Done. It is 45" x 60":


Now I have to get my two garments made for Houston. So this was my pre-Houston quilt marathon. There are several more quilts basted, just waiting for quilting. As soon as the garments are done I'll get right on the next one, Temecula Quilt Company, Circa 2016:


And one more thing happened in the last week--Stella became a BIG SISTER--welcome to the world, Samuel:


Let's quilt!

Barbara

Sunday, September 23, 2018

How To Miter A Border

I've been asked how to add a mitered border to a quilt.

What is a miter? It is a 45 degree angle seam, making the border fabric appear as a picture frame does on a picture:

Two fabrics--an inner tan solid and a border stripe
Two fabrics--an inner black solid and a batik print

Two fabrics--a narrow inner rose and a border stripe

Here is a single fabric mitered, the green stripe, and is an example of what NOT to do--the narrow white solid was first added as a regular "butted" border, then the green stripe was mitered. If you are looking for "rules", it is considered better design to treat both outside borders in the same manner:

In looking through my own quilts, it became apparent to me that I used to miter many of my borders and today I rarely do. This is true of the many quilts I see friends, guild members and students make--miters are rare. In fact, 20 years ago I used to include how to add a mitered border in my beginning class--today I do not.

Why is this? Most quilters think it is "hard" to add a miter--it doesn't have to be. It certainly uses more fabric and that is a factor when I am "shopping" in my closet and only have a certain amount of fabric. And border stripe fabrics look wonderful when mitered--we have a lot fewer of those today than 20-30 years ago and quilters don't know how to use them. An excellent reference on working with border prints comes from the master of these fabrics: Jinny Beyer.

Let's look at the basics of adding a mitered border to your quilt. Here is a small sample--of course, the same information applies to a bed-size quilt. These blocks are 6" finished and the purple sashing is 1" finished--right now, this quilt is 13" x 13" finished:

Here is the quilt with the double borders laid out:


With butted borders, I would cut two purple borders 13.5" x 1.5" for the left and right sides. After adding them, I would cut two more 15.5" x 1.5" for the top and bottom. Then I would do the same with the outer border--each would be cut to exact size then added to the quilt, one at a time. This helps make certain your quilt remains square.

With mitered borders, I make "border fabric". This means I will sew the narrow purple fabric to the print fabric BEFORE sewing them onto the quilt. This is one of the reasons I like to miter borders on a bed quilt. If I had 10" of border,  made up of three different fabrics, it would take handling the entire quilt under the needle 12 times to add each of those borders separately if I did the "butted" borders method. By doing the "mitered" method, I only have the entire quilt under the needle 4 times, as I add each of the four borders that have been created as "border fabric".

Here is the trick--you have to know how long to cut those strips. There are two options to consider.

FIRST OPTION: cut each of the fabrics you want for your border the same length, the finished outside measurement of the quilt plus about 1" for insurance. This takes the most fabric but eliminates doing the math for each border. In the same quilt above I would cut both the purple and the print 20" NOTE:The print fabric was cut 2.25" wide because I had 4.5" strips leftover and it was easy to cut those in half. The math:

6" + 1" + 6"           = 13" center of the quilt
1" + 1"                   =   2"    purple inner borders
1.75" + 1.75"         = 3.5" print outer borders
1" minimum extra = 1"
Total length for each border = 19.5"--let's just cut them 20" to keep it simple

NOTE--if your quilt is a rectangle, you will calculate the sides separately from the top and bottom. Another reason I like square quilts and often make them.

SECOND OPTION: cut the inner borders the finished length plus 1" for insurance. Do the same with the outer borders. Fold each in half, mark the middle, pin in the middle so you are staggering the inner border on the outer border. This saves some of the inner fabric--especially if the outer border is really a lot wider than the inner one. In this little sample it really doesn't matter as it doesn't save much. The math:

Purple fabric:
6" + 1" + 6"           = 13" center of the quilt
1" + 1"                   =   2"    purple inner borders
1" minimum extra = 1" 
Total length for purple inner border = 16"--cut four of these, saving 4" on each one

Outer Print fabric:
6" + 1" + 6" + 1" + 1" = 15" center of quilt and width of both finished purple borders
1.75" + 1.75"              = 3.5"  finished width of both outer borders
1" minimum extra     =  1"
Total length for outer print border = 19.5--again, I will just cut them 20", cut four of these.

The photo above shows both of these methods. On the top is the FIRST option, each was cut 20" and then joined to create "border fabric". On the bottom is the SECOND option, purple borders are cut shorter than the outer borders, then centered on the outer border fabric and sewn. In both cases, I pressed the seam toward the purple--it is narrower and might not have any quilting in it. It is also darker but the overriding thought process is about the quilting--where will the thickness of the seam allowances be less of a bother?

Now that the border fabric is created, it's time to sew them to the quilt. Find the center by pressing the border fabric in half, make a pencil mark  at the center. Now make another mark 6.5" on either side of that center mark. This is half of the center of the quilt (13") and gives you the exact place to start and stop sewing, 1/4" in from the outer edges of the quilt.

On a long border, I make pencil marks at several places where the border should line up with the body of the quilt, like where blocks join the border. If you just sew a long border to the quilt without measuring, the chances are very good your border will be wavy or full or short, not nice and flat as you want it to be.

Pin the border to the center to the quilt, matching the marks and you are ready to sew, one border at a time. You may also find it helps to make a mark on the four corners of the quilt, 1/4" in from the outer edge--this is the starting and stopping point. I sew with the quilt center on top so I can keep an eye of those seam allowances and prevent them from flipping in the wrong direction:


Here is the first border sewn in place. This is one of those rare places in piecing a quilt where you backstitch because this seam will not be crossed by another seam to lock it:

The starting edge
The stopping edge
Press toward the purple inner border, the path of least resistance:

Pin and sew the second border on in the same manner, being sure to start and stop at the dot, 1/4" inside the outer edge. If you go a "stitch too far", just take that stitch out:

Turn to the back side. Place the borders on top of each other, folding the quilt center at a 45 degree angle. Be careful to align the seams of the purple/print borders exactly on top of each other. When I have a border stripe fabric, I carefully check  by pinning that the stripes are aligned well:


Use a ruler and pencil to draw the sewing line. If you  have a Half Square Triangle ruler, use it. Align the sewn seam on the border with a line on the ruler to keep things straight and square:

If you have a square ruler, you can use it, again being sure the border fabrics are straight:


When I have multiple borders or a border stripe fabric, I usually baste the important intersections before I sew the seam for real. Here I have basted only the place where the purple and print meet, with very long stitches:

It only takes a few seconds to do this, and if things don't match up as well as you would like, it's easy to remove the basting stitches, fiddle with it again, and re-baste. When you are happy, turn the stitch length back to normal size and sew the seam, directly on top of those basting stitches. Be sure to start at the dot where the quilt joins the border and backstitch. I backstitch at the outer edge as well.  If the whole seam is good, I remove the basting stitches:

To trim the excess fabric away, place a ruler on the sewn seam, 1/4" away from the seam--remember, the part you want to PROTECT is under the ruler:

Trim the excess away and press the seam open:


The back

The front
Continue until you have added all four borders to the quilt and sewn each miter. I tell students the first time you do this you will have one that is perfect, one that is awful and two that are pretty good. The next time you do it, none will be awful. The third time you do it, you will have the process down pat.

A mitered border can add a touch of elegance to your quilt and it looks like you took a bit of extra care to make the quilt special. Try it, you just might like it!

Let's quilt.

Barbara