Showing posts with label Calico Carriage Designs. Show all posts

Sunday, August 6, 2023

SOUTHERN SUPER STAR

 Recently, I got the chance to travel to Corinth, Mississippi to teach a favorite class: Southern Super Star:

This is my go-to Giveaway quilt. I have made 8 of them, this one is mine to keep so I always have a teaching sample ready. I can make the top in a weekend, if I don't have to cook. And it's fast and easy to quilt, either doing it myself or "quilting by checkbook". It is easy to select colors that are perfect for the specific person I am making it for. 

The pattern is Southern Star by Calico Carriage Quilt Designs.

The Crosscity Piecemakers Quilt Guild, of Corinth, MS, is a wonderful group of women. Many of them are also members of the Needlechasers Guild of Iuka, MS--I spent a lovely time with them in January of this year, teaching Western Sun at their 3 day retreat. Read all about that amazing event here: Western Sun in Tennessee

It is an easy 2.5 hour drive from my home in Huntsville AL to Corinth MS. Since it was a driving trip, it was easy to pack two large suitcases full of quilts for the afternoon Trunk Show.  Everyone told me they enjoyed the quilts AND the stories. You know each quilt has a story, right? And a lot of my stories are funny. 


While I am speaking I am not aware of photos being taken. Several of these were shared on the guild's Facebook page. They tag me so I see them. The lovely compliments are nice to hear:


Aether, pattern by Patty Murphy Handmade 

Full Circle, pattern by Wendy Williams

Homeward Bound, pattern by Sarah Fielke, free to Star Members of TheQuiltShow.com during 2023

Full Circle was finished just the day before this trip so I was able to take it on it's maiden outing. Everyone loved seeing it and I got to sleep under it at the hotel:

I have written about Full Circle before. Find those posts here:


The pattern is by Wendy Williams. It lends itself to a 5 day, intense, challenging, rewarding Seminar experience. The local class September 11-15, 2023 at Southern Charm Quilting in Huntsville now only has TWO SPOTS left. Two of the Corinth women signed up while I was with them after seeing my quilt up close. If YOU want to learn so much and make a wonderful, important quilt, REGISTER TODAY .  Even if you can just get on the waiting list, there are usually a spot or two that open the week before classes start. You might still get in and it will be worth it, I promise.

Back to Corinth. After my trunk show, I left to check into the  hotel and go swimming. Having recently bought a bathing suit in a size I never expected to see again, a size I haven't been in 26 years, I was eager to try it out. I'll spare you the photo but it looked good, I felt good, and I love to swim. So even the 95 degree weather couldn't keep me out of the pool. Which was surprisingly refreshing.

The next morning I was at the Fitness center before 6 am to do 45 minutes on the treadmill, 4 mph pace. This is about half the time I usually spend each morning but it was better than nothing. No surprise, I had the place to myself:


After my oatmeal breakfast, I was back at the venue by 8:15. Someone brought these:


I didn't touch the donuts but was very happy to select a few home grown tomatoes to take home.

After a busy morning, we had salad and pizza for lunch. I went heavy on the salad, light on the pizza--my one slice was gone by the time I snapped this:


Afternoon was spent learning how to make the rest of the quilt and how additional borders can easily turn this into a queen size quilt.  Class went very well and a lot was accomplished:

A few detail shots: 


And the obligatory group shot:


We wrapped things up in time for most to get on the road before very heavy, torrential thunderstorms hit. I was making great time when I ran into a 30 minute traffic standstill due to an overturned tractor trailer. As soon as I got onto the Tennessee River bridge in Decatur AL the sky opened up and I white-knuckled it across the bridge and for the next 8 miles on the interstate. Got out of the blinding rain for about 15 minutes, until I was 5 miles from home and it started again. Not fun anytime of day but especially tough during Friday afternoon rush hour. 

But once I was safely home, all was well and only the good memories remain. I hope to see these wonderful women again someday.

Let's quilt.

Barbara


Tuesday, February 26, 2019

Southern Super Star

I have started on a new project--making a Southern Super Star. The pattern is from Calico Carriage Quilt Designs. They sell individual patterns for an 80" square quilt or a different pattern for a 40" square. You are better off buying the booklet shown in the link to get a variety of sizes and ideas.

This Amish variation is mine--I have given away several of these and wanted one I could have for my own:


This is my "go-to" giveaway quilt. I  have made at least seven of them for nieces and nephews as college graduation gifts. The top can be made in a weekend, if you don't have to cook, and as I make them about 75" square they don't cost a tremendous amount to have quilted. That size is also not too hard to quilt yourself, as I will do with this one.

The latest one, 74" square. It turned out a bit more gold than I expected;


Over the years I have taught this many times--in the one-day class students learn how to make all the parts and can complete it easily at home. They are always surprised how fast it goes together. Several students have gone on to make more. It is easy to make them in college colors--I  have seen Super Stars for Auburn, Alabama, LSU, Tennessee, lots of schools. This will be on the summer 2019 class schedule if you are interested.

You make some of these:


And you make some of these:


And you make some of these:


Put them all together and you have this:


Add as many borders as you like to make it the size you want and the top is done. The size of the triangle units can also change the size of the overall star.

I have written about this class before, here is one such post: Class for Southern Super Star. And a few photos of these quilts:

Given to a  nephew

Student work by Donna D
Given to a niece

Given to a niece
It is fun to make this quilt as a gift for a specific person. Choosing colors that mean something to them makes it personal. There is a page in the booklet that helps keep you organized. I have saved most of them; that's good, because I don't have photos of all of the finished quilts I have given away:


Now to get this one quilted, bound and gifted.

THEN, it's time to finish the Lifetime Quilt so I can have my design wall back. Only 512 triangles left to make the final 20" x 20" block:


Let's quilt,

Barbara

Sunday, August 5, 2018

Spellbound--It Needed More Quilting

When deciding on quilt designs for our quilts, several factors are considered:

Use--is it a show quilt or a utility quilt?
Batting--what is the minimum space un-quilted recommended by the manufacturer?
Deadline--how soon does it have to be done?
Quilt "Worthiness"--how much time does this quilt, for it's intended use and/or recipient, deserve?

I know I almost always err on the side of too little quilting. Usually a deadline is pending and this shop sample just has to be done. Sometimes, I'm over this particular quilt and it just needs enough quilting to get by.

Rarely, have I added more quilting and wished I hadn't but from time to time I have wished I had added more after the quilt was complete--that can be done but rarely is. Done is done.

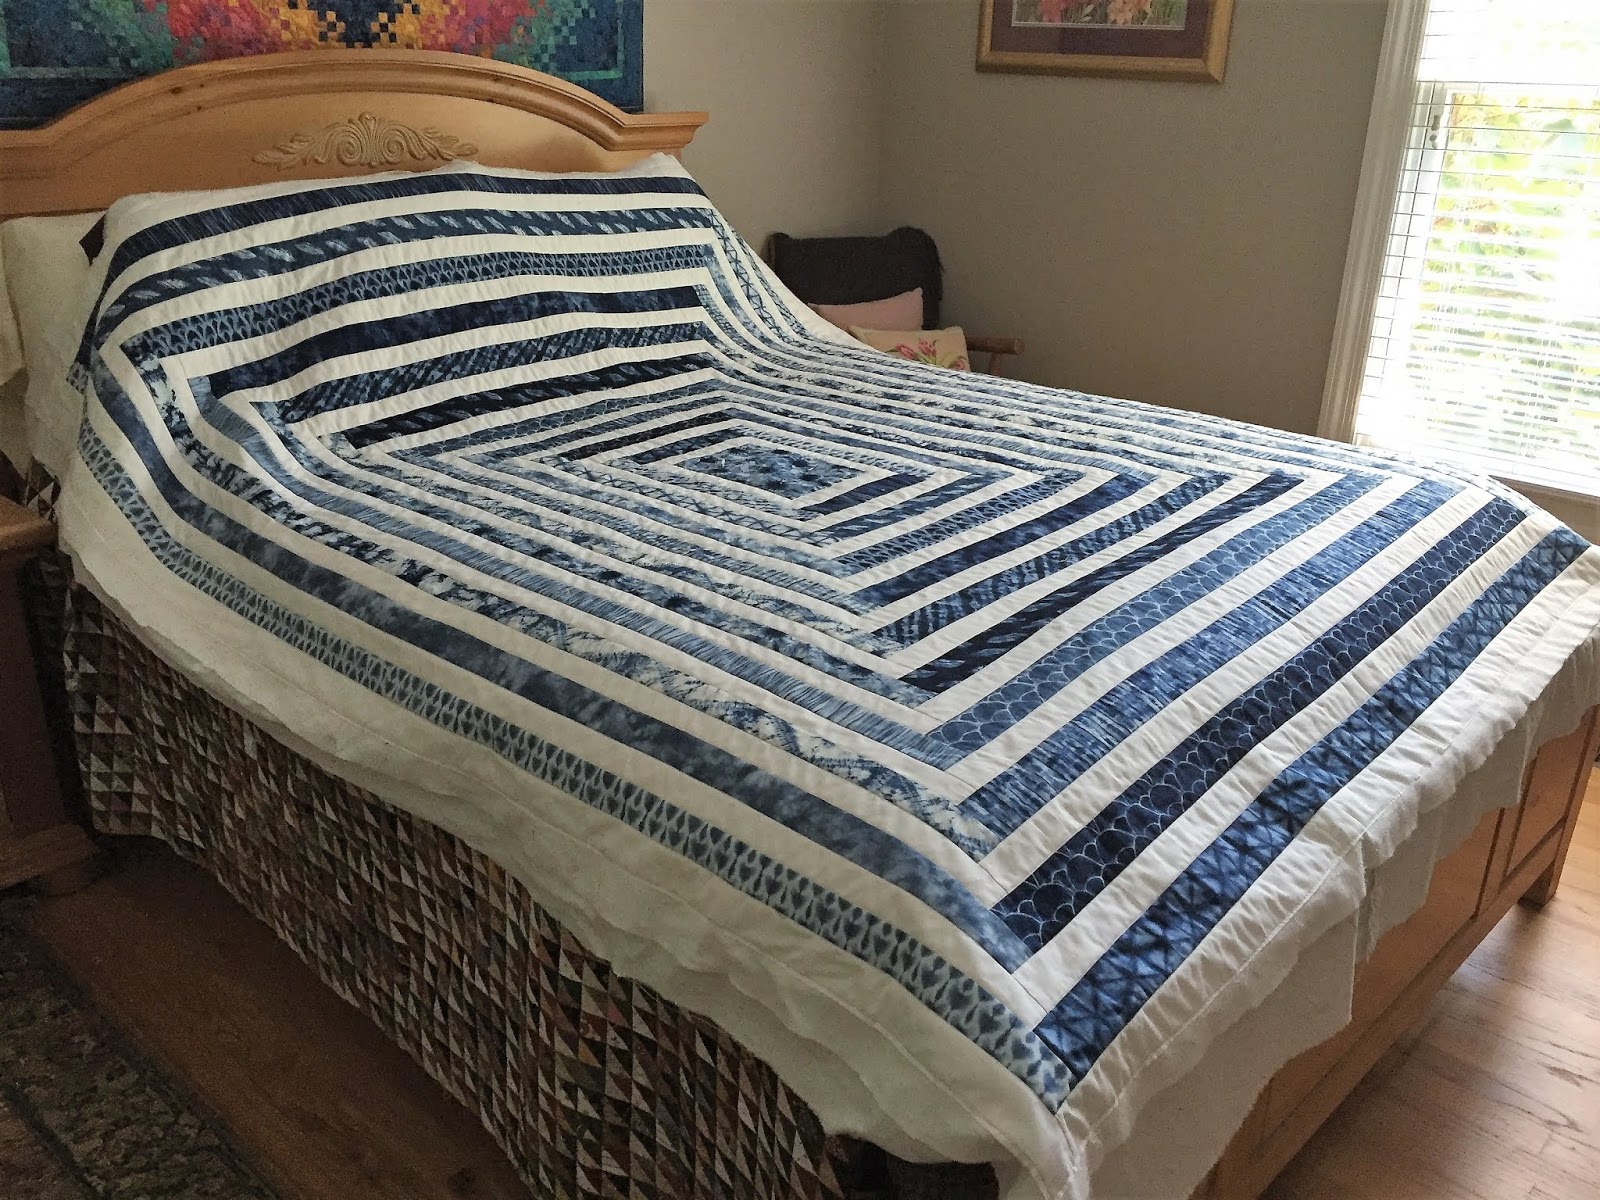
Spellbound is a great pattern from Calico Carriage Quilt Designs I first discovered at Spring Market in St. Louis in 2017. I took lots of photos of the quilt hanging in their booth, bought the pattern and secured the fabrics--two jelly rolls of a Shibori design by Debby Maddy for MODA. Here it is at Market:


When I got the top done, I decided I would first stitch in the ditch along all the seams, using white thread top and bottom, as the back is a very light white/floral fabric. Here it is "resting" after all the stitch in the ditch was done:

Next I used navy blue thread top and white bottom for the decorative stitching in the blue bands. This took a bit of tension tweaking, each time I changed bobbins, or started each day. Machine tension in quilting is so important and can be frustrating to achieve. The Bernina Q20 Sit Down Long Arm rarely has tension issues. No problem with Bottom Line in the bobbin and MicroQuilter 80 weight polyester in the top, both by Superior Threads. All I had to do was quilt.

 I always make a "practice piece" as soon as the top is done and when it is "sandwiched"--using the exact same backing, batting and leftover fabric pieces from the top. Since it can take me years to actually quilt a top, doing this at the same time the quilt is basted is a timesaver--no more searching through fabric bins to find that backing fabric leftover, or pieces from the top, and what was this batting? Now the practice piece is made and stored with the basted quilt, waiting for me. It doesn't have to be pretty, just functional. Here is the piece from Spellbound:

When all the blue bands were quilted, I declared it done and added the binding and sleeve to the trimmed quilt. I also make the binding as soon as the top is basted, deciding what fabric I want for the binding and getting it done. The sleeve is made from the back fabric and I either make the back 9" extra long for the sleeve or go ahead and make the sleeve while preparing the back.

Here it is just after I put the last blue quilting stitches in place:
During the hours spent hand-sewing the navy blue binding to the back side of the quilt, I kept thinking I might need to quilt the white bands too. I looked at the photo of the original quilt, in the Calico Carriage booth, and could clearly see the white quilting really added a lot.

BUT the sleeve was already sewn into the binding, that's how I always do it. If I was going to quilt the white bands I had to do that BEFORE I stitched the sleeve in place along the top edge of the quilt and before I attached the printed label I made to the back. Did I want  to double the quilting? No. Did the quilt NEED me to double the quilting? Yes.

For the white thread, I switched to Glide--it has a bit of shine and is certainly thicker than the 80 weight MicroQuilter. It behaved beautifully.

I started on the outside edge, at the top where the sleeve is, pulling the sleeve out of the way and coming up with a design that would fill the space but not catch the binding or any of that sleeve. To make matters just a bit more challenging: the vertical white bands are 1.25" finished and the horizontal white bands are 1.5" finished. Both blue bands are also different sizes but that stitching hardly shows and because they are wider, it was easier to come up with designs to fill the spaces.

The top design I did with a ruler and I loved how it looked:

That helped me decide I would use the same design all around the four sides of the quilt, selecting a different design for each round of white. I alternated between ruler work designs and free motion motif designs, looking at designs I like and have saved--mainly in the many books I have or on Pinterest.

It only took a few hours to quilt all the white bands and I was so glad I put in that time. Here is the quilt just after the last white stitching was completed. Much better:

All that was left was to hand-stitch the sleeve down and sew the label on:

Sleeve ready for hand-stitching

Label ready for hand-stitching


As you can see, sometimes I make the label prematurely, or with wishful thinking. All it took was a permanent Ultra Fine Sharpie to add 2018 to the expected date of 2017 and now it's accurate.

I have written in detail about bindings a few times--find specific details here in this Tutorial and here where I explain adding a sleeve and the quilting process.

And now here is the finished quilt, ready to show off at the next guild meeting and then get installed at Huntsville Sew & Vac where it will be a one-day class October 5, 10-4. The pattern seems pretty easy, I  thought I would zip right through it but it took me over a week to complete the top. There are important tricks to staying organized with this one--students will learn those tricks.

My Spellbound 64" x 83"
It is not easy to get good photos of the quilting--this is the best I could do. I am SO glad I quilted the white bands--it really shows there:


Let's Quilt.

Barbara

Thursday, October 12, 2017

Simple is Super

If I had to describe the style of quilts I am most known for it would be "complex", "lots of pieces", "small pieces in big quilts", etc. Lately, I've been working on a simple quilt:

Spellbound by Calico Carriage Quilt Designs:


The top is 64" x 84" and is a sample for a class at Huntsville Sew and Vac, November 11 and December 2, 2017, 9-3 both days.

This is SIMPLE sewing--it's just rectangles sewn to rectangles, over and over. But since it is made from two Jelly Rolls, there is a good bit of organization required to cut the specific fabrics for the specific placement. Yes, every strip is cut exactly to fit. The blues are cut 2.5", making the Jelly Roll the perfect solution. The white strips are cut 2" in some places and 1.75" in others. The directions are excellent. But you won't just knock this out quickly--it took me a week of pretty steady sewing.

Another simple quilt I am making is my Lifetime Quilt--I am always amazed at the reaction and comments this project gets on social media when I share it:


As I laid this out on the floor, I discovered the two sections were sewn together in different orientations. I may continue like this, with the quilt changing direction in the middle  OR I may rearrange the sections to keep all those HST marching in the same direction. Time will tell. You can find out more about this quilt here and here.I'm about 2/3 done and there are 6144 triangles here, each 1.25" finished.

I LOVE complicated quilts and today I saw a stunner from a wonderful quilter, Sherry Reynolds. This quilt, "Eternal Beauty" just won Best of Show at Pacific International Quilt Festival:

Eternal Beauty, 94" x 94"
I am eager to see "Eternal Beauty" in person and expect to feel a bit like a rookie as I study it up close. The geometry in this is just a-maz-ing!

Sherry is one of the most humble and kind people you could ever meet. She is also incredibly talented. Her first quilt is "America Let It Shine". This quilt won Best of Show 12 times. If you ever got to stand in front of it, you know why:


While I shared Sherry's quilt and posted Congratulations to her online today, I was occasionally surprised at how many people liked another one of my simple quilts, X Marks the Spot, an entry in my guild show this weekend:


This really is one of my favorites too. Just goes to prove, a quilt doesn't have to be complicated or have tiny pieces or drop-dead quilting to be a great quilt. It does need those things to win Best of Show, so good thing I'm not trying to do that. 

Make the quilts you love for the people you love and celebrate the accolades and prizes of others. Don't be discouraged at quilt shows when you see quilts you know you could never make. Just love the ones you do get to make. We are making "gifts for generations yet unborn". 

I'll be back with photos from our show, the Heritage Quilters of Huntsville--we have really amazing quilters and our show is always inspiring to so many.

Let's Quilt!

Barbara

Wednesday, August 23, 2017

Upcoming Classes

It is almost September when class schedules at local quilt shops ramp back up. I have several new classes and several "back by popular demand" classes to offer this Fall locally.

At Patches & Stitches in addition to two sessions of my long-running Quiltmaking 101 5 week Beginners class, I am teaching:

Super Southern Star:  my "go-to" gift quilt because I can make the top in a weekend. In this all-day class students finish about a third of the top and know how to complete it. Many love it and make more than one. From Calico Carriage Quilt Designs:

About 76" square

Little Handful of Scraps: a variation of a quilt from Edyta Sitar's book. Emphasis on careful piecing and design work will be the focus:

About 12" x 14" 

Creative Log Cabin: who doesn't love a Log Cabin quilt? I've made several with different techniques and rulers. At Quilt Market this Spring I saw a demo on the Creative Grids 8" Trim Tool for Log Cabin blocks and wanted to try it. It worked well, everyone will get perfect blocks:

About 58" square
Another local store I will be teaching at is Huntsville Sew and Vac.

Long Time Gone: a very popular Jen Kingwell pattern. This six month class will meet for 3 hours once a month. No sewing machines are needed in class. Students will bring their book and fabrics and cutting tools. I will demo the steps for the various blocks we'll be making that month and they can get help with fabric selection and cut their blocks out in class, sewing at home. At the last class we will audition various sashing fabrics to select the best.


Spellbound: a pattern from Calico Carriage Quilt Designs, this quilt uses your choice of two Jelly Rolls, both the same, one background and one fat quarter for the center. A great quilt to practice free motion quilting on when it's done:


Flip N Sew Throw: such an easy quilt that makes a fast gift. Start with a back fabric, add a cotton batt, cut a bunch of strips or use a Jelly roll and piece and quilt at the same time, through all layers, 3 hour class:

37" x 41", using a crib size batt
Mug Rugs: another 3 hour class for making fast quilted gifts. Enlarge the batt and back to make placemats:


If you are local, I hope you find something of interest. Sign up soon, spots fill quickly and we want to have all the supplies you will need on hand when class begins.

If you are not local, I have added my Teaching Calendar to the top bar so you can see where I will be. I would love to see you in class.

Let's Quilt! 

Barbara