Showing posts with label Old Italian Block. Show all posts

Sunday, January 18, 2026

SECOND LIFETIME QUILT TOP COMPLETE!

 It took a lot of sewing but the top is done:

85" square

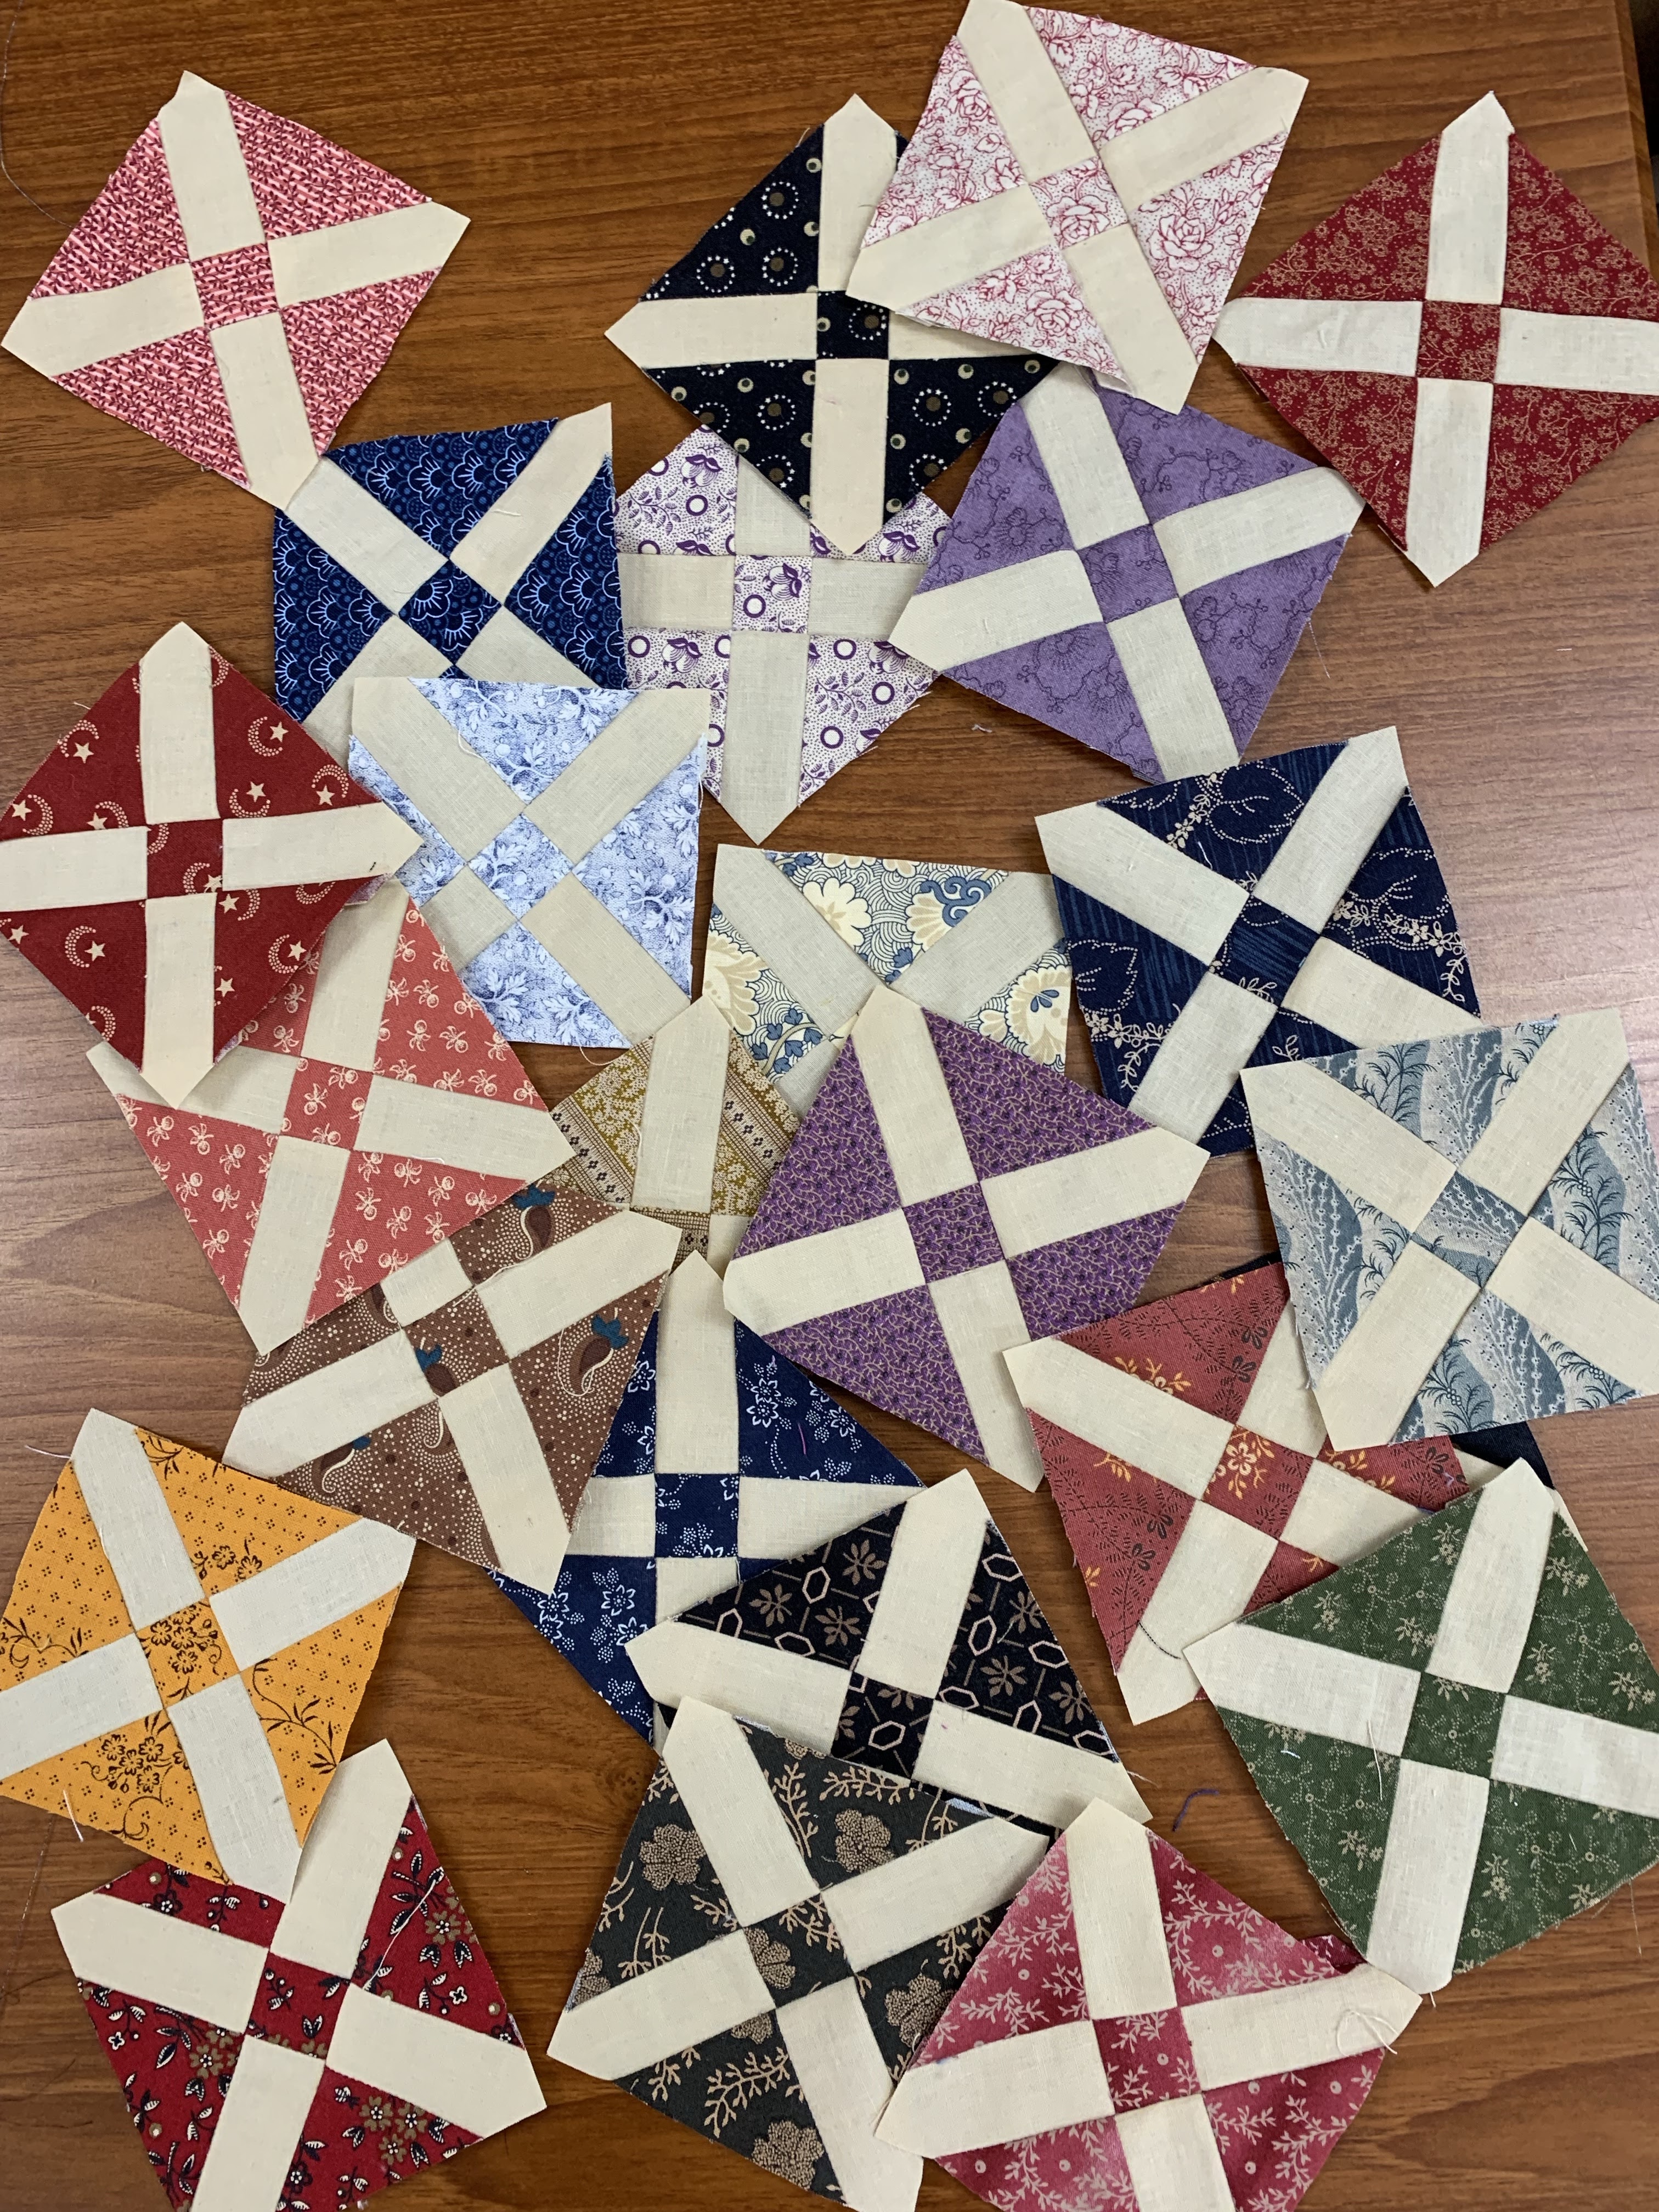
I am pleased with this top and glad it is done. There are 289 pieced Old Italian blocks, 3" square.

It is a replica of an antique top I bought in 2014 at Paducah from dealer Cindy Rennels:


It was my intention to have no repeats but there are at least TWO. There might be one more pair but I haven't found them yet. 

With the few leftovers I made a small quilt so I can hand quilt. It's been a while since I did any hand quilting and I am eager to get back to that. It would take me years to hand quilt the large quilt so this small one will have to do:

Leftovers 18" square

For more information on this quilt see these post:

MY SECOND LIFETIME QUILT

The 2025 SUMMER SEW ALONG provides information for making this block in 3 sizes:

2025 Summer Sew A Long

Now I have to decide which of my next BUCKET LIST quilts gets started...

Let's quilt.

Barbara

Sunday, January 11, 2026

BUCKET LIST QUILT #5 COMING ALONG

 This has been a productive week. I am coming along nicely with MY NEXT LIFETIME QUILT, aka Old Italian Blocks. It's been less than a year since I started this so that is good progress. The 3"blocks were made as Leader/Enders, using reproduction fabrics from my deep stash.

There is a very organized color plan although it may be hard to see here. First, I sorted all the blocks into basic color groups: dark blue, light blue, dark green, light green, black/brown, yellow/rust/orange, red/pink, purple, gray, lights. I was striving for NO repeats, but, alas, there may be a couple.

Once I cleared the design wall and placed all 289 blocks exactly where I wanted them, I knew I had to sew the complete top as quickly as possible to use the design wall again. Here is the layout:


The top row isn't quite right because I can't quite reach the top of the wall on my stepstool. Falling off is a possibility so I have to be very careful or get a bigger ladder.

Once I sewed several rows the wall looks odd and it's hard to be sure I have the blocks in the correct place. I have to get back on the stepstool to move them all down into position:


After  a lot more sewing it was time to really move everything down into position so I can reach all of them with the stepstool AND be sure all are in the right spot:


I have been asked to explain how I keep the rows organized as they come off the design wall and go to the sewing machine. It is a bit of a challenge but not really hard.

Here is the most recent row I added. Using the first photograph, the "official layout", I carefully check that each block is in the right place while still on the wall.

I carefully take each block off the wall and lay it on one of my large design boards, being sure to keep them in the proper order. The perimeter triangles are placed on the board to help me keep track of which side is left, which right:


Paying attention, I add a solid square to the right side of each block, then join them in pairs, then fours, etc. I have found it helpful to take a picture of the  board before starting to sew--it is EASY to get one or two of the blocks turned around, so out of order. 

After careful pressing, the sewn row goes back on the design wall and I make the next row. After making 4 rows, I join them in pairs, then into fours, then they go back on the wall. Once I get the first half done, I will switch to the other side to complete the other half. That way, the entire quilt is only under the needle for the final seam joining the two halves.

This is a replica of an antique top I bought in 2014--read about it  HERE--same link as above.


A yellow border wasn't my cup of tea. After getting started on this, I searched my closet and found the perfect border and binding fabric. This dark red, printed on the diagonal, will be just fine:


I am eager to get this top complete. At this point I expect there is a solid week of piecing to get it done. Then I can move on to other things and the design wall will be usable again.

For those interested, my DESIGN WALL is two sheets of 4' x 8' foam board, covered in Warm and White cotton batt, mounted to the wall. Blocks stick to the batting easily without pins. Only long rows once joined into larger sections need a few pins due to their weight. I've had this wall for 25 years. It is covered with strings--they are hard to remove because my husband used a squirt bottle of Elmer's White School Glue to adhere the batting. In hindsight, mixing a thinner solution of that glue/water might have allowed it to be painted on, keeping the batting more firmly in place. I still love my wall and use it every day.

If you want more information on how to make these fun blocks, in 3 different sizes, see my SUMMER SEW ALONG 2025

Let's quilt.

Barbara

Sunday, May 25, 2025

SUMMER SEW A LONG 2025

 Let's do a SEW A LONG! 

The Old Italian Block is one of my favorites, simple, easy, classic, the perfect block for a Scrappy Quilt.

 And it is the block in my antique top I am replicating:

Detail shots: 


When I first wrote about this project, My Next Lifetime Quilt, there was a lot of interest in doing this as a Sew A Long. So, here you go.

I am providing the cutting sizes for 3 different size blocks: 3", 5" and 6". You are free to make any other size you like. Either use design software like EQ8 or simply draw the block size you want on paper and figure out how to cut the pieces the correct size. My TUTORIAL SIMPLE MATH FOR QUILTERS makes that easy.


SHAPE

3” BLOCK

5” BLOCK

6” BLOCK

Triangles  4  

3.25” square

cut QST 

5” square

5 7/8” square

Center Square  1

1.25”

1 3/8”

1.5”

Bkgnd Strips  4

   1.25” X 3”


1 3/8” x 4”

   1.5” x 4.5”


Originally, I planned to make 4 of each block, so I cut rectangles 6.5" x 8". That would provide 4 squares 3.25" each for the Quarter Square Triangles, and 4 Center Squares, 1.25" each. As I am making 289 of these that would use 73 fabrics. After cutting ALL OF THOSE, I changed my mind and decided each block would be a different fabric. 

To make ONE 3" block I cut a rectangle 3.5" x 5". This allowed me to carefully cut the square 3.25" for the QST and one center square 1.25". You could be more precise, cutting 3.25" x 4.5" but your cutting would have to be perfect. It was faster to cut a hunk 3.5" x 5" from 289 fabrics as preparation for the project.


I stacked up two fabrics for faster cutting. As I am using only one background fabric I cut strips of it 1.25" x WOF, cutting that into 3" lengths, 4 needed for each block. Here are TWO blocks cut and ready, the dark fabric is under the print:


Here is the way I sew these blocks, three rows on the diagonal. And my pressing plan. Since I know I am not sewing these block to block, I am pressing them all this way. If I were sewing block to block, I would press half like this and half the opposite way so the seams would nest:


There is SO MUCH MORE INFORMATION on my earlier post I hope you will go read it first:


The ONLY SPECIAL TOOL I RECOMMEND for this project: a quality SQUARE RULER the size you will trim your blocks: 3.5", 5.5", or 6.5". The best brands are Quilters Select and Creative Grids.  I used a black Sharpie Fine Line marker to draw a diagonal line on the back from the upper left to lower right--that makes it easy to see the ruler is aligned properly:


I find these the perfect LEADER/ENDER blocks so I always have at least two of them cut and ready to sew while working on other projects. To understand that process, see my Tutorial about it: TIME MANAGEMENT FOR QUILTERS

To test the sizes for the larger blocks I made 5" and 6" blocks:

5" block

6" block

Here are 3" blocks in brighter colors than my 1800's reproduction fabrics, these would make a good baby quilt: :


There are many ways to set these blocks so I will offer those options next month. For now, choose your size and start making blocks. It's scrappy, you can't run out of fabric. 

Feel free to ask any questions you may have. Have fun using your favorite fabrics. AND if you want to post your progress on social media please use this hashtag:  #olditalianblocksewalong 

Please share this with all your quilty friends--the more, the merrier. It is easy to share this blog on your Feeds: Facebook, X, and Pinterest; or you can email it directly to anyone you like. Click on the icons at the bottom of the page to do this:


Let's quilt.

Barbara

Sunday, March 9, 2025

BUCKET LIST QUILT # 5 AKA MY NEXT LIFETIME QUILT

 As I try to make a list of the quilts I REALLY WANT TO MAKE, and EXPECT TO MAKE, it allows me to sort through the huge stash of fabric I own and make a plan to use it or lose it.

Here is the NEXT QUILT on on the list:


I bought this antique top in 2014 from quilt dealer Cindy Rennels,  of Cindy's Antique Quilts. I remember clearly buying it at her booth in Paducah--to treat myself for my "retirement" from H&R Block, and my 60th birthday. There was something about it that just spoke to me. The tag says "from Pennsylvania, 1860-1880 fabrics" Well, I'm from Pennsylvania too and I LOVE a quilt with lots of fabrics.  See many detail photos BELOW.

Once I decided to replicate it, I thought about the easiest way to cut fabrics for the 3" blocks.  Questions I asked myself:

1. What size quilt do I want? The original is 16 x 16 blocks.  Mine is 17 x 17, so I will have a CENTER block, more about that later.

2. Should each block be a DIFFERENT FABRIC? I have more than 289 Civil War reproduction fabrics, that's not the problem. At first, I decided to go with making 4 blocks exactly alike and then spreading them around the quilt. This requires 73 fabrics. Then I changed my mind. All of the blocks will be different. 

3. What background fabric to use? It will take 6-7 yards. The original used all the same cream solid. I only had one solid fabric in that quantity--Paperbag. Pulling the bolt out to the closet I found it had 7 yards on it--decision made!

It didn't take long before I was pulling fabrics and cutting. This makes the perfect LEADER/ENDER PROJECT. These 3" blocks practically make themselves as I am working on other projects.

One fabric I absolutely had to use was a small scrap--just enough to make ONE block. I decided it would be the CENTER BLOCK--which is when I changed the layout from 16 x 16 to 17 x 17. Here is the sketch from EQ8, when I learn how to make it that size, I will fix this layout:

;

This block is called the OLD ITALIAN BLOCK, Brackman # 2881. Here is that center block, laid out, ready to sew:


Here are ALL THE FABRICS NEEDED for all 289 blocks, all cut into the size needed, 6.5" x 8" to make 4 blocks from each. Then I pulled out the next big tub of reproduction fabrics and cut many more 3.5” x 5” pieces, enough to make ONE block, 289 DIFFERENT fabrics. No photo of that pile: 


Before I committed to making this I used completely different fabrics to test my plan. If it becomes another Workshop offering, I will need a smaller sample in more contemporary fabrics:

3" finished blocks

These are so much FUN to make!  

I was eager to make a few from reproduction fabrics--here are the first few done:


The only problem? If the idea here is to USE UP FABRIC, this is a fail! It didn't make a dent in the stack I pulled from the closet. At least I'll use up 7 yards of solid.  Here is what went back IN the closet after all cutting was done:


As promised, here are more photos of the original antique top. If you love 1800's fabrics as I do, it's quite a treat for the eye:


There is one SPECIAL BLOCK I am trying to research. I believe it is CENTENNIAL FABRIC, printed to celebrate 1876 in America. If you know this to be authentic Centennial Fabric, please let me know:


I am considering offering this as a Sew-Along project here on the Blog. I would provide instructions for cutting several different sizes, 3" might be a bit too small for some. It will teach you the 3 important BASICS OF PRECISION PIECING: the cutting, sewing and pressing. Let me know if you're interested...

UPDATE: here is the Sew A Long post:


There is no rush to get this quilt done fast. As a Leader/Ender project I can allow it to take years. It's my NEXT LIFETIME QUILT. Since I  can't die until it's done, it is smart to make it REALLY SLOWLY.

Here are more Blogs I have written on LIFETIME and LEADER/ENDER quilts:


Lifetime Leader/Ender

Having a leader/ender project is always part of my quiltmaking journey, with every quilt I make. With this one, I can achieve BOTH  a BUCKET LIST completion and have a Leader/Ender project ready.  Isn't life grand?!

Let's quilt.

Barbara

Wednesday, January 12, 2022

Antique Quilts #3

 Currently working like crazy to get ready for my big De-Stash Sale Thursday-Saturday January 13-15, 2022. Local friends, I really  mean it when I say "Don't Miss This".  These sales only come along every few years and they are really great, if I do say so myself.

Here is one of my favorite antique tops. I plan to reproduce this one day. I bought it from Cindy Diller Rennels at AQS Paduach, 2014, to celebrate my retirement from H&R Block after 35 years. Little did I know, there would be much more to celebrate in my quilt life a little later that year.,

Little Churn Dash blocks at first glance, but NO. They are Old Italian Blocks set on-point:


A tattered Chrome Yellow border: 

A piece of 1876 Centennial fabric--a real treasure to find here:

Back to prepping for the sale. If you are within driving distance, I hope you will come by.

Let's quilt.

Barbara