
Be sure to READ ALL THE GENERAL DIRECTIONS and WATCH ALL THE VIDEOS. Each month's pattern has detailed instructions as well.
PRIOR POSTS WITH HELPFUL INFORMATION:
Block 1
Block 2
Block 3
Block 4
Block 5
Block 6
Block 7
Block 8
Block 9
It is finally time to make the borders. As I am making two of these, the Cool Kit and a Warm/Combo version using my own fabrics, I decided one quilt will have an applique' border and one a pieced border.
The Warm/Combo is getting the applique' border. Here is the top before the borders:


I had just enough Kit fabric available to make this border--I was careful when cutting fabric for the blocks. If I had fabric left over, I cut pieces from the leftovers for the next month before cutting new strips. If you run low, any blue or green fabric that looks like these can easily be substituted in the border.
FIRST, before you begin the applique' borders, READ THE INSTRUCTIONS, and WATCH THE VIDEOS. Becky has put a lot of time and information into both the Instructions and the Videos--they will really help you. Find the Applique' Instructions HERE.
IMPORTANT CUTTING NOTE: Cut the borders wider and longer than called for. They shrink some with all the applique--you can always cut off the extra but it's harder to add more later. I recommend the side borders be cut at least 7.5" x 64".
This post will show you how to use her vinyl overlay technique. I will also offer you an alternative method you may prefer.
I printed the border pages following the instructions in Month 10 and taped them together to form the Side Border Pattern. At first, I thought I might be able to see through it on my dark border fabric. Alas, I could not. Here the pattern is on top of the border--I was not able to place the applique' shapes under the pattern accurately. Here the shapes are simply laying on top for the photo:

So, on to the vinyl applique' method. Using an old rotary cutter blade, I cut the vinyl overlay material included in the Kit into a 5" wide long piece--I needed two of those to be able to join them to form a 60" long piece.
I pinned the vinyl to the paper pattern and used an Ultra Fine Sharpie pen to trace the pattern onto the vinyl. Tracing is not my favorite thing. My drawn lines are not perfect but close enough:

The entire border is traced on the 60" long vinyl overlay:

Now I was able to place the prepared applique' shapes on the border where they are supposed to go. Top photo shows shapes under the vinyl:

The vinyl is carefully removed and the shapes are pinned in place, ready for sewing. You can glue the shapes down if you prefer:

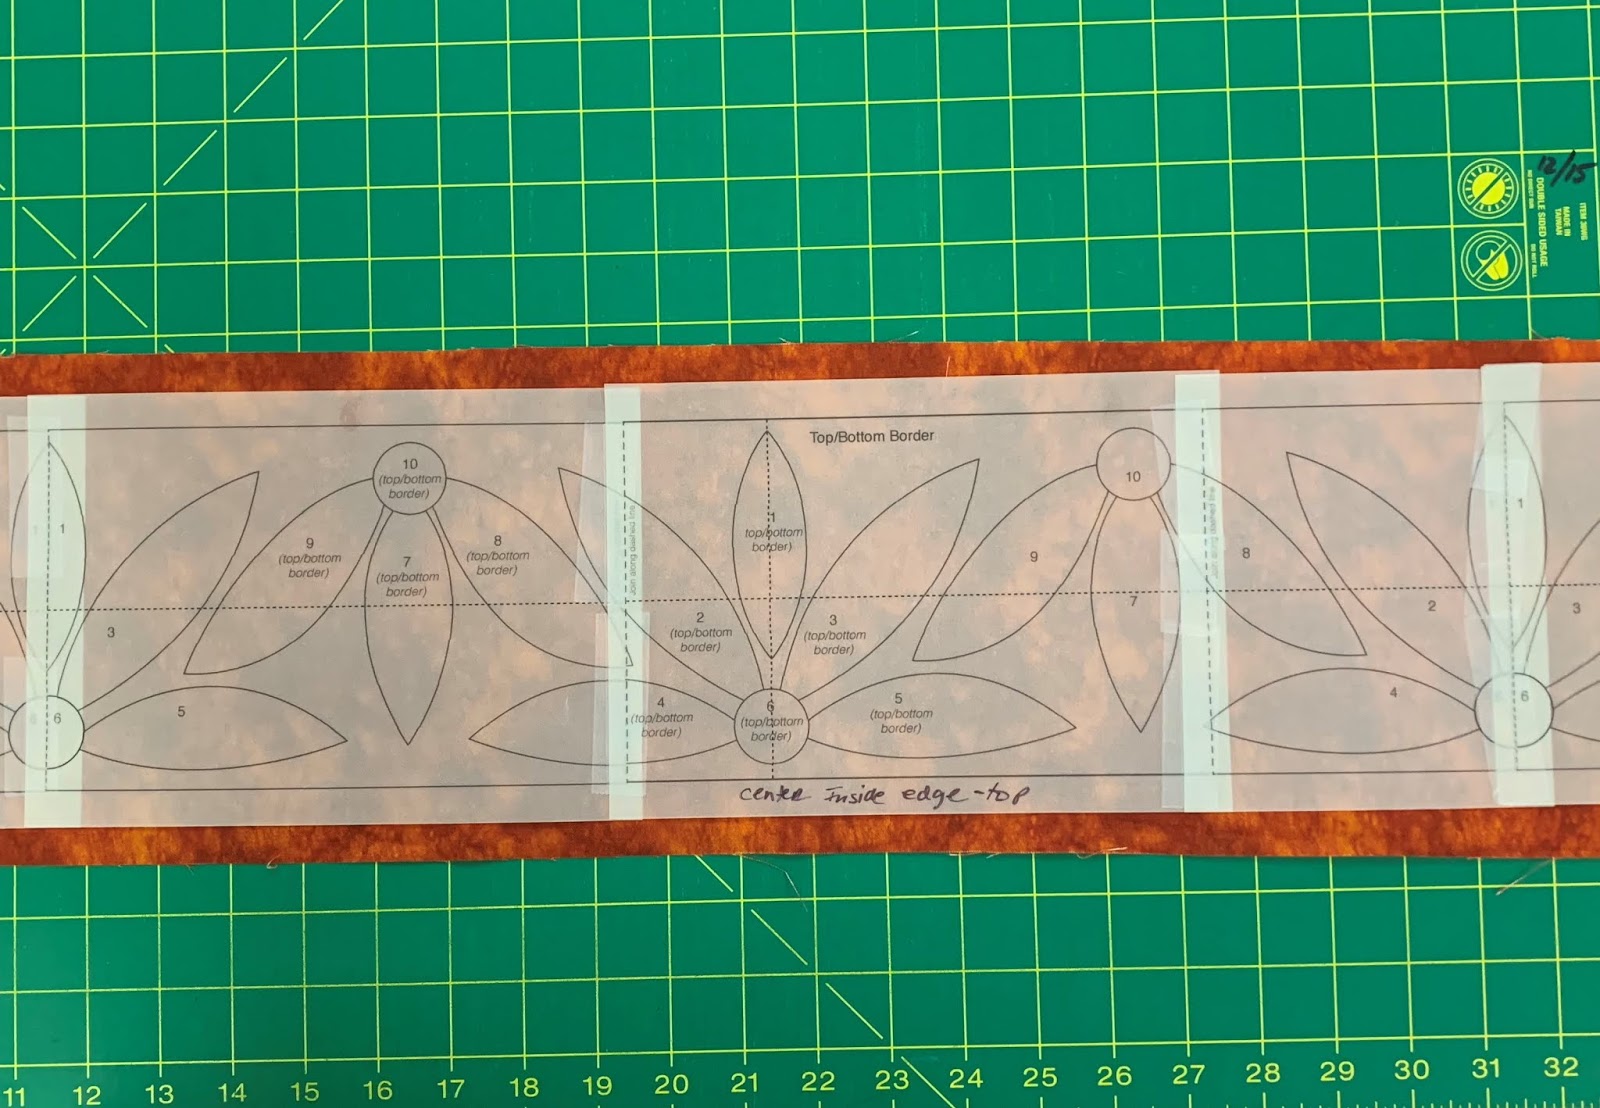
It took time to trace the 60" pattern onto the vinyl and I didn't enjoy that task. I got to thinking: What if I printed the pattern pages onto Vellum???
Here is the Top/Bottom border, printed on Vellum, taped together, ready to go. So much faster, so much more accurate than my poor tracing. I can easily see through the Vellum to place the applique' shapes on the border. You don't see the prepared shapes here because I haven't made them yet--still working on the Side Borders:

In the next blog post, October 2, I will show you how I cut out the applique' shapes and prepared them for machine applique'. My method is different from Becky's--she uses freezer paper which she puts on the RIGHT side of the fabric before gluing the turned edge under. I use a wash-out fusible fabric product that I put on the BACK side of the fabric before gluing the turned edge under.
Let's quilt.
Barbara
I am soooo behind on my Sizzle...but you have inspired me to get back on that quilthorse!
ReplyDeleteThey are both amazing, but that applique border is going to take the worm version over the top!
ReplyDelete