These instructions apply to any machine applique' pattern.
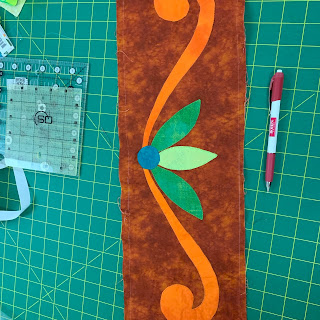
Now we get to the fun part, machine appliqueing the prepared shapes to the border fabric. The first side border is trimmed and on the wall--I like it:
You have lots of choices in this process:
Thread Size: thick or thin, anything from 40 wt to 100 weight
Decorative Stitch: Blanket Stitch, Straight Stitch, Zig Zag Stitch, Blind Hem Stitch, or others, you decide which you like
Thread Color: one or many? Matching the applique' means your stitches will hardly show. One color that blends well with most of your fabrics means you don't spend time changing thread
Becky has two videos in which she shows you both straight and buttonhole stitching. Practice a variety of stitches to see which you like. This sewing is going to take a while so you want to be happy with your stitching.
My thread choices:
Most important to me was the thread color. The blue and orange threads are Sew Complete, a 50 wt polyester thread from Superior Threads. The green on the left is 80 wt polyester thread from Quilter's Select.
The light orange thread in the back is the reject--I tested it on my orange fabric and thought it was too light so I replaced it with the darker orange in front of it.
The dull green on the right is also 80 wt Quilter's Select--it was going to be the bobbin thread I used for all of the stitching. BUT once I started stitching the orange swirls I found the bobbin thread wanted to show so I put the orange thread in the bobbin for those shapes and all was well. Much easier than making lots of adjustment to tension.
Here is my quick sample to test thread colors and stitch length:
The stitch is a buttonhole stitch, #1329 on the Bernina 765/770. I started with settings of 2.0 length, 2.0 width, as Becky recommended. The blue piece was stitched with that setting. On the rest of the pieces I increased the length to 2.3 and liked it better. Play with various sizes to determine which you prefer. Start with the machine default, then adjust until you are happy.
My sewing plan: stitch all the orange swirls first, 3 pair on the side border. Then add the 3 green leaves between the orange swirls--I chose one green thread that would work on both my darker and lighter leaves so I could applique' all three without having to change threads. Lastly, the blue circles get stitched on top of all the tails of the 5 shapes already stitched.
WHAT COULD POSSIBLY GO WRONG?
Several things. Buttonhole stitch looks best when the stitches are perpendicular to the background fabric. That means lots of pivoting. On tight curves it could be stitch, pivot, stitch, pivot, stitch, etc. Slow the speed down.
If your stitch goes into the applique' with a left swing, be sure to pivot ONLY when the needle is in the RIGHT position, in the background fabric.
If you find it hard to keep those buttonhole stitches straight and perpendicular, you might prefer a narrow zig-zag--it's supposed to be slanted.
Tension was off when I changed bobbins--check tension on a practice piece each time you change thread/bobbins.
When it was time to applique' the blue circles on top of the 5 raw edges, the 3 leaves and 2 orange swirls, I discovered the center circle had to be bigger--the shapes were farther apart then they should have been. TIP: don't make the circles until AFTER you stitch all the shapes--then you will know if your circle needs to be larger. Here is my center blue circle after I made it bigger:
NOTE; For the right Side Border, I used a white chalk pencil to draw the circle on the border--the only pencil marks I made on the border. This way I could be sure I placed the applique's so that all the raw edges would be covered by the circle:
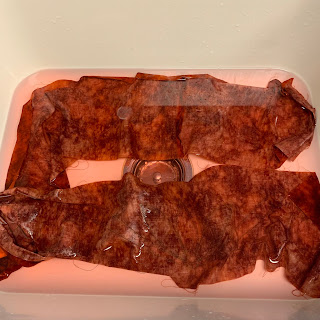
Next, I put the entire border in the kitchen sink in warm water and let it sit about 15 minutes. This removes the fusible interfacing product and the glue:
Oh, my, it appears there is bleeding... No, I didn't pre-wash most, if any, of these fabrics. Unlike the Cool Kit--I did pre-wash all of that. Hopefully, the fabrics won't absorb this color, time will tell. This quilt will definitely be washed with Color Catchers when completely done.
Since the other 3 borders were cut but not sewn yet, I soaked those 3 borders before sewing the applique's in place. After 15 minutes:
After allowing the Side Border to air dry overnight, I very carefully trimmed the border to 6" x 60.5". Measure three times to cut once--there is no do-over if you get it crooked.
I was careful to measure out from the applique's, keeping the background on both sides as close to the same distance from the applique's as possible. I used a chalk pencil with a light touch to know where to trim the outside edges of the border. Using a 6" wide ruler made it possible to draw both lines at once:
Half of 60.5" is 30.25"--I folded the border in half and measured from 30.25" out:
It took several days to do all these various steps before I could machine applique'. Lots of prep, but the sewing is fast. With needle turn applique', I have less prep time but the sewing is slow. Each has it uses, decide which you prefer for any given project.
Now it's on to the second Side Border, then the Top and Bottom borders.
Let's quilt.
Barbara


The beautiful swirls of the border applique bring a nice softness to the stunning, spiky compasses. Really a pretty combination.
ReplyDeleteLots of good tips here, should I ever decide to attempt machine applique again (but I'm not holding my breath)! :)